I am trying to run a cmd file, either in the terminal or in Visual Studio. In both of them I get zsh: permission denied error. I checked my access to the folder, I have read and write access. I am the only admin on this laptop. Using ls -l command shows I have -rw-rw-r-- access to the file and folders. (I wonder if there should be an x there as well?) Also the Terminal app and VS also have full access to the drive. I also used command chmod 755, my rights remains the same. from Apple Community
Mac OS X operating system is a Unix-based system for Mac computers. Now Mac runs all types of files and modifies all types of commands from the terminal. When the Zsh: permission denied Mac error shows, these commands are sent from the terminal. There are many reasons to get these error notifications, which are elementary and common. A complete guide has been available on this page to remove the permission denied error on this Mac.
What Is Zsh Permission Denied in Terminal on Mac
If anyone faces a permission device error, they might see many different types of messages appear on the screen. The error message may be different, but the meaning is the same. Now some examples are given below. Let's check them out one by one.
- ⚠️Terminal Missing Execute Permission. The most common reason for the Zsh: permission denied in Terminal. You're trying to run a file or script, but you don't have permission to change or open this file. It might be because you don't have administrator privileges, or the file is created to be locked.
- ⚠️Wrong Interpreter Path. If your command line points to a non-existent or incorrect interpreter path, the system can't execute it, resulting in a permission-type error.
- ⚠️File System Mounted as Read-Only. In rare cases, the directory or drive where the file resides might be mounted with read-only permissions, preventing any execution or write operations system-wide.
Besides Terminal permission denied on a Mac, you may encounter app permission denied as well. That means the Don't Allow option is chosen, which is rejected at the time of using a feature related to the application. There are very common things that deliver permission-denied issues, such as an app that can't use the camera or microphone, being unable to save files, beingn't to share your screen with others, and many more.
Data Rescue: Restore Permission Denied Files on Mac
The first method you can try is to apply third-party data recovery software. The reason why we recommend it is this kind of software can scan and search deeply in your computer's disk and find all the lost data. No matter whether the data is deleted, hidden, or turned to RAW.
One such tool you can trust is EaseUS Data Recovery Wizard for Mac. With the help of this software, you can restore any type of file or folder that is lost, invisible, or inaccessible. This option cannot fix all types of denied errors that occur directly, but it is worth trying after exhausting all possible methods.
When you are dealing with Mac errors like Zsh command not found or Zsh permission denied, you might lose your data in the quest. That is because errors are often due to site malfunctions, too. When something like Zsh permission is denied or directly related to files, your system is more vulnerable to them. Losing your data is frustrating, but the cool part is that you can recover it.
Download EaseUS Data Recovery Wizard for Mac now, and follow the steps below to find your lost or inaccessible files.
Step 1. Select the location to scan
Launch EaseUS Data Recovery Wizard for Mac and choose the hard drive, SSD, SD card, USB flash drive, or TF card where you lost data. Click "Search for lost files" to start scanning.

Step 2. Filter lost Mac data
The software will automatically scan for lost data on MacBook/iMac. When the scan completes, filter wanted data through the "Type" and "Path" buttons.

Step 3. Recover lost data or files
Double-click a file to preview it. Then, click the "Recover" button to restore the lost data to another place.

Don't forget to share this passage on social media to help more Mac users fix Zsh: permission denied without losing data.

How to Fix Zsh: Permission Denied Mac | 5 Fixes
Follow the steps below to access all inaccessible files and folders and fix permission denied on your Mac:
1️⃣Method 1. Gain Permission for Files, Folders, or Disks on Mac
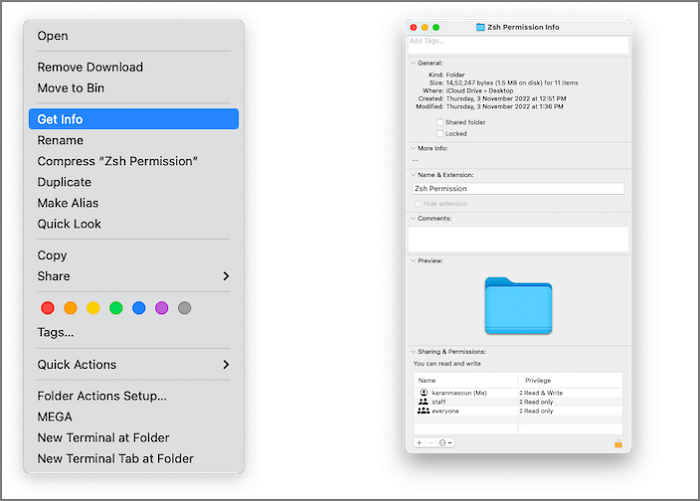
There is a permission setting available on the Mac computer. With the help of that permission, users can assign permission to all files and folders so that they can be viewed and altered. That can be changed according to the requirement. You can change it by reaching the info window. Here are the steps to gain permission for files, folders, or disks on Mac.
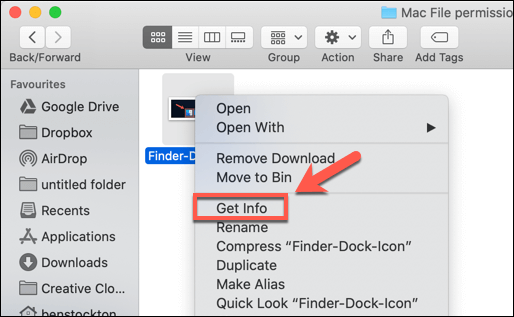
Step 1. Choose any file or a folder present on the disk and then get info of that on the selected one.
Step 2. If the selected permission is not visible in the info, click on the Arrow symbol.
Step 3. After that, the user will see a lock symbol to click on and enter the admin password and username to unlock it. After that user will see the assigned permission from the specific file and folder.
Step 4. Click over the name column and choose the privilege option available in the menu.
- Read and Write
- Read Only
- Write Only
- No Access
2️⃣Method 2. Check Your Permissions in Terminal
As mentioned above, one possible reason you might see the permission denied error is that you don't have file access permissions. Follow the steps below to check your permissions.
Step 1. Launch the Terminal in the Mac from the utilities.
Step 2. Type the command: Enter: ls -l. Make sure don't hit the Enter button but type the word.
Step 3. Drag the file or the folder into the terminal window.
Step 4. Now, hit Enter Button. Specific permission that is accessible to the current user will be visible on the screen.
3️⃣Method 3. Change the Ownership of the Directory
You need to change the specific file or folder ownership. For that, you need to enter a Chown command into the Terminal and press Enter.
Chown -R $USER:$USER /path/to/directory
* Change /path/to/directory with the path to where you want to write to.
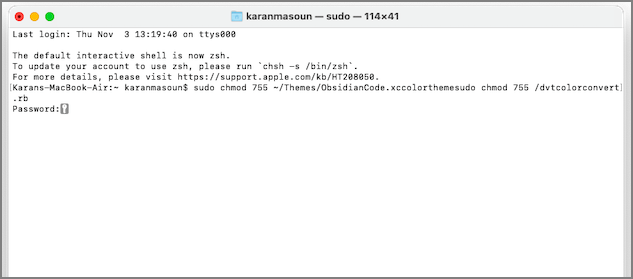
4️⃣Method 4. Use Sudo Commands
The Sudo command gives you the ability to run commands as an administrator for about five minutes. If you failed to run commands in the Terminal again and again, simply add "sudo" before the original commands.
For example:
- sudo chmod 755 /dvtcolorconvert.rb
- sudo chmod 755 ~/Themes/ObsidianCode.xccolortheme
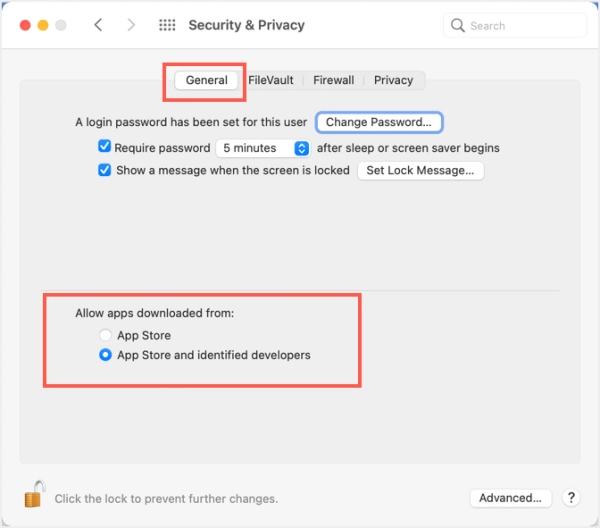
5️⃣Method 5. Grant Permission Third-party App Mac
In most cases, the Mac will issue a notification to remind users to pass all permissions when installing the application. On some rare occasions, you need to give permission to third-party apps on your own. Here are the detailed steps:
Step 1. Go to Security & privacy, then click on the General section.
Step 2. Enter the user administrator username / Password to unlock the editing screen.
Step 3. Mark all the radio buttons that are showing App Store and identified developers
Step 4. Click on the Lock Button and save the changed settings.
Don't hesitate to share all the five solutions on social media to help more Terminal users solve this Zsh permission denied error.
How to Avoid Zsh Permission Denied Error on Mac
You can avoid the Zsh permission denied error in three practical ways.
- Grant Access Privileges to Users and Groups
- Change the Owner of the File
- Add or Remove a User or Group.
Let us move on to each one to know you can implement them to avoid errors.
Fix 1. Grant Access Privileges to Users and Groups
One common reason behind the error is access privileges, and you can grant it to multiple users and groups even if you have given review access. Thus, you can avoid the Zsh terminal error if it is caused due to user access.
Follow the steps below to grant access privileges to users and groups:
Step 1. Open a file, click on the file label, and select Get Info from the drop-down menu.
Step 2. Press the lock icon to unlock it.
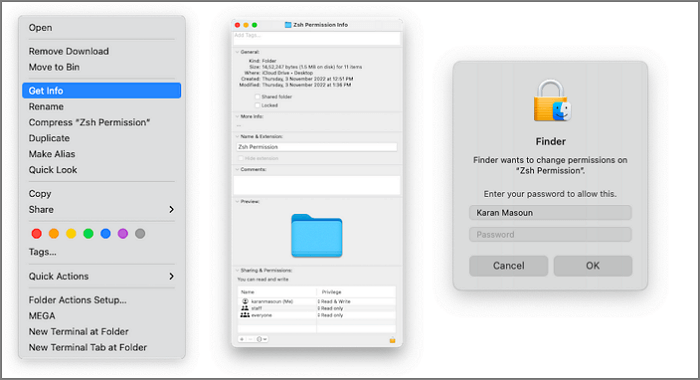
Step 3. It will prompt you to enter your Admin name and password.
Step 4. In the Name section, click on user or group, choose Privilege settings and select one.
Each privilege has a special meaning. If you select read, it will give the user/ group the right to read, but they cannot modify it. When you choose to Write only, you can move the file or copy it, but you cannot view it. Therefore, you must select Read and Write, which will let you read and edit.
Fix 2. Change the Owner of the File
If someone else owns the file, that can also reset the error. So if you change the owner, then you can avoid it.
Follow the steps given below to change the owner of an item:
Step 1. Open the file and click on the File label at the top-left corner.
Step 2. Select Get Info from the drop-down menu.
Step 3. Click on the + icon from the submenu and enter the owner's name.
Step 4. Click on Make as the owner and press the Save button.
Fix 3. Add or Remove a User or Group
If you have multiple users or another group with File permission, you can remove them to prevent the Zsh permission error. Further, you can add a user or group to check if that works and avoids the issue. Thus, you can control file access-related problems. Follow the steps given below to do so:
Step 1. Open the item, click on File and select Get Info from the drop-down menu.
Step 2. Now, navigate to Sharing and Permissions.
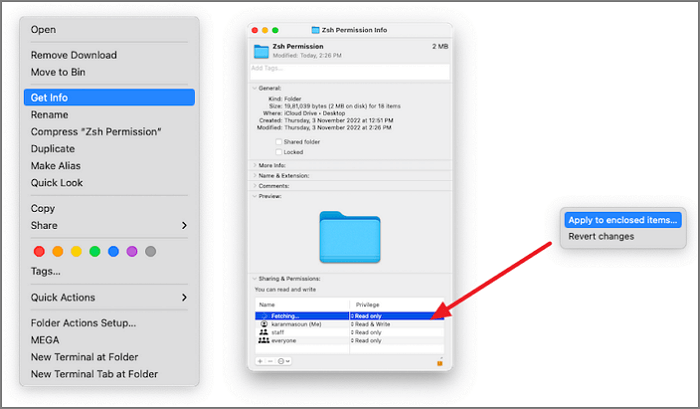
Step 3. Click on the - icon to remove a user, or click on the + icon and add one.
Step 4. Press the Apply Changes button.
Conclusion
That's all about how to fix the permission denied error on Mac. Follow the given methods one by one, you can solve the problem by yourself. Or, you can apply EaseUS Data Recovery Wizard for Mac as the last resort to see if it can scan and restore the inaccessible files. If it failed again, it's also a good choice when you need to recover Trash on Mac or recover unsaved Word documents.
Permission Denied on Mac FAQs
Read the questions below to get additional help on macOS permission.
1. How do I fix Zsh permission denied on Mac?
It's a piece of cake to fix Zsh permission denied:
- Check the File Permissions
- Give Full Access to the Disk
- Change the Directory's Ownership
- Use a SUDO Command
2. Why is permission denied on Mac?
The problem you are encountering appears because of the reasons below:
- The file is locked
- The command has been formatted
- The file permission is insufficient
3. How do I resolve the permission denied error?
Follow the steps below to fix the macOS permission denied:
- Gain permission for files
- Check your permissions
- Change the ownership
- Use Sudo commands
- Assign permission for third-party apps
Was This Page Helpful?
Dany is an editor of EaseUS who lives and works in Chengdu, China. She focuses on writing articles about data recovery on Mac devices and PCs. She is devoted to improving her writing skills and enriching her professional knowledge. Dany also enjoys reading detective novels in her spare time.
Jean is recognized as one of the most professional writers in EaseUS. She has kept improving her writing skills over the past 10 years and helped millions of her readers solve their tech problems on PC, Mac, and iOS devices.
-
EaseUS Data Recovery Wizard is a powerful system recovery software, designed to enable you to recover files you’ve deleted accidentally, potentially lost to malware or an entire hard drive partition.
Read More -
EaseUS Data Recovery Wizard is the best we have seen. It's far from perfect, partly because today's advanced disk technology makes data-recovery more difficult than it was with the simpler technology of the past.
Read More -
EaseUS Data Recovery Wizard Pro has a reputation as one of the best data recovery software programs on the market. It comes with a selection of advanced features, including partition recovery, formatted drive restoration, and corrupted file repair.
Read More
Related Articles
-
How to Fix SD Cards Cannot Be Fixed by First Aid Error on Mac
![author icon]() Jaden/Jun 16, 2026
Jaden/Jun 16, 2026 -
3 Ways to Fix the Mac Mount Failed with 72 Error [Without Data Loss]
![author icon]() Brithny/May 19, 2026
Brithny/May 19, 2026 -
✅You Don't Have Permission to Access This Folder [Solved]
![author icon]() Tracy King/Jun 16, 2026
Tracy King/Jun 16, 2026 -
Disk Not Ejected Properly Mac | How to Fix & Prevent
![author icon]() Dany/Jun 30, 2026
Dany/Jun 30, 2026