About Zsh Permission Denied Error
You would use Z shell (Zsh) scripting due to its comprehensive and reliable features, apart from a decent customized. Undoubtedly, Zsh has always been greater than Bash. Hence, as a Mac user, you would prefer it. While opening a file, you often encounter the Zsh permission denied in the macOS Ventura/Monterey Terminal. We have covered you all with it.
Let's try understanding the Zsh Permission Denied Error on the Terminal on your Mac. The good part is that it's not a significant issue, and it usually occurs when there is an issue in its configurations or errors while opening it.
Here are the causes leading to the Zsh permission denied error:
- 🔒File is Locked. You would often want to open a file but need its access rights. It can be if the file owner has locked it with the chmod command, then to it can lead to permission issues.
- ❌Incorrect Commands. It might also be that you have used incorrect commands to open it. Besides, you can also make an error while using chmod x.
How to Fix Zsh Permission Denied in Terminal
Now that you know the most common causes of the error, let's explore how to fix the Zsh permission denied error.
| Workable Solutions | Step-by-step Troubleshooting |
|---|---|
| Fix 1. Check the File Permissions | Go to Terminal and type in ls -l command. Make sure to add a space...Full steps |
| Fix 2. Give Full Access to the Disk | Press on the Apple logo at the top-left corner and select System Preferences...Full steps |
| Fix 3. Change Directory's Ownership | You can change the directory's ownership, which would help you fix the...Full steps |
| Fix 4. Use a SUDO Command | There is a superfix that's legitimately a rescue to fix permission...Full steps |
Before we start with the written tutorial, here is a video about fixing Zsh permission denied on Mac. There are three highlights in this video, and you can skip to the important part directly:
- 00:17 Create a test document
- 01:29 Type in ls -l command lines in Terminal
- 02:22 Type in chmod x command
Notice: How to Recover Lost Data Because of Mac Errors
You would face and fix different Mac errors like Zsh command not found: Brew, Zsh permission denied, no startup disk on Mac, cannot open or delete files, but you might lose your data in the quest. That is because errors are often due to site malfunctions too. When something like Zsh permission is denied or directly related to files, your system is more vulnerable to them. Losing your data is frustrating, but the cool part is that you can recover them.
The Mac Data Recovery Software - EaseUS Data Recovery Wizard for Mac lets you do so. It's a reliable, efficient, and easy-to-use method.
- 🖼️Recover deleted pictures, documents, videos, audio, music, and emails effectively.
- 💽Support Mac hard drive recovery, SD card recovery, NAS recovery, camera recovery, etc.
- 🗑️Support data recovery for sudden deletion, formatting, hard drive corruption, virus attack, etc.
- 💚Support unsaved Word document recovery on Mac
You can recover lost data because of Mac errors easily with EaseUS Data Recovery Wizard for Mac.
We provide a detailed tutorial to help you recover lost data on Mac with one click:
Step 1. Select the drive to be scanned
In the main EaseUS Data Recovery Wizard window, there will be a list of the drives connected to your Mac. Select the drive you need to recover lost/deleted files from, and click the "Search for lost files" button.

Step 2. Select your lost data/files
EaseUS Data Recovery Wizard for Mac will immediately scan your selected disk volume and display the scanning results on the left pane. You can sort the results to find the wanted files if you are looking for certain files.

Step 3. Recover lost/deleted data
Once you have found the desired files, preview the files and then click "Recover" to begin the recovery of your deleted/lost Mac files.

Fix 1. Check the File Permissions Using Terminal on Mac
There are two ways of checking disk permissions - you can do that either via Mac Terminal or with a GUI. Since you face the error while accessing files from the Terminal, you prefer to check disk permissions via it only.
Follow the steps given below to check disk permissions.
Step 1. Go to Terminal and type in ls -l command. Make sure to add a space after entering the command. However, do not press the Enter key at this moment.
Step 2. Drag the file you want to open, drop it in the Terminal, and press the Return key.
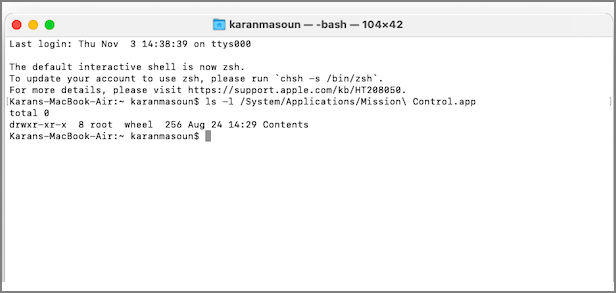
Now, check the results screen and look for your username. If RWXR shows up beside it, you have the required file permissions. Besides, if you see R, you have read-only permissions. If you have fixed this Zsh permission denied issue with the first method, you can share this useful tutorial with your friends.
Fix 2. Give Full Access to the Disk to Fix Zsh Permission Denied
If the file you are trying to open has not shared full access with the disk, you often encounter the Zsh permission denied in terminal error.
Here's how you can do so:
Step 1. Press on the Apple logo at the top-left corner and select System Preferences from the drop-down menu.
Step 2. Go to Privacy and Security and navigate to Privacy.
Step 3. Click on Padlock on the bottom left side of the window and enter your user password.
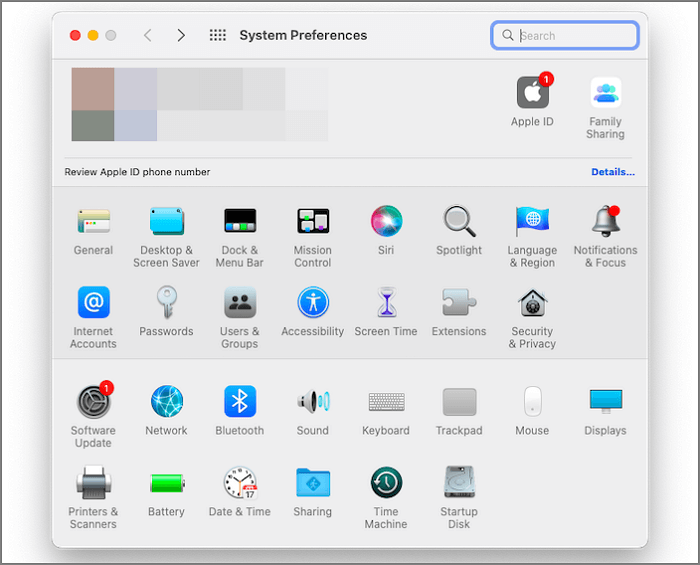
Step 4. After entering your admin credentials, a list appears checkbox Terminal.
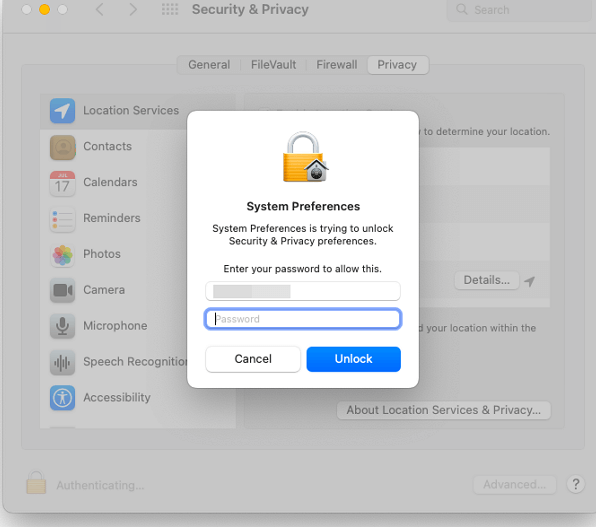
It will give the disk full access. Further, depending upon your Mac update, some of you may need help finding Terminal in the list. There's nothing to bother you as you can click on the plus-shaped icon and search for Terminal. Close the Terminal window for the changes to reflect.
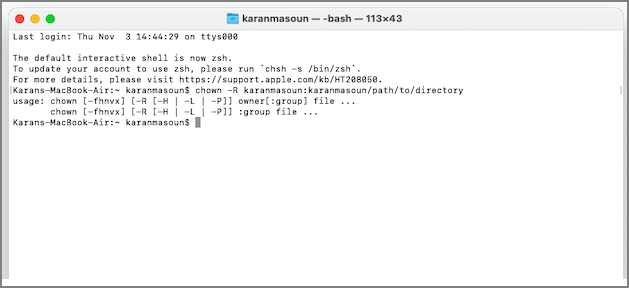
Fix 3. Change the Ownership of the Directory on Mac/MacBook
You can change the directory's ownership, which would help you fix the Zsh terminal without denying errors.
Head over to the Terminal and input chown -R $USER:$USER/path/to/directory command. Make sure to replace "$USER" with the user you have logged in with. Further, instead of /path/to/directory, specify the path where you want to write the while.
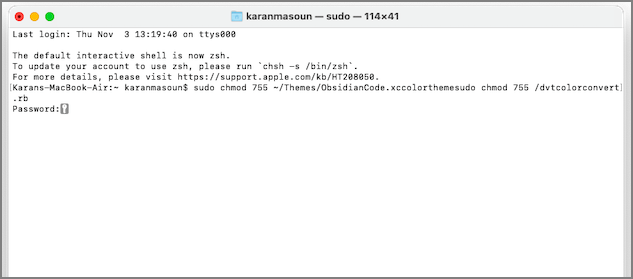
Fix 4. Use a SUDO Command to Fix Zsh Permission Denied
There is a superfix that's legitimately a rescue to fix permission denied on Mac. You can rely on Sudo commands when none of the above solutions work. SUDO is an acronym for Superuser do. When you use SUDO commands, it grants superuser rights to the allowed user. However, you should know the password of the user you are currently logged in to, as this is the first time you have used the command. If you don't remember the password, you can reset Mac password first.
Below is an example of a SUDO command you can use in Terminal:
sudo chmod 755 ~/Themes/ObsidianCode.xccolorthemesudo chmod 755 /dvtcolorconvert.rb
Now, you have successfully fixed the Zsh permission denied error. However, avoid it the next time, and the following section will help you with it.
How to Avoid Zsh Permission Denied Error on Mac
You can avoid the Zsh permission denied error in three practical ways.
- Grant Access Privileges to Users and Groups
- Change the Owner of the File
- Add or Remove a User or Group.
Let us move on to each one to know you can implement them to avoid errors.
Fix 1. Grant Access Privileges to Users and Groups
One common reason behind the error is access privileges, and you can grant it to multiple users and groups even if you have given review access. Thus, you can avoid the Zsh terminal error if it is caused due to user access.
Follow the steps below to grant access privileges to users and groups:
Step 1. Open a file, click on the file label, and select Get Info from the drop-down menu.
Step 2. Press the lock icon to unlock it.
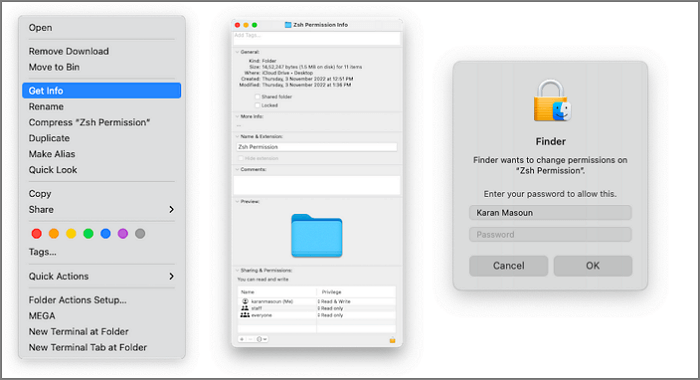
Step 3. It will prompt you to enter your Admin name and password.
Step 4. In the Name section, click on user or group, choose Privilege settings and select one.
Each privilege has a special meaning. If you select read, it will give the user/ group the right to read, but they cannot modify it. When you choose to Write only, you can move the file or copy it, but you cannot view it. Therefore, you must select Read and Write, which will let you read and edit.
Fix 2. Change the Owner of the File
If someone else owns the file, that can also reset the error. So if you change the owner, then you can avoid it.
Follow the steps given below to change the owner of an item:
Step 1. Open the file and click on the File label at the top-left corner.
Step 2. Select Get Info from the drop-down menu.
Step 3. Click on the + icon from the submenu and enter the owner's name.
Step 4. Click on Make as the owner and press the Save button.
Fix 3. Add or Remove a User or Group
If you have multiple users or another group with File permission, you can remove them to prevent the Zsh permission error. Further, you can add a user or group to check if that works and avoids the issue. Thus, you can control file access-related problems. Follow the steps given below to do so:
Step 1. Open the item, click on File and select Get Info from the drop-down menu.
Step 2. Now, navigate to Sharing and Permissions.
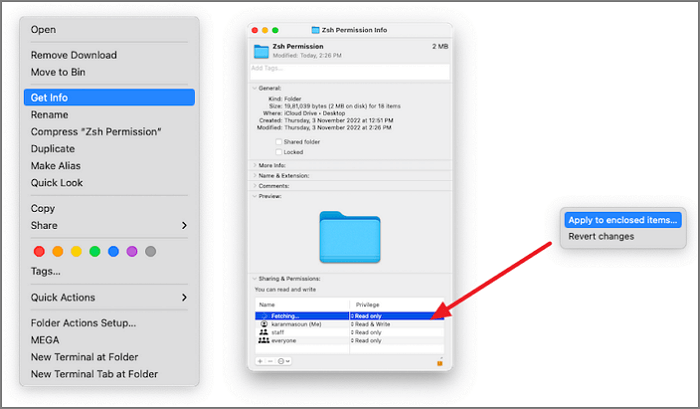
Step 3. Click on the - icon to remove a user, or click on the + icon and add one.
Step 4. Press the Apply Changes button.
Summary
If you were trying to fix Zsh Permission Denied in Terminal on macOS Ventura/Monterey, you would have gotten your answer. You can fix it by checking the disk permissions, modifying them if required, changing the directory ownership, or using Sudo Commands.
Some or more of the errors like this do pop up, and you might lose data. EaseUS Mac Data Recovery Wizard is the ultimate rescue in such a scenario, and you can use it to recover deleted files on Mac.
Zsh Permission Denied FAQs
You would have specific queries related to the Zsh permission denied. We have aimed to answer the most frequent ones!
What is Zsh Shell on Mac?
Zsh shell is a type of Unix shell in Mac. It is a Command Line tool meant for shell scripting that incorporates tcsh,ksh, and Bash features. It is known as the extended Bourne shell with more advancements. Moreover, we recommend installing another API to deal with its comprehensive setup.
How Do I Fix Zsh Command Not Found on Mac?
When you encounter the Zsh command not found on Mac, then chances are that you have entered the wrong command. Hence, you must recheck the command. If it's okay, then try setting the path as default macOS. Further, if that does not work, back up your Mac and reinstall it.
How Do You Fix Zsh Permissions Denied on Mac?
You can fix Zsh permissions denied on Mac by checking the disk permissions, giving full access to the Disc, changing ownership of the directory, or using Sudo Commands. It is noteworthy that you should follow every method serialized. Check the disk's permissions, and if required, give Full Access. If that does not work, change ownership of the directory or use Sudo Commands.
How Do I Fix Zsh Permission Denied in Terminal Linux?
To fix the Zsh permission denied in Terminal Linux, you will have to modify the permissions of the file/program and add full access. However, you will have to use the Sudo command to make these changes. chmod (Change mod) is one such command which you can use. If not, you should be the root user to make these changes.
Was This Page Helpful?
Cedric Grantham is a senior editor and data recovery specialist of EaseUS. He mainly writes articles and how-to tips about data recovery on PC and Mac. He has handled 10,000+ data recovery cases and is good at data recovery of NTFS, FAT (FAT32 and ExFAT) file systems, and RAID structure reorganization.
Dany is an editor of EaseUS who lives and works in Chengdu, China. She focuses on writing articles about data recovery on Mac devices and PCs. She is devoted to improving her writing skills and enriching her professional knowledge. Dany also enjoys reading detective novels in her spare time.
Related Articles
-
6 Proven Ways to Fix Windows Update Download Error 0x80248007
![author icon]() Larissa/2024-05-20
Larissa/2024-05-20 -
Windows Update Keeps Crashing My PC [Causes & 8 Fixes]🔥
![author icon]() Jerry/2024-10-25
Jerry/2024-10-25 -
How to Delete Bookmarks on Mac | Remove Favourites
![author icon]() Dany/2024-10-25
Dany/2024-10-25 -
6 Solutions to Mac Recovery Mode Not Working [2024 Guide]
![author icon]() Jaden/2024-10-25
Jaden/2024-10-25

EaseUS Data Recovery Services
EaseUS data recovery experts have uneaqualed expertise to repair disks/systems and salvage data from all devices like RAID, HDD, SSD, USB, etc.