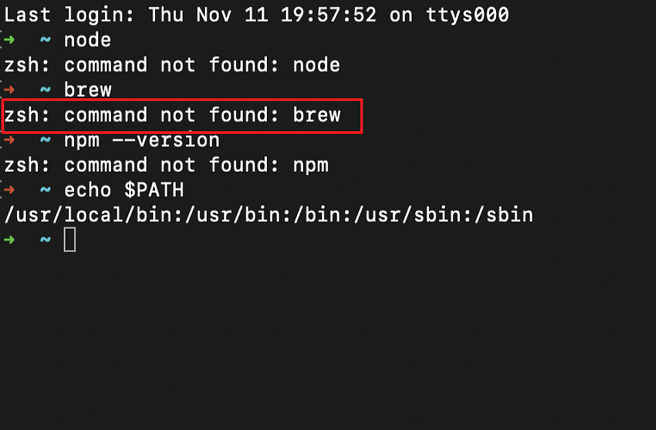
When programmers forget to install Brew or don't provide the path inside the page, the zsh: command not found: Brew error occurs. To fix the "zsh: command not found: brew" problem, check the quick navigation:
| Workable Solutions | Step-by-step Troubleshooting |
|---|---|
| Fix 1. Reinstall the Zsh Brew | The best action is to uninstall the Homebrew program, then reinstall it...Full steps |
| Fix 2. Add Brew to the Path Variable | Upon installation, the brew will automatically add the install directory to the path...Full steps |
| Fix 3. Correct Homebrew Installation | It would be best to run these zsh commands independently on the terminal...Full steps |
| Fix 4. Install Arm Version to M1 Mac | If you're using a Mac with an Apple M1 chip, your device will display a message telling you...Full steps |
| Fix 5. Install Xcode on Mac | Most Mac users have griped that without Xcode installed on the machine...Full steps |
The command-line interface (CLI) and interpreter for the collection of commands used to communicate with the operating system are known as the shell.
Every Unix-based operating system has a preferred package manager, and Homebrew is that package manager in macOS. Yet, while package managers make managing and installing various tools on your computer incredibly simple, they occasionally encounter problems like zsh command not found, zsh: command not found: npm, and zsh: command not found: node.
In this article, we will specially talk about the "zsh: command not found: brew" error.
First-Aid: Recover Deleted Data by Terminal on Mac
A significant usage of Terminal on Mac is to delete or undelete files. Sometimes, you find your zsh command not found due to unintentional deletion. So, recovering deleted files on Mac Terminal is unreliable because the downloaded file was faulty or broken. Thus, Mac users may find that their important files or data are disappeared once the Terminal recovery is made.
Otherwise, your files and data could be lost if the zsh tools were mistakenly updated or commands were given incorrectly. Therefore it would be advantageous if you were careful in securing your data. Here is a great Mac Trash recovery program for recovering data: EaseUS Data Recovery Wizard for Mac.
- 👌If you don't know how to use the Terminal command line and don't have a Time Machine backup, this is your best choice.
- 🦠When a system crash or virus attack causes your files to be lost, you can recover permanently deleted files Mac.
- 📄Files deleted using the Terminal command line can also be recovered with the aid of EaseUS Data Recovery Wizard for Mac.
Check the steps and learn how to use the software to recover deleted files on your Mac.
Step 1. Select the drive to be scanned
In the main EaseUS Data Recovery Wizard window, there will be a list of the drives connected to your Mac. Select the drive you need to recover lost/deleted files from, and click the "Search for lost files" button.

Step 2. Select your lost data/files
EaseUS Data Recovery Wizard for Mac will immediately scan your selected disk volume and display the scanning results on the left pane. You can sort the results to find the wanted files if you are looking for certain files.

Step 3. Recover lost/deleted data
Once you have found the desired files, preview the files and then click "Recover" to begin the recovery of your deleted/lost Mac files.

How to Fix Zsh: Command Not Found: Brew on Mac
Homebrew or Brew, sometimes known as Brew, is an open-source package manager for Linux and macOS. You may download, install, update, and uninstall packages using its user-friendly command-line interface. In this part, we will learn how to fix the "zsh command not found brew" error on Mac, which can appear when you run the brew command with Terminal.
Before starting the 5 fixes, check the following tutorial video first. It provides more details about the method for fixing the Zsh command not found brew error.
Please read the solutions below if you still have questions about correcting the problem.
- Fix 1. Reinstall the Zsh Brew
- Fix 2. Add Brew to the Path Variable
- Fix 3. Correct the Homebrew Installation
- Fix 4. Install Arm Version to M1 Mac
- Fix 5. Install Xcode on Mac
Fix 1. Reinstall the Zsh Brew
The best course of action is to uninstall the Homebrew program, then reinstall it if it doesn't operate as planned. Open the terminal on your Mac and type the following command if you want to uninstall the "Homebrew" software without leaving any cache:
/bin/bash -c "$(curl -fsSL https://raw.githubusercontent.com/Homebrew/install/HEAD/uninstall.sh)"
The Homebrew project's official developers provide this command on Github.
Restart the computer after completely uninstalling the Homebrew program. Then go to the Homebrew website now and then paste the installation code there:
/bin/bash -c "$(curl -fsSL https://raw.githubusercontent.com/Homebrew/install/HEAD/install.sh)"
The command line is changed to /bin/bash because the Homebrew was rewritten on the "Bash" platform rather than Ruby.
Fix 2. Add Brew to the Path Variable
The brew will automatically add the install directory to the path upon installation. Unfortunately, this might not work occasionally, and you'll have to add the guide manually to fix the zsh: command not found: Brew error.
For Bash -
Use the following command to accomplish this:
$ echo 'export PATH="/usr/local/bin:$PATH"' >> ~/.bash_profile
Substitute the target directory for /usr/local/bin if Homebrew is installed in a different location. For instance, the brew is installed under /opt/homebrew/bin on macOS.
For Zsh -
Similarly, you can substitute the destination directory for /usr/local/bin.
echo 'export PATH="/usr/local/bin:$PATH"' >> $HOME/.zshrc
Running the command.
$ brew –version
Homebrew 3.5.1
Homebrew/homebrew-core
It will demonstrate that the brew command has been successfully executed.
You can now access Homebrew from your terminal session after successfully installing it.
Although the above method of running the brew command will work on Mac, it is preferable to add the installation location of the brew to the.zshrc file instead.
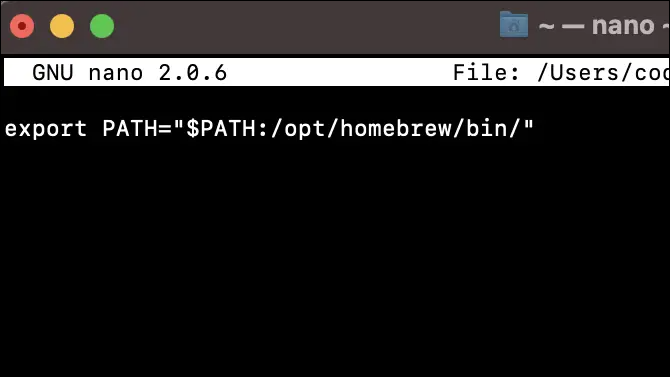
- With the command nano /.zshrc, open the .zshrc file.
- Now add the following line to the .zshrc file. "$PATH:/opt/homebrew/bin" is the export path.
- By pressing Ctrl + X and Enter, you can save the file.
- Use source /.zshrc to apply the modifications.
Fix 3. Correct the Homebrew Installation
You should run these commands independently on the terminal to correct the installation.
Step 1. Open Terminal on Mac.
Step 2. Type export PATH="/opt/homebrew/bin:$PATH" in the terminal and press return.
Step 3. Type this command in the terminal and press return: export PATH="/opt/homebrew/bin:$PATH"' >> $HOME/.zshrc
After these commands, you won't see anything, which is excellent. Write the command "brew help" right now to verify that everything is fine and that Homebrew is functioning.

Fix 4. Install Arm Version to M1 Mac
If you're using a Mac with an Apple M1 chip, your device will display a message telling you to add brew to the .zprofile zsh configuration file.
You should install Homebrew under /opt/Homebrew rather than /usr/local/homebrew. To install the ARM version of Homebrew on your M1 device, enter the following code:
- 666@XXX-MacBook-Pro ~ % /bin/bash -c "$(curl -fsSL https://raw.githubusercontent.com/Homebrew/install/HEAD/install.sh)"
- ...
- ==> Next steps:
- - Add Homebrew to your PATH in /Users/668/.zprofile:
- echo 'eval $(/opt/homebrew/bin/brew shellenv)' >> /Users/668/.zprofile
- eval $(/opt/homebrew/bin/brew shellenv)
- - Run `brew help` to get started
- - Further documentation: https://docs.brew.sh
- 666@XXX-MacBook-Pro ~ % brew install --cask google-chrome zsh: command not found: brew
It is advised to read each line before copying and pasting thoroughly.
Fix 5. Install Xcode on Mac
Most Mac users have griped that without Xcode installed on the machine, Homebrew software will not run. As a result, you should have Xcode installed on your system.

To do so, follow these instructions:
Step 1. To find out whether XCode is already installed on your machine or not, use the following command:
/usr/bin/xcodebuild -version
Step 2. If XCode is already installed on your Mac, you can identify the specific version by looking for something like this:
Xcode 12.3 Build version 12C33
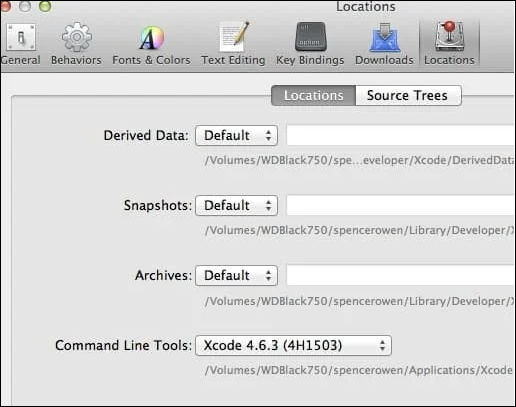
Step 3. Open Xcode now, then go to Preferences Location. This option can be found in the "Command Line Tools" section.
Step 4. Open the terminal and then execute the following command:
/bin/bash -c "$(curl -fsSL https://raw.githubusercontent.com/Homebrew/install/HEAD/install.sh)"
If one of the fixes above is helpful to resolve the zsh: command not found: brew issue, share it on Facebook, Twitter, Instagram, and other social media platforms!
Zsh: Command Not Found: Brew Error Occurs, Why
The most apparent reason for the issue, as indicated by the error message, is that either Brew isn't installed or the existing installation is damaged or otherwise flawed.
The systems have a list of folders to search for a command's binaries. So your system encounters the "zsh command not found brew," and zsh permission denied problem when it cannot locate the brew binary on its path.
Hence, when you issue a command from your terminal, the system will go through this list of directories for the binary with that name. The error message "command not fouTerminal be returned if the system cannot locate a binary with that name.
The PATH environment variable holds the list of directories the system will search.
Moreover, additional typical causes include:
- ❗The PATH variable no longer contains the brew binary.
- 📁The downloaded file was faulty or broken.
- 🔨Incorrect installation of Homebrew.
Conclusion
The two choices for Mac's default shell are Zsh and bash. However, since macOS Catalina, Apple switched from zsh to bash, partly because bash is now subject to the GPL v3 licensing, which is incompatible with Apple's rules, and zsh is more functionally equivalent to the ordinary bash.
Ultimately, the path change and the incorrect installation caused the "Zsh command not found: brew" problem. We hope the methods below will be helpful if you recently rectified your download and got your brew files back on the right path. Moreover, EaseUS Data Recovery Wizard for Mac may work well with your Mac devices to protect your data.
Zsh Command Not Found Brew FAQs
After learning how to fix the Mac zsh command not found brew, you may have more questions about it. See if you can find your answers here:
1. How do I fix the zsh command not found error on Mac?
To fix the zsh error, you can try the 5 methods below. To read more, you can click the linked page on how to fix Zsh: command not found.
- Set $Path Environment
- Ensure the Package Is Installed
- Check the Syntax
- Set Path in the .zshrc File
- Reinstall the macOS
2. What is Zsh Shell on Mac?
Macs have a Unix shell called Zsh. It is a Command Line shell scripting tool that combines Bash, Tcsh, and Ksh functionalities. It is referred to be an improved extended Bourne shell. In addition, we advise setting up a different API to handle its complex setup.
3. What is the brew command in Mac?
Homebrew (brew command) is a crucial package manager for macOS programmers, system administrators, and power users. We can use Homebrew to install the most recent and improved versions of widely used programs, packages, and development tools.
4. How to open the Zsh terminal on Mac?
Step 1. Open the Mac's Dock and click the Launchpad icon.
Step 2. In the field, type "Terminal."
Step 3. Choose Terminal.
Step 4. Launch it by typing "Zsh".
Was This Page Helpful?
Jaden is one of the editors of EaseUS, who focuses on topics concerning PCs and Mac data recovery. Jaden is committed to enhancing professional IT knowledge and writing abilities. She is always keen on new and intelligent products.
Related Articles
-
Cleaning Up, Do Not Turn Off Your Computer - How to Fix
![author icon]() Larissa/2024-10-25
Larissa/2024-10-25 -
How to Fix Mac/MacBook Pink Screen? Here Are Reasons and Solutions
![author icon]() Jaden/2024-10-25
Jaden/2024-10-25 -
Fix Windows 10 Hangs or Stuck on Shut Down Error
![author icon]() Tracy King/2024-08-22
Tracy King/2024-08-22 -
Call of Duty Warzone Save Files (Everything You Need to Know)
![author icon]() Larissa/2024-11-25
Larissa/2024-11-25

EaseUS Data Recovery Services
EaseUS data recovery experts have uneaqualed expertise to repair disks/systems and salvage data from all devices like RAID, HDD, SSD, USB, etc.