| Workable Solutions | Step-by-step Troubleshooting |
|---|---|
| 1. Create a Bootable Installer | Go to application > utilities > terminal...Full steps |
|
2. Install macOS with Bootable USB |
determine which chip your computer...Full steps |
When you need to update macOS, usually you need to click on Software Update on your computer, check the system update information, and then start the update. This method is the choice of most people, however, you can also make a bootable USB drive. With a bootable macOS USB, you can perform a clean install or reinstall the macOS when your Mac won't boot into Recovery Mode.
EaseUS Data Recovery Wizard for Mac
- Three-step Mac data recovery software protects you from OS crash, accidental deletion, and external hard drive format.
- With EaseUS Data Recovery Wizard for Mac, retrieve your data in three-step: locate-scan-recover.
EaseUS Data Recovery Wizard Free offers up to 2 GB of free data recovery, including 500 MB available by default and an extra 1.5 GB unlocked after sharing on Facebook and X.
To recover data from an unbootable Mac, it is necessary to boot the Mac into Recovery Mode first. Then, you can follow these steps:
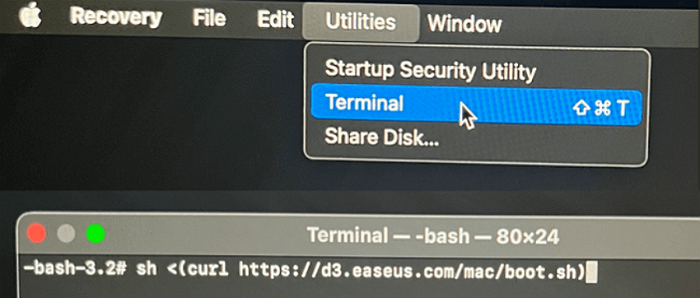
Step 1. Launch EaseUS Software in Recovery Mode
Select "Utilities > Terminal" from the top menu, and enter the command sh <(curl https://d3.easeus.com/mac/boot.sh). Hit "Return". Wait for the application to open, and it will take several minutes.
Note: If the Terminal displays either "No such file or directory" or "Could not resolve host," you should verify that the command line you entered is correctly spelled, ensure your Mac has a stable internet connection, and confirm that your macOS version is not lower than macOS 10.15.
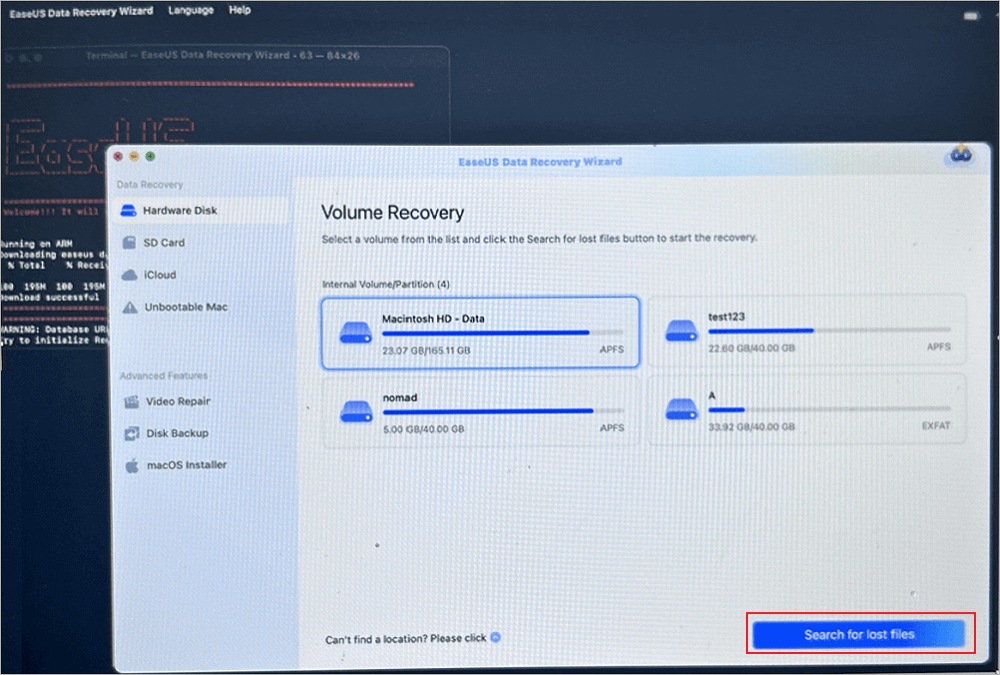
Step 2. Select the Volume on Your Mac Hard Drive
Select the volume where your lost data is stored, and click "Search for lost files". The EaseUS software will quickly locate all the recoverable data on the selected volume.
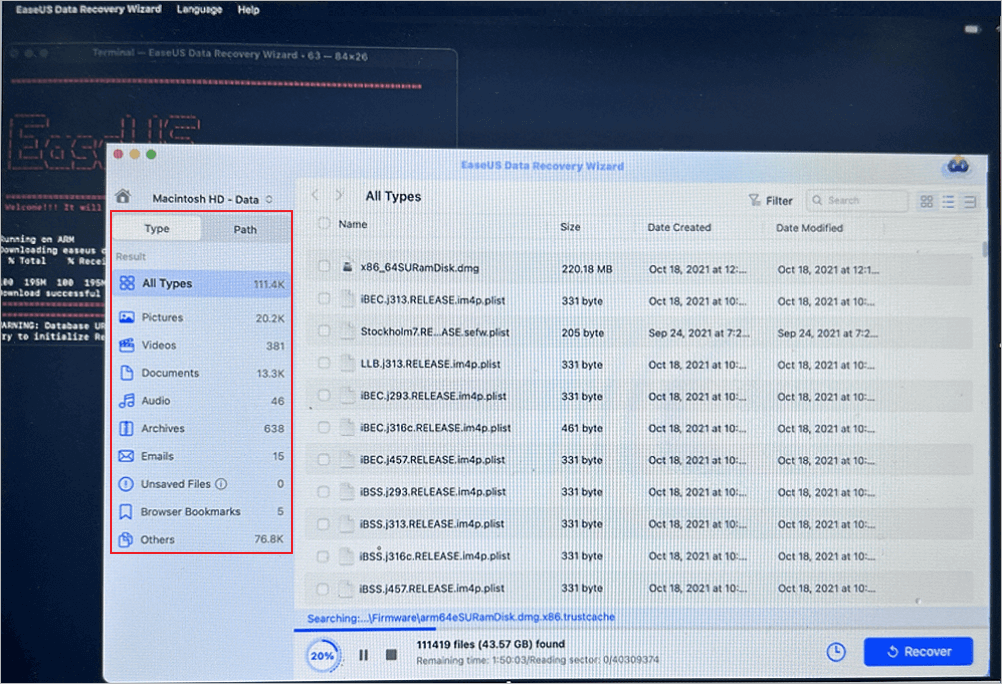
Step 3. Choose the Lost Data You Want
EaseUS software categorizes the scanned recoverable data by file type and storage path. Find the data you want by clicking "Type" or "Path" in the left panel. Then, check the boxes in front of the data you want to recover.
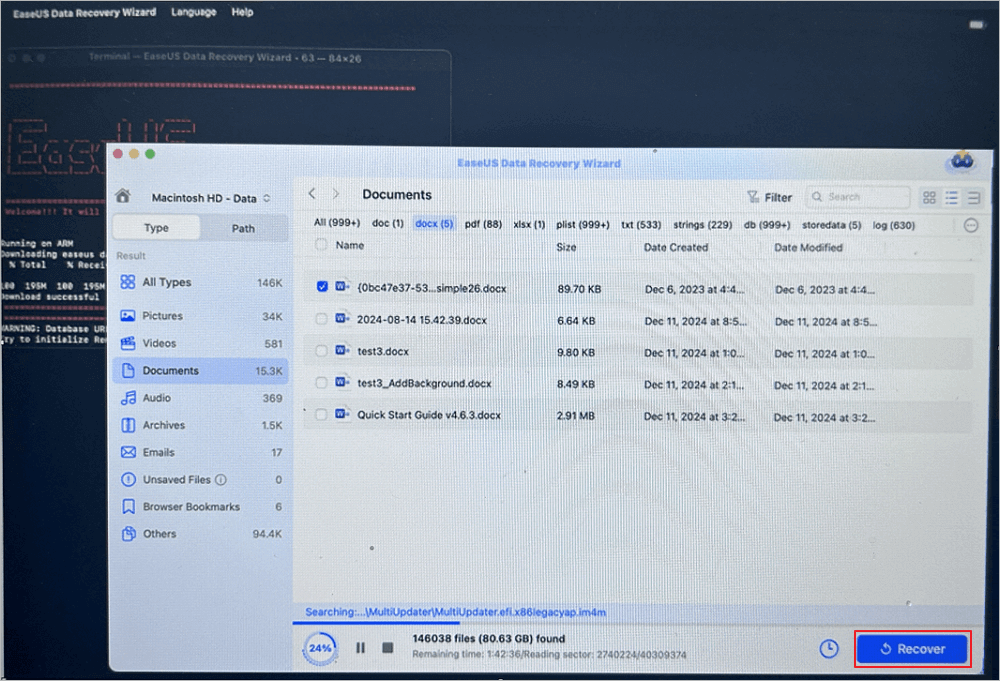
Step 4. Recover and Save Data on an External Disk
Click the "Recover" button, and a pop-up window will show up saying, "Please select a target location to save". Choose the external disk as the new storage location of your recovered data.
What You Need for Making a Bootable USB Drive
Before starting to make a bootable USB drive, you need to prepare for it. Below are the tools you need to prepare.
1. A macOS compatible USB drive with at least 14GB of available storage space. And this drive should be formatted to Mac OS Extended.
2. Click the corresponding link to download the macOS installer. (Monterey, Big Sur, Catalina, Mojave, or High Sierra.)
How to Create a Bootable Installer with macOS
After downloading the macOS installer, connect the prepared USB flash drive to your Mac. Again, make sure it is empty and has at least 14GB of free space. The next steps are a bit more complicated, as the Mac Terminal's 'createinstallmedia' command will be used. Make sure the computer is fully charged or connected to the power cord, and do not turn off the computer in the meantime.
Go to Application > Utilities > Terminal. Below is the command line required to create a bootable USB drive, find the version of macOS you want to install and paste it into Terminal.
Monterey:
sudo /Applications/Install\ macOS\ Monterey.app/Contents/Resources/createinstallmedia --volume /Volumes/MyVolume
Big Sur:
sudo /Applications/Install\ macOS\ Big\ Sur.app/Contents/Resources/createinstallmedia --volume /Volumes/MyVolume
Catalina:
sudo /Applications/Install\ macOS\ Catalina.app/Contents/Resources/createinstallmedia --volume /Volumes/MyVolume
Mojave:
sudo /Applications/Install\ macOS\ Mojave.app/Contents/Resources/createinstallmedia --volume /Volumes/MyVolume
High Sierra:
sudo /Applications/Install\ macOS\ High\ Sierra.app/Contents/Resources/createinstallmedia --volume /Volumes/MyVolume
El Capitan:
sudo /Applications/Install\ OS\ X\ El\ Capitan.app/Contents/Resources/createinstallmedia --volume /Volumes/MyVolume --applicationpath /Applications/Install\ OS\ X\ El\ Capitan.app
Press Return to enter the command. Enter your administrator password in the prompted box and press Return again. Follow the on-screen wizard to confirm the following process. Type Y to confirm that you want to erase the USB flash drive, and then click OK to allow the creating process.
When the whole process is finished, the USB's name will be changed to the installer's name, such as Install macOS Monterey. Quit Terminal now and eject your USB drive.
Install macOS with Created Mac Bootable USB
To use the created bootable USB on Mac, the steps will be different on computers with different chips. There are two types of chips used in Mac computers: Apple silicon and Intel processors. First, determine which chip your computer is equipped with, and then follow the corresponding steps to use the bootable installer.
Mac computers with Apple silicon:
- MacBook Pro (14-inch, 2021)
- MacBook Pro (16-inch, 2021)
- iMac (24-inch, M1, 2021)
- Mac mini (M1, 2020)
- MacBook Air (M1, 2020)
- MacBook Pro (13-inch, M1, 2020)
| Apple silicon | Intel processor |
|---|---|
| 1. Plug the bootable USB into a Mac. Your Mac should be connected to the internet and compatible with the version of the macOS you're installing. 2. Turn on your Mac and continue to hold the power button until you see the startup options window, which shows your bootable volumes. 3. Select the USB drive containing the bootable installer, then click Continue. 4. When the macOS installer opens, follow the onscreen instructions. |
1. Plug the bootable USB into a Mac. Also, the Mac should have an internet connection and be compatible with the installed macOS. 2. Press and hold the Option (Alt) key immediately after turning on or restarting your Mac. 3. Release the Option key when you see a dark screen showing your bootable USB drive. 4. Select the bootable USB drive. Then click the up arrow or press Return. 5. If you can't start up from the bootable installer, make sure that the External Boot setting in Startup Security Utility is set to allow booting from external media. 6. Choose your language, if prompted. 7. Select Install macOS (or Install OS X) from the Utilities window, then click Continue and follow the onscreen instructions. |
The Bottom Line
With a bootable USB drive, you are able to install specific macOS according to your needs. The whole process is a bit complicated, but don't worry, follow the guide step by step.
Was This Page Helpful?
Jaden is one of the editors of EaseUS, who focuses on topics concerning PCs and Mac data recovery. Jaden is committed to enhancing professional IT knowledge and writing abilities. She is always keen on new and intelligent products.
Jean is recognized as one of the most professional writers in EaseUS. She has kept improving her writing skills over the past 10 years and helped millions of her readers solve their tech problems on PC, Mac, and iOS devices.
-
EaseUS Data Recovery Wizard is a powerful system recovery software, designed to enable you to recover files you’ve deleted accidentally, potentially lost to malware or an entire hard drive partition.
Read More -
EaseUS Data Recovery Wizard is the best we have seen. It's far from perfect, partly because today's advanced disk technology makes data-recovery more difficult than it was with the simpler technology of the past.
Read More -
EaseUS Data Recovery Wizard Pro has a reputation as one of the best data recovery software programs on the market. It comes with a selection of advanced features, including partition recovery, formatted drive restoration, and corrupted file repair.
Read More
Related Articles
-
Browse Version History Is Greyed out on Mac? 3 Fixes to Recover Data!
![author icon]() Brithny/Jun 21, 2026
Brithny/Jun 21, 2026 -
How to Remove Photos from Mac Desktop Without Deleting Step by Step
![author icon]() Dany/Mar 29, 2026
Dany/Mar 29, 2026 -
External SSD Keeps Disconnecting on Mac [Complete Guide]
![author icon]() Brithny/Jun 30, 2026
Brithny/Jun 30, 2026 -
How to Transfer Files in Recovery Mode [Full Guide]
![author icon]() Brithny/Jun 30, 2026
Brithny/Jun 30, 2026