The provided solution for fixing unmounted external hard drives can also be applied to fix unmounted USB drive, Thunderbolt drive, firewire drive, etc., on Mac. If you are unable to access or view your external hard drive on Mac desktop, follow-through the following process to make your device accessible without losing any data:
| Workable Solutions | Step-by-step Troubleshooting |
|---|---|
| Part 1. Check Drive | Check external hard drive cable, the USB port on Mac, and its state in Disk Utility...Full steps |
| Part 2. Mount "Unmounted" Drive | Open Disk Utility > Select the unmounted external hard drive > Select "Mount"...Full steps |
| Part 3. Recover Lost Data | If you lost drive data, run EaseUS Data Recovery Wizard for Mac to bring it back...Full steps |
| Part 4. Change Drive Format | If Mac is not compatible with the drive format, use Disk Utility to erase it to Mac OS Extended...Full steps |
Have you ever met this problem that you tried to open an external hard drive on your Mac computer but the disk displayed as unmounted? If yes, you are in the right place. Here we'll take the unmounted external hard drive as an example to show you how to force the unmounted external hard drive show up on your Mac desktop without losing any data.
You can follow to resolve the same issue on your own now.
Part1. Check External Hard Drive
Before you start to fix the external hard drive unmounted error, you should first check the external hard drive, finding the real cause of the device unmounted error.
Follow through the checking tips here and find out the problem:
# 1. Check the cable
Check if the external hard drive cable is plugged in correctly, not loose. If yes, fasten it. Also, check if the external hard drive is probably plugged in the Mac computer via its connection cable. If not, re-plug the drive and reconnect it to Mac. If it turns out the drive connection cable is damaged, replace one and your problem is resolved.
# 2. Switch USB port
Change a USB port and reconnect the external hard drive. If the external hard drive shows up, congratulations. If not, continue with the next tip.
# 3. Check disk file system
Mac computer can read HFS+, NTFS, FAT32, exFAT, and exFAT. If your external hard drive is another recognizable format, reformat it to a readable file system for Mac.
# 4. Check Disk Utility
- Open Disk Utility by opening new Finder windows > Applications > Utilities > Double-click to bring up Disk Utility.
- Check if the external hard drive is visible.
- If yes, you can simply follow through the next 2 parts to mount your external hard drive and get your data back with ease. If the external hard drive icon doesn't appear below the External section, it means that there might be a problem on your drive. You need to either get a repair or replace it as it might have failed and if it's totally crashed, there's not really much you can do at that point.
Part 2. Mount 'Unmounted' External Hard Drive
Mac Disk Utility is a professional tool that helps resolve most disk management issues on Mac, functioning similarly to Disk Management in Windows OS.
When a storage device becomes unmounted as shown on this page, Disk Utility also assists mounting the device and fixing it back to a healthy state:
Step 1. Open a new Finder window, click "Application" and open "Utilities".
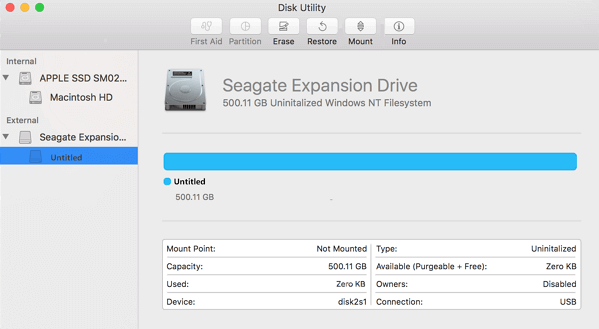
Step 2. Locate and double click "Disk Utility" to launch it. Locate the external hard drive at the left panel under the External section.
You'll see that the external hard drive is greyed out, marked as untitled. (Untitled means unmounted on Mac computer.)
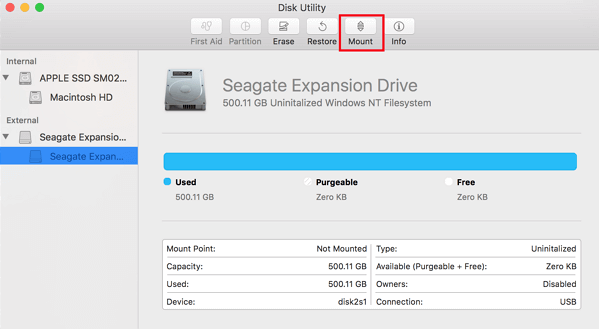
Step 3. Select the untitled external hard drive and click the "Mount" button from the Disk Utility bar.
After this, you can restart the Mac computer and reconnect the external hard drive. There, you are good to go and check whether you can access and use the existing data in your external hard drive again.
If not, move to Part 3 and restore all lost and existing data from the external hard drive with ease.
Part 3. Restore Lost Data after Mounting External Hard Drive
Theoretically, if an external hard drive becomes inaccessible after mounting on Mac with Disk Utility, something was wrong with your device. It is caused by the mounting but the device itself.
And the best way is to apply professional Mac hard drive data recovery software to bring your saved data out of the device immediately. EaseUS Data Recovery Wizard for Mac is able to scan and bring all existing data with lost files back from your external hard drive on Mac OS X and macOS systems.
Follow the step-by-step guide below to bring your external hard drive data back:
Step 1. Connect your USB drive to your Mac
Correctly connect your USB flash drive to your Mac. Launch EaseUS Data Recovery Wizard for Mac. Start selecting the flash drive and click "Search for lost files" to let the software scan for lost files on it.

Step 2. Find lost data on the USB drive
After the scan, all files will be presented in the left panel in the scan results.

Step 3. Recover data from flash drive
Select the files you want to recover and click the "Recover" button. Don't save the recoverable files to the USB drive itself in case of data overwriting.

Note: Remember to save your data to another secure location before making sure the external hard drive is secure to store files again.
Bonus Tip: Format External Hard Drive for Mac Compatibility
As we have mentioned, that when the external hard drive file system is unrecognizable on Mac, it may not mount to Mac. Also, if the external hard drive is still inaccessible after mounting, you will need to format the device for Mac compatibility.
Here are the steps:
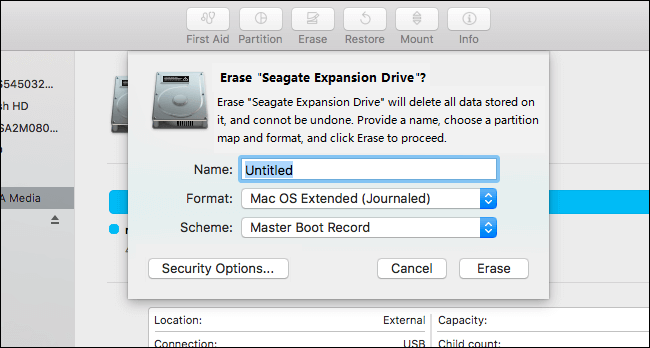
Step 1. Connect the external hard drive to Mac and open Applications > Utilities > Double-click to launch Disk Utility.
Step 2. Select the external hard drive in Disk Utility and click "Erase" at the top pane.
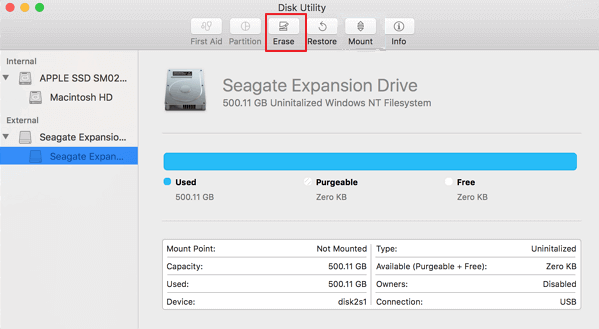
Step 3. Set the external hard drive as "Mac OS Extended (Journaled) next to "Format".
Step 4. Rename the drive if you want and click "Erase" to confirm again.
After this, you can restart the Mac computer and reconnect your external hard drive. Then you should be able to access and save new data on the drive again.
People Also Ask
Some Mac users may still not clear about mounting and unmounting issues on the Mac computer. Here we have collected some frequently asked questions about mounting and unmounting Mac drive and left a brief answer below each question. Find out answers on your own.
1. What does unmounted hard drive mean?
A mounted drive on Mac computer can be directly detected by the operating system and users can directly access saved files on it.
But when a hard drive is unmounted, it will neither be recognized by the Mac operating system or showing up on the computer.
2. Why won't my external hard drive mount on Mac?
There are many reasons that may cause the external hard drive unmounted on Mac. Here is a list of the major causes:
- Hardware and connection issue
- Corrupted disk
- Incorrect formatting of the disk
- Software conflict
- Malfunction of macOS
Based on these reasons, we suggest you back up essential data more regularly. Sometimes, even two copies of essential files are acceptable.
3. How do I mount an unmounted hard drive or external hard drive Mac?
- First, make sure that your external or internal hard drive is correctly connected to your Mac computer.
- Next, reboot the Mac computer and open Disk Utility > locate and select the unmounted drive > Select Mount at the top menu.
- Last, reboot Mac computer again to keep all the changes.
After this, you should be able to access your device and use the saved data again. If your files are missing on the mounted the drive, EaseUS Data Recovery Wizard for Mac is always ready to help.
Was This Page Helpful?
Cedric Grantham is a senior editor and data recovery specialist of EaseUS. He mainly writes articles and how-to tips about data recovery on PC and Mac. He has handled 10,000+ data recovery cases and is good at data recovery of NTFS, FAT (FAT32 and ExFAT) file systems, and RAID structure reorganization.
Written by Tracy King
Tracy became a member of the EaseUS content team in 2013. Being a technical writer for over 10 years, she is enthusiastic about sharing tips to assist readers in resolving complex issues in disk management, file transfer, PC & Mac performance optimization, etc., like an expert.
-
EaseUS Data Recovery Wizard is a powerful system recovery software, designed to enable you to recover files you’ve deleted accidentally, potentially lost to malware or an entire hard drive partition.
Read More -
EaseUS Data Recovery Wizard is the best we have seen. It's far from perfect, partly because today's advanced disk technology makes data-recovery more difficult than it was with the simpler technology of the past.
Read More -
EaseUS Data Recovery Wizard Pro has a reputation as one of the best data recovery software programs on the market. It comes with a selection of advanced features, including partition recovery, formatted drive restoration, and corrupted file repair.
Read More
Related Articles
-
4 Fixes to Recover Unsaved Photoshop Files Mac Now!
![author icon]() Tracy King/Jun 30, 2026
Tracy King/Jun 30, 2026 -
How to Stop macOS Automatic Update Step-by-Step
![author icon]() Jean/Jun 28, 2026
Jean/Jun 28, 2026 -
Recover Deleted/Unsaved Numbers Files Mac
![author icon]() Jean/Jun 18, 2026
Jean/Jun 18, 2026 -
Recover Deleted Photos from Canon Camera [2 Solutions for Mac Users]
![author icon]() Dany/Jun 03, 2026
Dany/Jun 03, 2026