Where Are Screenshots Saved on Mac
Mac users usually crop a screenshot on Mac with Command + Shift + 3/4 shortcut, but you don't know where are screenshots saved on Mac. If you don't see the location of the screenshots you take, you cannot edit them or send them to friends.
Where are screenshots saved on Mac? The screenshots will be saved on the desktop by default once taken. After pressing the shortcuts to take the screenshots, the thumbnails will appear in the lower right corner. Users can easily click on the thumbnail to edit the screenshot.
If you cannot find the screenshots, you should think about accidental deletion or you have never taken the screenshots successfully. Check this video tutorial from Apple Support to ensure your method of taking screenshots is correct. The highlights of this video are listed below:
- 00:28 How to capture the entire screen
- 00:48 How to capture a portion of your screen
- 01:14 How to capture a specific window

How to Find Lost Screenshot on Mac with Software
If you confirmed that you had taken the screenshots on Mac and failed to find them on the Mac desktop, maybe the screenshots were deleted accidentally. First, you'd better check Mac Trash. If you have emptied the Trash, it is necessary to perform Mac Trash recovery.
When you can't find screenshots on Mac, you should try to recover them with professional photo recovery software. If you need to know which product should choose or what is your best choice, you'd better try EaseUS Data Recovery Wizard for Mac.
We hope you can learn more about this handy screenshot recovery software after reading the following features:
- Recovering deleted screenshots on Mac will not be difficult with the EaseUS recovery tool. This software is handy enough, and new Mac users can use it easily.
- Recover deleted photos on Mac is also possible with this tool. You can retrieve deleted selfies, family pictures, game screenshots, wallpapers, etc.
- Support digital camera recovery. You can recover deleted photos from Canon cameras, Sony cameras, Fujifilm cameras, etc.
If you have downloaded this Mac screenshot recovery tool, follow the written tutorial to locate the lost screenshots on your Mac. To help you understand more quickly, we have added operation screenshots also:
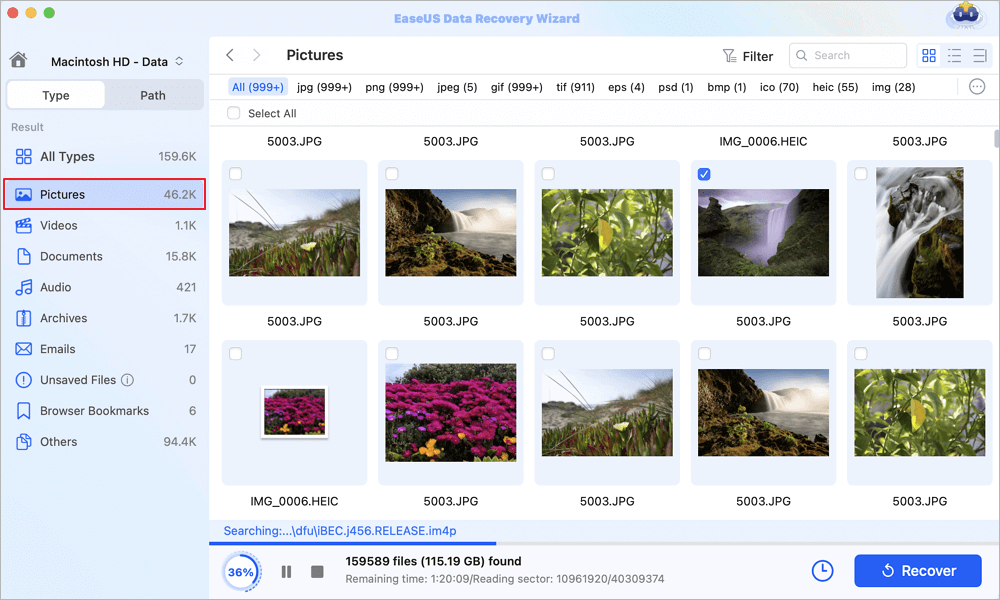
Step 1. Scan for lost photos
Select the location where your valuable photos were lost and click the "Search for lost files" button.

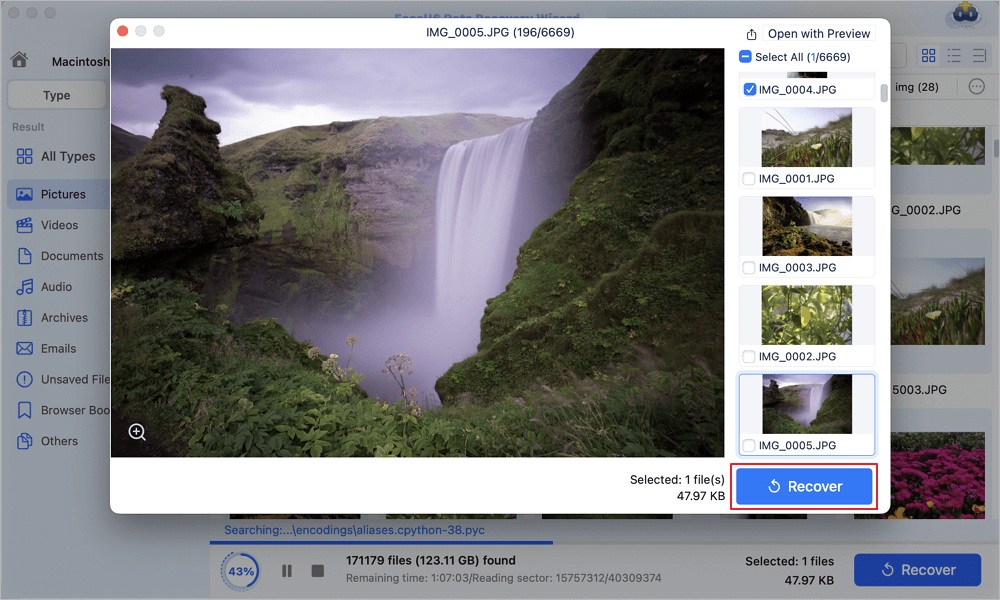
Step 2. Select wanted photos
EaseUS Data Recovery Wizard for Mac will immediately start a scan on your selected disk volume. Meanwhile, the scanning results will be presented in the left pane. By Path and Type, you can quickly filter the photos you've lost earlier.
Step 3. Recover lost photos
Select the target photos and click the "Recover" button to get them back at once.
How to Change Screenshots Location on Mac [2 Methods]
Many Mac users find saving screenshots on the desktop untidy and don't know how to change the screenshot's location to make their desktop tidier. You will have different methods to change the screenshot's location on Mac for different macOS base systems.
Change Screenshots Location on macOS Mojave or Later
Modifying where screenshots are saved is simple if you have installed macOS Mojave, Catalina, Big Sur, Monterey, or macOS Ventura. Check the following written tutorial to change the screenshot's location on your Mac devices:
Step 1. Open the Screenshot application on Mac. You can launch Finder, navigate to Apps > Utilities > Screenshot, or use the Command + Shift + 5 shortcut to open the Screenshot application.

Step 2. Click the "Options" button.
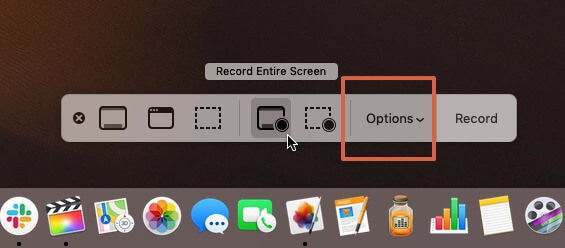
Step 3. You can see multiple choices that can save your screenshots, and you can keep them on the desktop, documents, Mail, etc.
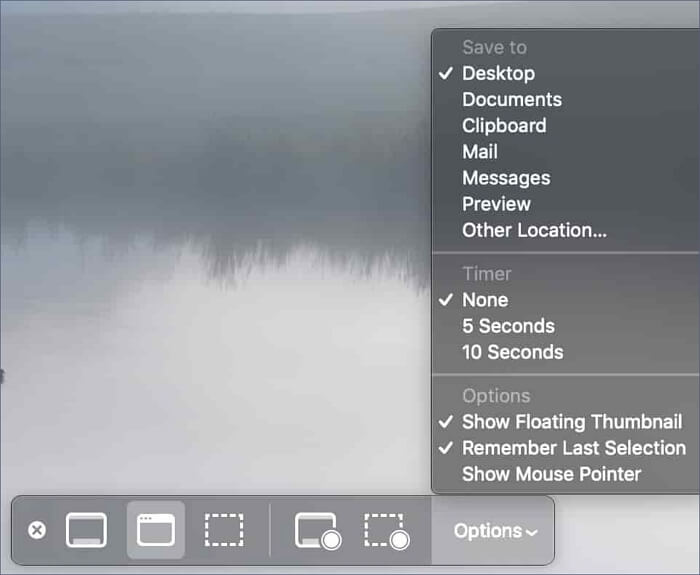
Step 4. After choosing the location, your screenshots will not be saved on the desktop, and you should know where screenshots are saved on Mac.
Change Screenshots Location on Earlier macOS Versions
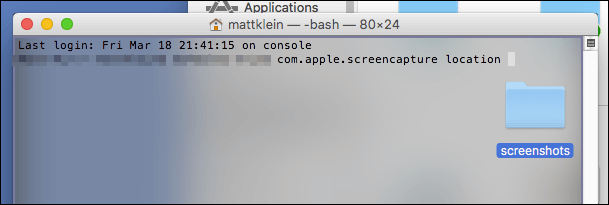
The procedure to change the screenshots saving directory on a Mac running macOS High Sierra and older versions is a little more difficult. You'll need to use Mac Terminal. Here is how you do it:
Step 1. Launch Mac Terminal on macOS High Sierra or other older versions.
Step 2. In the Terminal window, type in defaults write com.apple.screencapture location. Make sure you put in the right command line.
Step 3. Type in the folder path you want to save the screenshots, or you can drag this folder directly to the Terminal window.
Step 4. Hit the Return key and type in killall SystemUIServer to change the location.
Step 5. After pressing the Return key, the command will activate, and your screenshots will be saved in the target folder from the next time you take a screenshot.
If you find this article useful, share it with more people to help them figure out where screenshots are saved on Mac!
How to Copy Screenshots to the Clipboard on Mac
Maybe you think it is too complex to find the screenshot and send it to your friends. You have a quick method: copy the screenshots to the macOS clipboard and send them to others by pasting them. You can check the step-by-step guide here:
Step 1. Use the screenshot shortcut, Command + Shift + 3/4, to take a screenshot on Mac
Step 2. Press and hold the Control key while taking the screenshot to copy it to the clipboard.
Step 3. The screenshot can then be pasted somewhere else on Mac. Even better, you can also copy it to MacBook Air, iPhone, or iPad with Universal Clipboard.

Conclusion
After reading the information we have written, you should know how to take a screenshot on Mac correctly and find your screenshots. If you have changed the location of the screenshots, you should find the target folder.
Can't find screenshots on Mac because of accidental deletion? Don't worry! You have EaseUS Data Recovery Wizard for Mac, and this fantastic photo recovery program will help you find lost or deleted screenshots with one click.
Where Are Screenshots Saved on Mac FAQs
This is the last part of this passage, and you'll learn more from these frequently asked questions:
1. Where are photos stored on Mac?
Where are photos stored on Mac? If you are using macOS Big Sur, Monterey, and Ventura, you can find photos in the Photos application on Mac. Your photos will be stored in the Photos application and may be in different albums. You can search for target photos by typing in keywords in the search box of the Photos application.
2. How to change the location of the screenshots on Mac?
You have two ways to change the location of the screenshots on Mac. You can change the location by clicking the Options button after entering the Screenshots application. Or you can use the Terminal command to change the location of your screenshots.
3. Will my Mac automatically save screenshots?
Yes, your Mac will automatically save the screenshots for you. By default, your screenshots will be saved on the desktop. If you have changed the default settings of the location to save the screenshots, you should find the target folder.
4. Can I recover deleted screenshots on Mac from emptied Trash?
Yes, it will be so easy to recover deleted screenshots on Mac from an emptied Trash with EaseUS Data Recovery Wizard for Mac.
- 1. Download this recovery program from the official website. You can choose the Trial version for Mac.
- 2. Launch the application and select the internal hard drive of your Mac to scan for deleted screenshots.
- 3. You can select the screenshots and preview them by clicking the eye icon. Then, you can recover them and save them to a new folder.
Was This Page Helpful?
Jaden is one of the editors of EaseUS, who focuses on topics concerning PCs and Mac data recovery. Jaden is committed to enhancing professional IT knowledge and writing abilities. She is always keen on new and intelligent products.
Dany is an editor of EaseUS who lives and works in Chengdu, China. She focuses on writing articles about data recovery on Mac devices and PCs. She is devoted to improving her writing skills and enriching her professional knowledge. Dany also enjoys reading detective novels in her spare time.
-
EaseUS Data Recovery Wizard is a powerful system recovery software, designed to enable you to recover files you’ve deleted accidentally, potentially lost to malware or an entire hard drive partition.
Read More -
EaseUS Data Recovery Wizard is the best we have seen. It's far from perfect, partly because today's advanced disk technology makes data-recovery more difficult than it was with the simpler technology of the past.
Read More -
EaseUS Data Recovery Wizard Pro has a reputation as one of the best data recovery software programs on the market. It comes with a selection of advanced features, including partition recovery, formatted drive restoration, and corrupted file repair.
Read More
Related Articles
-
This Volume Is Not Compatible with This Update When Installing macOS Sonoma
![author icon]() Brithny/Jun 30, 2026
Brithny/Jun 30, 2026 -
How to Delete Admin User on MacBook Pro/Air [Step-by-Step Tutorial]
![author icon]() Brithny/Jun 30, 2026
Brithny/Jun 30, 2026 -
5 Proven Solutions to Recover iMovie Projects on a Mac
![author icon]() Dany/Jun 30, 2026
Dany/Jun 30, 2026 -
Why Can't I Erase My Mac | Causes & Fixes
![author icon]() Finley/Jun 30, 2026
Finley/Jun 30, 2026