Many Mac users may see the problem message "This volume is not compatible with this update," which might disturb the seamless transition to the macOS Sonoma update. The reason is likely a compatibility issue between the previous volume setup and the updated needs.
Users facing this challenge may seek efficient ways to connect their systems easily with Sonoma's improvements. In this detailed guide, we look into the fundamental causes of this compatibility mismatch and direct consumers to a practical solution, ensuring a smooth updating experience.
Recover Data Before Reformatting the External Drive in APFS
As you try to overcome the "This volume is not compatible with this update" error during your macOS Sonoma installation, preparing the basis for a smooth transition is critical. Before beginning the reformatting procedure, we suggest you prepare for probable data loss using EaseUS Data Recovery Wizard for Mac.
EaseUS software allows you to protect your important files by easily recovering them in the event of formatting or other unexpected data loss circumstances, such as the volume is not mounted on macOS due to "com.apple.DiskManagement.disenter error 0".
The program simplifies external disk reformatting recovery with a simple interface. With compatibility with several file formats, EaseUS can retrieve documents, images, and videos after formatting.
Here are steps to recover a formatted hard drive on a Mac:
Step 1. Search for lost files
Select the disk location to search for lost files (it can be an internal HDD/SSD or a removable storage device) on macOS Sierra, High Sierra, Mojave, Catalina, Big Sur, Monterey, Ventura, and the latest Sonoma. Click the "Search for lost files" button.

Step 2. Go through the scanning results
EaseUS Data Recovery Wizard for Mac will immediately scan your selected disk volume and display the scanning results.

Step 3. Select the file(s) and recover
In the scan results, select the file(s) to preview and click the "Recover" button to have them back.

Share this article on social media to help others learn how to fix the error message "This volume is not compatible with this update".
Format the External Drive as APFS in Disk Utility
As you work to overcome the "volume is not compatible with this update" problem during your macOS Sonoma upgrade failed, converting your external drive to APFS (Apple File System) using Disk Utility is crucial.
This crucial operation assures compatibility with the upgrade and facilitates a seamless transition to the desired macOS Sonoma. We've created a thorough step-by-step tutorial to help you accurately erase and format your external drive.
Step 1. Launch "Disk Utility" from Launchpad or Spotlight or go to "Applications > Utilities > Disk Utility".

Step 2. Connect and find your external drive on the left side of the Disk Utility interface. Click on the external drive.
Step 3. Select the "Erase" option at the top of the Disk Utility window. Rename the drive if needed.
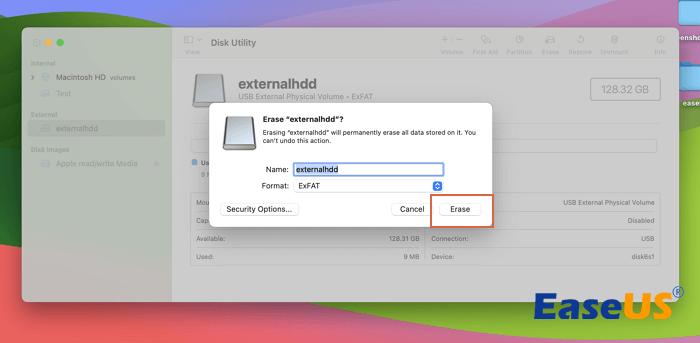
Step 4. Set the format to APFS for the best compatibility (APFS vs Mac OS Extended). Ensure that the scheme is set to GUID Partition Map.
Step 5. Click the "Erase" button in the confirmation box. To ensure the formatting was successful, use Disk Utility to examine the drive's current format.
Step 6. Click the drive's name on the left side to get more information. Make sure the Type section says "APFS Volume".
If your external drive is not shown in Disk Utility, for example, a WD hard drive is not showing up in Disk Utility, click "View" and then "Show all devices" to see all attached drives.

This Volume Is Not Compatible With This Update, Why
I formatted the HDD as APFS. When I tried to install Sonoma, I got the error: "This volume is not compatible with this update". From IFIXIT Web
During macOS Sonoma installation, you may get the baffling "This volume is not compatible with this update" issue, disturbing your system upgrade. The major cause of this problem is the external hard drive's file system format. To ensure compatibility and fix this problem, reformat the external hard drive in APFS (Apple File System) format.
This advice is derived from macOS Sonoma, relying on the APFS format for best performance. Adopting APFS allows smooth interaction with the most recent macOS upgrades, enabling your machine to bypass compatibility issues and continue with the installation process.
In the following sections, we'll walk you through the preparation procedures before reformatting and give extensive instructions for using Disk Utility to format the external drive in APFS, guaranteeing a seamless and error-free updating experience.
Conclusion
Strategic solutions are needed to overcome macOS Sonoma update issues like the "This volume is not compatible with this update" problem. We've covered how to reformat your external drive in APFS format using Disk Utility to improve compatibility. This detailed tutorial helps users easily fix this problem and optimize their machine for the newest macOS version.
EaseUS Data Recovery Wizard for Mac is the right tool for you; this adaptable program protects your data throughout system changes. The EaseUS experience is seamless and robust while recovering lost files or planning for data emergencies.
This Volume Is Not Compatible With This Update FAQs
Following are some queries "This volume is not compatible with this update" error that users ask:
1. How do we fix the update volume that could not be mounted for the target?
To use Disk Utility to repair a disk, you must first boot into a different volume. Therefore. Boot onto the Recovery volume or use Disk Utility to execute First Aid on all accessible volumes.
If the First Aid process has failed, consider using EaseUS Data Recovery Wizard for Mac to save the stored data first, and ask for help from specialists to fix the HDD/SSD errors.
2. Why do I have incompatible updates on my Mac?
These incompatible app updates are due to the applications needing updated versions of macOS, which you've not updated in a while. Thus, your current operating system might not support the new updates of some apps.
3. What is the updated volume on a Mac?
In macOS 11.1, the "Update" volume delivers macOS updates. However, this volume only appears if Finder is set to display drives and volumes. We recommend not to save or delete anything from the "Update" disk in order to keep your data safe and secure.
Was This Page Helpful?
Brithny is a technology enthusiast, aiming to make readers' tech lives easy and enjoyable. She loves exploring new technologies and writing technical how-to tips. In her spare time, she loves sharing things about her game experience on Facebook or Twitter.
-
EaseUS Data Recovery Wizard is a powerful system recovery software, designed to enable you to recover files you’ve deleted accidentally, potentially lost to malware or an entire hard drive partition.
Read More -
EaseUS Data Recovery Wizard is the best we have seen. It's far from perfect, partly because today's advanced disk technology makes data-recovery more difficult than it was with the simpler technology of the past.
Read More -
EaseUS Data Recovery Wizard Pro has a reputation as one of the best data recovery software programs on the market. It comes with a selection of advanced features, including partition recovery, formatted drive restoration, and corrupted file repair.
Read More
Related Articles
-
How to Recover Videos from a Nextbase Dashcam
![author icon]() Brithny/Jun 30, 2026
Brithny/Jun 30, 2026 -
Forgot MacBook Password No Question Mark
![author icon]() Jean/Jun 17, 2026
Jean/Jun 17, 2026 -
SD Card Says Full But Nothing on It Mac [with 5 Proven Fixes]
![author icon]() Brithny/Jun 30, 2026
Brithny/Jun 30, 2026 -
Restore Time Machine Backup | Restore Lost or Deleted Time Machine Backups
![author icon]() Tracy King/Jun 30, 2026
Tracy King/Jun 30, 2026