If you have a problem with the external hard drive not showing up on Mac, you might have struggled to fix it. Many people reported the same issue by saying that their Mac cannot recognize the external hard drive, including the Seagate external hard drive not showing up and the WD external hard disk not being detected or read on iMac or MacBook.
This guide covers all the troubleshooting tips to teach you. We will walk you through the reasons and fixes in detail. You can quickly check the eight methods from the following list:
- Fix 1. Reboot Your Mac
- Fix 2. Edit Finder Preferences
- Fix 3. Repair External Hard Drive with First Aid
- Fix 4. Mount External Hard Drive to Make It Showing on Mac
- Fix 5. Format External Hard Drive with Disk Utility
- Fix 6. Reset NVRAM
- Fix 7. Use Terminal to Troubleshoot
- Fix 8. Contact Data Recovery Services to Fix the External Hard Drive
First of all, we will provide you with a tip to recover your data if your external hard drive is corrupted or you accidentally lose your precious data.
How to Recover Data from Corrupted External Hard Drives on Mac
If you have confirmed that the external hard drive has been damaged already or you have formatted the external hard drive, you will need to recover data from an external hard drive on a Mac.
The most convenient method to recover data from a formatted or corrupted hard drive is using EaseUS Data Recovery Wizard for Mac Pro. Don't hesitate to download this 100% safe Mac recovery software now.
This powerful tool is designed to help users recover lost data on macOS, including the latest macOS Sonoma. It is a professional data recovery software that provides progressive and intelligent data-restoring solutions in any situation or condition of the storage drive. It can also recover data from unmounted external hard drives on a Mac.
In fact, it takes just a few seconds to operate and apply the efficient data recovery algorithm of EaseUS Data Recovery Wizard for Mac to recover deleted files on Mac. When you get the results, you can choose the files you want to save and what you don't need. Here are the easy steps to follow:
Step 1. Connect the external hard drive to your Sonoma/Ventura/Monterey Mac, and select "Search for lost files".

Step 2. You can choose a specific file type from the left side. For example, you can choose "Pictures" to restore missing photos from the external hard disk.

Step 3. Double-clicking the file can help you open a preview window. You can recover files after viewing the details by clicking "Recover".

If you think the tutorial is helpful, you can share this external hard drive recovery product with your family and friends!
Fix External Hard Drive Not Showing Up Mac (8 Working Ways)
After understanding how to recover data from a corrupted or formatted external hard drive on a Mac, it's time to fix this issue. Go through the section and learn different fixing methods in detail.
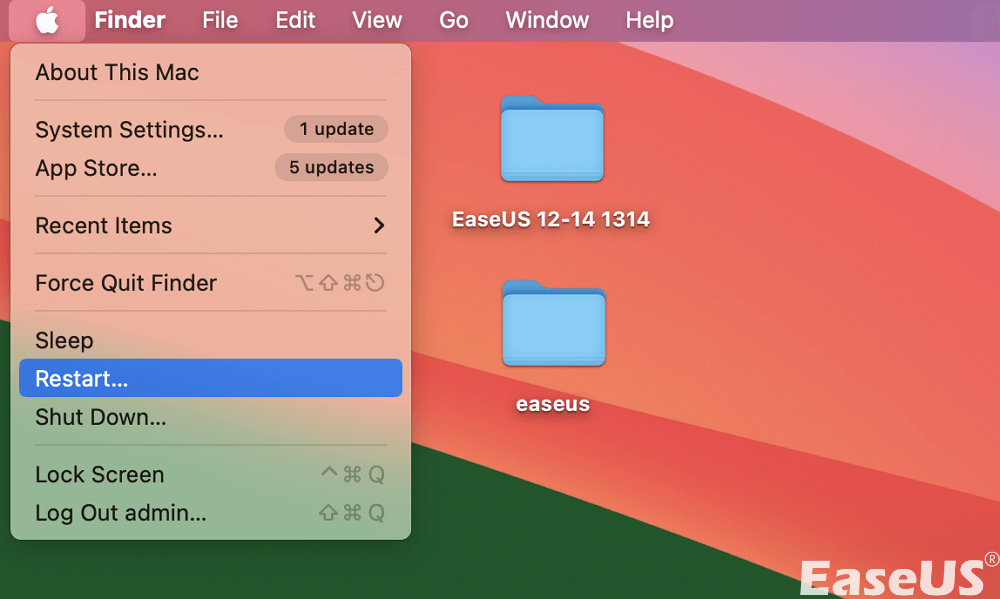
Fix 1. Reboot Your Mac
Rebooting your Mac is one of the simplest methods to fix minor data damages and show the hard disk in Mac. This solution has a pretty impressive success rate of fixing such initial issues in Mac. If you are dealing with the problem of the external drive not showing up on your Mac, follow these steps to reboot your Mac.
Click the "Apple logo" and select "Restart" to restart your MacBook Pro or Air. Hold the power button for a few seconds and press R when the dialog box appears. It will wipe up all the unnecessary data from the macOS memory and give it a fresh start. Once your Mac turns on, check if the external drive is visible on the Finder. If not, you need to edit the Finder preference by using the following fix.
Fix 2. Edit Finder Preferences
When you connect an external hard drive, check if it is showing in the Finder. You will need to edit the Finder preference to show external drives on the desktop if it's not showing. How to find an external hard drive on a Mac? Let's see how to fix this.
Step 1. At the top of the screen, go to the "Finder" menu and click "Settings". (You may see "Preferences" in macOS Ventura or other versions.)
Step 2. Select "General", and make sure the External disk and Hard Disk are checked under the "Show these items on the desktop" tab.

Step 3. Using the "Sidebar" tab, you can configure the Finder window's left column to display specific folders and devices.

The solution should solve the external hard drive not showing up on the Mac issue, and you can share this method on social media. If not, go with the next solution.
Fix 3. Repair External Hard Drive with First Aid
If your Mac is not identifying the external drive, there are possibilities of having errors in the disk. You can utilize the First Aid tool to check and perform disk repair on the Mac without losing the data. It is an inbuilt Mac tool that is designed to identify disk issues and attempt the necessary fixes. Check the following steps to fix it:
Step 1. Type Disk Utility in the Spotlight search bar.
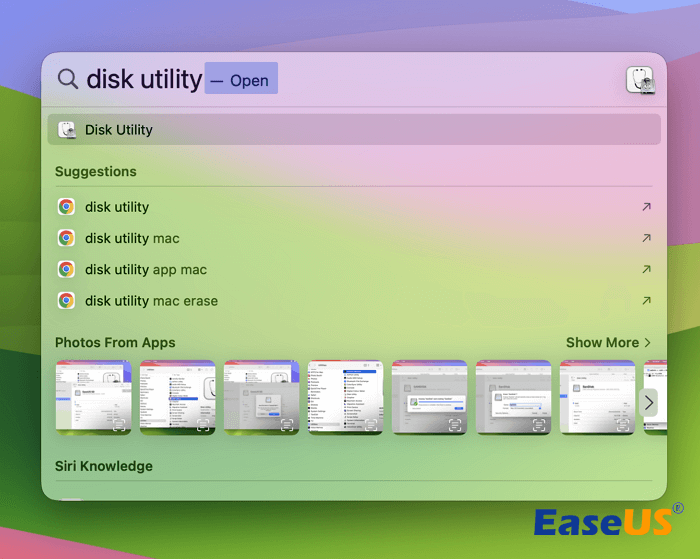
Step 2. You can see the icon for the application shown in the image below. Click to launch it.
Step 3. Click to explore the left side panel on the disk utility.
Step 4. Find and click the external hard drive that is not showing up otherwise.
Step 6. Select "First Aid" and then click on "Run". It will notify when the system finds an error on the hard disk.
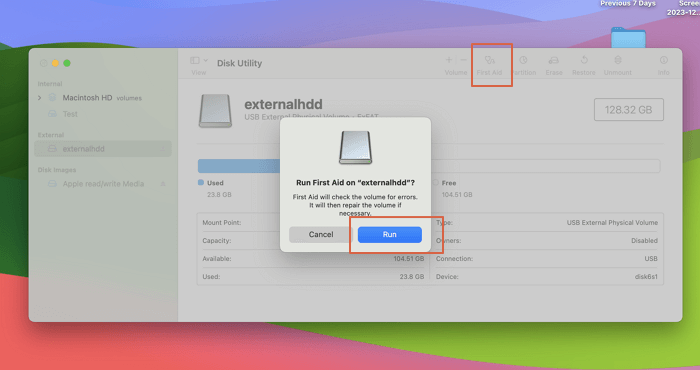
Step 7. Run First Aid again if it fails to fix the issue, and wait until the process ends.
If it still does not find any error, save the data to another drive and format the disk using the coming method. You can also run First Aid from the Recovery Mode:

Run First Aid from Recovery Mac | 3 Essential Steps
In this post, we have shared how to run First Aid from a recovery Mac when you cannot access the system. Read more >>
Fix 4. Mount External Hard Drive to Make It Showing on Mac
If your newly bought External hard drive is not mounted, it can not show up on Mac successfully. You can check the following tutorial to mount an external hard drive on the Mac:
Step 1. Press the Command key + Space bar to bring up the Spotlight Search menu.

Step 2. Type disk utility and press the Return key.
Step 3. Click the external hard drive in the left menu and "Mount" on the right top menu.
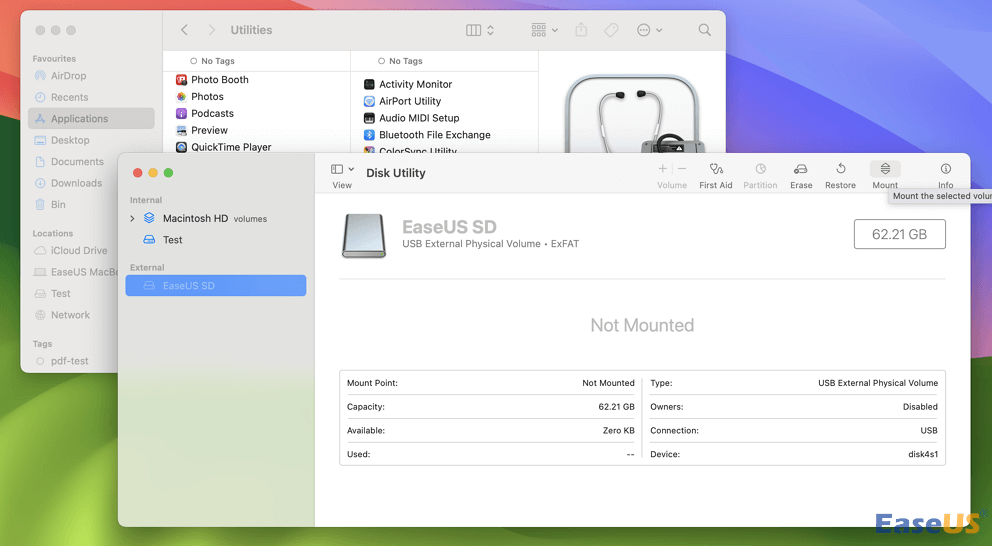
Later, the external hard drive will automatically show up on the desktop.
Fix 5. Format External Hard Drive with Disk Utility
If you formatted the external drive earlier on another device, the macOS might be unable to recognize it. You will need to format the drive to make it Mac-friendly, and the system will identify it without any issues.
You can also back up your external hard drive to a local disk with EaseUS Data Recovery Wizard for Mac:
Back Up Your Mac and Never Lose Data
Back up and restore your MacBook/iMac without Time Machine, iCloud, or external hard drives.
Here are the steps to properly format your external drive on Mac:
Step 1. Plug in the hard drive, then open Disk Utility from the Launchpad. Or Press CMD and Spacebar together and type Disk Utility.
Step 2. Select the external drive from the left-side panel that you want to format.
Step 3. Click the "Erase" Tab.
Step 4. From the drop-down menu, choose any macOS-compatible format. Select the drive format compatible with the Mac.
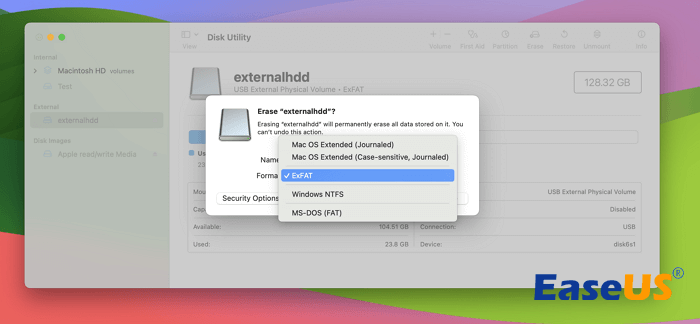
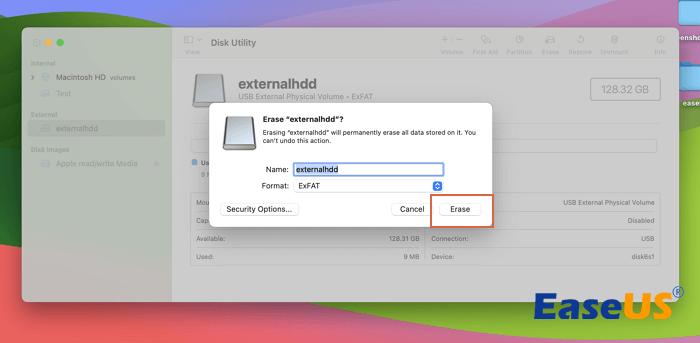
Step 5. Select the "Erase" option, and macOS will format the selected drive.
Fix 6. Reset NVRAM
The external drive not showing up issue should be fixed after the successful format. If not, the problem may exist in the nonvolatile random-access memory (NVRAM). The local setting of your Mac is stored on NVRAM, which can create bugs, and as a result, the system does not recognize the external drive. This method will help you to reset these settings by following the steps below.
Step 1. On the top of the screen, click the Apple logo and select "Restart".
Step 2. Press and hold the keyboard's Command + Option + P + R keys to boot up the system.
Step 3. It will lead your Mac to restart again. Release all the keys when the Apple logo appears on the screen or when you hear the shutdown sound.
Step 4. Wait until it boots up.
Note: If you are using a new generation of Mac, you will not need to restart it. Hold all the keys for 30 seconds, and the NVRAM will reset automatically. Check this post to learn how to reset NVRAM/PRAM on your MacBook Pro/Air.
Fix 7. Use Terminal to Troubleshoot
Using the Terminal app is a final fix for all non-tech-savvy users because they tend to find it complicated. In addition, most users find it a bit tricky to use. However, it can certainly fix the problem, and using the app is not that challenging. You can solve the external hard drive not showing up on the Mac issue by using the given commands and following the steps carefully. Let's do it together:
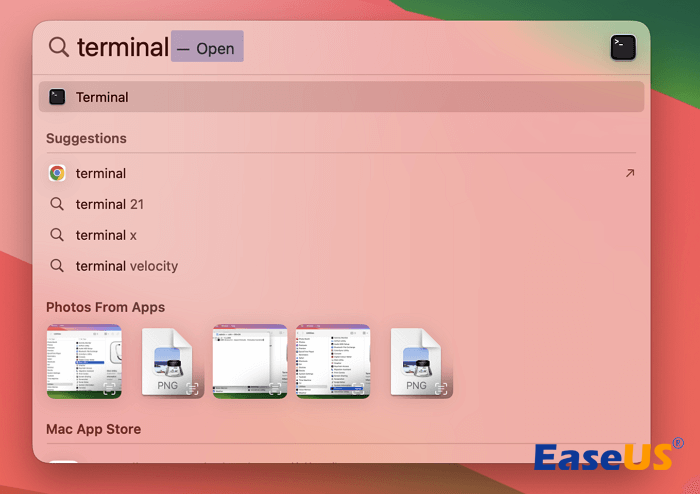
Step 1. Launch Terminal with the Spotlight.
Step 2. Type diskutil list and hit Enter to execute it.
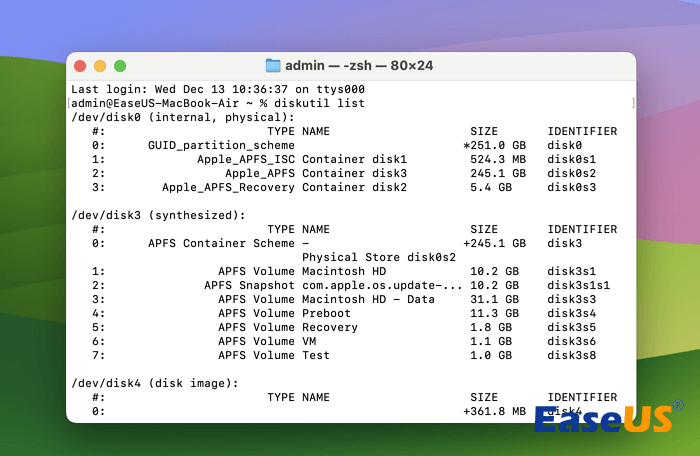
Step 3. You will see the list of connected storage drives to your system. Search the external drive that the Mac is not recognizing, or type /dev/disk* (external, physical) and press Enter. (Note: * is the identifying number of the disk.)
Step 4. Type in diskutil info disk*, and replace * with the identifying number of the disk. If the system successfully recognizes the disk, it will display the information on the screen.
Step 5. Use the diskutil eject disk* command to eject the drive in order to avoid data loss.
Step 6. If the drive disappeared from the list, remove it from your Mac's USB port.
Step 7. Close the Terminal and plug in the external drive to mount a new connection.
Fix 8. Contact Data Recovery Services to Fix the External Hard Drive
If you think the above methods are too complex or cannot fix the not-showing problem perfectly(Sometimes the external hard drive does not show up in Mac Disk Utility), try to contact EaseUS data recovery services. Our experts will help you solve the external hard drive issues without losing data. You can start a free diagnosis online right now!

Consult with EaseUS data recovery experts for one-on-one manual recovery service. We could offer the following services after FREE diagnosis
- Repair corrupted RAID structure, unbootable macOS, and corrupted virtual disk file
- Recover/repair lost partition and re-partitioned drive
- Unformat the external hard drive and repair the raw drive(Bitlocker encrypted drive)
- Fix disks that become GPT-protected partitions
Reasons for External Hard Drive Not Showing Up on Mac
The reasons for the unrecognized external drive can be different in different situations. This section will help you understand the most common reasons why users face this issue.
- 🔌Drive isn't connected properly: If your external device is not accurately connected, the Mac will not recognize your external device. Ensure the hard drive is connected, and check if the USB port works faultlessly.
- There are possibilities of a corrupted or broken hard drive causing the issue.
- ⚡USB or HDMI cable can be the culprit: If the cable is damaged from somewhere, it will break the connection. If you think the cable is completely fine, you may need to try another cable because there is the possibility of internal damage that might be invisible to you.
- ❌Temporary issues with your Mac: In many cases, macOS starts to experience some temporary problems if the Mac has not been restarted for a long time. Sometimes, restarting your Mac gives a kick-start to the operating system and removes errors.
- 📒File system issues: The external hard drive is unmounted or not readable on macOS.
Learning the reasons that may cause an external hard drive not to show up on a Mac is also very important, and you can mark this page or share it on social media to help more readers!
Final Thoughts
This article saved you from struggling to fix your external hard drive not showing up on the Mac. In addition, if you accidentally lost your data during the fixing process, we recommend you utilize the most advanced features of the EaseUS Mac data recovery software to restore lost data on Mac.
More FAQs About External Hard Drive Not Showing Up Mac
All the possible reasons and solutions are mentioned in this article. However, if you still have further questions, please follow this FAQs section.
1. Why is my external hard drive not showing up in the disk utility?
If your external hard drive is not showing up in the Disk Utility, go to the View tab and choose Show All Devices. If it is still not showing up, the drive might be physically damaged, and you will need to replace it.
2. How do I fix an external hard drive not detected on macOS Monterey?
Choose Preferences from the Finder menu at the top of the screen. Go to General. Ensure that the External disks option is checked. Next, click Sidebar and ensure the External disks checkbox is selected.
3. What do I do if my external hard drive is not recognized on Mac?
In the search bar, type System Preferences, then open Disk Utility. Click the Sidebar and check that the external disk is selected. Click the checkbox of the hard drive, and select Mount.
4. How do I revive a dead hard drive?
Double-check all cables and connections before trying to revive a dead hard drive. After this, try to find the cause of the hard drive failure. Apply the solution based on whether there is physical damage, logical damage, malware, etc.
Was This Page Helpful?
Dany is an editor of EaseUS who lives and works in Chengdu, China. She focuses on writing articles about data recovery on Mac devices and PCs. She is devoted to improving her writing skills and enriching her professional knowledge. Dany also enjoys reading detective novels in her spare time.
Cedric Grantham is a senior editor and data recovery specialist of EaseUS. He mainly writes articles and how-to tips about data recovery on PC and Mac. He has handled 10,000+ data recovery cases and is good at data recovery of NTFS, FAT (FAT32 and ExFAT) file systems, and RAID structure reorganization.
-
EaseUS Data Recovery Wizard is a powerful system recovery software, designed to enable you to recover files you’ve deleted accidentally, potentially lost to malware or an entire hard drive partition.
Read More -
EaseUS Data Recovery Wizard is the best we have seen. It's far from perfect, partly because today's advanced disk technology makes data-recovery more difficult than it was with the simpler technology of the past.
Read More -
EaseUS Data Recovery Wizard Pro has a reputation as one of the best data recovery software programs on the market. It comes with a selection of advanced features, including partition recovery, formatted drive restoration, and corrupted file repair.
Read More
Related Articles
-
SD Card Says Full But Nothing on It Mac [with 5 Proven Fixes]
![author icon]() Brithny/Jun 12, 2026
Brithny/Jun 12, 2026 -
How to Fix Mac Not Recognizing External Hard Drive [6 Proven Solutions]
![author icon]() Jean/Jun 12, 2026
Jean/Jun 12, 2026 -
How to Recover Unsaved Excel Files on Mac: Tested Methods (2026)
![author icon]() Tracy King/Jun 16, 2026
Tracy King/Jun 16, 2026 -
How to Make a Bootable USB Drive for Mac
![author icon]() Jean/May 03, 2026
Jean/May 03, 2026