When the error "com.apple.DiskManagement.disenter error 0" occurs, it is a sign that your Mac's disk management system is facing a mounting issue. In this guide, we've reviewed five effective methods to overcome this obstacle and regain control over your hard drive.
From checking connection issues to reformatting, we've reviewed some solutions that promise to resolve the "com.apple.DiskManagement.disenter error 0" error and put your disk back on track for seamless operation.
- Fix 1. Check Connection Issues
- Fix 2. Restart Your Mac
- Fix 3. Run First Aid in Disk Utility
- Fix 4. Mount the Disk via the Terminal
- Fix 5. Reformat the Problematic Disk
What Is com.apple.DiskManagement.disenter error 0
The "com.apple.DiskManagement.disenter error" message shows underlying issues with the drive or macOS, rendering the disk unmountable through the Disk Utility's Mount feature, which is necessary when you mount a disk on Mac.
Sometimes, you can find that your disk is mounted but can't be ejected or viewed. As a result, access to photos, videos, documents, and other files on the hard drive becomes impossible. This error appears with varying codes based on your macOS version and the connected hard drive.

Therefore, you might encounter the error alongside codes other than 0. For instance, you might see variations like "com.apple.DiskManagement.disenter error 49223/221" or "com.apple.diskmanagement.disenter error 119930868".
In addition, the "com.apple.DiskManagement.disenter error 49244" error means you can't access the external hard drive content.
Protect Data Before Fixing the External Disk Error 0
Facing the 'com.apple.DiskManagement.disenter error 0' on your Mac should not alarm you. There are easy fixes that you can apply to resolve this error.
However, before delving into these solutions, you must safeguard your data first. This is because unexpected disk issues can sometimes lead to data loss. As an all-in-one backup and recovery tool, EaseUS Data Recovery Wizard for Mac secures your valuable files with only three steps.
The EaseUS recovery software can recover permanently deleted files on Mac. Whether it's formatting, corruption causing the disk error, or accidental deletion, this software can recover your data swiftly and efficiently. It also can recover files from external hard drives not detected on Mac.
By creating a backup with EaseUS Data Recovery Wizard for Mac, you'll have a safety net in case the troubleshooting process affects your files. And you can perform the external hard drive recovery on Mac quickly with the backup. Check out the following steps:
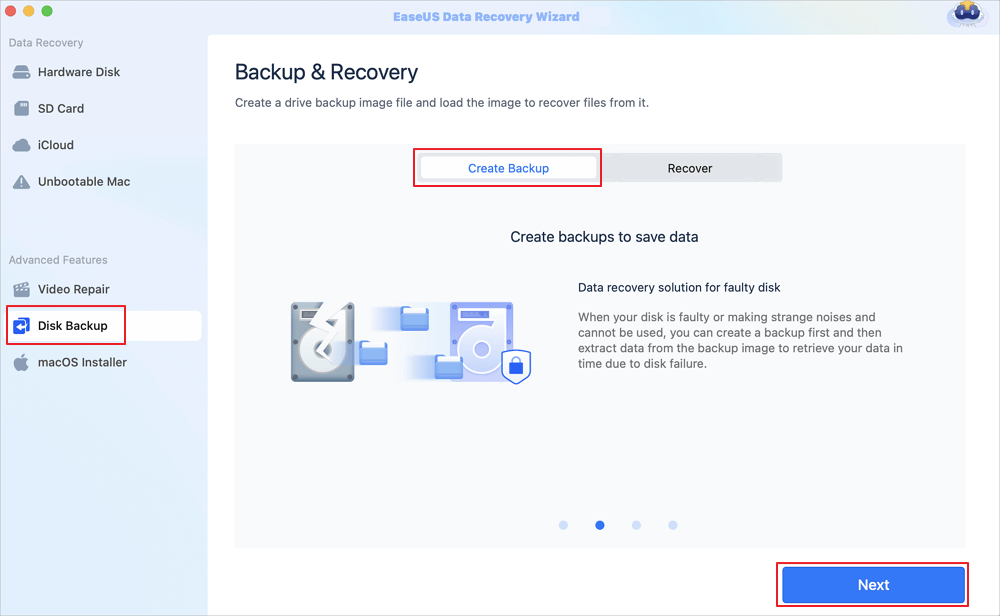
Step 1. Click "Disk Backup" > "Create Backup" > "Next" in EaseUS Data Recovery Wizard for Mac's main interface. You can create a drive backup image file in case the data is overwritten.
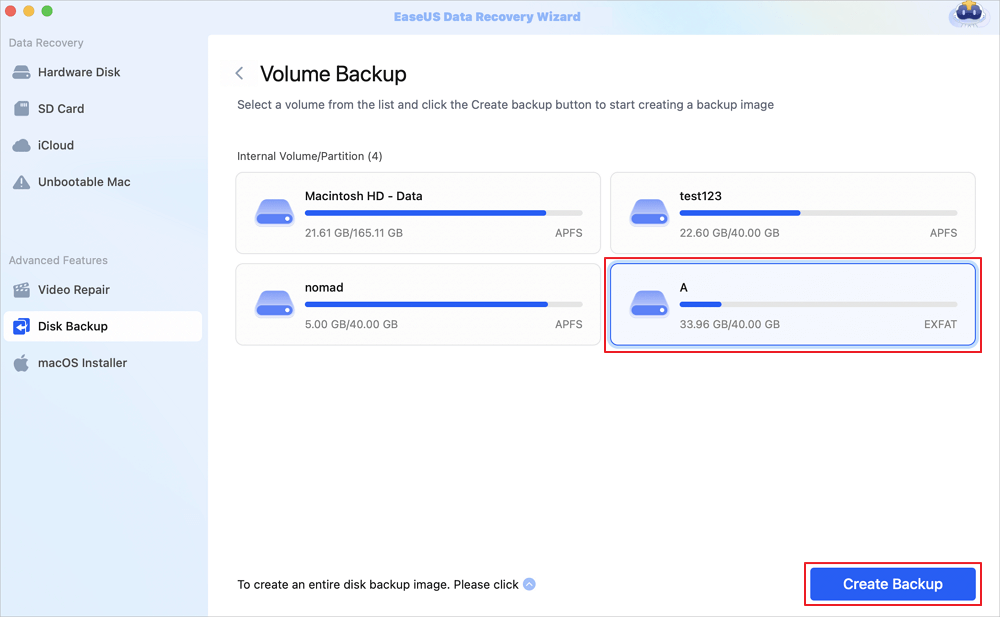
Step 2. Select an internal volume to back up, and click "Create Backup". If you want to create backups and recover data from an external hard drive, USB flash drive, or SD card, remember to connect the storage device to your Mac in advance.
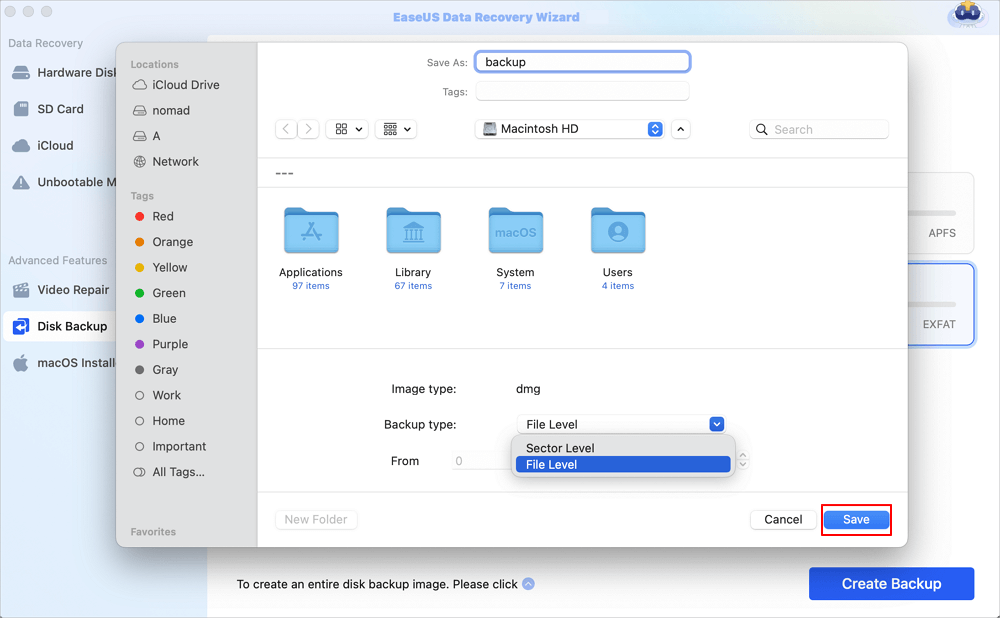
Step 3. Choose a place to save your backup files, and change the name of your backup file, then click "Save". It is not wise to save backups in the same storage device that you want to recover data from.
How to Fix com.apple.DiskManagement.disenter error 0 on Mac
Encountering the "com.apple.DiskManagement.disenter error 0" on your Mac can be frustrating and hinder normal disk operations.
Let's explore practical solutions to troubleshoot and fix this error and enhance the smooth functioning of your Mac's disk management.
Fix 1. Check Connection Issues
Ensuring a secure physical connection for your external hard drive is vital for smooth mounting. Be sure to confirm the cable and the functionality of the USB port before proceeding to the next steps.
To do this, disconnect and reconnect the drive. Alternatively, connect it using a different cable or insert it into an alternative USB port on your Mac. These simple techniques should aid in resolving the "com.apple.DiskManagement.disenter error 0" if it results from connectivity issues.
The "com.apple.Diskmanagement.disenter error 49218" occurs when mounting an external hard drive on your Mac unsuccessfully, which means you can't access stored data on the external hard drive, including stored documents, photos, videos, and more. In this case, use the professional data recovery software EaseUS Data Recovery Wizard for Mac to recover your lost data.
Fix 2. Restart Your Mac
Sometimes, an unsuccessful mount could be due to a temporary bug in macOS. Restarting or hard restarting your Mac is a simple solution to refresh the operating system and remove these temporary system errors.
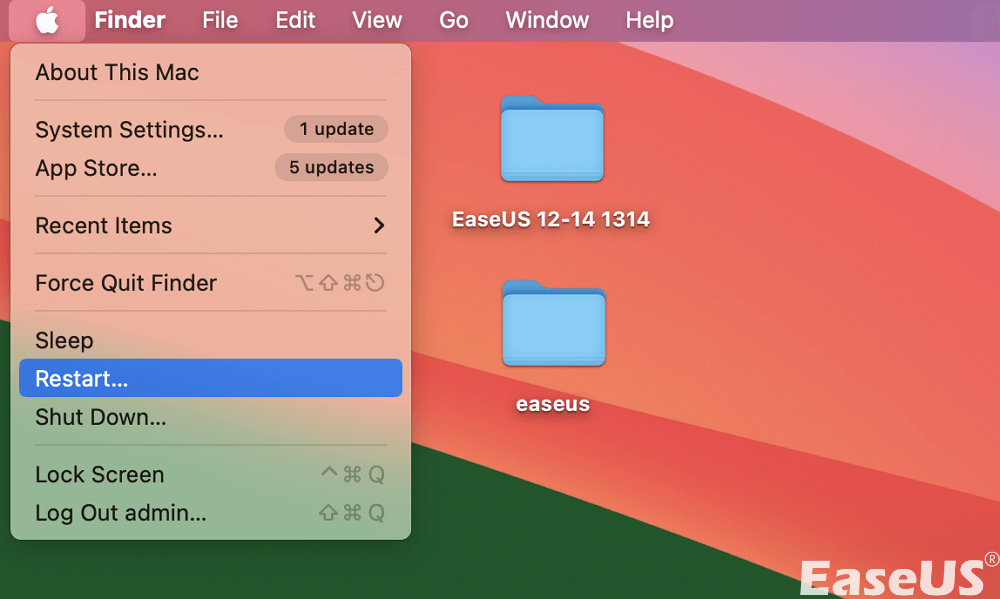
To restart your Mac:
Step 1. Click on the Apple icon at the top left corner of your screen.
Step 2. Select "Restart" from the drop-down menu.
If this doesn't resolve the issue, it's essential to verify the formatting of your hard drive. This is particularly relevant if you've previously used the drive on Windows or Linux machines.
macOS might not be compatible with all file system formats, meaning it won't be able to mount the disk and access its files.
Verify the compatibility of the drive's file system with macOS
When macOS can't read a drive, it won't be able to mount it. For instance, a Linux hard drive is not readable on a Mac. As of now, macOS supports the following file systems:
- FAT32
- APFS
- exFAT
- HFS+ (or Mac OS Extended)
- NTFS (with read-only support)
However, some users encounter this error when inserting an NTFS or exFAT drive into a Mac. This happens because the drive was formatted on Windows for cross-platform usage. Not all Windows allocation unit sizes (block sizes) are supported by macOS.
You can update your macOS to address this problem or reformat the drive on a Mac; for example, format a USB to FAT32 on a Mac. If this method doesn't word, install EaseUS Data Recovery Wizard for Mac to restore the stored data on the unmounted drive to avoid data loss.
Share this article on social media to help others learn how to fix the "com.apple.DiskManagement.disenter error 0" error on Mac.
Fix 3. Run First Aid in Disk Utility
The First Aid feature, accessible in Disk Utility, is helpful. It lets you verify and correct system errors concerning directory structure and formatting.
When faced with the "com.apple.DiskManagement.disenter error 0" message in Disk Utility, initiating a First Aid scan is advisable. To access First Aid:
Step 1. Launch "Disk Utility" via "Applications > Utilities".
Step 2. Select the unmounted drive from the left-hand list.
Step 3. Click on "First Aid" and proceed by clicking "Run".
After finishing the process, you'll see a detailed report, such as "First Aid found corruption that needs to be repaired". Ensure to address any errors flagged by First Aid during the scanning process. Suppose the First Aid process fails; don't panic; check out this article to solve the problem.

Disk Utility First Aid Process Has Failed [with 5 Proven Ways to Fix It]
This article discusses 5 proven ways to fix the First Aid process issues. Read more >>
Fix 4. Mount the Disk via the Terminal
Terminal, a command-line interface in Mac, can manage your operating system and implement various changes. In cases where mounting encounters logical errors leading to a refusal to mount the hard drive, Terminal can act as a conduit, granting you access to the system's core, allowing for hard drive mounting through command-line actions.
Follow these steps:
Step 1. Navigate to "Finder > Applications > Utilities" to open Terminal.
Step 2. Input diskutil list to display all drives on your Mac. Identify the unmountable drive by its identifier.

Step 3. Input diskutil mount /dev/disk1s2 command to mount the drive. Replace 'disk1s2' with the identifier of your unmountable drive.

Fix 5. Reformat the Problematic Disk
If other solutions fail to resolve the "com.apple.DiskManagement.disenter error 0", reformatting your hard drive should be your final attempt.
Reformatting is often effective for various disk issues since it wipes the drive clean and resets it. However, it's important to note that this approach has a drawback - it results in losing all data stored on the drive unless you make a backup before reformatting the external hard drive. If not, use EaseUS Mac data recovery software to recover the formatted hard drive on Mac.
Follow the steps below to reformat the hard drive on Mac:
Step 1. Open Disk Utility and select the hard drive you want to format in the left list.
Step 2. Click "Erase" in the top menu, choose a new format, and rename the hard drive if you want.
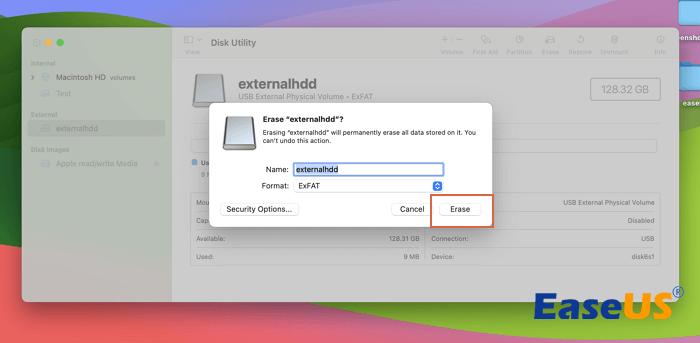
Step 3. Click "Erars" again to confirm.
If you aren't sure which format is better on macOS, this article may help you.

APFS vs Mac OS Extended [Beginner's Guide]
This article discusses which format is better on macOS: APFS vs. Mac OS Extended. Read more >>
If you don't have crucial data or have recovered any lost data, you can erase the drive and reinstall macOS via Recovery mode.
First, head to "Disk Utility", choose your drive, and erase the data. Afterward, return to the main window and initiate the "Reinstall macOS" process.
Conclusion
This article introduces 5 practical methods to fix the "com.apple.DiskManagement.disenter error 0" and rectify your disk issue on your Mac.
However, if you have accidentally deleted important data, you can use a data recovery tool like EaseUS Data Recovery Wizard for Mac to retrieve your data. This software helps you recover deleted documents, videos, music, and movie files. It is efficient and easy to use, even for beginners.
com.apple.DiskManagement.disenter error 0 FAQs
There are tons of frequently asked questions about the com.apple.DiskManagement.disenter error 0. These include:
1. How do you fix a hard drive that won't mount on a Mac?
For resolving a Mac drive that won't mount, use these solutions:
- Remount your disk connection in Disk Utility.
- Restart the Mac.
- Reformat the drive.
- Adjust display settings for your macOS drive.
- Reconnect the drive to your Mac.
- Utilize Disk Utility's "First Aid" feature.
The methods mentioned above also work when the "couldn't unmount disk. : (-69888)" error occurs on your Mac.
2. How do I force my Mac to mount a hard drive?
To force your Mac to mount a hard drive, here are the steps to follow:
Step 1. Establish the connection with the drive on your Mac.
Step 2. Launch "Disk Utility" on your system (navigate to Finder > Applications > Utilities and open Disk Utility).
Step 3. Identify and choose your external HDD in the sidebar.
Step 4. Click on the "Mount" option at the top.
3. Why can't I unmount my hard drive Mac?
This error can arise from various factors, such as an abrupt system shutdown and an inconsistent file system. Other causes contributing to this error include:
- Human Error: Incorrectly deleting or formatting files or data during ongoing operations can trigger disk errors.
- Interruptions in Read/Write Operations: Disruptions during data access or system operations can lead to data loss or corruption.
- Forced or Accidental Data Formatting: Accidentally deleting critical systems or data files can result in data loss or erroneous disk functioning.
- Virus Attacks: Malicious software attacks can compromise data integrity, often stemming from unsafe software or unauthorized website access.
Other causes can be system-related, such as bootstrap errors, incorrect kernel installation, hardware or software failures, etc.
Was This Page Helpful?
Brithny is a technology enthusiast, aiming to make readers' tech lives easy and enjoyable. She loves exploring new technologies and writing technical how-to tips. In her spare time, she loves sharing things about her game experience on Facebook or Twitter.
-
EaseUS Data Recovery Wizard is a powerful system recovery software, designed to enable you to recover files you’ve deleted accidentally, potentially lost to malware or an entire hard drive partition.
Read More -
EaseUS Data Recovery Wizard is the best we have seen. It's far from perfect, partly because today's advanced disk technology makes data-recovery more difficult than it was with the simpler technology of the past.
Read More -
EaseUS Data Recovery Wizard Pro has a reputation as one of the best data recovery software programs on the market. It comes with a selection of advanced features, including partition recovery, formatted drive restoration, and corrupted file repair.
Read More
Related Articles
-
How to Delete Other Users Storage on Mac [Undelete Tips Included]
![author icon]() Brithny/Jun 30, 2026
Brithny/Jun 30, 2026 -
How to Fix MP4 Not Compatible with Quicktime on Mac? 7 Ways to Repair MP4 Video on Mac
![author icon]() Jaden/Jun 26, 2026
Jaden/Jun 26, 2026 -
How to Recover Deleted DNG Files on Mac and How to Open Them
![author icon]() Jaden/Jun 30, 2026
Jaden/Jun 30, 2026 -
How to Recover Data from the Dead Mac in 2026 [Pro/Air]🍎
![author icon]() Tracy King/Jun 17, 2026
Tracy King/Jun 17, 2026