External hard drive (HDD) is one of the most essential pieces of storage equipment for a personal computer. Its capacious storage can hold massive data of all kinds, particularly large movies, photos, and videos. And, because it's portable, it can be used to transfer data from one computer to another. Or, if the compatibility is not an issue, it can be used on multiple devices and different platforms!
But what to do if connecting an external hard drive to Mac but Mac not recognizing external hard drive? How do you proceed with the tasks of data copy, data transfer, data backup, or any purposes that require an external USB storage drive?
Why External Hard Drive Not Recognized? Reasons Are...
Lots of factors can result in the frustrating situation in which you followed the same way to connect a hard drive to a Mac but it's not showing up as usual. There has to be something wrong. But you don't need to worry, some cases are not a big deal, though some are really tough cases that need some endeavor to fix them.
In general, the reasons why an external hard drive cannot be recognized are associated with the connector you use, corrupted file system, partition problems on the external hard drive like bad sectors, outdated driver, or virus infection on Mac. All those are potential culprits that make your Mac fail to detect or recognize an external hard drive.
Follow our 6 tips here for Mac not recognizing external hard drive for a rectification. You may find that most of the attainable fixes are based on Disk Utility (Solution #3-#5), the default application installed on Mac machine, so you can hopefully fix a not recognized external hard drive on Mac without paying a penny.
EaseUS Data Recovery Wizard for Mac
- Recover lost or deleted files, documents, photos, audio, music, and emails effectively
- Recover files from external hard drive on Mac, as well as emptied Trash bin, memory cards, flash drives, digital cameras, and camcorders
- Support data recovery for sudden deletion, formatting, hard drive corruption, virus attack, and system crash under different situations
#1. Check the Connection
One top concern is with the connection. It's easy to identify, whereas the most likely to cause an external hard drive not showing up. There are several directions and ways to check issues for a connection, primarily the USB port and the connection cable.
- Make sure that the connection between a USB/eSATA cable and the USB port is tight enough, not loose.
- Are there other USB ports available? Try to connect the drive to other USB ports. See if the problem persists.
- Only one USB port on your Mac? If necessary, use other devices which can be connected to the USB port, see if Mac can recognize this device normally.
- Otherwise, can you find another Mac? Try to connect the drive to the other one. Is it showing up there?
If all the answers to the given examples are negative, you got a connection issue, and you can just deal with the problem by changing a cable or USB port. On the contrary, if your case has been completely excluded from this cause, go on with the rest solutions behind.
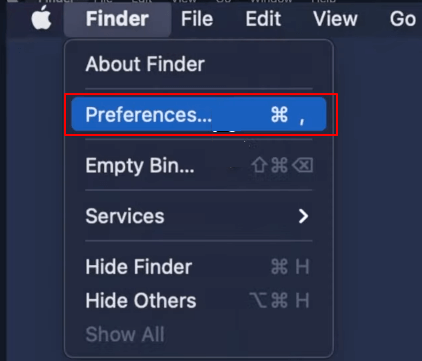
#2. Tweak Settings in Preferences in Apple Finder
Only when you enable the option to show external disks in Finder settings can you see the external hard drive shortcut on your Mac screen.
Step 1: On your Mac, click the Finder icon in the dock, and then choose Finder > Preferences.
Step 2: Under the General tab where you'll choose what items to show on the desktop, you should tick the option "External disks". (The option has been turned on? Skip it and follow the other methods)
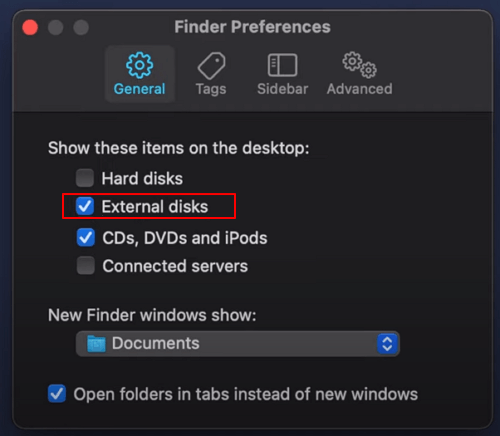
Close the Finder preferences window, you can see the external hard drive showing up on the Mac desktop.
#3. Disk Utility - Mount External Hard Drive
Usually, your Mac can automatically mount any hard drives connected via one of its USB ports, to be able to read and write data on it. There are times that your external hard drive didn't mount on Mac so it fails to show itself up. Nonetheless, you can do your own to mount an external hard drive manually on Mac in Disk Utility, which is a hard disk management application that is built-in Mac operating system by default.
If this is the case for you, when you open the Disk Utility location here you may receive some error messages implying it's the dismounting issue that causes your external hard drive not showing up normally, like Mac cannot mount the disk.
How to Recover Data from Unmounted External Hard Drive on Mac
When an external hard drive becomes inaccessible or unrecognized on your Mac computer, check it in Disk Utility. If it shows as unmounted, you'll need to mount the external hard drive and make it recognizable.
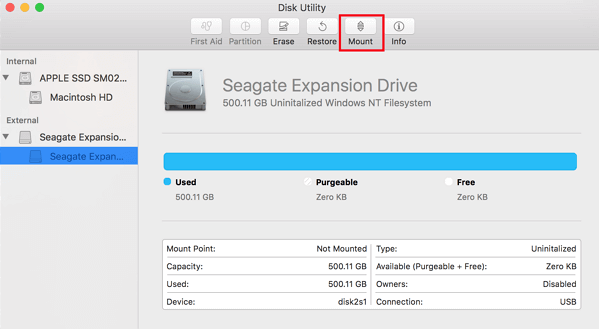
Step 1: To open Disk Utility, which you'll need to apply #solution 4 and #solution 5, click the Finder icon in the dock > Applications in the sidebar > double-click the Utilities folder > double-click Disk Utility to launch it.
Step 2: Check the external hard disk in the left sidebar, highlight your hard drive and click Mount.
Mount the disk doesn't solve the problem, either? You might move on to do some repair then.
#4. Disk Utility - Check and Repair External Hard Drive Corruption
The First Aid feature in Disk Utility is to find and repair disk errors like file system corruption, bad sectors, and so on.
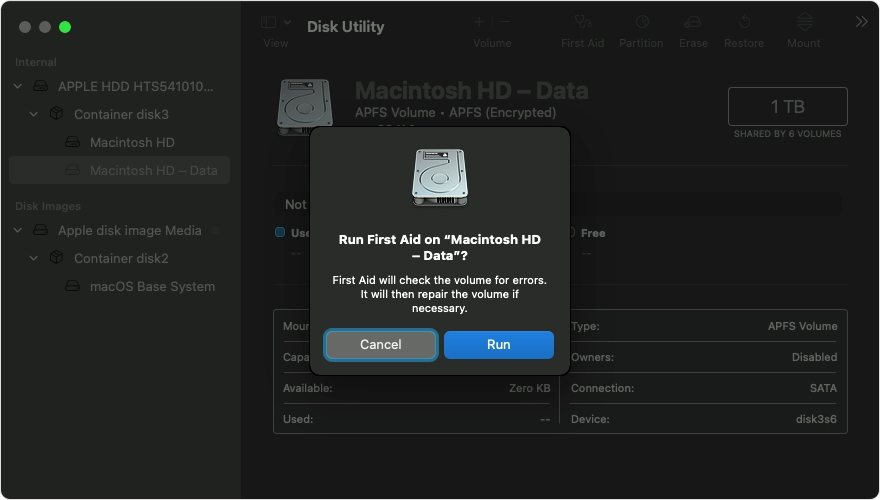
Step 1: Stay in Disk Utility, highlight and select the very external hard drive in the left sidebar as well, this time click the First Aid button.
Step 2: First Aid will check the volumes for errors and will then repair the volume if necessary. Once confirmed, click Run.
#5. Disk Utility - Erase and Format External Hard Drive to APFS/ExFAT
Formatting a disk is simple yet effective in resolving most of the hard drive issues, usually with logical errors. Volumes problems on an external hard drive that has a corrupted file system or the file system are not compatible with the current macOS would hugely cause Mac not recognizing the drive.
- Warning
- Despite it's a solution that is very basic, easy to operate, and obtainable on Mac, we don't recommend you try it in the first place because formatting a disk will erase data in it. To get back the data, you'll only depend on a third-party Mac data recovery tool.
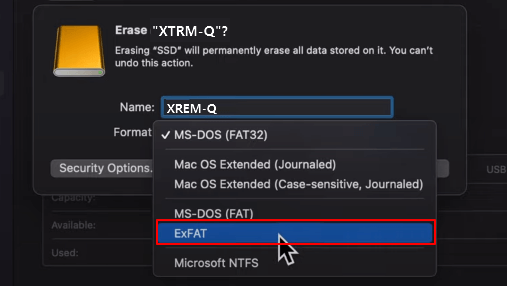
Step 1: In Disk Utility, this time you'll click the Erase button to format the selected external hard drive.
Step 2: The critical step here is to choose a proper file system for the external hard drive. From the Volume Format drop-down list, you should choose APFS or ExFAT which Mac can recognize, and click Erase.
#6. Recover Data from Not Recognizing External Hard Drive on Mac
The former five tips are tested effective in dealing with an external hard drive issue on Mac, and most of the methods are based on Mac's default disk management utility, so you can hopefully fix a not recognized external hard drive on Mac by yourself without paying money. Whenever you lost data when the external hard drive not showing up or recognized on Mac, you can feel free to download EaseUS Mac hard drive recovery software to perform a full data recovery.
Step 1. Search for lost files
Correctly connect your external hard drive to your Mac. Launch EaseUS Data Recovery Wizard for Mac, and select the external hard drive. Then, click "Search for lost files" to find lost/deleted files on your external devices.

Step 2. Filter and find lost files
After the scan, all file types will be presented in the left panel. Select the file type to find wanted files on your external devices.

Step 3. Preview and recover
Click the file and preview it. Then, select the files you want to recover and click the "Recover" button. You can save your data to local and cloud drives.

Was This Page Helpful?
Brithny is a technology enthusiast, aiming to make readers' tech lives easy and enjoyable. She loves exploring new technologies and writing technical how-to tips. In her spare time, she loves sharing things about her game experience on Facebook or Twitter.
Jean is recognized as one of the most professional writers in EaseUS. She has kept improving her writing skills over the past 10 years and helped millions of her readers solve their tech problems on PC, Mac, and iOS devices.
-
EaseUS Data Recovery Wizard is a powerful system recovery software, designed to enable you to recover files you’ve deleted accidentally, potentially lost to malware or an entire hard drive partition.
Read More -
EaseUS Data Recovery Wizard is the best we have seen. It's far from perfect, partly because today's advanced disk technology makes data-recovery more difficult than it was with the simpler technology of the past.
Read More -
EaseUS Data Recovery Wizard Pro has a reputation as one of the best data recovery software programs on the market. It comes with a selection of advanced features, including partition recovery, formatted drive restoration, and corrupted file repair.
Read More
Related Articles
-
Recover Data from Unmountable Hard Drive on Mac
![author icon]() Cedric/Jun 30, 2026
Cedric/Jun 30, 2026 -
How to Delete Admin User on MacBook Pro/Air [Step-by-Step Tutorial]
![author icon]() Brithny/Jun 30, 2026
Brithny/Jun 30, 2026 -
Xcode Not Working on macOS Sonoma? How to Solve
![author icon]() Jaden/Jun 17, 2026
Jaden/Jun 17, 2026 -
Battle of Hard Drives: Fusion Drive vs. SSD vs. HDD. Which Is Better?
![author icon]() Cedric/Jun 17, 2026
Cedric/Jun 17, 2026