-
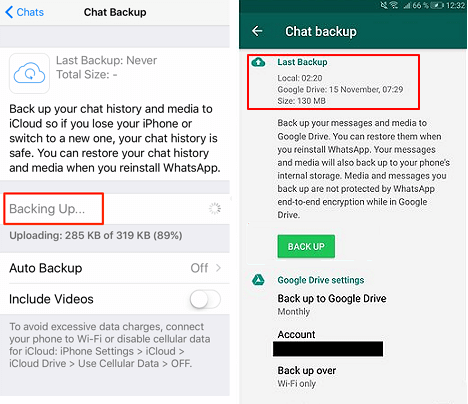
![]() How to Repair/Recover Corrupted Files Using Command Prompt
How to Repair/Recover Corrupted Files Using Command Prompt July 23,2026
 6 min read
 -
![]()
-
![]()
-
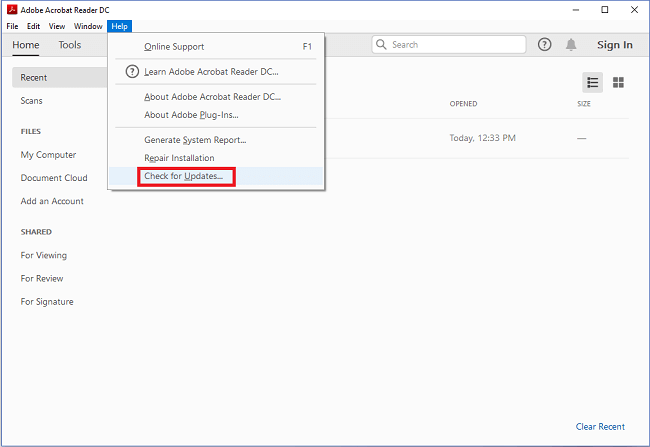
![]() PDF Won't Open? 3 Quick Ways to Fix 'can't open pdf' Error on Windows/MacJuly 23,20266 min read
PDF Won't Open? 3 Quick Ways to Fix 'can't open pdf' Error on Windows/MacJuly 23,20266 min read -
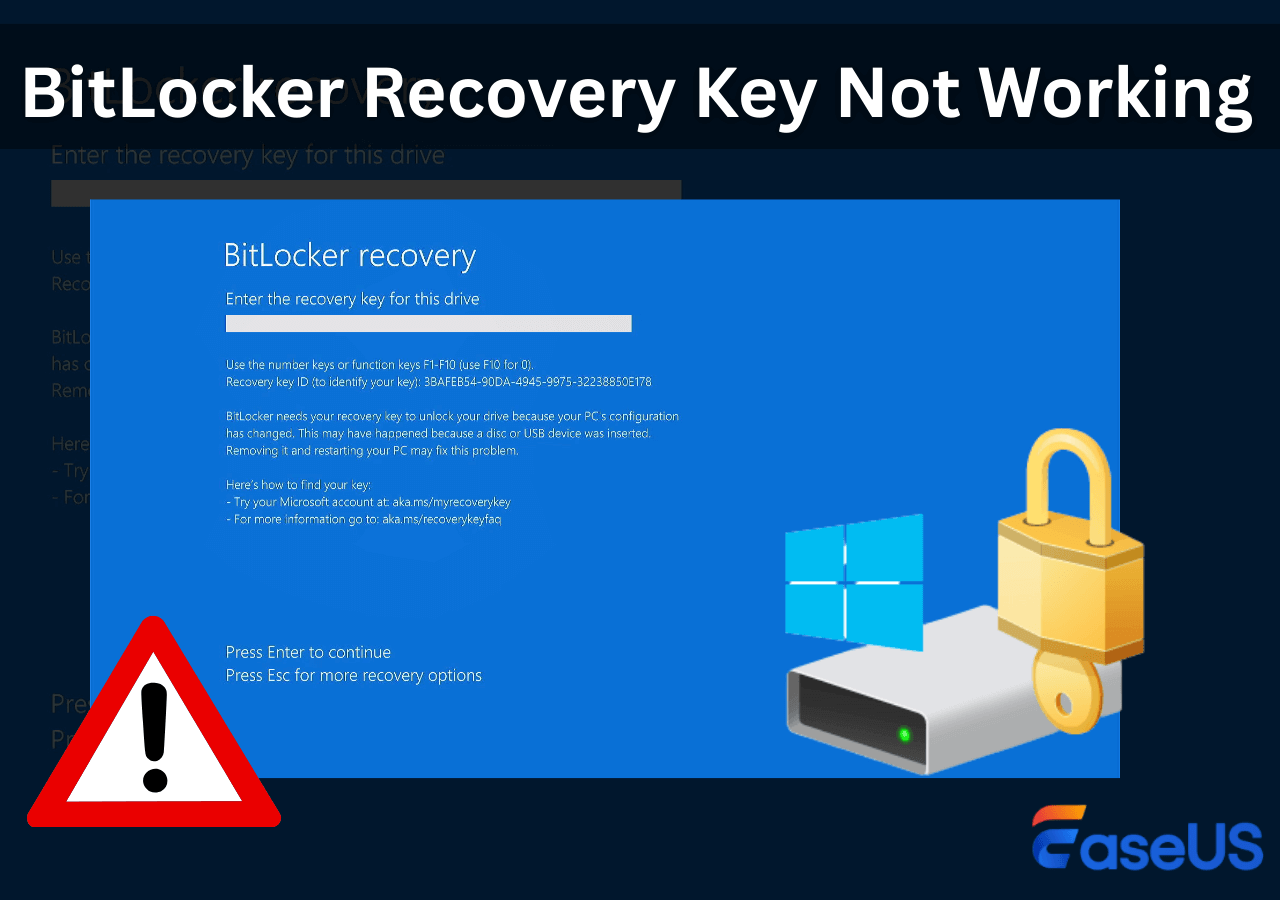
![]() How to Fix BitLocker Recovery Key Not Working | No Data LossJuly 23,20266 min read
How to Fix BitLocker Recovery Key Not Working | No Data LossJuly 23,20266 min read -
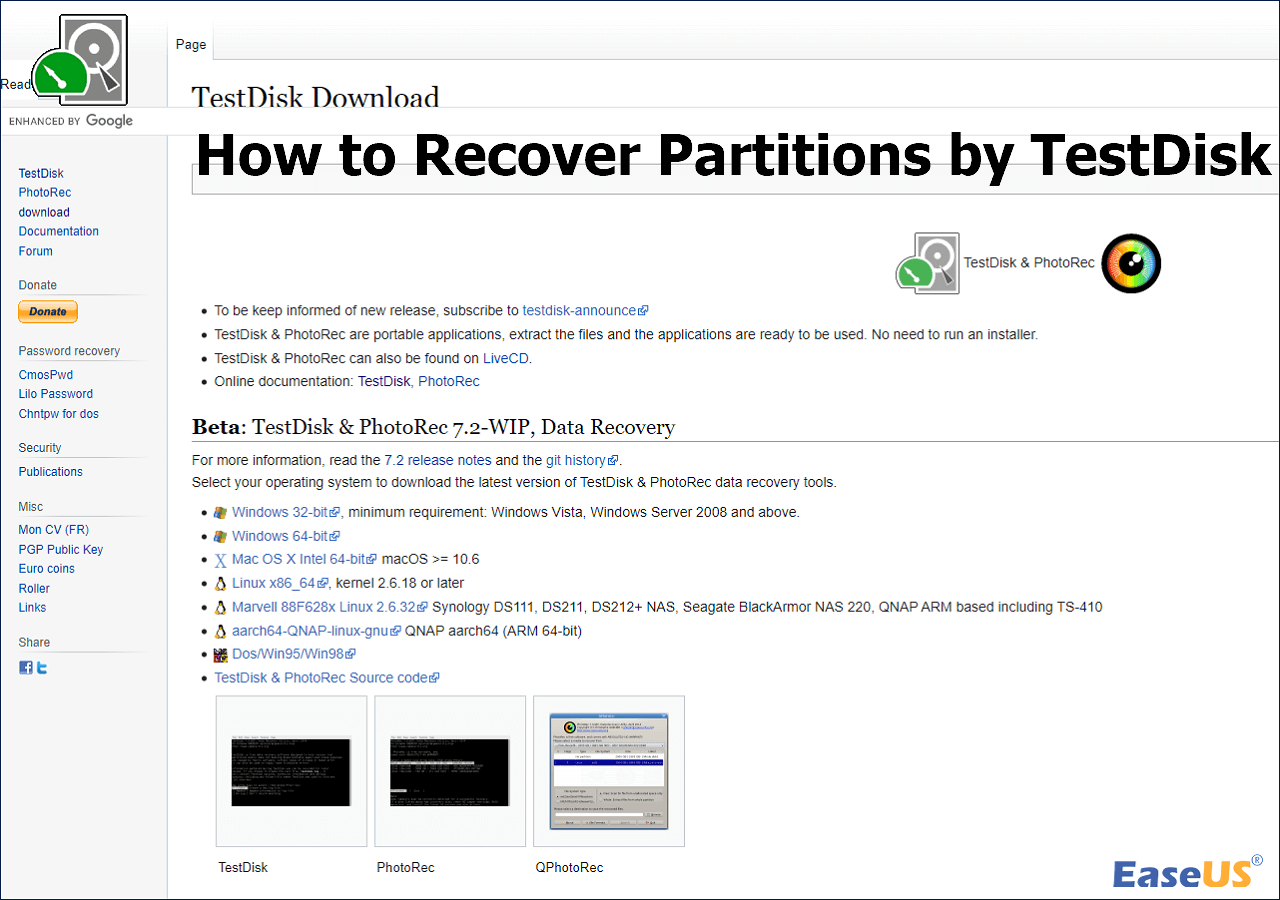
![]() Perform TeskDisk Partition Recovery [with Alternative]July 23,20266 min read
Perform TeskDisk Partition Recovery [with Alternative]July 23,20266 min read -
![]() How to Fix Excel Found Unreadable Content Error (Easy Guide)July 23,20266 min read
How to Fix Excel Found Unreadable Content Error (Easy Guide)July 23,20266 min read -
![]() [Official & Latest] EaseUS Data Recovery Wizard License Code 18.1.0July 23,20266 min read
[Official & Latest] EaseUS Data Recovery Wizard License Code 18.1.0July 23,20266 min read -
![]()
-
![]() Data Recovery Software with Original File Names [Full Guide in 2026]July 23,20266 min read
Data Recovery Software with Original File Names [Full Guide in 2026]July 23,20266 min read
Page Table of Contents
Learn several effective ways to find scanned documents on Mac and Windows:
| Workable Solutions | Step-by-step Troubleshooting |
|---|---|
| How to Find Documents on Mac |
Method 1. Find the scanned files on Mac...Full steps Method 2. Scan Documents via Software...Full steps |
| Where Do Documents Go on Windows |
Method 1. Check Pictures folder in Windows...Full steps Method 2. Find scanned files by checking...Full steps |
How to Find or Re-scan Your Documents on Mac
The documents can be located by Mac users using the Finder or Spotlight. In the Finder or Spotlight window, type your search terms into the search field, such as the file types or file name.
Scanned files and photos are saved by default on your Mac device's pictures folder. Here is how to access the Pictures folder using Finder on Mac:
- Go to "Finder" and then select "Home."
- You can find the photographs folder when the Home pane in Finder appears.
Method 1. Go to the Scanned Files Location You Choose
Where do scanned files go on Mac? As mentioned, when you try to scan a document on Mac, you will be asked to choose the storage folder. All you need to do is to remember the location you chose. Then, navigate to the location on Mac. By default, scanned image, pdf file, and multiple documents, etc., are saved automatically in your Mac's "Pictures" folder. To open the "Pictures" folder on Mac:
Step 1. Open "Finder > "Go" > Home" on your Mac.
Step 2. When your Home window opens in Finder, locate the "Pictures" folder. Double-click the icon to open it.

Then, you can view the Scanned files on Mac. Where are scanned files kept on Mac, furthermore? Typically, the Scanned Document subdirectory of the Documents folder is where scans are saved by default. If you wish to change that manually, you can just relocate the entire Documents folder.
Method 2. Recover the Lost Documents via Software on Mac
The method mentioned above has fewer disadvantages. If the important documents are missing or deleted, or the Mac PC does not put your files into the correct path or destination, the files just disappear. Thus, we want to recommend professional Mac data recovery software.
In order to assist Mac users in recovering lost documents such as unsaved Word documents, EaseUS Data Recovery Wizard for Mac is a better choice. Additionally, it may assist Mac users in recovering unsaved Pages and documents on Mac from media devices like cameras and iPods and recovering deleted files on Mac. The EaseUS Data Recovery Wizard will quickly and deeply scan all of your lost Mac data and recover the files you require without any effort.
You can run EaseUS Data Recovery software on both Mac and Windows PCs. You can choose one according to your computer OS.
Follow the details below to find the recover deleted scanned documents on Mac.
Step 1. Select the drive to be scanned
In the main EaseUS Data Recovery Wizard window, there will be a list of the drives connected to your Mac. Select the drive you need to recover lost/deleted files from, and click the "Search for lost files" button.

Step 2. Select your lost data/files
EaseUS Data Recovery Wizard for Mac will immediately scan your selected disk volume and display the scanning results on the left pane. You can sort the results to find the wanted files if you are looking for certain files.

Step 3. Recover lost/deleted data
Once you have found the desired files, preview the files and then click "Recover" to begin the recovery of your deleted/lost Mac files.

How to Locate the Lost Documents on Windows 10
Then, how to locate the scanned document on Windows 10 or Windows 11? This question are frequently asked by Windows PC users.
Hi, Everyone - Possibly a very simple question to those who know; previously, on Windows 7, when I scanned a document from my wireless printer to my laptop, the scan used to go into "my documents folder." Now, on Windows 10, it seems to put the scan into any obscure folder attached to "my document" folder. It's hard to find after scanning. How do I determine which folder the scans go to?
It's annoying to be unable to find your newly scan documents on your hard drive. Here, we will explore the best way to deal with the missing documents issue and how to change the settings so that this issue never occurs again. Read on to find out how to do it.
Method 1. Check the Pictures Folder in Windows 10
Usually, when you connect a scanner or printer to your computer, Windows PC saves the documents in either the "My Documents" or "My Scans" folder by default.
But for a Windows 10 user, you may recover deleted files in the "Pictures" folder, especially if you choose saved them as images, such as .jpg, .jpeg, or .png.
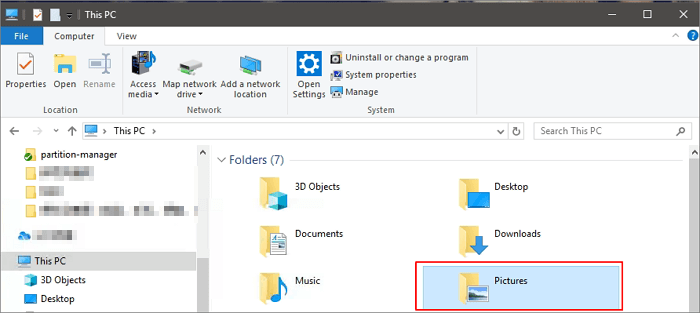
Step 1. Open "This PC" on your desktop.
Step 2. Select the "Pictures" folder to find the scanned files in this folder and recover files from folder.
If you fail to find the scanned files, you can search your entire hard drive for them.
Show hidden files in USB attrib command
On this page, you can learn how to show hidden files in USB flash drives, pen drives, hard drives, memory cards, pen drives using Control Panel, CMD, and EaseUS software.

Method 2. Find the Scanned Files by Checking the Scan Utility
When you are unsure about the file types of your scanned file compression, you can check your scan app to find the default storage folder. Then, you can locate the scan documents. Here are the steps to check the built-in scan programs on Windows 10.
Step 1. Click the search button in your Taskbar and input Scan.
Step 2. Choose the app "Windows Fax and Scan" by clicking it.
Step 3. Select the "Scan" button at the bottom left corner of your screen inside the "Windows Scan" application.
Step 4. Here, choose the "Save as" option. The default save location for scans is the "Scanned Document" subfolder of the "Documents" folder in the dialog box. (If you want to change that manually, you can move the entire Documents folder to a new location.)
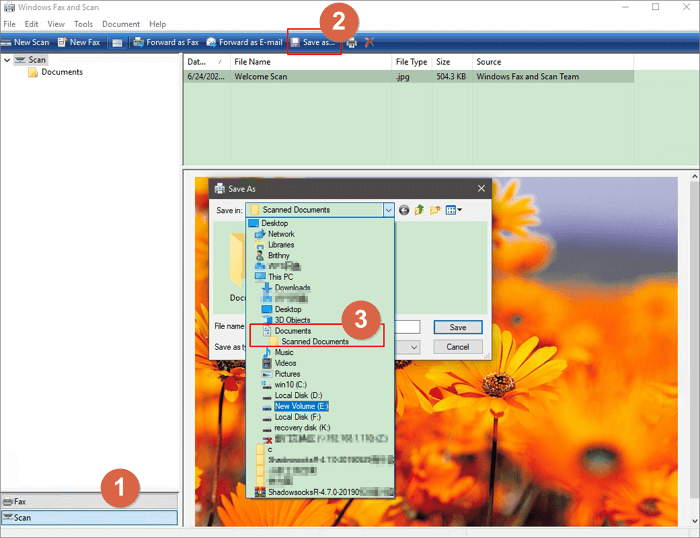
Step 5. Then, you can navigate to "This PC > Documents > Scanned Document" to find the scanned files on your Windows 10/8.1/8/7 PC.
Depending on the scanner you're using, you might have specialized software installed on your PC. (For example, if you use an HP scanner, you must find scanned files from HP Solution Center). If you have any difficulty finding your files, for example, unhiding hidden files in USB caused by virus using the above-mentioned method, it is recommended that you check the original software of your scanner as well.
LEARN MORE
Still curious? Click here to learn about how to recover hidden files on the hard drive.
If one of the methods is helpful to find scanned document on Mac, share it on Facebook, Twitter, Instagram, and other social media platforms!
Scanning Tips: Where Do Scanned Files Go on Mac
Before you wonder where the scans go on Mac, consider that did you apply the right method for scanning on Mac. You can learn how to scan a document on Mac with Image Capture.
Step 1. Turn on your scanner and, connect to your Mac, place a document you want to scan in the scanner.
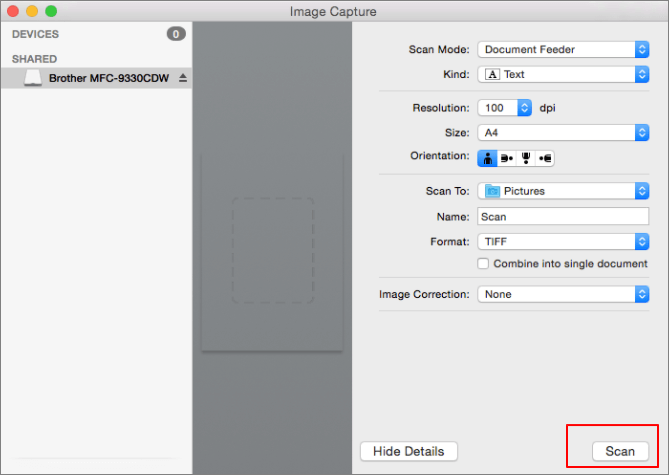
Step 2. Open "Image Capture" on Mac.
Step 3. Select your scanner from the pane at the left of the main window.
Step 4. In the Pictures drop-down menu, select a destination for the scan. Here, I select the "Picture" folder.
Step 5. Select a file size for the bounding box. US Letter is the default, and you can draw several bounding boxes to scan several document portions. Then, click "Scan" to start the scan. It is saved to the location you chose.
Conclusion
Your scanned files can show up in different places depending on what brand of scanner you use and the storage location you choose. If you fail to find the scanned files, you can also turn to deep scan recovery with EaseUS Data Recovery Wizard. It can scan and recover formatted hard drive to help you find lost or existing files.
Where to Find Scanned Document FAQs
Here are 4 additional questions about where to find scanned document on Mac and Windows. Check here for the answers.
1. Where do I find scanned document on my iPhone?
On your iPhone, iPad, or iPod touch, you may use the Google drive app to read and download documents that you have scanned. Choose a note with a scanned document from your Notes on iCloud account.
2. Where do I find scanned document on my computer?
- Click the "Windows" - "Start" buttons.
- Choose your username.
- Search for the "My scanned image" folder.
Most programs will typically create this directory as the default location to save documents. Check the "My Pictures" if your folder is not accessible.
3. Why is my scanned document not saving?
The original may not be positioned correctly, or the scanner driver may be at fault as a potential cause. Another cause may be that the storage disk is full of data and files, and the scanned document can't be written to the hard disk. Thus, the internal hard drive not showing files though they still exist.
4. Why are my scanned document not showing up in iCloud Notes?
Make sure Notes is enabled in Settings - [your name] - iCloud if it hasn't previously been so. Ensure that your Internet connection is reliable as well. If feasible, test the problem while logged onto a separate network. Let us know if the note itself displays in iCloud if the problem continues.
Was this page helpful?


20+
Years of experience

160+
Countries and regions

72 Million+
Downloads

4.9 +
Trustpilot Score


