-
![]()
-
![]()
-
![]()
-
![]() How to Fix Excel Found Unreadable Content Error (Easy Guide)
How to Fix Excel Found Unreadable Content Error (Easy Guide) June 16,2026
 6 min read
 -
![]()
-
![]() Volume Information for This Disk Cannot Be Found [2026 Fixes]June 16,20266 min read
Volume Information for This Disk Cannot Be Found [2026 Fixes]June 16,20266 min read -
![]() Free Download EaseUS Data Recovery Wizard Torrent, Serial KeyJune 09,20266 min read
Free Download EaseUS Data Recovery Wizard Torrent, Serial KeyJune 09,20266 min read -
![]() How to Access User Folder on Old Hard Drive Windows 10/11June 09,20266 min read
How to Access User Folder on Old Hard Drive Windows 10/11June 09,20266 min read -
![]()
-
![]() [DIY Guide] Where Do I Find My Scanned Documents on Windows/MacJune 09,20266 min read
[DIY Guide] Where Do I Find My Scanned Documents on Windows/MacJune 09,20266 min read
Page Table of Contents
To begin utilizing this tool, you can acquire it from the official Microsoft website. This software is readily available and can be easily installed on your device. Once ready for use, it operates through a command that streamlines the retrieval process of your missing data.
PAGE CONTENT:
In this post, we'll look at the download process and essential commands, provide a quick and effective solution for recovering your files on Windows 10/11, and show you how to use the Windows File Recovery tool.
Introduction: What Is Windows File Recovery Tool
The functionality of the Windows File Recovery tool is crucial in recovering accidentally deleted files on your Windows 10/11 operating system. It is a powerful ally for those who have encountered data loss for various reasons like unintentional deletion, formatting, or system malfunctions.
How do I use Windows file recovery?
byu/Financial-Patient664 inRecoveryOptions
We will take a deeper dive into the process of downloading the tool, executing commands, and increasing the likelihood of successfully recovering your lost data. Lost files can disrupt your digital flow, but with our guide on how to use Windows File Recovery, you're just a few steps away from reclaiming control.
Check out the video we have provided for more insights:
- 00:44 Introduction of Windows File Recovery [2 Recovery Modes]
- 01:03 Use Windows File Recovery to Restore Permanently Deleted Files

Alternative: Recover Windows Files with Data Recovery Software
While the Windows File Recovery Tool is a valuable native solution, you may also explore professional data recovery tools like EaseUS Data Recovery Wizard. It employs advanced algorithms to scan storage devices thoroughly, ensuring a high success rate in recovering lost files.
Whether you are looking to recover accidentally deleted documents, photos, or other important files, EaseUS Data Recovery Wizard provides a reliable solution for data retrieval on Windows 10 and Windows 11.
As an alternative to the native Windows File Recovery Tool, we will now guide you through the process of using EaseUS Data Recovery Wizard. Follow the steps below:
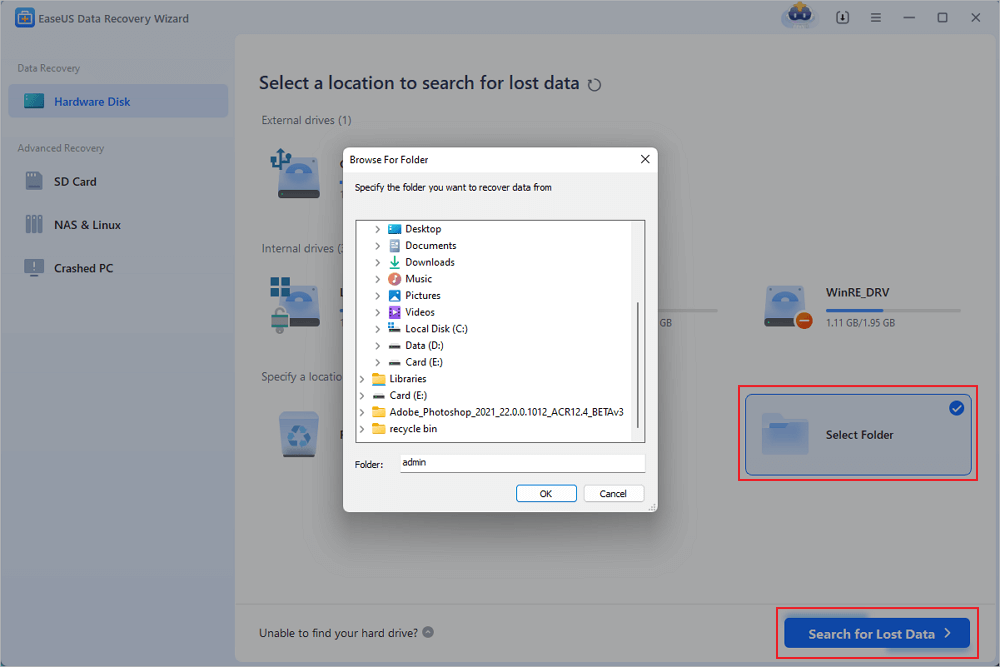
Step 1. Select a folder to scan for lost files
Launch EaseUS Data Recovery Wizard. Double click "Select Folder" to browse the the location where you lost the folder and click "OK" to scan the lost folder.
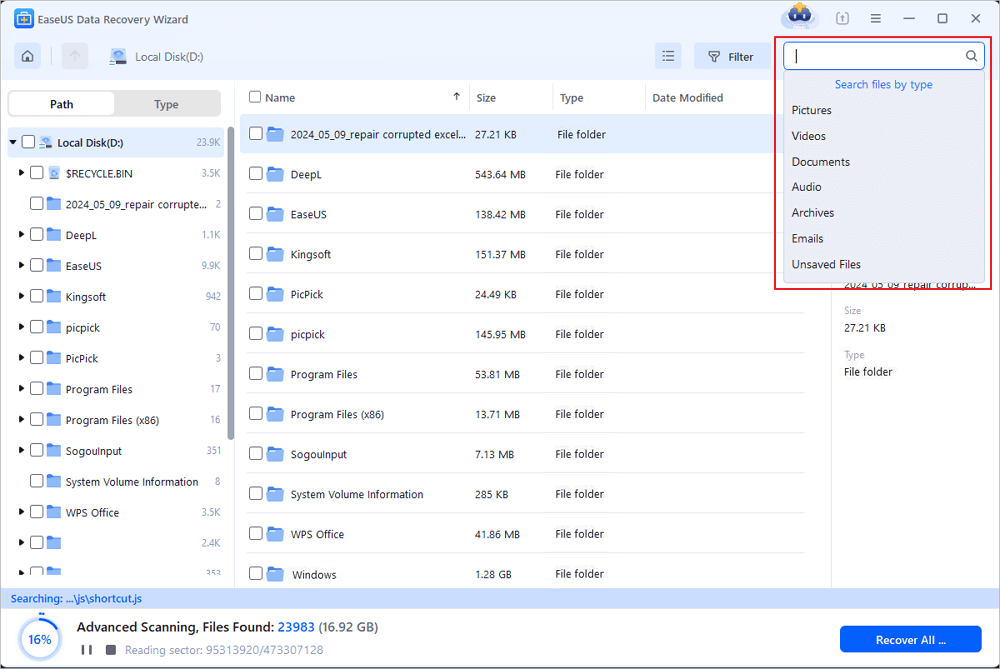
Step 2. Find and preview found files in the lost folder
If you remember the folder name, type the folder name in search box to quickly find the lost files. Then, open the found folder and double-click to preview scanned files. Or you can use the Filter feature to find a certain type of files.
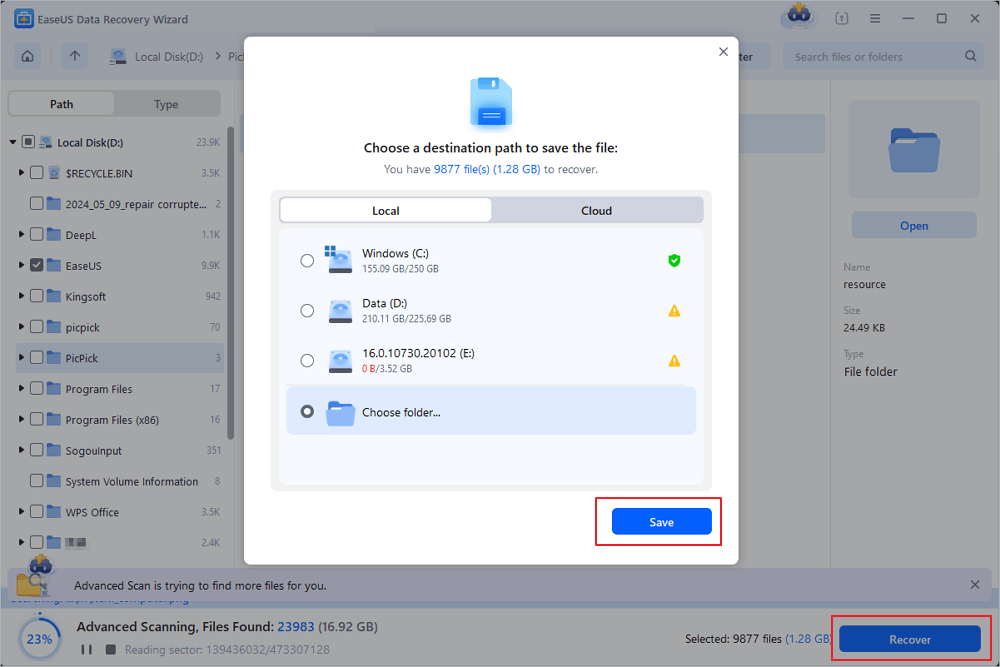
Step 3. Recover and save the lost folder
Last, select the folder and files you need, click "Recover" and choose a new & secure location on your PC or cloud storage like OneDrive, Google Drive, or Dropbox to keep the recovered data.
If you found this guide helpful, share it with your friends and colleagues who might benefit from learning about effective file recovery methods on Windows. Spread the knowledge and help others regain access to their lost data.
How to Use Windows File Recovery
Microsoft's Windows File Recovery is a dedicated program designed to restore deleted files, offering a solution beyond the typical graphical interface with its command-line utility.
While the absence of a user-friendly interface may seem unconventional for a Microsoft utility available in the Microsoft Store, mastering its capabilities allows for a hands-on file recovery process on both Windows 10 and 11:
🔍1. Default Mode Recovery
Step 1. Initiate a file search using /n and provide the complete path for the desired file. For instance, to locate a docx file, input /n UsersNameFolderfile.docx in the command prompt, specifying the actual user, folder, file names, and extensions.
Step 2. Conduct a targeted search for a specific file, like file.docx, in the user folder UsersNameFolder with the command winfr C: D: /n UsersNameFolderfile.docx. This command locates the deleted file in the C drive and saves it to the D drive.
Step 3. Specify multiple searches for different file types using commands like winfr C: D: /n *.docx /n *.xlsx /n *.pptx.
Step 4. Search for all Docx files on the C drive and copy them to the D drive with "winfr C: D: /n *.docx." Confirm each command with y.
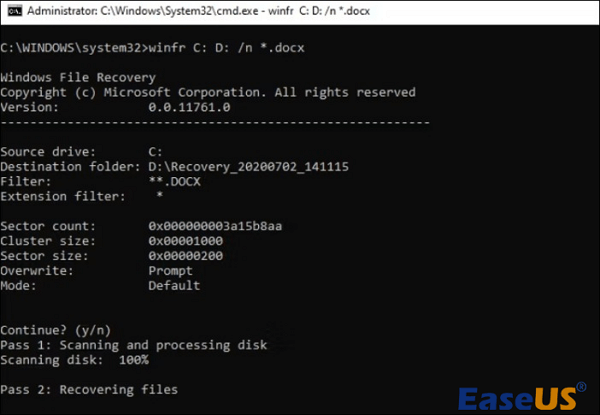
Step 5. Access the recovered files in a "Recovery_[date and time]" directory on the designated drive.

🔍2. Signature Mode Recovery
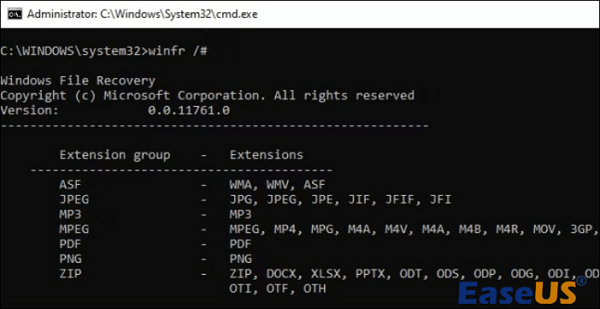
Utilize the signature mode to find specific types of deleted files. Enter /x to activate the signature mode and /y: to list groups of file types to search for.
Step 1. For example, to recover deleted JPEG files on drive E and save them to D, use winfr E: D: /x /y:JPEG.
Step 2. For multiple file types like JPEGs, PDFs, and Word documents, run winfr E: D: /x /y:JPEG,PDF,ZIP.
Step 3. To view supported file types, use winfr /# command. Mastering both modes empowers users to navigate the intricacies of Windows File Recovery effectively.
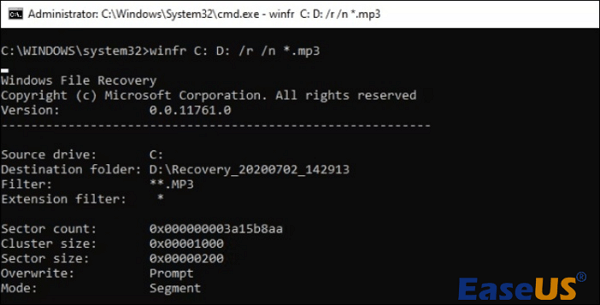
🔍3. Segment mode Recovery
If the other modes fail in your file recovery quest, Segment mode is a powerful alternative with a mechanism similar to Default mode. To start Segment mode, which explores file record segments, introduce the /r parameter alongside /n.
Generally, constructing recovery commands for Segment mode is similar to the process for Default mode which needs you to simply add /r.
CMD File Recovery - Recover Deleted Files Using Command Prompt
This article will show you how to recover deleted files from USB using CMD (Command Prompt) or using EaseUS data recovery software to recover deleted files with a few clicks.

For instance, in order to retrieve all deleted MP3 files from your C: drive and transferring them to the D: drive. The command to execute this operation would be:
winfr C: D: /r /n *.mp3
In the event that a Default mode search doesn't work, a quick turn to Segment mode with the inclusion of /r may uncover the hidden files.
This approach enhances the versatility of the recovery process, providing you with an additional tool to navigate the file retrieval process on Windows systems.
How to Download Windows File Recovery on Windows 10/11
Windows File Recovery doesn't come pre-installed on Windows 10 or 11; therefore, a manual download and installation are required before utilization.
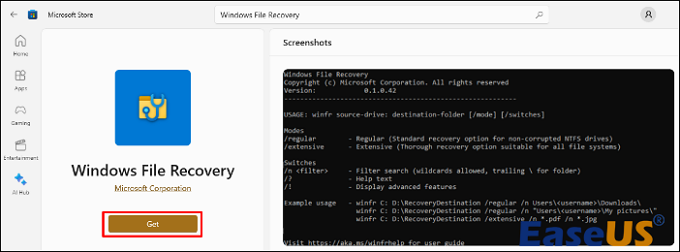
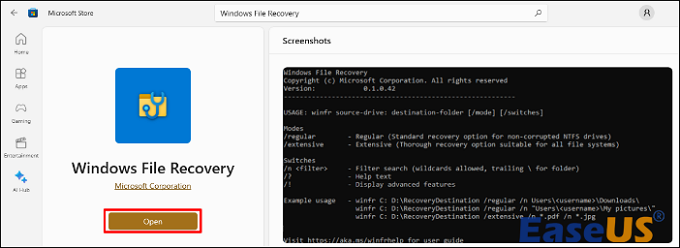
Step 1. Enter Microsoft Store into the search box and select the top result.

Step 2. Search for "Windows File Recovery" within the Microsoft Store and hit "Enter."

Step 3. Review the search results and click on "Get" to initiate the download and installation of the Windows File Recovery tool.
Step 4. Once the installation is done, click "Open." If you prefer not to use the tool immediately, simply close the Microsoft Store.
Step 5. If you want to use it later, access your "Start" menu and type Windows File Recovery.
Step 6. Select "Run as administrator" and confirm with "Yes" to permit User Account Control. This ensures smooth access to the tool when needed.
Final Thoughts
As we conclude this guide on how to use Windows File Recovery on Windows 10/11, you are now equipped with the expertise to recover lost files masterfully.
Throughout this guide, we've unveiled the essential steps, from the download process to executing commands in Default, Signature, and Segment modes.
Mastering this tool becomes crucial in case of accidental deletions or unforeseen system errors.
Harnessing the power of this tool ensures that you can confidently navigate the recovery process, securing your vital files on Windows 10/11 systems.
How to Use Windows File Recovery FAQs
Check out the answers below to learn more about how to use Windows File Recovery tool:
1. How to use Windows Recovery?
To access Windows Recovery:
Step 1. Press the "Windows" key
Step 2. Type in Windows File Recovery in the search box.
Step 3. Select the corresponding option and grant permission for the app to make changes by choosing "Yes" when prompted.
There are three primary modes available for file recovery which are the Default Mode, Signature Mode, and Segment Mode.
2. How do I recover Windows files?
There are various methods to recover deleted files from your computer. These include:
- Restoring deleted files with the Undo Delete feature.
- Checking the Recycle Bin.
- Utilizing File History.
- Recovering files with the "Backup and Restore" feature.
- Using the Command Prompt.
- Utilizing the Windows File Recovery tool.
- Using professional data recovery software like EaseUs Data Recovery Wizard.
3. What is the run command for Windows File Recovery?
Open Windows File Recovery by running the winfr command. Specify the target drive for the deleted file search, designate the destination for saving it, and configure switches that determine the tool's search parameters and methods. Ensure that the recovered file is saved to a different drive.
4. How do I use Windows File Recovery Recycle Bin?
Recovering a file from the Recycle Bin involves these steps:
Step 1. Double-click the "Recycle Bin" icon on your desktop.
Step 2. Locate the desired deleted files.
Step 3. Select the files to recover.
Step 4. Right-click on the selected files.
Step 5. Choose "Restore" to return files to their original location.
Was this page helpful?


20+
Years of experience

160+
Countries and regions

72 Million+
Downloads

4.9 +
Trustpilot Score


