Page Table of Contents
Updated on Feb 26, 2024
The tech world functions on data. You store your personal, professional, and social information on PCs, smartphones, and laptops. It allows quick processing, editing, and sharing of information. However, you can't ignore that digital data can be lost due to viruses, malware, updates, or unexpected software changes.
To counter this, the sanest option is always to back up your data. Backup and restore can save your educational records, business sheets, vacation memories, or all other necessary files after the data loss. Previously, a USB or external hard was the only option to back up the data. With Modern cloud storage, you can store your data in a virtual drive and access it via any device from anywhere worldwide. HiDrive is the latest cloud storage technology to come out from Europe.
HiDrive is compatible with operating systems like Windows, Android, macOS, Linux, etc. For organizations, it allows the creation of public links for file sharing/editing. HiDrive includes the option of scheduled backups and automated backups.
Simply put, HiDrive is among the most versatile cloud backups we have. In this post, we shall learn how to backup your data to HiDrive.
How to Set Up a New HiDrive Account
Before the data backup, you need a new HiDrive account for data storage. HiDrive offers free and premium versions. The free account provides 5GB of storage space. You can get 100 GB and 500 GB of data by buying HiDrive 100 and HiDrive 500 plans. The choice depends upon your requirement.
Follow these steps to set up a new HiDrive Account:

- Go to the official Strato Website
- Find the HiDrive. The system will ask you either sign up for free or log in
- Choose "Sign up for free" here
- The system will ask you to fill email, username, and password. Fill out this form and submit it
- The system will send a confirmatory email. Confirm it. Your account is ready
- Log in to your account and start using it
Do remember to share it with your fans if you find it useful:
2 Ways to Back Up Data to HiDrive (Manually & Automatically)
You have covered both manual and automatic ways to back up data to Hi Drive. We compare two methods in terms of their effectiveness, time duration, and difficulty. Please refer to the chart below before deciding which way you use.
| Workable Solutions | Effectiveness | Time Required | Difficulty Level |
|---|---|---|---|
| Manual Method | Moderate | 1-2 days to back up an entire system | ⭐⭐⭐⭐ |
| Automatic Method | Highly Effective | 3-4 hours for a 512 GB of hard drive | ⭐ |
1. Manually Backup Data to HiDrive
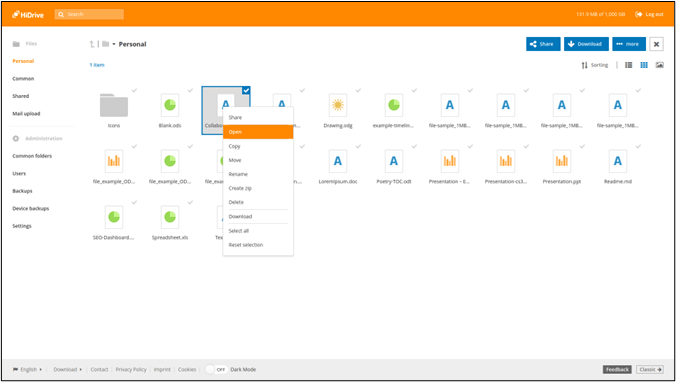
You can upload a file or folder directly to HiDrive in the manual backup. It is a straightforward method that doesn't require any third-party assistance.
You can manually backup data to HiDrive with these steps
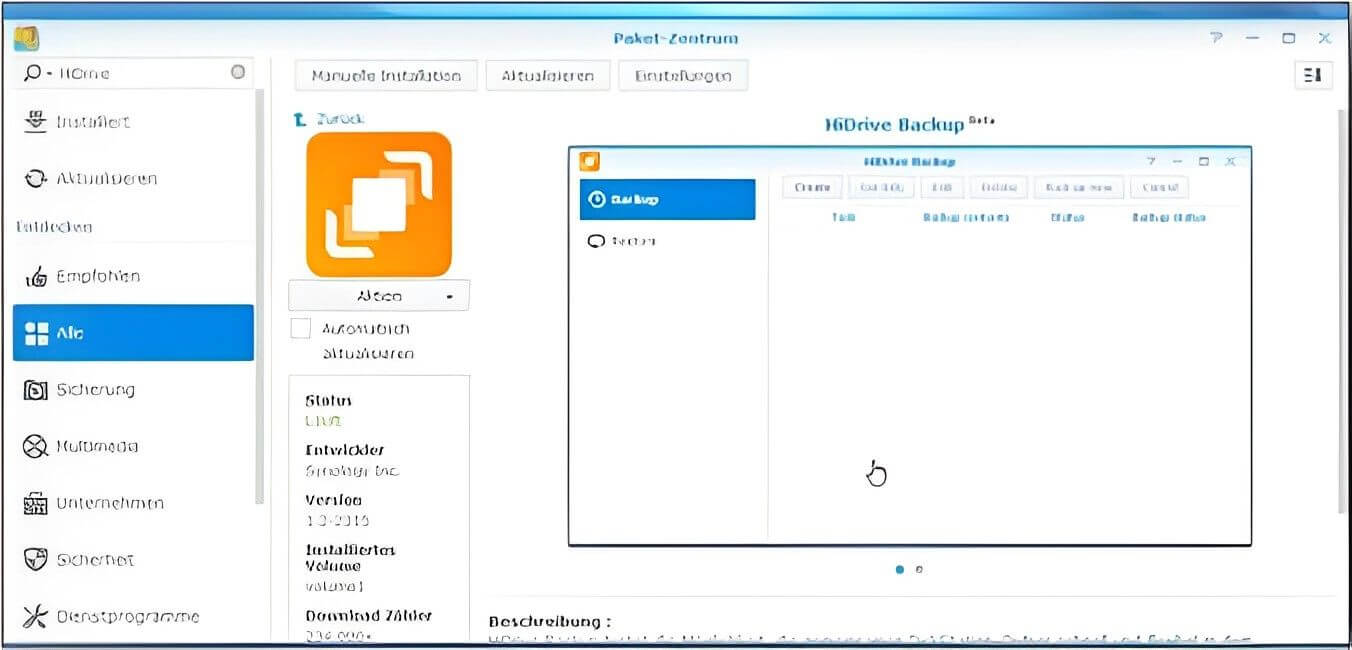
Step 1: Download and Install the HiDrive app on your system.
Step 2: Click "Create" in the HiDrive app and select any name for backup.
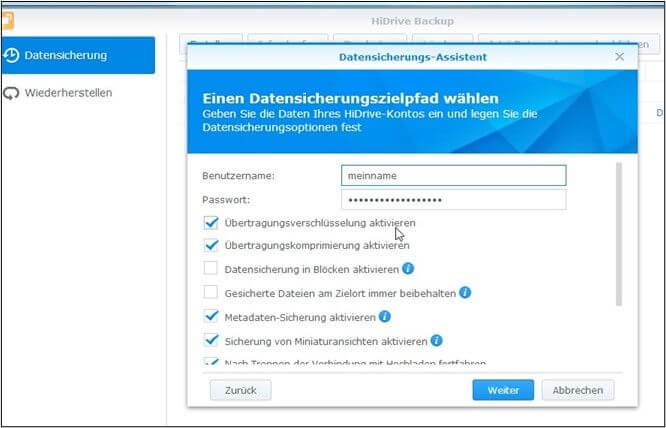
Step 3: Enter the log-in data of your Hi Drive and select any backup option. You should enable "encrypting" and "bandwidth limiting" by checking the boxes.
Step 4: Specify the files you want to backup. All the files will be selected manually.
Step 5: Choose a "backup schedule". You can choose a weekly or monthly backup for selected folders.
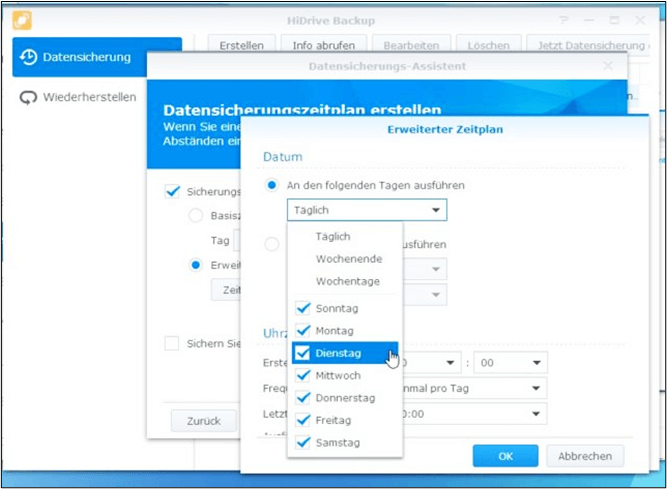
Step 6: Click "Apply" to save these changes. And select "Backup Now" to start the process.
Step 7: The backup can take hours to days, depending on your data. Once the process completes, your date will be uploaded HiDrive Cloud.

The manual process has some drawbacks.
- The processing speed is relatively low; it can take 1-2 days to back up an entire system
- If the system gets shut down, you must restart the process
- It also takes a lot of effort to select each file/older
- You need to save these files again after every edit
These factors limit manual backup, and you must switch to automatic backup.
2. Automatically Backup Data to HiDrive
For quick and efficient HiDrive backup, you should use EaseUS Todo Backup. This award-winning data backup tool can easily back up the files, hard drives, and main operating system to HiDrive. It can perform disk imaging with an instant recovery option. You can save bulk data in no time. Download EaseUS Todo Backup for a complete backup solution.
Secure Download
This is how you can automatically back up data to HiDrive.
Step 1. To initiate a backup, click the Select backup contents option.

Step 2. There are four data backup categories, File, Disk, OS, and Mail, click File.

Step 3. On the left, both local and network files will be shown. You may extend the directory to pick the backup files.

Step 4. Follow the on-screen instructions and choose a location to store the backup.

Click Options to encrypt the backup with a password in Backup Options, then click Backup Scheme to specify the backup schedule and start the backup at a certain event. There are also other additional choices you may choose to tailor the backup process to your requirements.

Step 5. The backup may be stored on a local disk, EaseUS' online service, or NAS.

Step 6. EaseUS Todo Backup enables customers to back up data to a third-party cloud drive as well as its own cloud drive.
If you want to back up data to a cloud drive provided by a third party, choose Local Drive, scroll down to add Cloud Device, and then add and log in to your account.

You can also choose the EaseUS cloud drive. Sign up for an EaseUS Account, then click EaseUS Cloud and log in.

Step 7. Click Backup Now to begin the backup process. The backup job will be presented as a card on the left side of the panel after it has been finished. Right-click the backup job to handle it further.

The Advantages of Storing Data on HiDrive
HiDrive offers the following advantages over conventional data storage methods
- It syncs across all devices and operating systems.
- It can accept and stream large files with no delay.
- It stores your data in TUV-certified data centers.
- You can access/edit data worldwide.
- It allows teamwork collaboration with advanced data sharing.
- It offers a mail upload feature to receive all files directly in HiDrive.
- It also has a mobile app to facilitate 24/7 service.
Sum Up
In our world, digital data is everything. You should have a proper backup to prevent computer virusesand malware. The HiDrive is a European cloud-based storage that provides 100% secure data. It allows data access via any device worldwide.
There are two ways to backup data to HiDrive; manual and automatic. The manual consumes a lot of time and requires resaving after every edit. So, you should always prefer Automatic Backup. We recommend EaseUS Todo Backup as the most viable software for backup. Install EaseUS Todo Backup now and move toward 100% data security.
Secure Download
FAQs on How to Backup Data to HiDrive
These are the most sought-out queries about how to backup Hidrive in 2023:
1. Is HiDrive free to use?
Hi-Drive is entirely safe to use. The software follows SFTP/FTPS, Rsync, SCP, SMB/CIFS, and GIT protocols for data security and access.
2. Can HiDrive work on my iPhone?
Yes, HiDrive can work on all operating systems. You can use it on your iPhone and MacBook with ease.
3. How long will the backup be saved on the HiDrive?
There is not any time limit for cloud storage. It will say there as long as your account is active and sufficient storage capacity is available.
Was this page helpful? Your support is truly important to us!

EaseUS Todo Backup
EaseUS Todo Backup is a dependable and professional data backup solution capable of backing up files, folders, drives, APP data and creating a system image. It also makes it easy to clone HDD/SSD, transfer the system to different hardware, and create bootable WinPE bootable disks.
Secure Download
-
Updated by
![]()
Larissa
Larissa has rich experience in writing technical articles and is now a professional editor at EaseUS. She is good at writing articles about data recovery, disk cloning, disk partitioning, data backup, and other related knowledge. Her detailed and ultimate guides help users find effective solutions to their problems. She is fond of traveling, reading, and riding in her spare time.…Read full bio
Related Articles
![]() Acronis Imaging Software for Windows 11/10/8/7 Free Download
Acronis Imaging Software for Windows 11/10/8/7 Free Download![]() How to Backup SD Card to Dropbox [PC & Android]🔥
How to Backup SD Card to Dropbox [PC & Android]🔥![]() How to Transfer Windows 11 to Another Computer [100% Workable]🥇
How to Transfer Windows 11 to Another Computer [100% Workable]🥇![]() How to Auto Sync Files to External Hard Drive on Windows
How to Auto Sync Files to External Hard Drive on Windows![]() 3-Minute Guide | How to Restore Outlook Backup With Ease
3-Minute Guide | How to Restore Outlook Backup With Ease![]() Windows Backup Encountered An Error When Writing Data to the Backup Target [Full Guide]
Windows Backup Encountered An Error When Writing Data to the Backup Target [Full Guide]

EaseUS Todo Backup

Smart backup tool for your files, disks, APPs and entire computer.
Topic Clusters


Interesting Topics