Featured Articles
- 01 Why Computer Won't Turn On
- 02 Computer Won't Turn On Though Plugged In
- 03 Computer Won't Boot After OS Update/Rebuild
- 04 PC Not Turning On with Black Screen
- 05 Fix 1: Boot Device Not Found
- 06 Fix 2: Your PC Ran into a Problem and Needs to Restart
- 07 Fix 3: Laptop Screen Black but Still Running
- 08 Fix 4: Windows 11/10/8/7 Won't Boot from SSD
- 09 Fix 5: Recover Data from a PC/LaptopThat Won't Boot
Quick Navigation
- 1. Why Is Windows 11 Not Booting/Not Restarting/Not Loading/Not Turning on
- 2. Troubleshoot Your Computer When Windows 11 Won't Boot (6 Methods With Specific Instructions!)
- 3. Important: How to Create a Bootable Backup for Windows 11 (Try an Easy-to-Use Tool)
Read this article if your Windows 11 won't boot, or your computer experiences a Windows 11 not booting black screen. We will also cover problems with why Windows 11 won't boot after the update. The solutions presented in this guide have been duly tested by professionals and are 100% effective. Keep reading to fix your unbootable Windows issues.
Why Is Windows 11 Not Booting/Not Restarting/Not Loading/Not Turning on
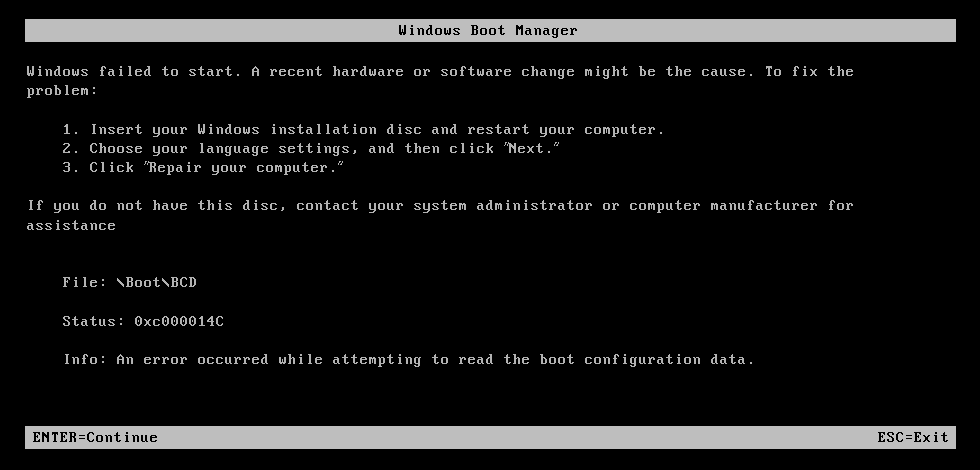
Windows 11 not booting black screen or black screen with the cursor is a common problem that you might experience due to the following reasons:
- Power failure/faulty cables
- Faulty monitor
- Problem with connected external devices
- Disk errors
- Missing operating system files
- Corrupted hard drives
Whenever a Windows won't boot error occurs, the first step should be troubleshooting the PC for likely problems as listed above. You must check the power supply, hard drives, software for corrupted files, and connected external devices.
How to Backup Data without Booting into Windows
When a hard drive failure or Windows fail-to-boot issue occurs, reinstalling the operating system can help to rebuild the OS.
Troubleshoot Your Computer When Windows 11 Won't Boot
Following methods may offer help to troubleshoot your computer when Windows 11 won't boot.
- Method 1. Windows 11 Won't Boot and No Sign of Power
- Method 2. Windows 11 Won't Boot After Update
- Method 3. Windows 11 Won't Boot After Install
- Method 4. Windows 11 Not Booting Black Screen
- Method 5. Windows 11 Won't Boot to Safe Mode
- Method 6. Windows 11 Won't Boot from USB or SSD
Method 1. Windows 11 Won't Boot and No Sign of Power
Try any of the following when Windows 11 won't boot or show signs of power.
Solution 1. Check the Power Cables
Step 1. Press the power button and observe if you can hear the cooling fans or the sound of running hard drives. The absence of a startup sound is probable that the PC is not getting power.
Step 2. Please disconnect the power cable and reconnect it. If it's a laptop, try charging for extra hours.
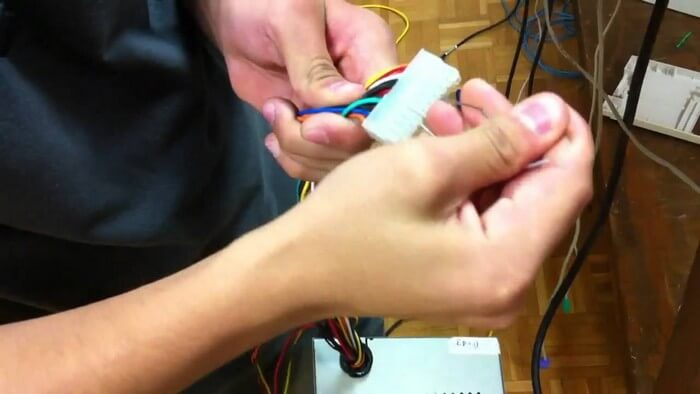
Step 3. Use a different power cable to ascertain that the original one is not faulty.
Solution 2. Check the Monitor Connections
Step 1. If the PC sounds like the internal system is running, the next step is checking the monitor.
Step 2. Reconnect the monitor power cables. Also, try out new ones.
Step 3. Unplug and reconnect system peripherals.
You May Also Like: Computer Won't Boot, Causes and Fixes
Method 2. Windows 11 Won't Boot After Update
Sometimes, computers don't function properly after a new Windows update, and there is no need to panic in such a situation. Follow the steps below to resolve problems when Windows 11 won't boot after the update.
Solution 1. Restart the PC
Check the system requirements: verify that your PC meets the minimum requirements for the recently updated version of Windows.
Restart the system: the boot error might be temporary. Turn off the PC and restart.
Solution 2. Run a Repair Command
Also, proceed to this method if Windows 11 won't boot after update.
Step 1. Force shutdown, and restart the system several times to force it to enter Automatic Repair mode.
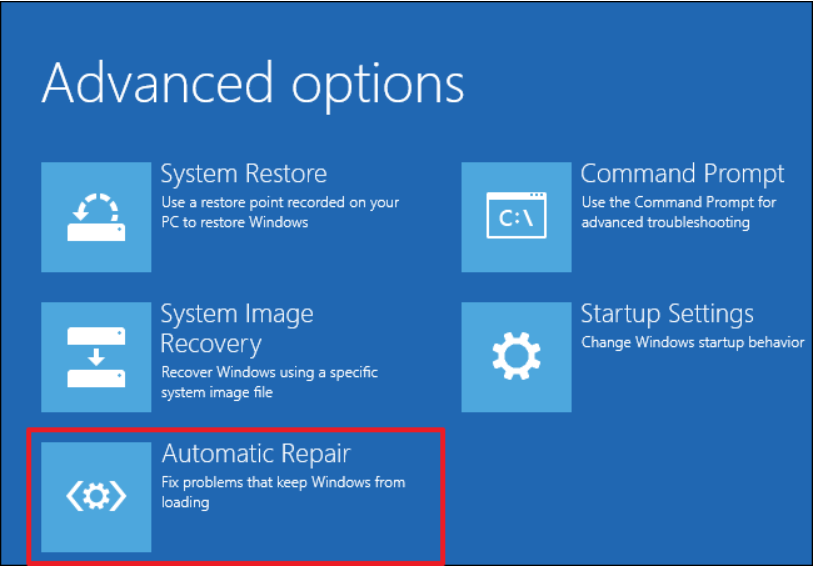
Step 2. Click Advanced Options > Troubleshoot > Command Prompt.
Step 3. Enter chkdsk c: /f /r and press Enter.
Step 4. The previous step should fix the unbootable Windows issue if the problem were the disk. Otherwise, it might be the MBR. Follow the previous steps, but enter a different command line. Type the following and press Enter after each line.
bootrec /FixMbr
bootrec /FixBoot
bootrec /RebuildBcd
Step 5. Restart the system and see if Windows boots properly.
Solution 3. Run Windows 11 Startup Repair
Step 1. Force Shutdown repeatedly: Press the power button down for about 5-7 seconds. Turn the system on, and force another shutdown. Repeat about four times. The PC should automatically boot into Automatic Repair mode the next time.
Step 2. Once the Automatic Repair Mode display opens, click on Advanced Options.
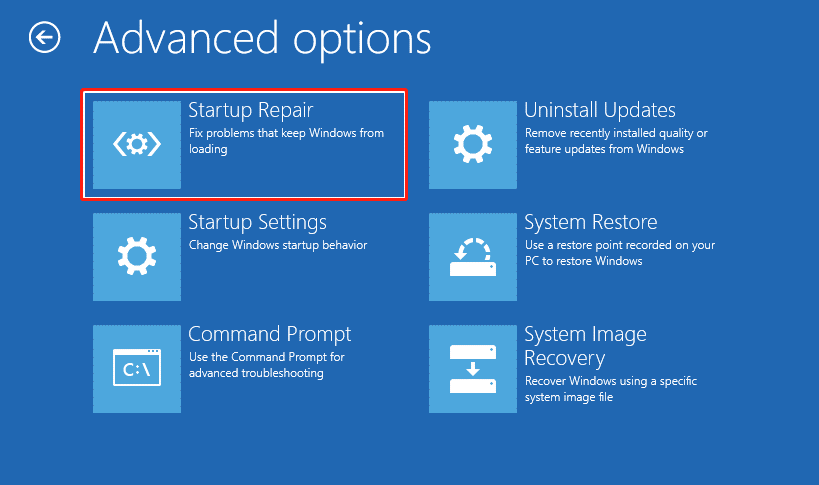
Step 3. Select Troubleshoot > Advanced options > Startup Repair. Follow the onscreen instructions and confirm that Windows 11 boots properly upon the next startup.
Method 3. Windows 11 Won't Boot After Install
Use any recommended fixes below if Windows 11 won't boot after installation.
Solution 1. Run CMD Command
Problems with the Master Boot Record (MBR) might be why Windows 11 won't boot. The solution is to launch the CMD Command prompt through an installation media
Step 1. Insert and boot the system from Windows Installation Media.
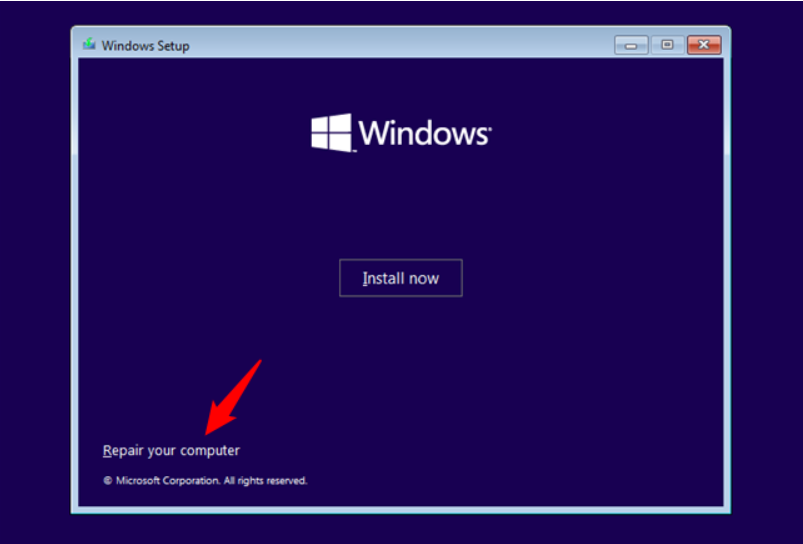
Step 2. Navigate through Repair your computer > Troubleshoot > Advanced options > Command Prompt.
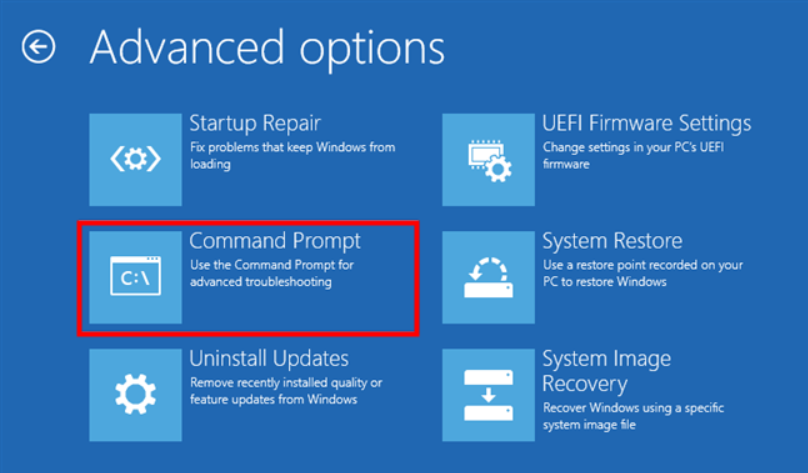
Step 3. Under CMD, enter the following commands. Ensure you hit Enter after each command.
bootrec /fixmbr
bootrec /fixboot
bootrec /rebuildbcd
Step 4. Restart your PC and see if the booting problems persist.
Solution 2. System Restore
Perform a system restore to bring your PC to its initial state before installing the new Windows.
Step 1. Repeatedly force shutdown and restart PC to enter Automatic Repair mode.
Step 2. Select Troubleshoot > Advanced Options > System Restore.
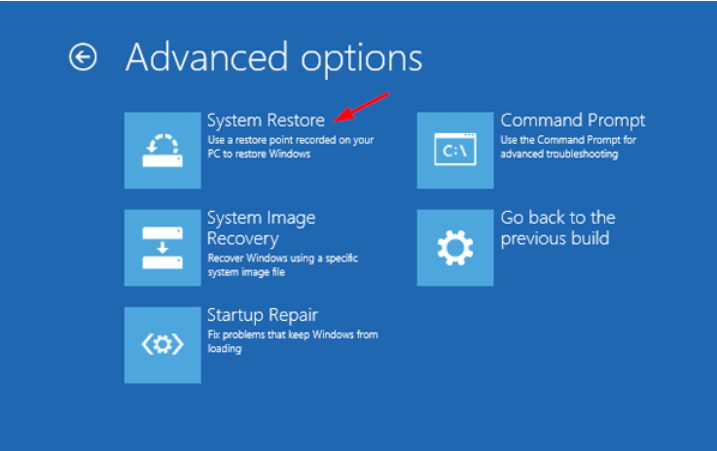
Step 3. Click Next when System windows open.
Step 4. Choose the most recent restore point and click Next to continue.
Step 5. Select Finish.
Method 4. Windows 11 Not Booting Black Screen
Your Windows 11 not booting with a black screen can be tricky. The fans are working, and the system is running, but the screen only displays black with the mouse cursor. Subsequently, there is no error message to guess what could be wrong! Confusing, right? See the following Windows 11 boot issue troubleshooting for the black screen.
Solution 1. Check PC connections
Restart the computer: force shut down the computer and restart it. Press the power button for about 5 seconds to force a shutdown.
Check the connections: observe whether the video card or other port connectors is appropriately plugged. Test another connector in case the original one is faulty.
Reconnect peripherals: try this step if you recently changed the peripherals or disconnected one.
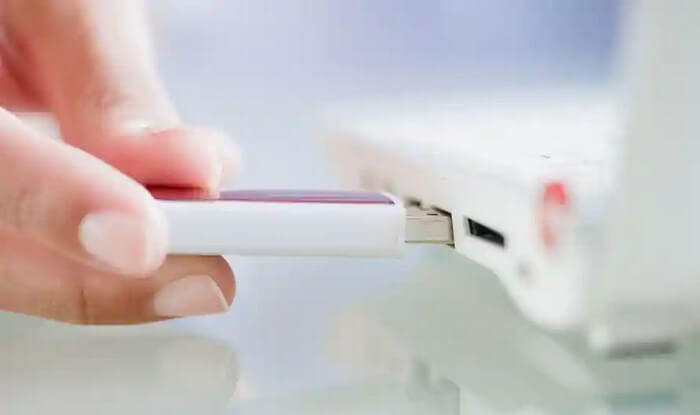
Solution 2. Use Windows Startup Repair
Follow Solution 3 under Method 2.
Method 5. Windows 11 Won't Boot to Safe Mode
Try these methods if Windows won't boot after updating into safe mode.
Solution 1. Repair Windows with Recovery Disk
Step 1. Insert the Windows installation media and restart the PC.
Step 2. Click the Repair your computer option to enter the Choose an Option menu.
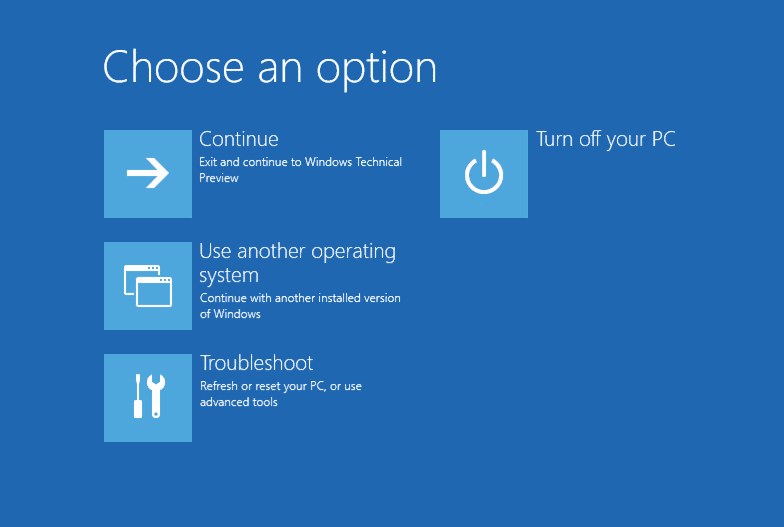
Step 3. Select Troubleshoot > Advanced Options > Startup Repair.
Step 4. Choose the Operating system and wait for Windows to complete the repair process.
Solution 2. Fix with Windows Startup Repair
Follow Solution 3 under Method 2.
Solution 3. Carry out System Restore
See Solution 2 under Method 3 for help.
Method 6. Windows 11 Won't Boot from USB or SSD
Check out how to resolve Windows 11 not booting from USB or SSD issues.
Boot Windows from BIOS
Step 1. Connect the USB or SSD to your computer using a SATA cable.
Step 2. Restart your PC and keep pressing F2, F8, F10, F12, or Del on startup. That should take you to the BIOS Setup.
Step 3. Select the Boot option, and set the USB or SSD boot disk as the first option.

Step 4. Save the changes.
Step 5. Restart the PC.
See Also Other Related Guides:
Important: How to Create a Bootable Backup for Windows 11
The consequence of an unbootable Windows 11 computer is losing access to data. So, it's significant to create a bootable backup to prevent severe data loss the next time your computer experiences a permanent shutdown, black screen, or crash. Perhaps you need to reinstall Windows 11 to make your computer bootable again.
EaseUS ToDo Backup can make a bootable backup for you, which allows you to restore the backups without booting into Windows 11. See the main features below:
- 30-day money-back guarantee
- One-click backup and quick recovery
- Partition/Disk backup
Secure Download
Follow the steps below to make a bootable Windows 11 backup:
Step 1. Prepare a USB drive which can be written and read.
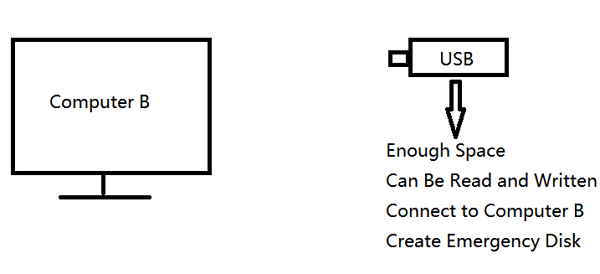
Step 2. Launch and install EaseUS Todo Backup on the Computer B.
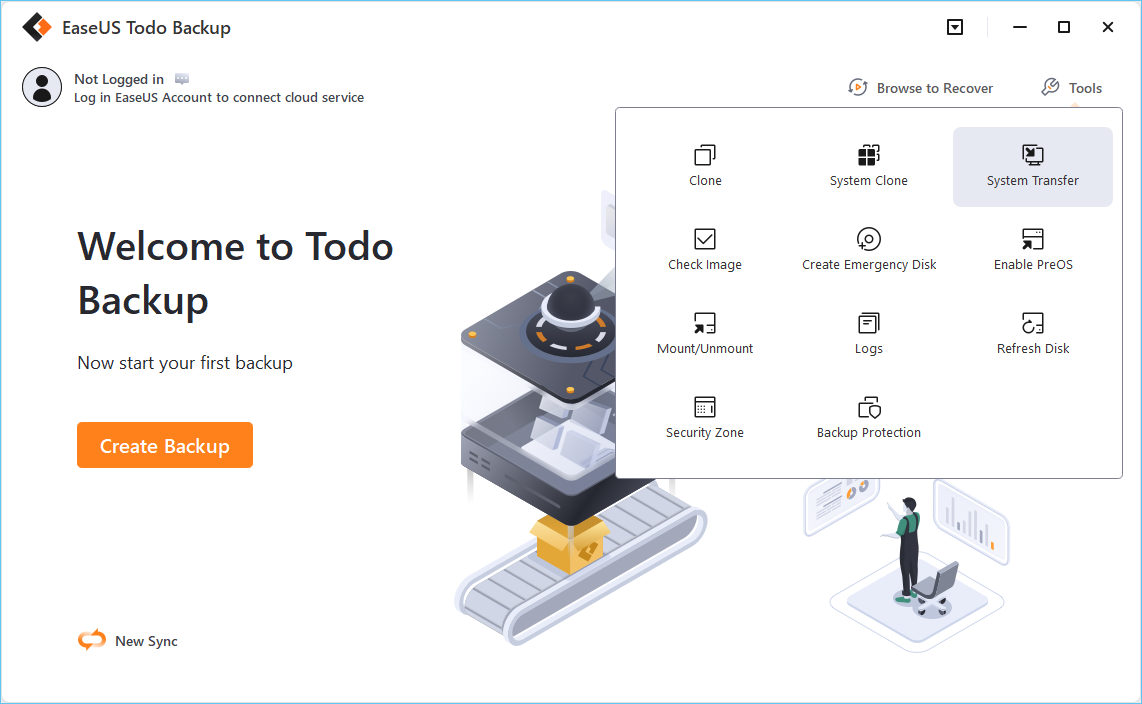
Step 3. Find and click "Tools" and choose "Create Emergency Disk".

Step 4. Choose the Boot disk location. You can create an ISO file, a bootable USB or CD/DVD disc.
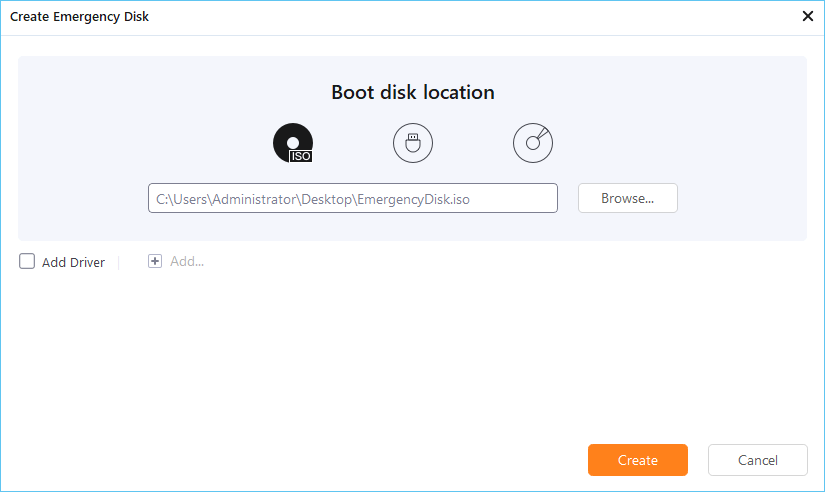
Step 5. Then click "Create" to start.
Start a live chat with an EaseUS Expert to tailor a solution specific to your boot issuess. We are here to assist you with the following as well:
- PC won't boot
- Cloned hard disk cannot boot
- System not booting error
Was This Page Helpful?
Updated by Larissa
Larissa has rich experience in writing technical articles and is now a professional editor at EaseUS. She is good at writing articles about data recovery, disk cloning, disk partitioning, data backup, and other related knowledge. Her detailed and ultimate guides help users find effective solutions to their problems. She is fond of traveling, reading, and riding in her spare time.
Jean is recognized as one of the most professional writers in EaseUS. She has kept improving her writing skills over the past 10 years and helped millions of her readers solve their tech problems on PC, Mac, and iOS devices.
Related Articles
-
EaseUS Todo Backup License Code 2026 (100% Official)
![author icon]() Jean/Jan 21, 2026
Jean/Jan 21, 2026 -
Windows 10/8/7 System Restore Points Not Working
![author icon]() Jean/Jan 21, 2026
Jean/Jan 21, 2026 -
Is Acronis True Image Free? | Find the Answer Here
![author icon]() Jerry/Jan 21, 2026
Jerry/Jan 21, 2026 -
Tutorial: Windows 10 Offline Update Tips
![author icon]() Tracy King/Jan 21, 2026
Tracy King/Jan 21, 2026
