Page Table of Contents
Updated on Jul 01, 2026
Quick Navigation:
- 1. Does Windows 11 Have WiFi Issues
- 2. Why Does My WiFi Keep Disconnecting in Windows 11
- 3. 10 Methods to Fix Windows 11 WiFi Disconnection (Super Easy!)
- 4. Another 3 Solutions to Fix Unstable WiFi Problems (Advanced!)
Does Windows 11 Have WiFi Issues
After Microsoft released Windows 11, most Windows 10 users have updated Windows to the latest version. But, the transition to Windows 11 has not been fruitful for many. Windows 11 users are facing problems, including WiFi issues.
On the internet, many users have been complaining that their WiFi automatically disconnects using Windows 11. The Microsoft team has noticed this issue, and they are working on it.
But, you don't have to worry, as there are fixes available to resolve the common problem of WiFi connect issue in Windows 11. Before you see the fixes, let's see first why your WiFi keeps disconnecting in Windows 11.
Why Does My WiFi Keep Disconnecting in Windows 11
Below are some of the common reasons why your WiFi keeps disconnecting in Windows 11:
File System Corruption: Users who have installed Windows 11 can face WiFi that keeps disconnecting errors because of File system corruption. But, gladly, you can fix it by clean install method, which is enlisted in this article.
DNS issue: An inconsistent DNS (Domain Name System) can also trigger a problem for WiFi in Windows 11. Therefore, you need to ensure that DNS remains consistent. Else, you will have to set your current DNS.
Network Card Issues: Your system handles WiFi with the help of a Network card installed inside of it. Problems with the network card can also trigger disconnection of your WiFi.
TCIP and DHCP Problems: Sometimes, your system can misinterpret DHCP and TCIP settings due to connection with multiple WiFi devices. Hence, this results in WiFi issues in Windows 11.
The above-listed reasons are some of the common causes of WiFi Issues in Windows 11. In the next section, you will see how to fix Windows 11 WiFi disconnection issues.
Windows 11 File History: Create File Backups and System Backup Image
Many people will agree with the importance of backup in data security protection. Still, when it comes to a specific implementation, they can hardly make a decision: which backup software should I use?
10 Easy Methods to Fix Windows 11 WiFi Disconnects Frequently in Windows 11
When you have come across the Windows 11 Wifi disconnection problem, you can try the 10 methods below, all of which are pretty easy.
- 1. Turn On/ Off Airplane Mode
- 2. Forget and Reconnect to WiFi Network
- 3. Connect Automatically to WiFi Network
- 4. Set WiFi Network to Private
- 5. Enable WLAN AutoConfig Service
- 6. Update the WiFi Driver
- 7. Adjust the WiFi Power Management Settings
- 8. Change Power Plan Settings
- 9. Reset Network Settings
- 10. Run Network Troubleshooter
Method 1. Turn On/ Off Airplane Mode
The easiest solution to the WiFi problem in Windows 11 is to enable and disable the Airplane mode on your computer. It will automatically restart your WiFi connection. Follow the below steps to turn on/off the airplane mode in Windows 11:
Step 1. Open the Action Center in Windows 11 by pressing Windows + A key.
Step 2. Toggle the Flight mode button. It will enable the Airplane mode.
Step 3. Once enabled, toggle the Flight mode button again. It will disable the Airplane mode.
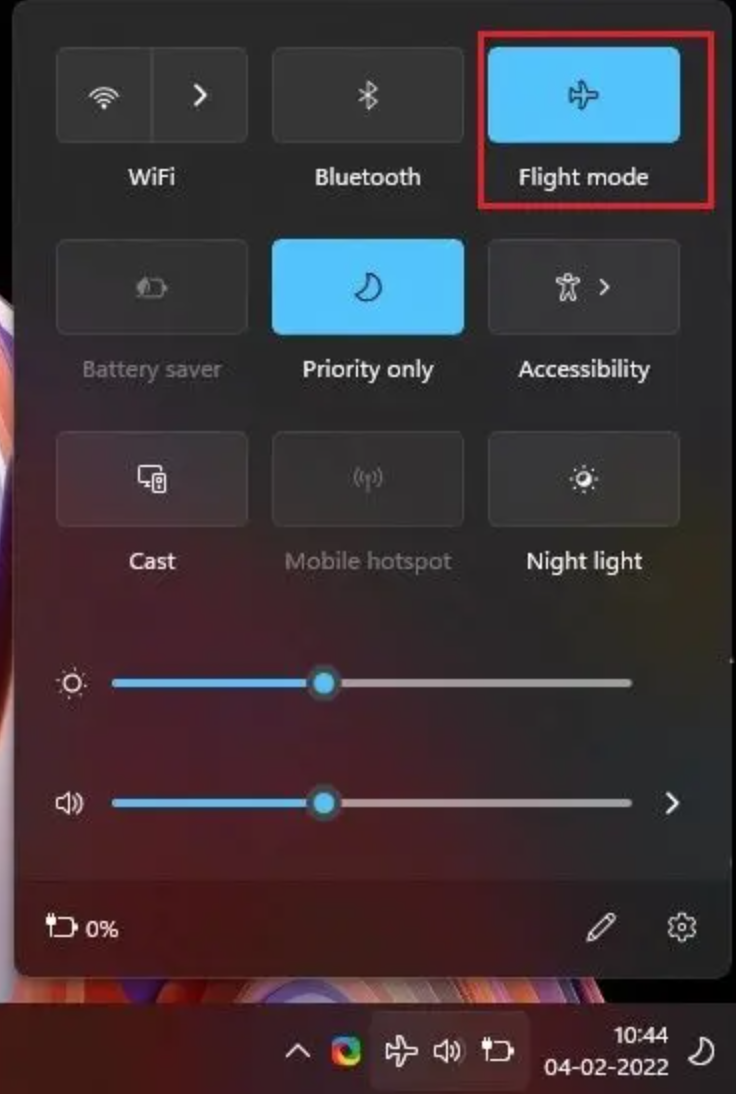
Now try using your WiFi and see if the problem persists or not.
Method 2. Forget and Reconnect to WiFi Network
Another simple fix is to forget and reconnect your WiFi network. Follow the below steps:
Step 1. Open the action center using Windows + A key.
Step 2. Click next to your connected WiFi icon.
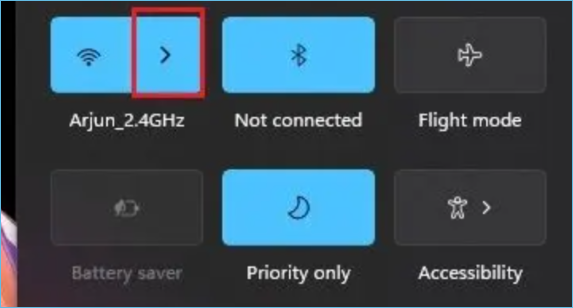
Step 3. Now, Right-click on your connected WiFi and click on Forget.
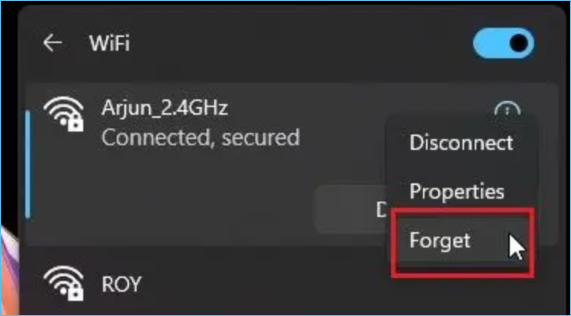
Step 4. Once forgotten, reconnect to WiFi again.
Method 3. Connect Automatically to WiFi Network
Sometimes, even when your WiFi is nearby, it won't connect because of WiFi settings. Therefore, you need to allow Windows 11 to connect automatically to the WiFi network. Follow the steps below:
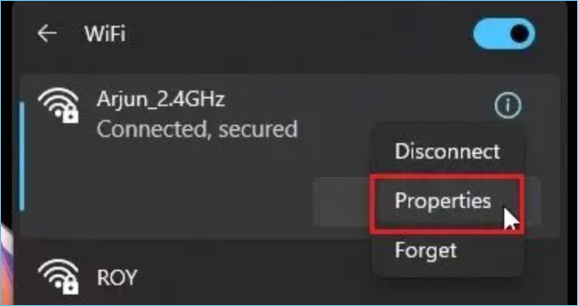
Step 1. Go to the action center (Windows + A) and click the arrow next to your WiFi.
Step 2. Click on WiFi Properties.
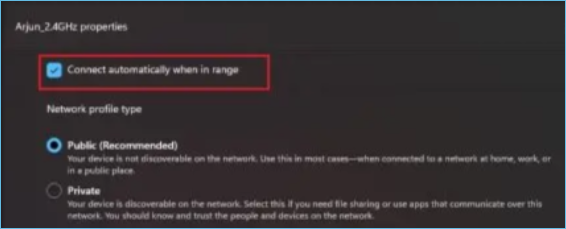
Step 3. Enable the "Connect automatically when in range" option.
Method 4. Set WiFi Network to Private
A Public WiFi network is open to threat and can cause issues to your computer. Therefore, it is recommended to set the WiFi network to private in Windows 11. Follow the below steps:
Step 1. Go to the action center (Windows + A) and click the arrow next to your WiFi.
Step 2. Click on WiFi Properties.
Step 3. Set WiFi availability to Private.

Method 5. Enable WLAN AutoConfig Service
WLAN AutoConfig Services handles your WiFI operations in Windows 11. Ensure that the services are enabled for smooth WiFi usage in Windows 11.
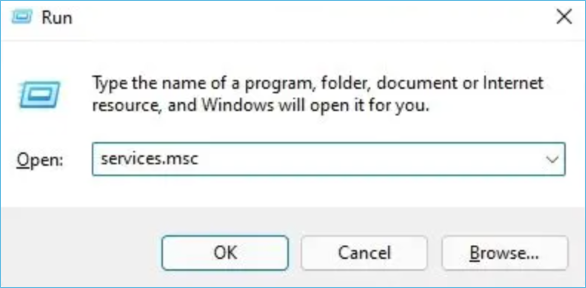
Step 1. Press the Win + R key to open the Run window, type services.msc, and hit the OK button.
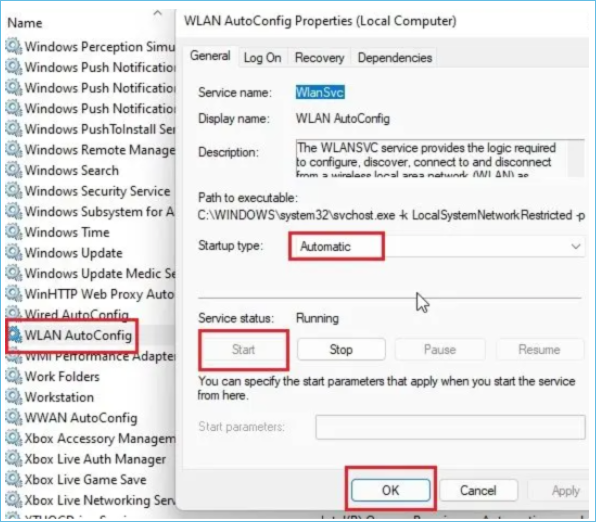
Step 2. From the menu, select WLAN AutoConfig service and double-click on it.
Here, you have to change its Startup type to Automatic. Once done, click the Start button and hit the OK button.
Method 6. Update the WiFi Driver
It is a best practice to have the latest version of the WiFi driver. Updating your WiFi driver can resolve problems with WiFi in Windows 11. Follow the below steps:
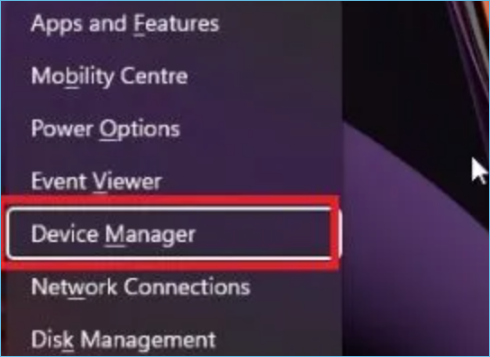
Step 1. Press the Windows Key + X button and open the Device Manager.
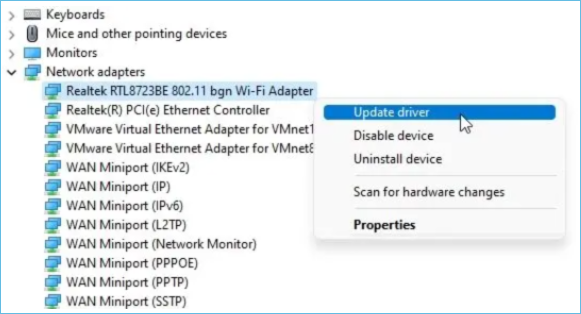
Step 2. Expand your Network adapters, select your WiFi drivers, and right-click on them.
Choose the Update driver option. Select search latest drivers from the internet option and follow the steps to update the WiFi drivers.
Method 7. Adjust the WiFi Power Management Settings
Windows 11 have options to save battery by disabling the connected WiFi. You can disable this property if you are facing WiFI disconnection issues. Follow the steps below:
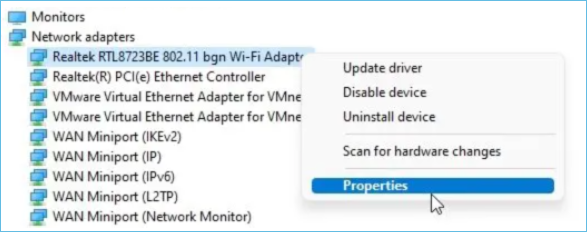
Step 1. Press the Windows Key + X button and open the Device Manager.
Step 2. Open the properties of your installed WiFi drivers.
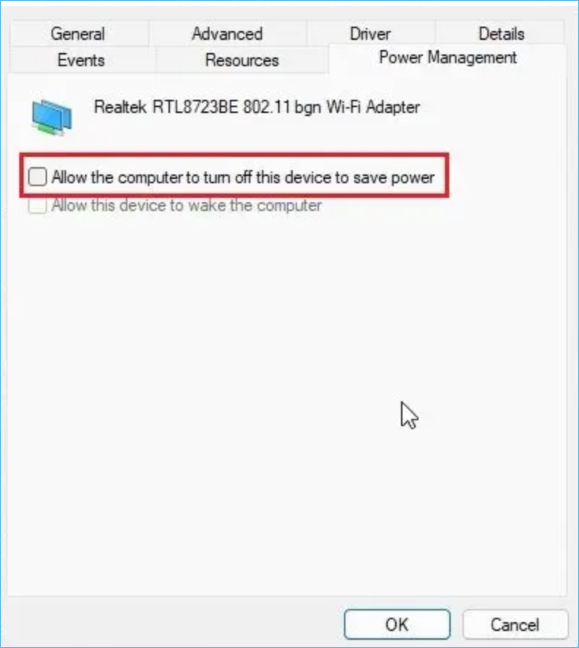
Step 3. Move to the Power Management tab > Uncheck the "Allow the computer to turn off this device to save power" option > Hit the OK button.
Method 8. Change Power Plan Settings
You can change your power plan settings for maximum Windows 11 computer performance. Follow the steps below:
Step 1. Search Power plan from Windows 11 search option and option Edit power plan.

Step 2. Choose the "Change advanced power settings" option from the list.
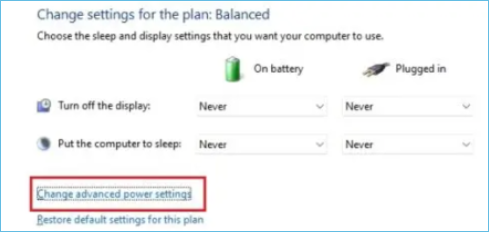
Step 3. Change the Wireless Adapter Settings to maximum performance and hit the OK button.

Once done, restart your system, and check if the issue persists or not.
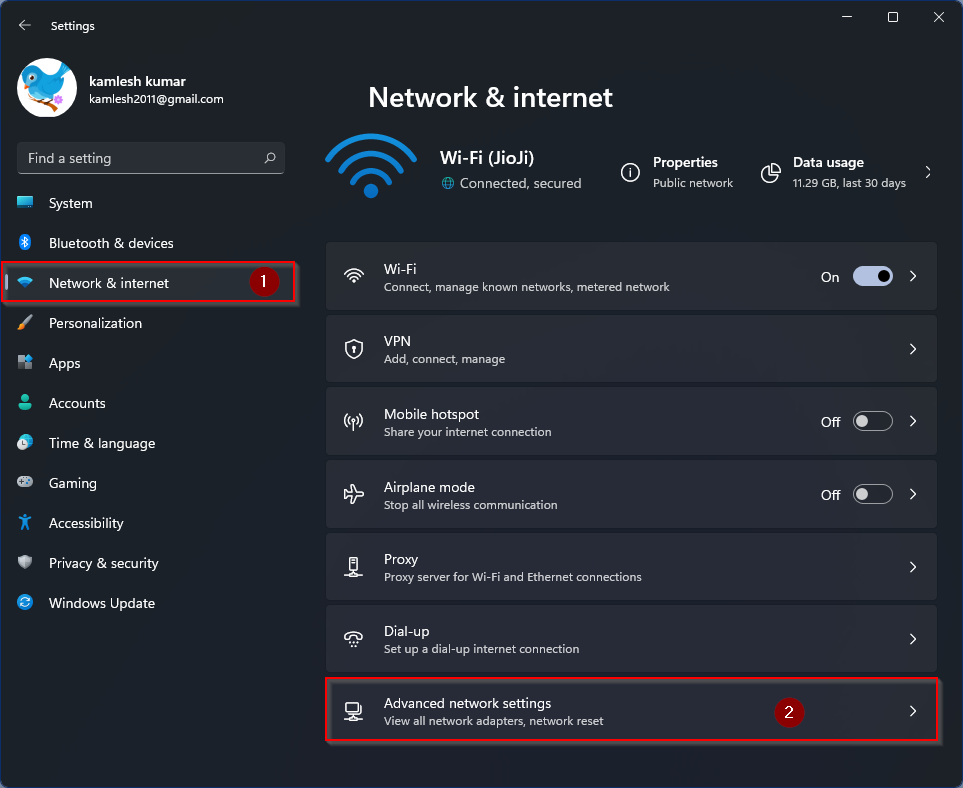
Method 9. Reset Network Settings
Another thing that you can try if nothing works is to reset your network settings. Follow the below steps:
Step 1. Open Windows Settings using Windows + I shortcut key.
Step 2. Click the Network & Internet option and select Advanced network settings.

Step 3. Hit the "Network reset" option.
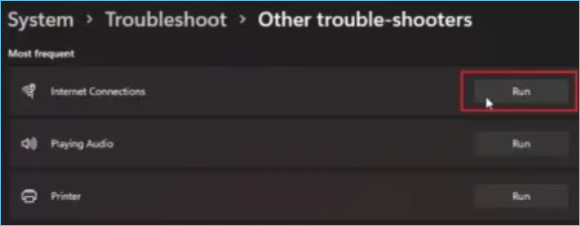
Method 10. Run Network Troubleshooter
A network troubleshooter in Windows 11 helps you fix multiple issues regarding your internet and connectivity. Run the network troubleshooter by following the steps below:
Step 1. Press Windows Key, search for troubleshooting and open Troubleshoot settings.
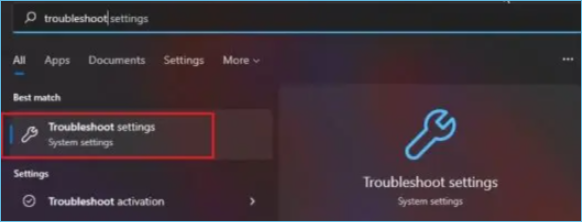
Step 2. Select "Other troubleshooters"
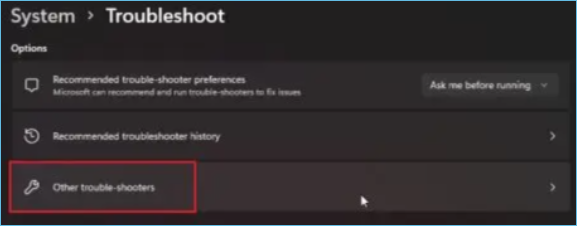
Step 3. Run the Internet Connections troubleshoot.
Try Another 3 Advanced Solutions to Fix Unstable WiFi Problems in Windows 11
The last part consists of simple fixes for WiFi issues in Windows 11. If you are still unable to resolve your issue, follow the advanced methods below.
- 1. Reinstall the Network Adapter
- 2. Install the Lasted Windows 11 Build
- 3. Perform a Repair Install (Clean Install)
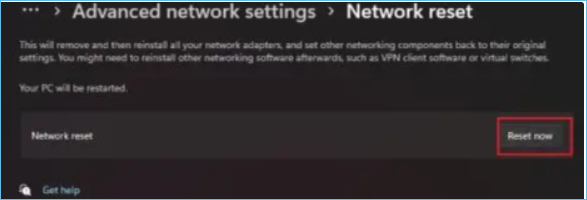
Advanced Method 1. Reinstall the Network Adapter
Improper Network Adapter settings can result in Windows 11 WiFi disconnection issues. If such is the case, you need to reinstall the Network adapter. Follow the guide below:
Step 1. Open Windows 11 Settings.
Step 2. Open the Network & Internet from Windows Settings and click on the Advanced network settings.
Step 3. Click on the Network reset option from the More settings section.
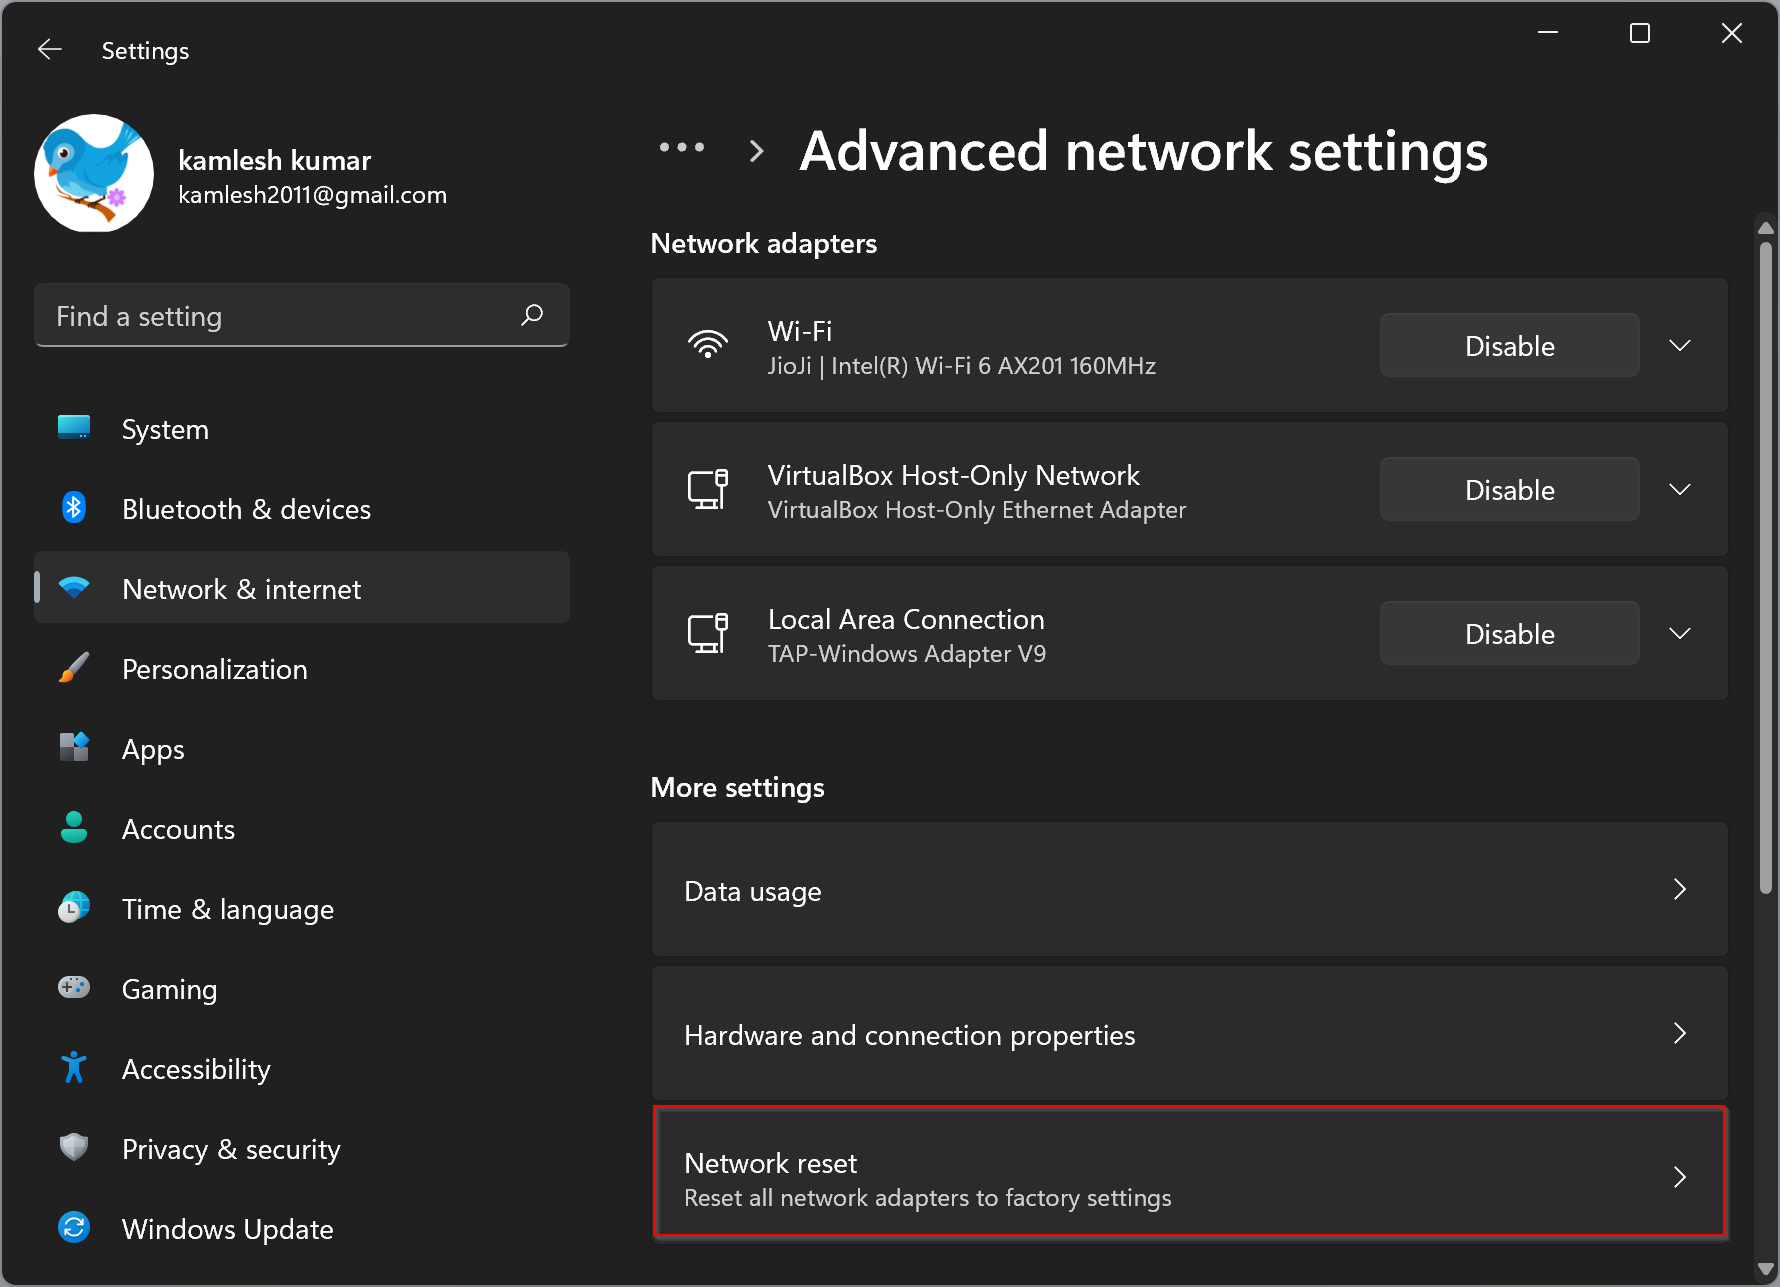
Step 4. Click the Reset now button. It will automatically remove and then reinstall network adapters.
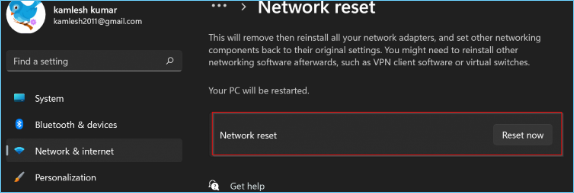
Now, wait for your computer to restart. After restarting, you will see that your network adapters have been reinstalled.
Advanced Method 2. Install the Lasted Windows 11 Build
Running an older Windows 11 built can also be a significant reason for your WiFi problems. To eliminate the WiFi keep disconnecting issue, you need to update your Windows 11 to the latest build.
Follow the below steps to install the latest Windows 11 build:
Step 1. Go to Windows 11 settings.
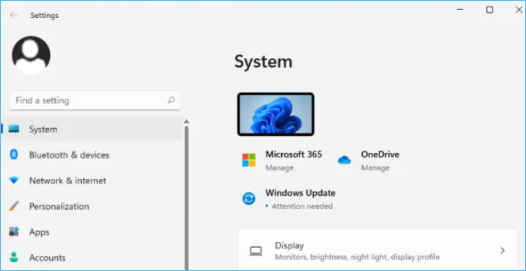
Step 2. Click on Windows Update from the Settings menu.
Step 3. Click on check for updates from the Windows Update.
It will check and show you if there are any updates to your current Windows 11 version. If it shows nothing, you are already on the latest build of Windows 11.
Advanced Method 3. Perform a Repair Install (Clean Install)
Unfortunately, if nothing has worked for you, you need to clean install your Windows 11. But, before going for this option, make sure you have created a complete backup of your existing data and files.
EaseUS Todo Backup
EaseUS Todo Backup is simple-to-use and reliable software that helps you automatically create a backup of your important files. So, before you clean install Windows 11, create a backup of files, disks, partitions, etc., using this recommended software.
Secure Download
You can follow the step-by-step guide below to create a backup of your data by using EaseUS backup tool before performing a repair install.
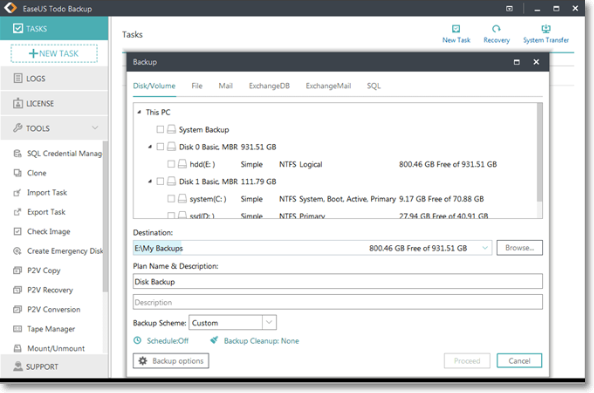
Step 1. To initiate a backup, click the Select backup contents option.

Step 2. There are four data backup categories, File, Disk, OS, and Mail, click File.

Step 3. On the left, both local and network files will be shown. You may extend the directory to pick the backup files.

Step 4. Follow the on-screen instructions and choose a location to store the backup.

Click Options to encrypt the backup with a password in Backup Options, then click Backup Scheme to specify the backup schedule and start the backup at a certain event. There are also other additional choices you may choose to tailor the backup process to your requirements.

Step 5. The backup may be stored on a local disk, EaseUS' online service, or NAS.

Step 6. EaseUS Todo Backup enables customers to back up data to a third-party cloud drive as well as its own cloud drive.
If you want to back up data to a cloud drive provided by a third party, choose Local Drive, scroll down to add Cloud Device, and then add and log in to your account.

You can also choose the EaseUS cloud drive. Sign up for an EaseUS Account, then click EaseUS Cloud and log in.

Step 7. Click Backup Now to begin the backup process. The backup job will be presented as a card on the left side of the panel after it has been finished. Right-click the backup job to handle it further.

Now, follow the below steps to perform a repair install:
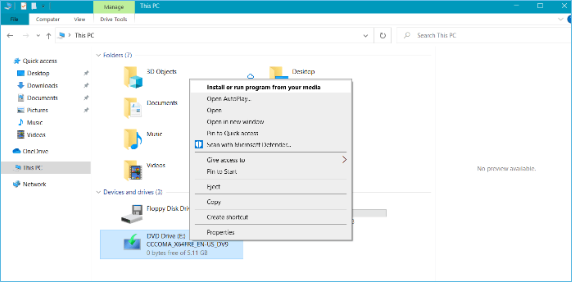
Step 1. Double click on the mounted Windows 11 ISO setup file to open Windows 11 setup.
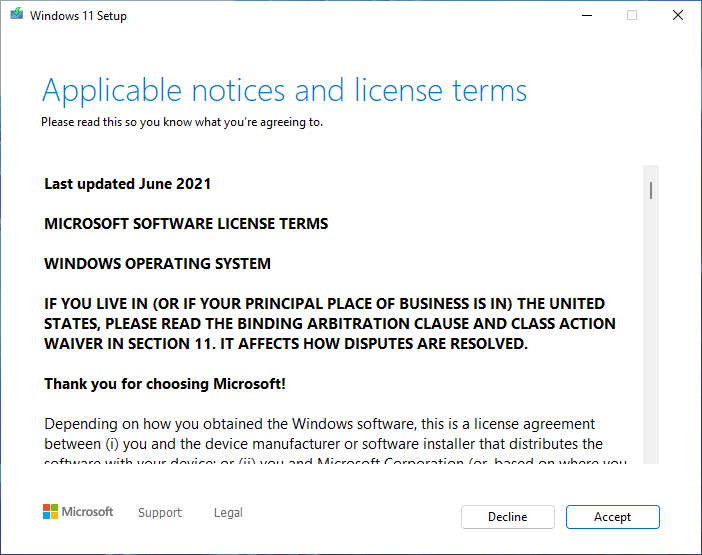
Step 2. Click Next on the Windows 11 setup and agree to license terms.
Step 3. Windows 11 will show you that it is ready to Install. Click on the Install button.

Step 4. The system will restart and see the Windows 11 installation screen.

Step 5. Wait for the process to complete.

Once the process is complete, Windows 11 will be repaired and installed on your computer. You can now restore the backup you created with EaseUS Todo Backup software. After everything is done, your WiFi will start to work without any issue.
Closing Words - Backups are Always Concerned in Fixing Any Windows-related Problems
Whenever you work on any Windows-related issue, the most important thing is to have an up-to-date backup copy of your data because any fix in Windows has a slight probability that it can accidentally delete or corrupt your existing data.
Especially in the case of Windows 11 repairing, you must create a backup first before proceeding. Users have lost their data many times during Windows repair and clean installation.
Thankfully, the trouble of creating a backup of data is resolved using EaseUS Todo Backup. It is GUI-based, and you need to perform just a few clicks to ultimately create a backup of your data which you can restore at any time.
Secure Download
Was this page helpful? Your support is truly important to us!

EaseUS Todo Backup
EaseUS Todo Backup is a dependable and professional data backup solution capable of backing up files, folders, drives, APP data and creating a system image. It also makes it easy to clone HDD/SSD, transfer the system to different hardware, and create bootable WinPE bootable disks.
Secure Download
-
Updated by
![]()
Daisy
Daisy is the Senior editor of the writing team for EaseUS. She has been working at EaseUS for over ten years, starting as a technical writer and moving on to being a team leader of the content group. As a professional author for over ten years, she writes a lot to help people overcome their tech troubles.…Read full bio -
Written by
![]()
Jean
Jean is recognized as one of the most professional writers in EaseUS. She has kept improving her writing skills over the past 10 years and helped millions of her readers solve their tech problems on PC, Mac, and iOS devices. …Read full bio
Related Articles
![]() How to Update Acer BIOS with No Data Loss
How to Update Acer BIOS with No Data Loss![]() Top 10 Best Gmail Backup Tools in 2026 (Free & Paid)
Top 10 Best Gmail Backup Tools in 2026 (Free & Paid)![]() Download WinPE Builder for All Windows
Download WinPE Builder for All Windows![]() Top 4 Third-party Time Machine Alternatives for Windows 11/10/8/7
Top 4 Third-party Time Machine Alternatives for Windows 11/10/8/7![]() How to Use ASUS EZ Update for ASUS BIOS Update on Windows
How to Use ASUS EZ Update for ASUS BIOS Update on Windows![]() How Long Does it Take to Install Windows 10/11
How Long Does it Take to Install Windows 10/11


Topic Clusters


Interesting Topics