Page Table of Contents
About the Author
Hot Topics
Updated on Jan 29, 2026
SSD is a solid-state drive used as a storage device that offers better performance than HDD. Many users choose to migrate their data to SSDs. Or they may have SSDs and HDDs coexist on their computers. When running out of space, you may want to resize partition on SSD.

Resizing partitions on SSD can efficiently use the space on SSD and manage the disk better. You may want to extend SSD partition Windows 10, or you may want to shrink the partition on SSD to increase the size of other drives. No matter why you want to resize partition on SSD, this article will show you three ways to complete the task. You can choose the correct method according to your SSD partition.
How to Resize Partition on SSD without Losing Data – Three Methods
Resizing partitions on SSD on Windows 11/10 is not a difficult task. You can use two built-in tools of Windows: Disk Management and Diskpart. or choose a reliable third-party tool: EaseUS Partition Master Free. All three methods can help you easily extend or shrink the partitions on SSD.
You can follow the table below to compare and choose the proper method to resize a partition on SSD.
| Comparison | |||
|---|---|---|---|
| Supported SSD Format | Both NTFS and FAT32 | Only NTFS | Only NTFS |
| Resize Partition | From head to the end of the partition | Only one side supported | Only one side supported |
| Operation difficulty | Easy, three steps | Medium, six steps | Difficult, commands required |
| Suitable Users | For all users | For experienced users | For experts |
EaseUS Partition Master has more features for resizing partitions on SSD. And it can also resize FAT32 partition, a file system format not supported by Windows' built-in tools. Even novice users can easily resize partitions on SSDs with EaseUS Partition Master.
Let's begin with the easiest way and see how the three methods work to resize partitions on SSD.
Method 1. Resize Partition on SSD via EaseUS Partition Master
EaseUS Partition Master can support all Windows users, including Windows 11/10/8/7 and Windows XP. It can manage disk space better for different uses. Even if you are not skilled in computers, you can easily learn how to resize a partition on an SSD. Follow the steps below to use the "Resize/Move" function to extend or shrink the partition on the SSD.
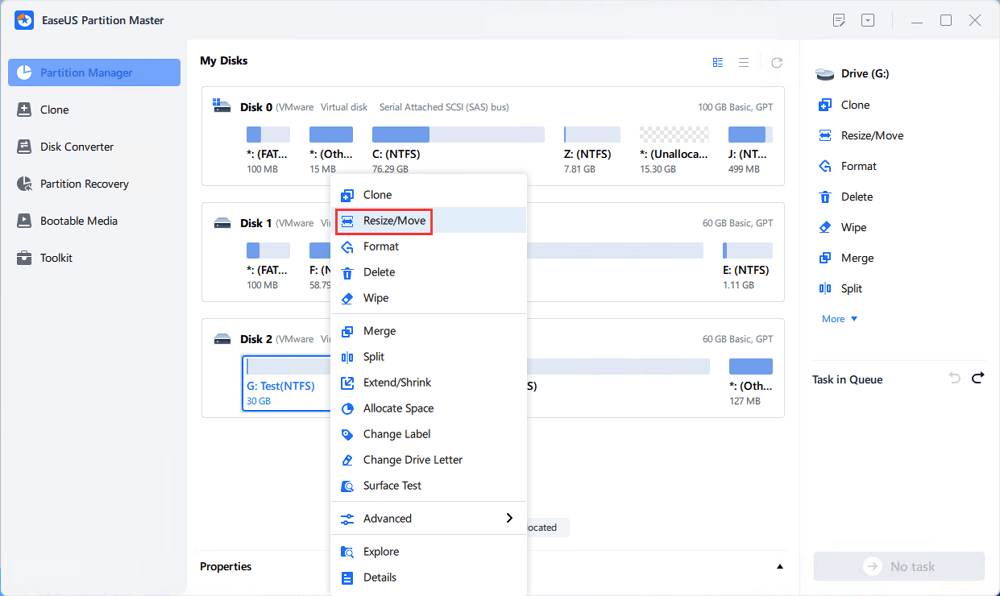
Step 1: Locate and select the target drive/partition
Launch EaseUS Partition Master and go to Partition Manager, select the target drive or partition you need to adjust its size, right-click on it and choose "Resize/Move".
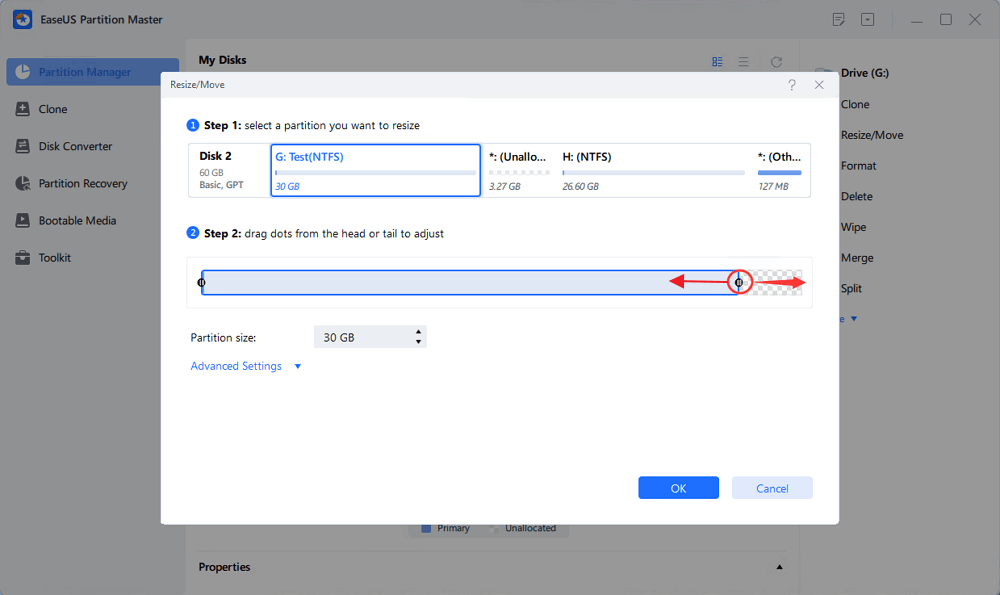
Step 2: Resize or move the partition
1.To shrink the partition, simply drag one of its ends to free up unallocated space. Once done, click "OK".
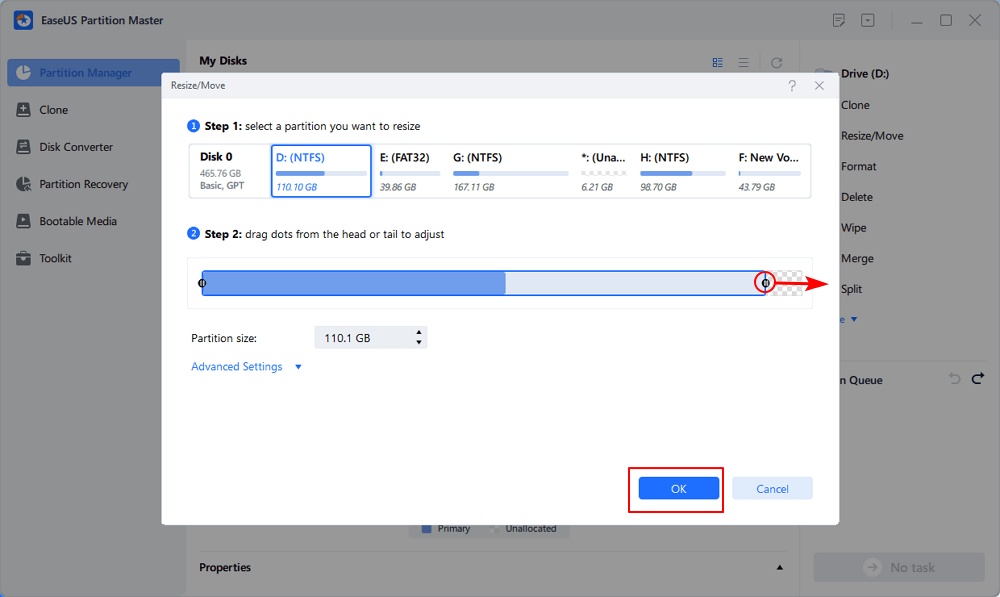
2. To extend the partition, make sure that there is unallocated space aside (if there isn't, follow the above steps to create some). In the same way, drag your mouse into the unallocated space. Click "OK".
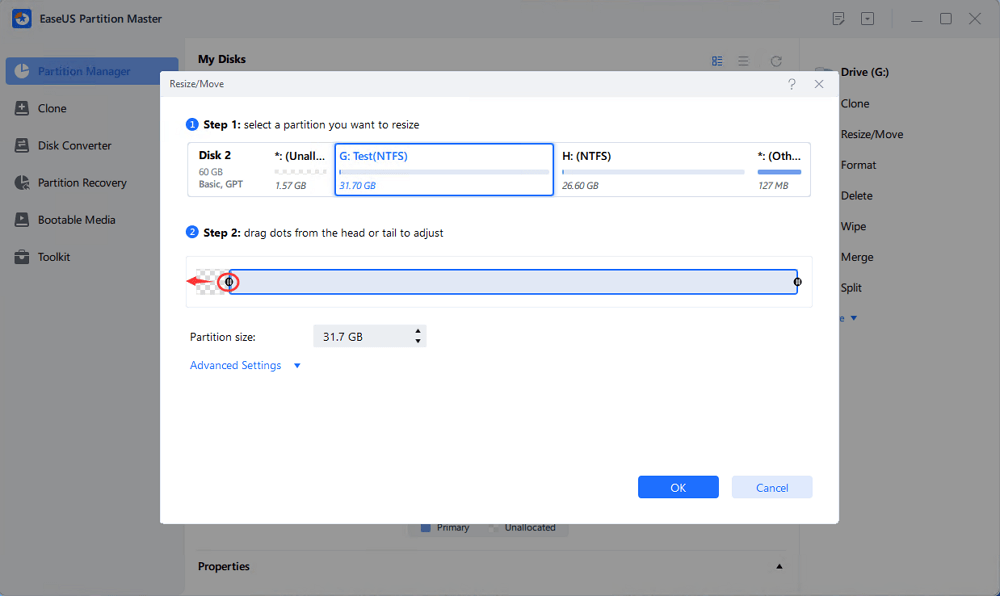
3. To move a partition position, suppose you have created and left the unallocated space next to the target partition. If no, free up some unallocated space first.
Then, right-click the target partition, select "Reize/Move". Then drag the whole partition leftward or rightward to adjust its position. Click "OK" to confirm.
Step 3: Confirm the result and apply changes
At this step, you will see the new disk partition information & diagram.
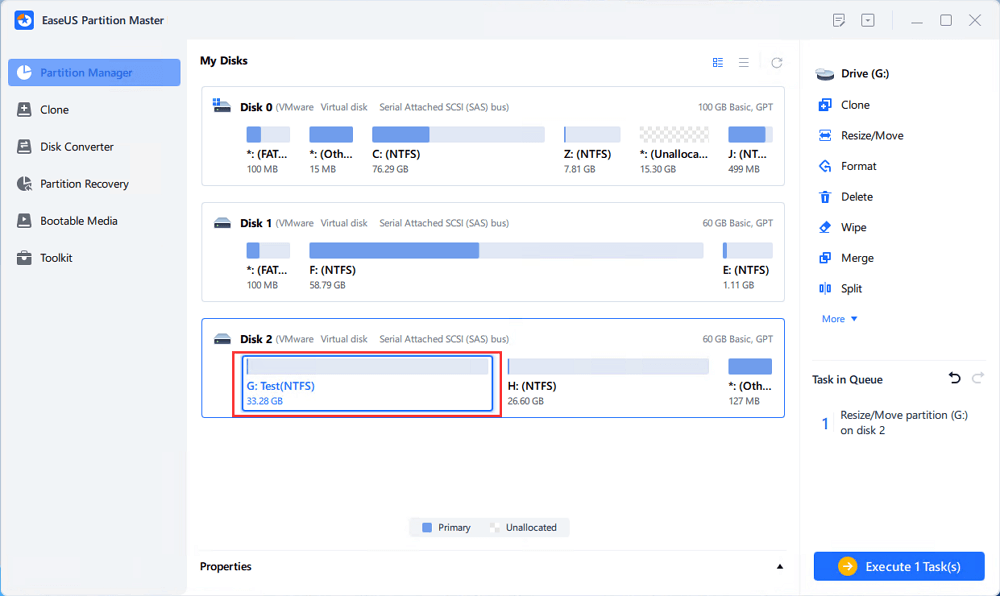
To save changes, click the "Execute Task" button and then "Apply".
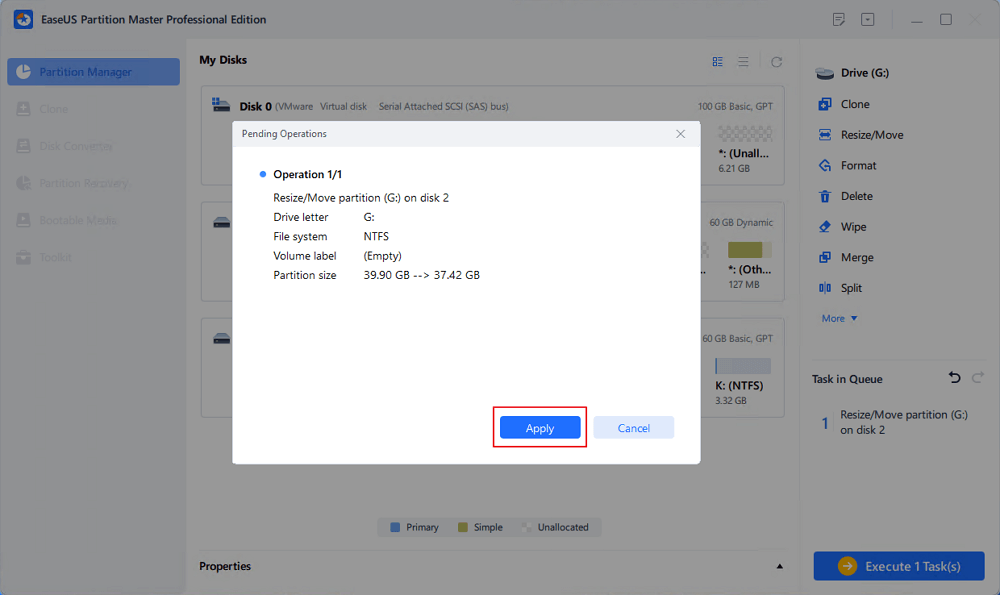
EaseUS Partition Master makes it much easier to resize partitions on SSD, and it is a good disk partition helper. You can download it to enjoy the benefits it brings.
You May Also Like: How to Partition a Hard Drive or SSD?
Method 2. Resize Partition on SSD via Disk Management
What is Disk Management? It is a manual method for Windows 11/10 to extend, shrink, and adjust partition size on SSD. You can use the "Extend Volume" or "Shrink Volume" to change the partition on SSD.
- Tip
- If you want to extend the partition on SSD via Disk Management, you need to ensure unallocated space exists on the right side of the target partition. And you are not able to merge non-adjacent partitions Windows 10.
Now, follow the steps below to resize the partition on the SSD.
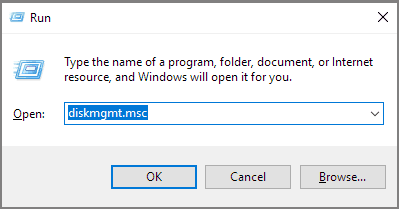
Step 1. Press and hold "Windows+R" and type "diskmgmt.msc" to open Disk Management.
Step 2. Choose the partition on the SSD and right-click it.
Step 3. Choose "Extend Volume" to increase the space of the partition on the SSD. Or you can select "Shrink Volume" to decrease the partition.
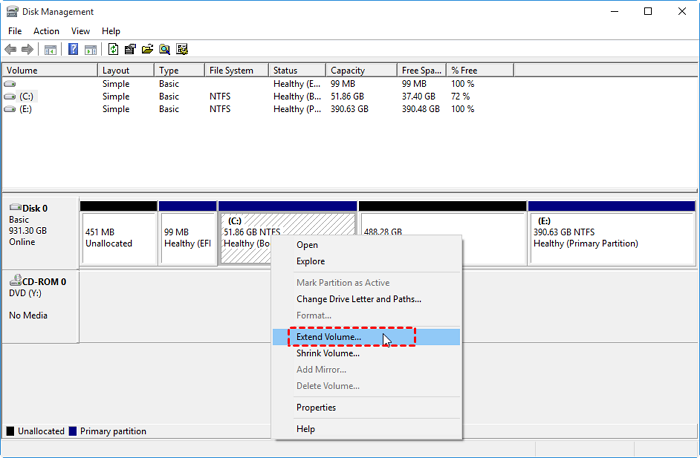
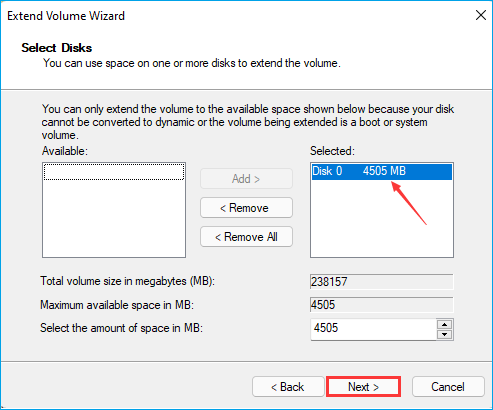
Step 4. Click "Next" in the Extend Volume Wizard windows.
Step 5. Set the amount of space for the partition on the SSD. And click "Next."
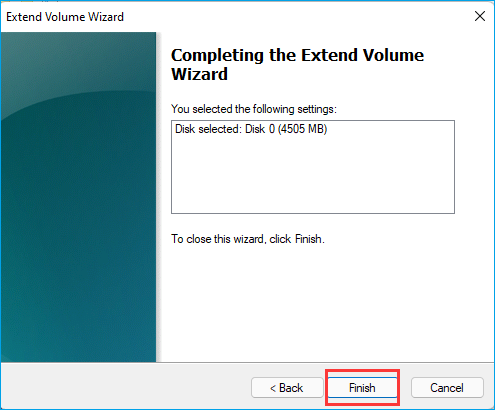
Step 6. Click "Finish" to complete the task of resizing the partition on the SSD.
- Notice:
- If the extend volume greyed out or you can't shrink volume, it may be caused by the wrong file system format - FAT32. You can turn to EaseUS Partition Master.
Method 3. Resize Partition on SSD via Diskpart Command
Diskpart command is provided for experts. It has more functions than Disk Management. It can create, delete, and resize partitions on SSD. If you choose this method, you need to be careful when inputting the commands. Let's look at how to resize partitions on an SSD using CMD.
Step 1. Open the run window by pressing "Window+R."
Step 2. Type "cmd" in the run window and hit "Enter."
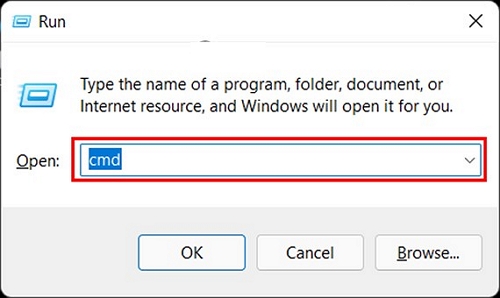
Step 3. Input "diskpart" and hit "Enter" to open the command window.
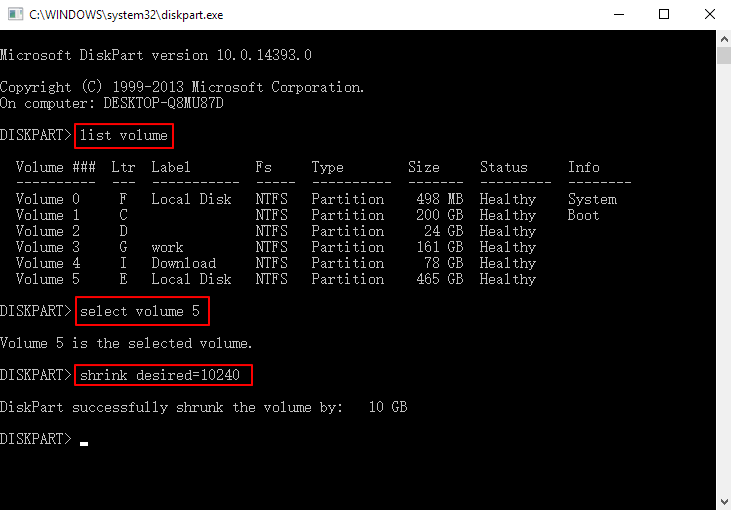
Step 4. Input the following command and hit "Enter" after each command.
list volume (To see all volumes on the computer)
select volume 5 (5 refers to the target volume number on SSD)
shrink desired=10240 (You can change the 10240 to a suitable size and change "shrink" to "extend" to extend the partition)
Step 5. Type "exit" to close the window and finish resizing partitions on SSD.
Although the Diskpart command is a little complicated, it is a powerful tool. You can also use extend partition with Diskpart on Windows.
If you don't frequently use partition management tools, it would be better to get a portable one so that you don't have to install it on your computer. The following page will help you decide the most suitable portable partition resizer.
Top 4 Best Partition Resizer Portable Review: Pros and Cons
Looking for a portable partition resizer? This article compares 4 tools from multiple aspects. Come and check this page, and you may find the best one for you.
Conclusion
This article introduces three ways to resize partition on SSD. You can use Disk Management and Diskpart commands to adjust the partition size on Windows 11/10. But you need to be familiar with some computer knowledge.
EaseUS Partition Master is a recommended tool. It can save more time to adjust the partition size on SSD. It is easy to use but has powerful functions. It can break the limitations of Windows built-in tools, such as resizing FAT32 partition and merging non-adjacent partitions.
FAQs About How to Resize Partitions on SSD
If you have further questions about resizing the partition on SSD, continue to read this part, and I hope it can help you.
1. Can you change the partition size without losing it?
Yes, you can change the partition size by extending or shrinking the partition space. Both methods will not lose data.
2. How do I shrink my C drive on my SSD?
You can shrink your C drive on SSD with several methods. Follow the steps below to shrink the C drive on SSD via Disk Management on Windows.
Step 1. Right-click "Computer" and choose "Manage."
Step 2. Double-click "Disk Management" and select the C drive on SSD.
Step 3. Right-click C drive and choose "Shrink Volume."
Step 4. Set the amount of space you want to shrink.
3. How do I increase C drive space on my SSD?
It is easy to increase C drive space on SSD. You can use the "Extend Volume" function in Disk Management or use the Diskpart command. Follow the steps below to increase C drive space on SSD using CMD.
Step 1. Open the run windows and type "diskpart.exe."
Step 2. Type the following commands and hit "Enter" each time.
- list volume
- select volume x
- extend size
Step 3. Type "exit" to close the window.
How Can We Help You
About the Author
Updated by Tracy King
Tracy became a member of the EaseUS content team in 2013. Being a technical writer for over 10 years, she is enthusiastic about sharing tips to assist readers in resolving complex issues in disk management, file transfer, PC & Mac performance optimization, etc., like an expert.
Cici is the junior editor of the writing team of EaseUS. She accepted the systematic training on computers at EaseUS for over one year. Now, she wrote a lot of professional articles to help people resolve the issues of hard drive corruption, computer boot errors, and disk partition problems.
Product Reviews
-
I love that the changes you make with EaseUS Partition Master Free aren't immediately applied to the disks. It makes it way easier to play out what will happen after you've made all the changes. I also think the overall look and feel of EaseUS Partition Master Free makes whatever you're doing with your computer's partitions easy.
Read More -
Partition Master Free can Resize, Move, Merge, Migrate, and Copy disks or partitions; convert to local, change label, defragment, check and explore partition; and much more. A premium upgrade adds free tech support and the ability to resize dynamic volumes.
Read More -
It won't hot image your drives or align them, but since it's coupled with a partition manager, it allows you do perform many tasks at once, instead of just cloning drives. You can move partitions around, resize them, defragment, and more, along with the other tools you'd expect from a cloning tool.
Read More
Related Articles
-
How to Fix ASUS Stuck on Logo | 7 Efficien Solutions💡
![author icon]() Cici/2026/01/29
Cici/2026/01/29 -
How to Find Bitlocker Recovery Key on Windows 11?
![author icon]() Sherly/2026/01/29
Sherly/2026/01/29 -
How to Enable Secure Boot on MSI PC to Play Battlefield 6
![author icon]() Sherly/2026/01/29
Sherly/2026/01/29 -
How to Tell If a Hard Drive Is New or Used [2026 Tutorial]
![author icon]() Tracy King/2026/01/29
Tracy King/2026/01/29
Hot Topics
EaseUS Partition Master

Version 20.0 is here - full exFAT support, easier disk partitioning, and PC performance optimization.


