
Content
Page Table of Contents
About the Author
Hot Topics
- Important
- Microsoft has confirmed that Windows 10 support will officially end on October 14, 2025. After this date, the system will no longer receive security updates, bug fixes, or technical support. To understand what this means for users, check our Windows 10 End of Support, Stay or Upgrade.
When you happen to meet the 'can't shrink volume Windows 10' issue, here is the free EaseUS disk manager and other solutions you can try:
Error: Can't Shrink Volume Windows 11/10
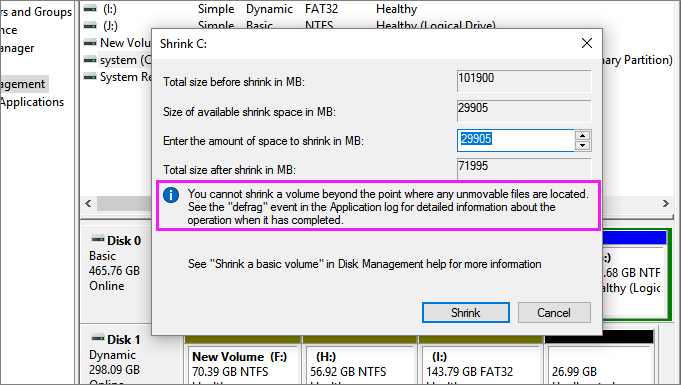
"Hi guys, do you know why Windows 10 cannot shrink volume? It doesn't allow me to shrink C: drive on my laptop? I want to shrink the C drive, but the Shrink button is greyed out.
Disk Management won't allow me to shrink or decrease C drive with an error message, saying that 'You cannot shrink a volume beyond the point where any unmovable files are located. See the 'defrag' event in the Application log for detailed information about the operation where it has completed.' Can you help me to fix the cannot shrink volume in Windows 10 issue? Thank you."
Why Can't Shrink Volume in Disk Management on Windows 11/10
To fix this issue effectively, it's highly necessary to understand what causes unable to shrink C drive error. Here are the major reasons that disable you from shrinking partitions on Windows PC:
- You can't shrink a volume with unmovable files. There are unmovable files at the very end of the volume, such as the hibernation file, page files, and system volume information folder used by the System Restore.
- Not enough space for shrinking with error messages "There is not enough space available on the disk(s) to complete this operation.".
- Existing fragments separate files saved on the device.
- File system error causes volume, partition inaccessible, or invisible.
- Your partition type is FAT 32. Both Shrink and Extend Volume support NTFS partition only. You can't shrink FAT32 volume.
Any of the factors will lead to the cannot shrink volume Windows 10 problem. In these cases, how to shrink volume or how to shrink C drive? Don't fret. This article will learn to use a professional partition management tool to shrink volumes when Disk Management is not available. Moreover, we will also provide you effective methods to make the Shrink Volume option work again.
If you want shrink C drive with Windows built-in tools, you can click the link below to learn more detailed information.
How to Shrink C Drive without Losing Data [2023 Full Guide]
How to shrink C drive on Windows 10? You are in the right place if you are looking for a detailed answer about shrinking C drive. On this page, you can get three free tools to successfully shrink C drive without destroying data.
How to Shrink Volume with EaseUS Partition Management Free Tool
When you failed to shrink volume due to unmovable files or file system issues, don't worry. You can use third-party free software to partition hard drive to overcome the limitation of Microsoft technology. Powerful Disk Management alternative freeware - EaseUS Partition Master Free can help you easily shrink C drive in Windows 10/8/7 with simple clicks.
Download this user-friendly free disk management tool and learn how to shrink partitions with simple steps.
Step 1: Locate and select target partition to shrink
Go to the Partition Manager section, right-click on the partition that you want to shrink and select "Resize/Move".
Step 2: Adjust to shrink partition
Use your mouse to drag the end of the target partition to shrink partition space.
You can also adjust the partition size box to shrink the target partition. Once done, click "OK" to continue.
Step 3: Execute operation
Click the "Execute 1 Task(s)" button and "Apply" to keep all changes.
EaseUS Partition Master Free makes it effortless to partition hard drives in Windows 10. Check the following video and learn to resize C drive, allocate space from one drive to another, delete partition, and more.
How to Fix Can't Shrink Volume Error So That You Can Shrink C Drive
Before you shrink partitions, you should check how much available space you have on your disk so that you can avoid not enough space error if you manually resize your partitions. If there is enough space, but you still can't shrink, take the following different solutions for different problems.
1. Convert FAT32 to NTFS to Solve FAT32 Partitions Can't Shrink Problem
The easiest and quickest way to convert FAT32 to NTFS is using EaseUS Partition Master Free and finish the conversion with one-click. After converting, the cannot shrink volume problem won't appear, and you can start to shrink your partitions in Disk Management.
Step 1. Install and launch EaseUS Partition Master on your computer.
Step 2. Go to the Disk Converter tab, select "FAT => NTFS" and click "Next."
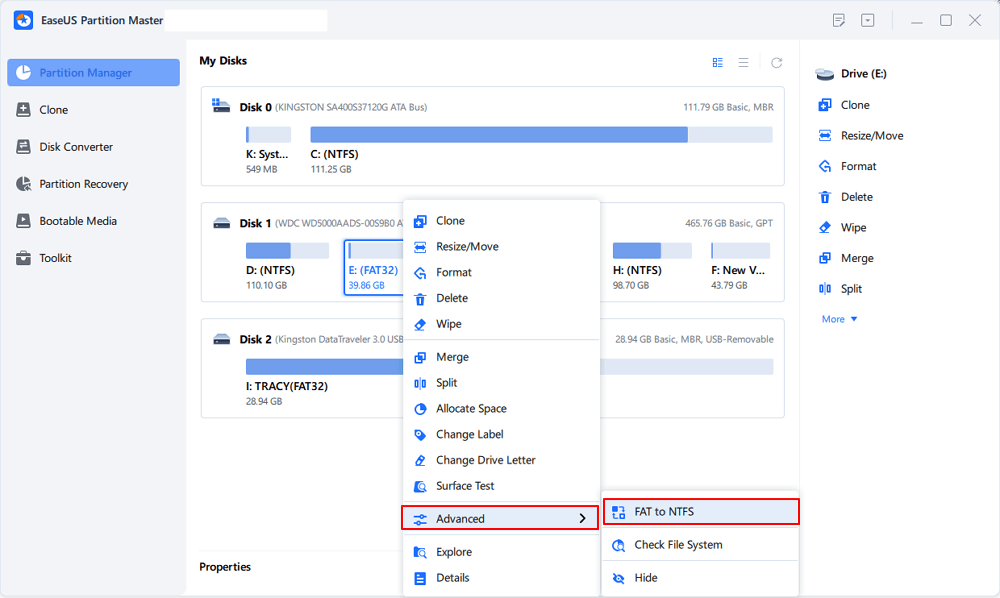
Step 3. Select the partition that you want to convert to NTFS and then click on "Convert." (Tick the "Show More" option in the panel's upper right corner to display the hidden partitions.)
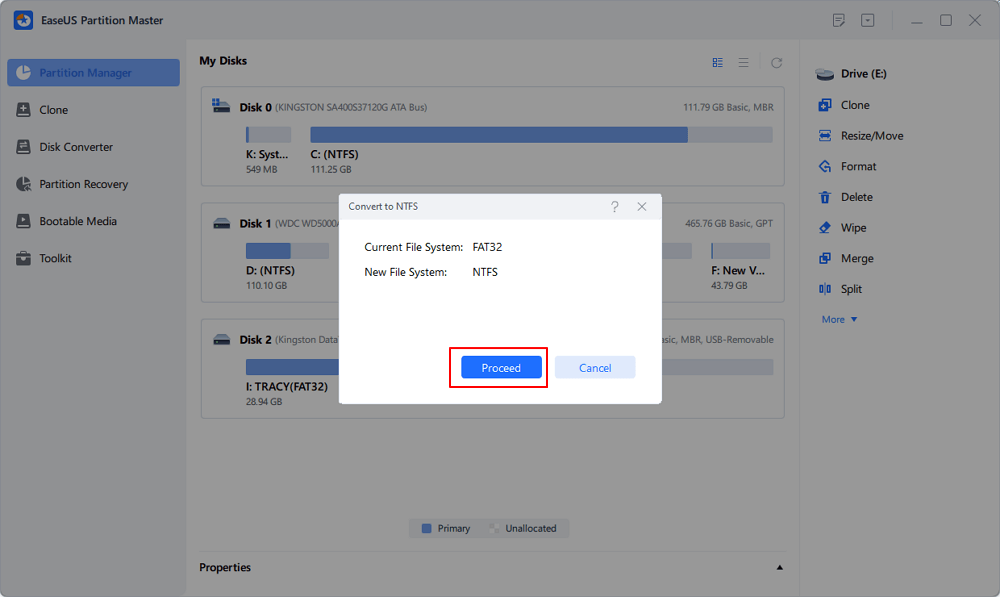
Step 4. Wait until the operation process is finished.
If you think this article is helpful for you to solve the Windows was unable to shrink volume in Windows 11/10, you can click the button below to share it to someone who needs it!
2. Defragment and Check Disk Error to Fix Windows Unable to Shrink Volume
Another method to fix the can't shrink volume issue in Windows 10, 8, or 7 is to defragment and check disk error.
Note: To resolve this issue, you need to sign in to Windows 10/8/7 with your administrator account.
Defragment hard drive partition
Step 1. Click "Start" > Select "File Explorer".
Step 2. Expand This PC tree on the left pane, right-click "Local Disk (C:)" or other partition which can't be shrunk in Windows PC.
Step 3. Select "Properties" > Go to the "Tools" tab and click "Optimize" under the Optimize and defragment drive section.
Step 4. Select the system drive (C) box on the Optimize Drives box, click "Analyze".
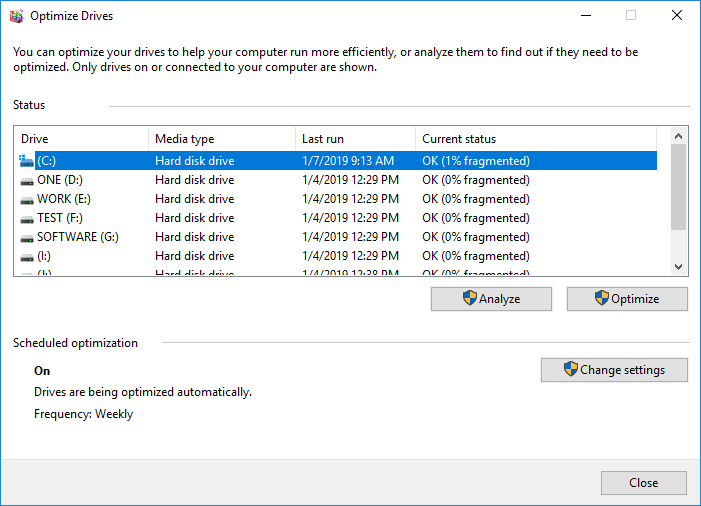
Wait until Windows completes the analysis and displays the percentage of the fragmented files in the selected drive.
Check and fix disk file system errors
If the number of bad clusters detected by dynamic bad-cluster remapping is too high, you'll not be able to shrink the partition. So to perform a disk check and repair all file system errors is your next move:
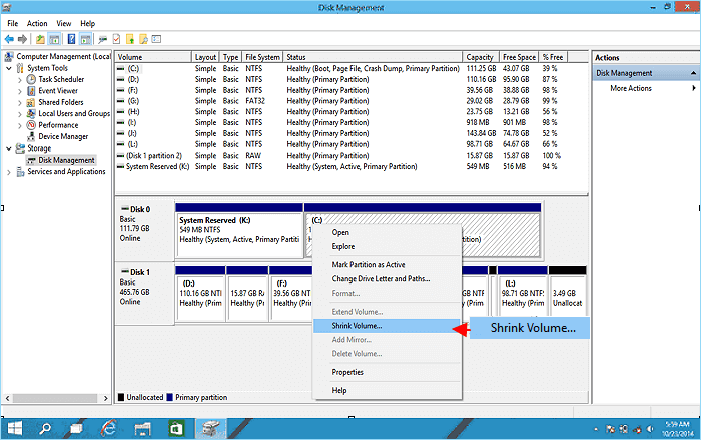
Step 1. Right-click on the drive or partition, which can't be shrunk in Windows PC, and select "Properties".
Step 2. Go to the Tools tab, click the Check button under "Error checking".
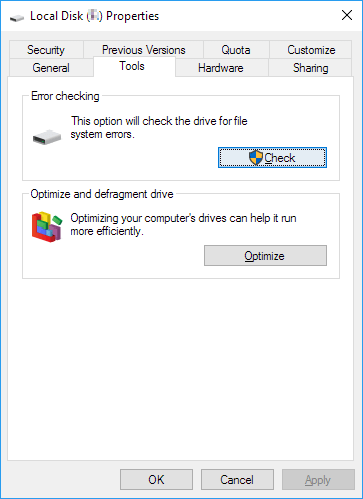
Wait to let the process complete and fix the drive for file system error.
3. Disable the Unmovable Files to Fix Cannot Shrink a Volume Beyond the Point
Windows won't let you shrink the volume because there are immovable system files at the very end of the volume, like page file, hibernation file, or system volume information folder.
The fix is to temporarily disable hibernation, the Paging file, as well as the System Restore feature. Once disabled these features, restart Windows and resize (shrink) the volume using Disk Management.
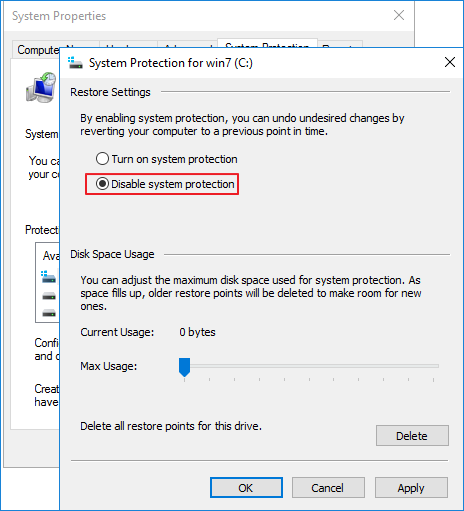
Disable System Restore
Step 1. Launch systempropertiesprotection.exe from the Run dialog.
Step 2. Select the system drive and click "Configure".
Step 3. Click "Disable system protection" and then click OK.
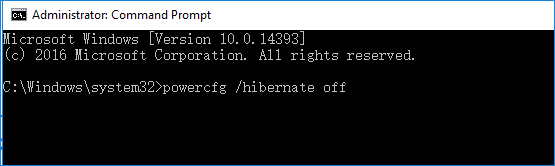
Disable hibernation file
Step 1. Click on Start, type cmd, and then right-click on Command Prompt to select "Run as administrator".
Step 2. Run the following command: powercfg /hibernate off. This will turn off the hibernate feature and clear the hiberfil.sys from the system drive.
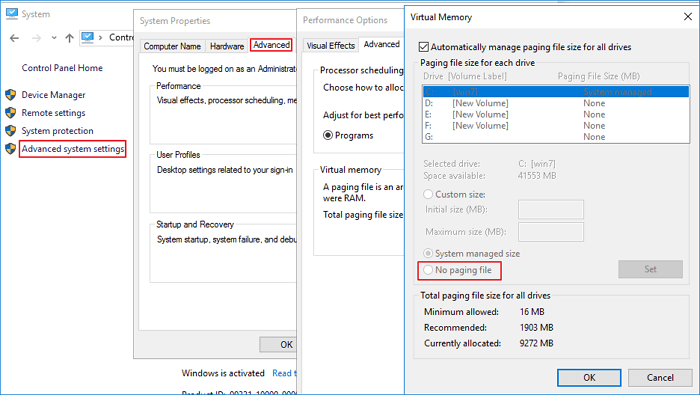
Disable paging file
Step 1. Launch systempropertiesadvanced.exe from the Run dialog.
Step 2. Click the "Advanced" tab. Under Performance, click "Settings", click the "Advanced" tab, then click the "Change" button.
Step 3. Select "No paging file", and click "Set".
Or you can also disable kernel memory dump.
In the same Advanced Settings, go to "Startup and Recovery" > "Settings". Change the Write debugging information drop-down to "None" to disable the kernel memory dump.
Sum Up
By following the provided methods on this page, you can effectively resolve the can't shrink volume issue on Windows 11/10. We highly recommend you try EaseUS Partition Master Free to manage and optimize your disk partitions to extend your computer's life and capability.
Can't Shrink Volume Windows 11/10 FAQs
Here are more relevant topics about cannot shrink volume Windows 11/10. Find solutions if you also have these questions.
Why can't I shrink volume more?
Why can I not shrink my partition? There are several possible reasons:
- FAT32 partitions can't be shrank.
- Not enough free space
- File system or other error
- Unmovable files are located
How do you fix cannot shrink a volume beyond the point?
When you use the Disk Management in Windows 10 to shrink a volume, you may see an error message "You cannot shrink a volume beyond the point where any unmovable files are located. See the "defrag" event in the Application log for detailed information about the operation when it has completed.".
It's usually the pagefile.sys (an unmovable file), hiberfil.sys hibernation file or System Volume Information folder used by the System Restore feature prevents you from shrinking the drive beyond a point.
To fix "You cannot shrink a volume beyond the point" when shrinking the partition, you can try:
- Disabling System Restore.
- Disabling the hibernation feature.
- Disabling the Paging file.
How do I shrink a volume in Windows 11/10?
The simplest way to shrink a volume in Windows 10 is using EaseUS partition management software. It allows you to shrink C drive or any other partition by easy drag-and-drop.
Step 1. Open EaseUS Partition Master, right-click on the partition that you want to shrink and select "Resize/Move".
Step 2. You can use your mouse to drag one of its ends to shrink partition space. Or you can also adjust the partition size box to shrink the target partition. Then, click "OK".
Step 3. Click the "Execute Operation" button and "Apply" to keep all changes.
How long does it take to shrink a volume Windows 11/10?
It's very quick to shrink a partition. The amount of time it takes also depends on how much data you store in your partition.
How Can We Help You
About the Author
Sherly joined EaseUS in 2022 and she has always loved writing articles and enjoys the fun they bring. She receives professional training here, focusing on product performance and other relative knowledge. She has written over 200 articles to help people overcome computing issues.
Written by Tracy King
Tracy became a member of the EaseUS content team in 2013. Being a technical writer for over 10 years, she is enthusiastic about sharing tips to assist readers in resolving complex issues in disk management, file transfer, PC & Mac performance optimization, etc., like an expert.
Product Reviews
-
I love that the changes you make with EaseUS Partition Master Free aren't immediately applied to the disks. It makes it way easier to play out what will happen after you've made all the changes. I also think the overall look and feel of EaseUS Partition Master Free makes whatever you're doing with your computer's partitions easy.
Read More -
Partition Master Free can Resize, Move, Merge, Migrate, and Copy disks or partitions; convert to local, change label, defragment, check and explore partition; and much more. A premium upgrade adds free tech support and the ability to resize dynamic volumes.
Read More -
It won't hot image your drives or align them, but since it's coupled with a partition manager, it allows you do perform many tasks at once, instead of just cloning drives. You can move partitions around, resize them, defragment, and more, along with the other tools you'd expect from a cloning tool.
Read More
Related Articles
-
How to Fix SD Card Not Showing Up on Windows 11/10
![author icon]() Jean/2026/06/17
Jean/2026/06/17 -
How to Check/View Disk Storage/Usage on Windows 10/11
![author icon]() Tracy King/2026/07/01
Tracy King/2026/07/01 -
How to Migrate Windows 11 to New SSD [Complete Guide 2026]
![author icon]() Tracy King/2026/06/30
Tracy King/2026/06/30 -
How to Combine Two SSD Drives [Complete Guide in 2026]
![author icon]() Brithny/2026/06/30
Brithny/2026/06/30


