
Content
Page Table of Contents
About the Author
Hot Topics
This page gives you an overall glimpse of the unallocated space shown on storage devices in the Disk Management on Windows computers. Let's see what unallocated space is, what you can do with it, and how to use it on your storage devices in Disk Management.
What Is Unallocated Space | Unallocated Space Definition?
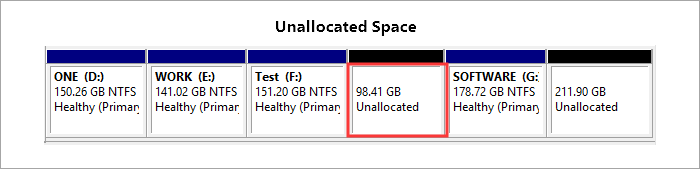
Unallocated space, also called "Free Space" by some Windows users, is an area or a certain unused storage space on a hard drive, SSD, external hard drive, USB flash drive, or SD card.
To be specific, the unallocated space is part of a storage space that hasn't been allocated to any partitions. For example, a Windows computer would define a physical space on a storage device that doesn't belong to a partition as unallocated. And you can easily view the unallocated space on your disk in Disk Management with the steps shown here:
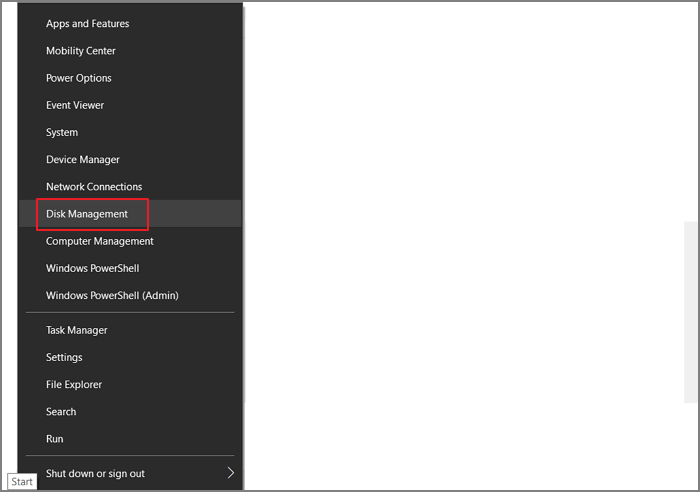
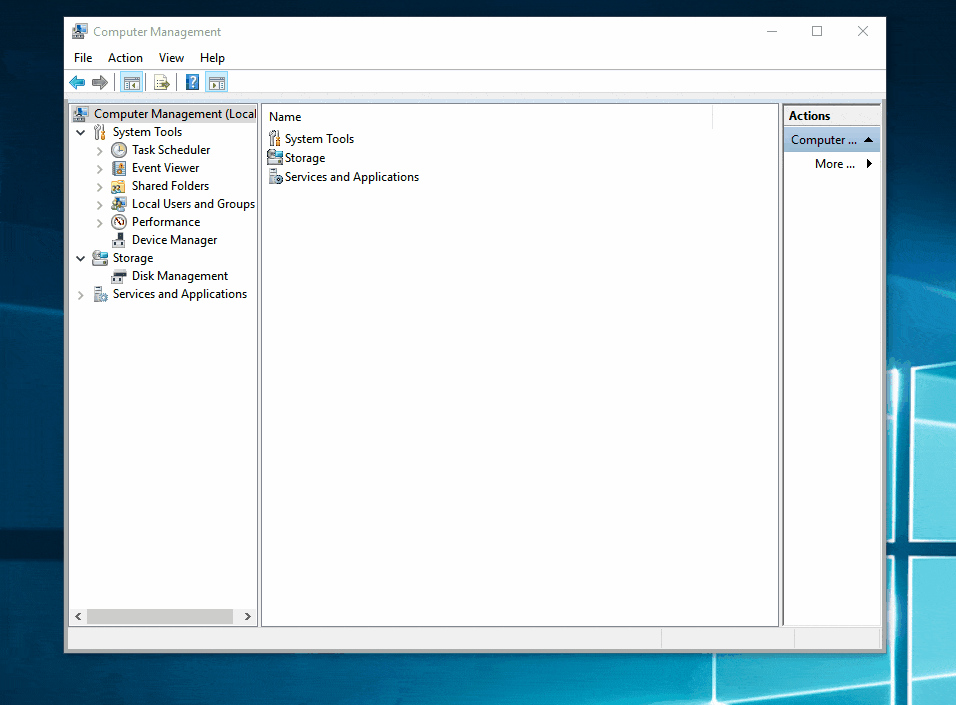
Step 1. Open Disk Management by right-clicking the Windows icon and selecting "Disk Management".
Step 2. Once disk management opens, you can view the unallocated space existing on your drives.
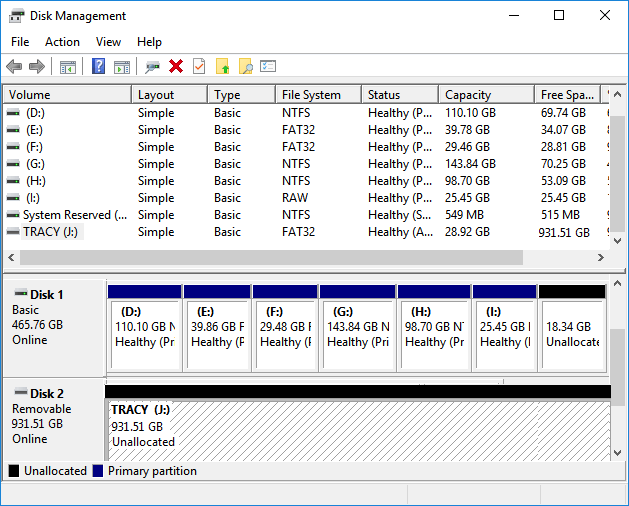
Note that the unallocated space exists on all types of storage devices like hard drives, SSDs, external HDDs/SSDs, USB flash drives, SD cards, etc. So what can I do with the unallocated space? And how do you use the free unallocated space on your drive? We'll cover all the answers for you in the coming parts.
What Can I Do with Unallocated Space in Disk Management [Pros & Benefits]
Having unallocated space on your storage devices leaves many possibilities on Windows computers and external storage devices.
Here are some benefits that explain why we would often suggest that you leave enough unallocated space on a hard drive, especially on the OS disk:
- Unallocated space helps users to create new simple volumes in Disk Management and store files on their hard drives, SSD, and external drives.
- Unallocated space allows you to extend volumes flexibly when it faces low disk space error.
- Unallocated space helps to extend the C drive and release you from computer slow issues instantly.
Aside from the above benefits, you can also use unallocated disk drives to install Windows or even macOS on a computer. In a word, installing Windows or macOS must be done on a total unallocated drive. To do so, you'll need to delete all partitions on a drive and make the whole disk unallocated.
So how do I make use of the unallocated drive or unallocated space in a storage device? Move to the next part, and we'll be showing you the complete guide on how to use unallocated free space in Disk Management on Windows.
How to Use Unallocated Free Space in Disk Management
There are two major things that you can do with the unallocated free on your disk in Disk Management:
- 1. To create new simple volumes or partition a new hard drive/SSD.
- 2. To extend partitions that are adjacent or non-adjacent.
Refer to the respective guide and learn how to use the unallocated space on your drive now:
#1. Create New Simple Volume or Partition Hard Drive/SSDs
Step 1. Right-click the Windows icon, and select "Disk Management" from the list.
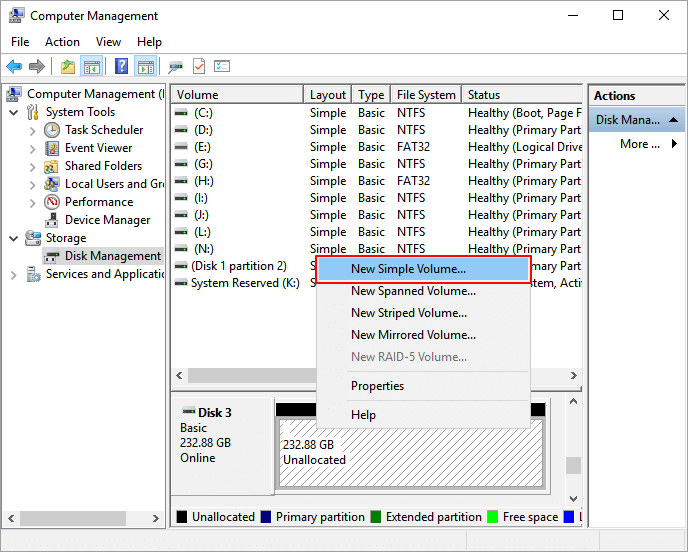
Step 2. Locate the unallocated space on your disk, right-click on it and select "New Simple Volume...".
Step 3. Set up the new simple volume by adjusting its size, file system format, and the drive letter. Click "Next" each time.
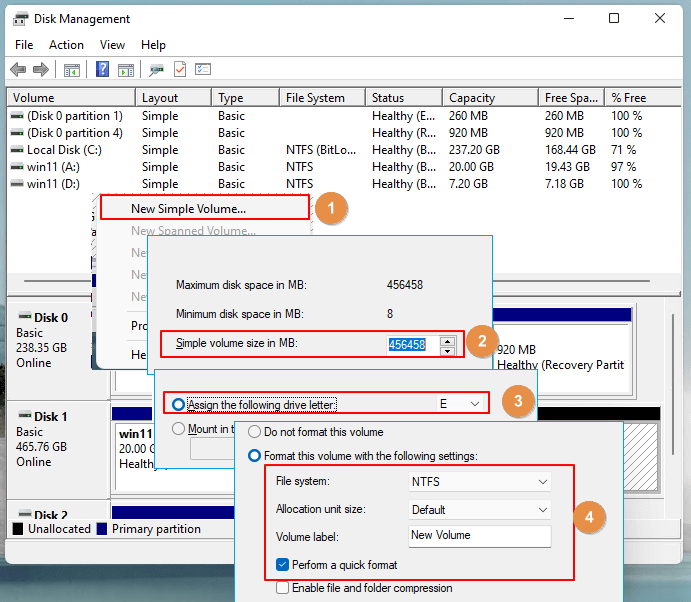
Step 4. Click "Finish" when everything is done.
If your drive is brand new and the whole disk is unallocated space, you can repeat the process to create several partitions as you want.
-
MBR disk is limited to creating 3 primary partitions and 1 extended volume. You can create several logical partitions on an extended volume.
GPT disk is not limited to partition numbers. You can create as many primary or local partitions as you want.
- Notice:
#2. Extend an Adjacent/Neighbor Partition or Add Unallocated Space to C Drive
When you have an unallocated space next to the target partition that you wish to extend, you can directly extend the volume with the unallocated free space.
Note that the unallocated space must be next to your target volume, whether it be in front of the drive or behind.
Here, we'll take adding unallocated space to C drive as an example to show you the complete process:
Step 1. Open Disk Management by right-clicking the Windows icon and selecting "Disk Management" from the list.
Step 2. Right-click the C drive or target volume, and select "Extend Volume...".
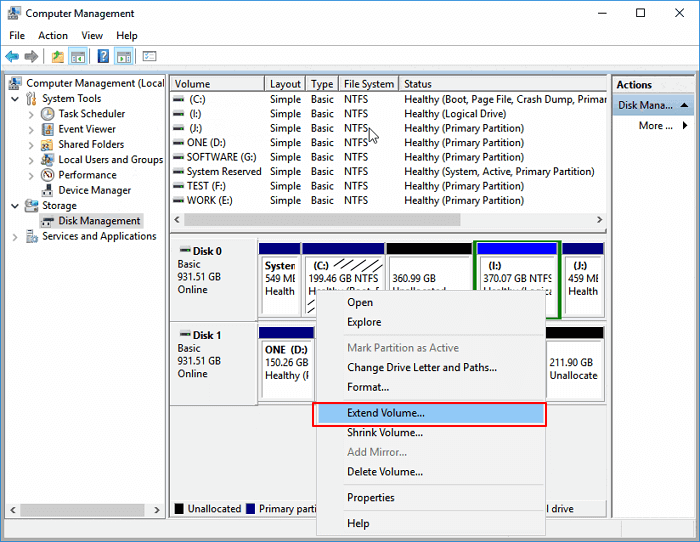
Step 3. Select the unallocated space, and click "Next" to continue.
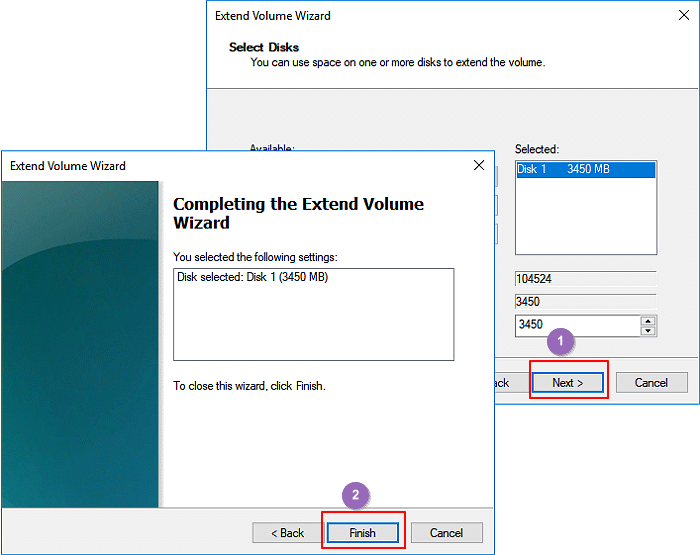
Step 4. Click "Finish".
#3. Allocate Unallocated Space to Extend a Non-adjacent Partition
When your hard drive contains unallocated space, but it's not next to your target volume, you'll need a solution to move the unallocated space first. Disk Management can't execute the work. You'll need to turn to professional partition manager software for help.
EaseUS Partition Master can fulfill your need here. You need to install it on your PC and apply it to move the unallocated space.
Here is how to do so:
1. Move Unallocated Space Next to The Target Partition
Step 1. Select the partition next to the unallocated space, select "Resize/Move".
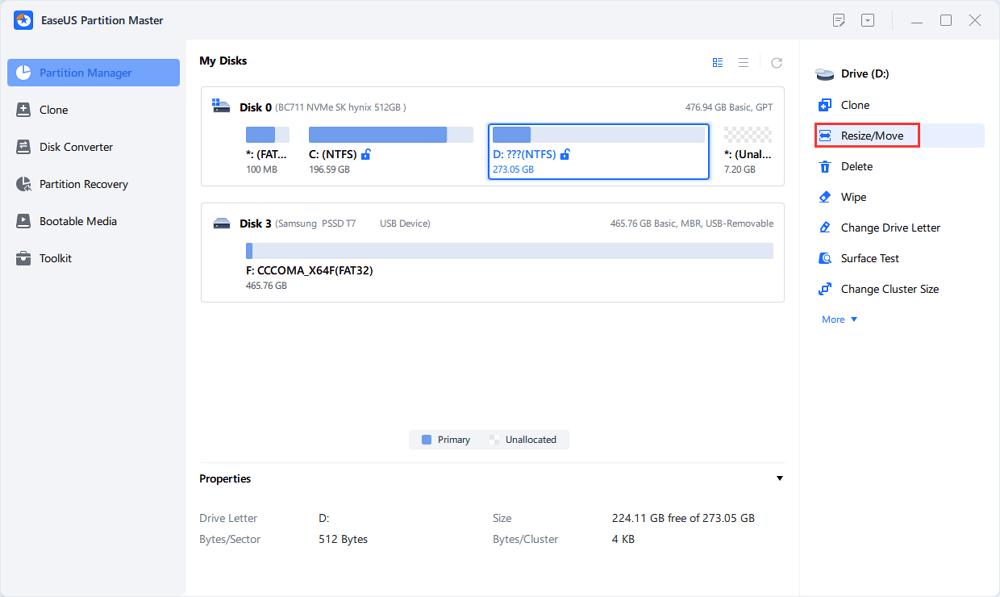
Step 2. Click on the partition and use the mouse to drag it to the left or right to move the unallocated space.
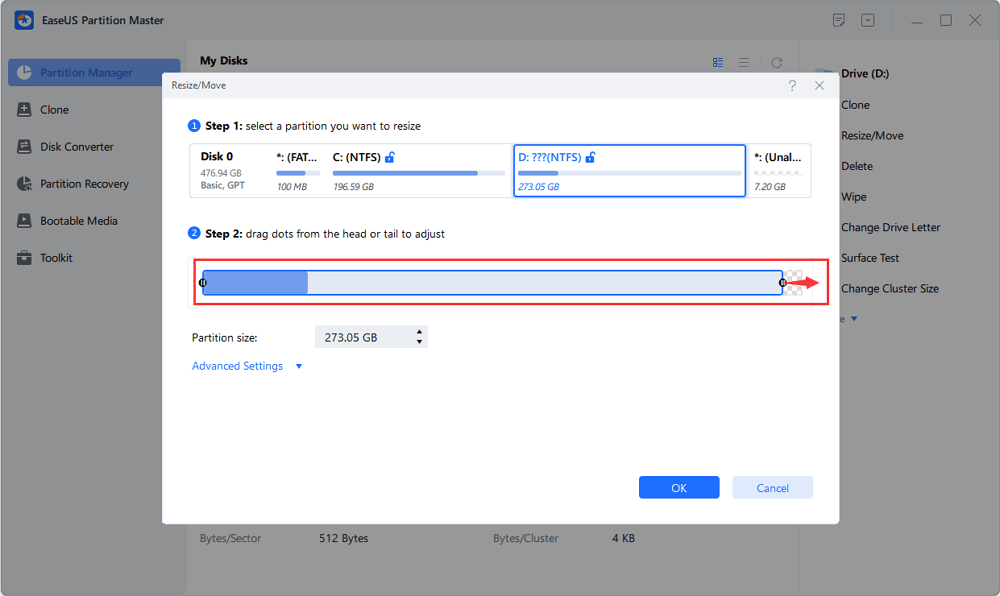
You can repeat Step 1 and 2 to move the unallocated space to the desired location.
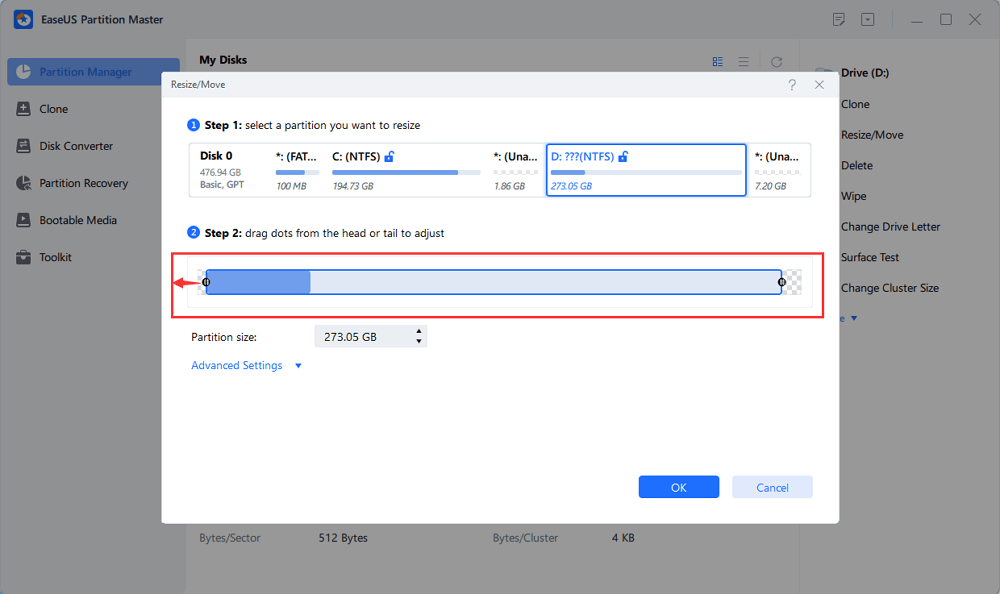
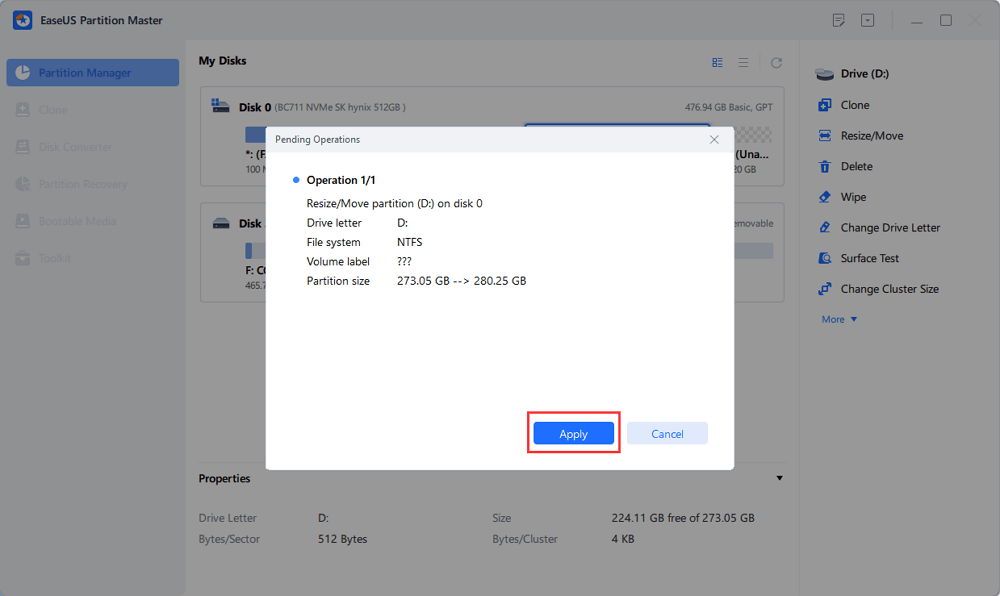
Step 3. Click "Execute Task" and "Apply", it will execute the operations to add the unallocated space into the target partition eventually.
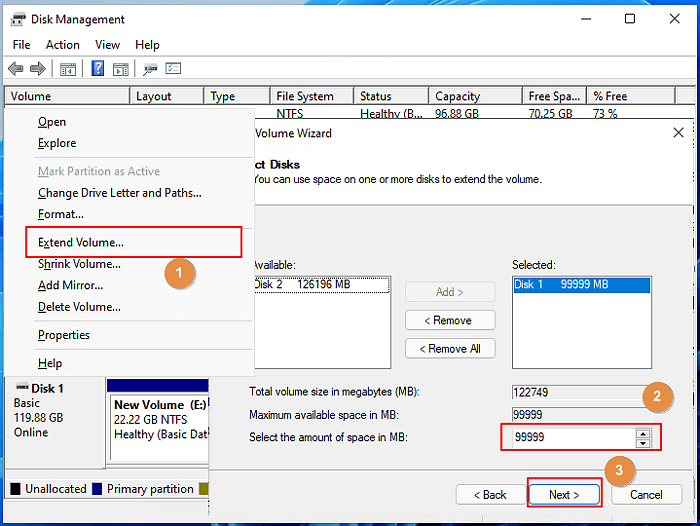
2. Extend Partition with Unallocated Space
Step 1. Open Disk Management, and right-click the target volume.
Step 2. Select "Extend Volume..." and click "Next" to continue.
Step 3. Click "Finish" when the extending partition process completes.
Once done, you've completed the process to extend a non-adjacent partition with unallocated space with the help of EaseUS partition manager software and disk management.
Unallocated Space Troubleshooting: Fix Unallocated Space Problems on Windows
In the process of using hard drive and storage devices in Disk Management, some of you may have encountered some issues that are related to the unallocated space.
Here we'll list 3 top concerned problems and show you the complete guide here to help you fix these errors effectively. Let's go.
1. Can't Extend C Drive with Unallocated Space on Windows 10
It could be many reasons that you cannot use Disk Management to extend the C drive, and you can open disk management and check if your disk has the same cases listed below.
If yes, follow the respective method to extend your C drive with success:
1.1 Unallocated Space is Not Next to the System C Drive
If the unallocated space on your computer is not next to your C drive, you can revert to Method 3 as shown above to move the unallocated space after the C drive first with the help of EaseUS Partition Master.
Then extend the C drive, and add unallocated space into the C drive with Disk Management as shown in Method 2.
1.2 There Is No Unallocated Space Left on the OS Disk
When the Windows disk doesn't have unallocated space, you'll have two ways out here:
#1. Shrink a Neighbor Volume and Extend C Drive
When the partition next to C drive has enough free space, you can follow the steps here to shrink it and then add the unallocated space to C drive:
- Open Disk Management, right-click the partition after C drive and select "Shrink Volume...".
- Adjust the size of unallocated space that you want to make for C drive and click "Shrink".
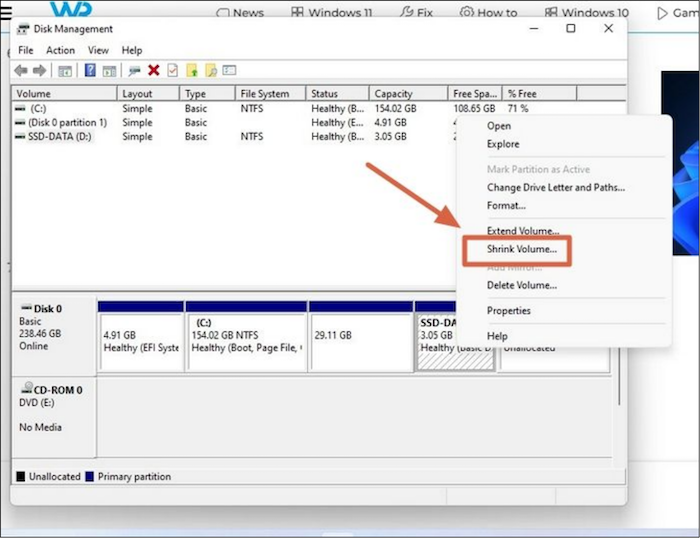
- Right-click C drive and select "Extend Volume...", and click "Next" to continue.
- Then, click "Finish" to complete the process.
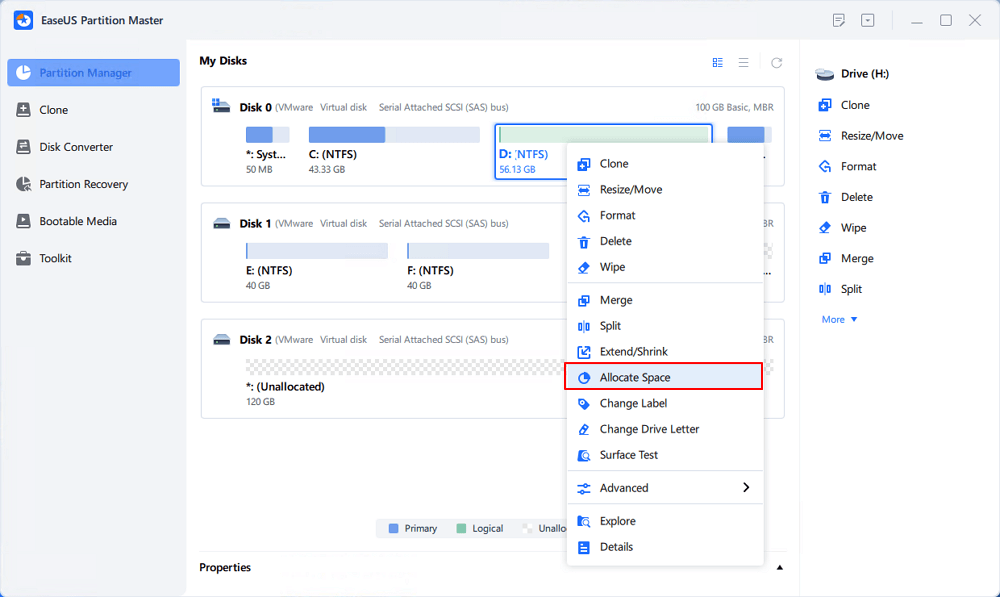
#2. Allocate Space from Other Drive to C Drive
When you don't have enough space in the partition next to the system C drive, you can apply EaseUS Partition Master and allocate free space from other existing partitions to the C drive.
See how to do so with the guide here:
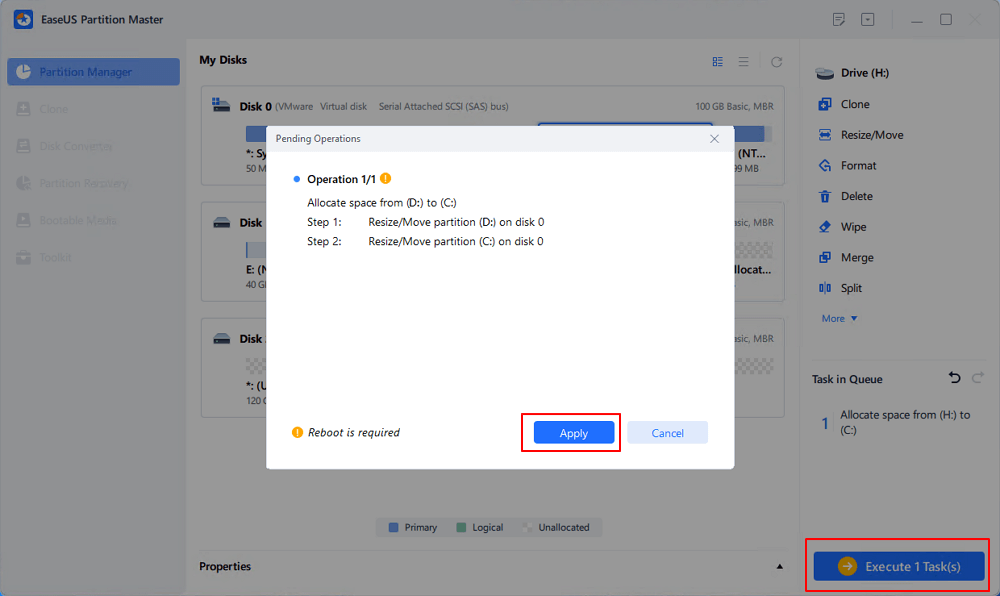
Step 1. Right-click on the D: partition with enough free space and select "Allocate Space".
Step 2. Select the target partition - C: drive and drag the partition panel rightward to add the free space from D: drive to C: drive. Then click "OK" to confirm.
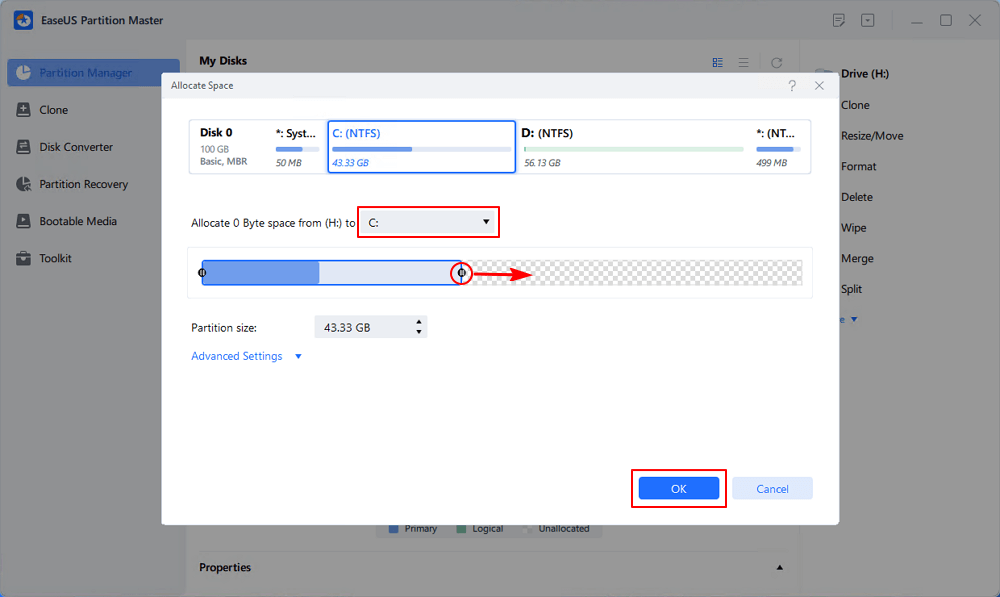
Step 3. Click the "Execute Task" button and click "Apply" to start the process of moving free space from D: drive to C: drive.
2. What Do I Do If There Is Not Enough Unallocated Space on Target Disk
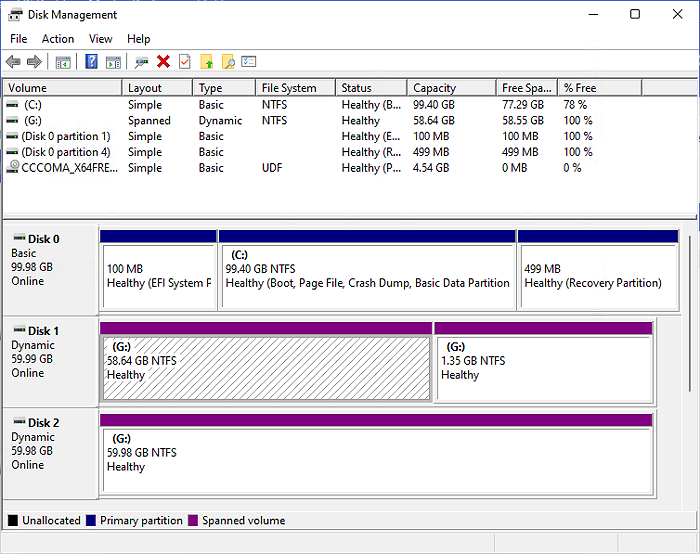
If your data disk doesn't have enough unallocated space or free space for saving more data, you can convert the current disk and a second disk into dynamic, then merge two disk spaces as one.
To do so, you'll be able to extend your current disk space into a second disk. Here is how to do so:
Step 1. Open Disk Management, right-click the source disk, and select "Convert to Dynamic Disk...".
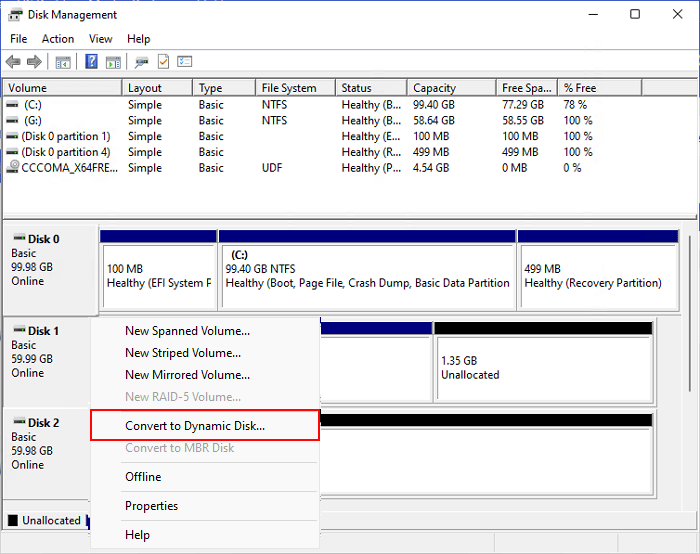
Step 2. Tick and select the disks that you wish to convert to Dynamic.
Here you can select both the source and target disks and click "OK".

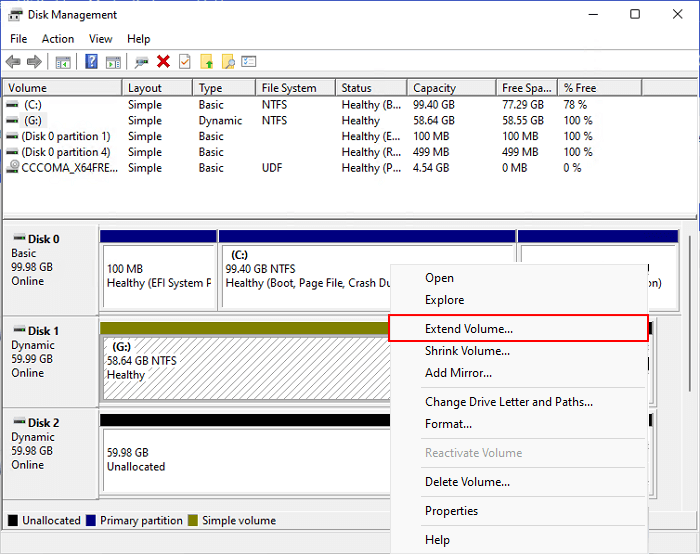
Step 3. Then click "Convert" to start converting both two disks into Dynamic. And click "Yes" to confirm.

Step 4. Right-click the partition that needs to be extended, and then select "Extend Volume...".
Step 5. Then select the target disk, select "Add", and click "Next".
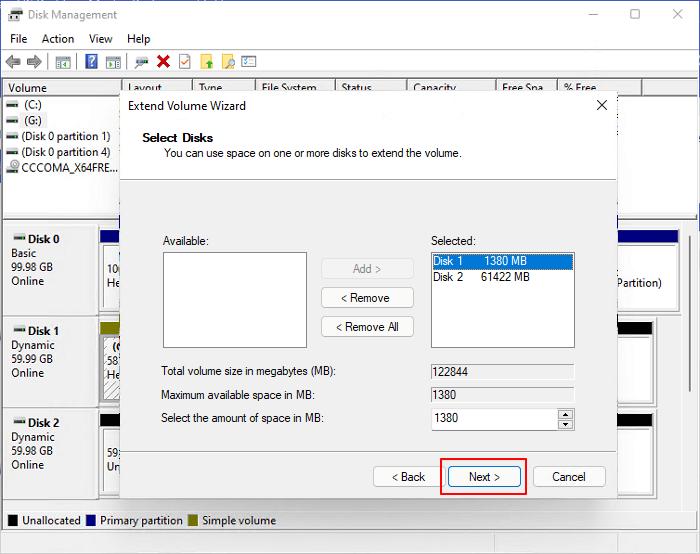
Step 6. Last, click "Finish".
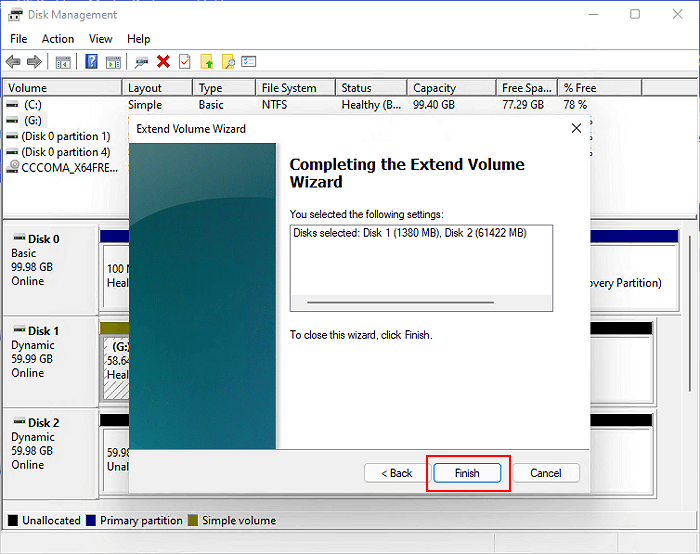
You'll be able to use unallocated disk space across two disks or even more disks then.
3. Disk 0, Disk 1 Unknown, Not Initialized, Unallocated, What Do I Do
When your disk shows as unknown, not initialized, and unallocated, it's highly possible that your disk is brand new and not initialized yet.
To make full use of your disk, saving it out of the unknown, not initialized, and unallocated state, you can use Disk Management to initialize the disk and then create partitions with unallocated space.
Here is how to do so:
First, open Disk Management and, right-click the disk, select "Initialize Disk".
Second, set a disk partition type for the drive, disk smaller than 2TB - MBR, larger than 2TB - GPT.
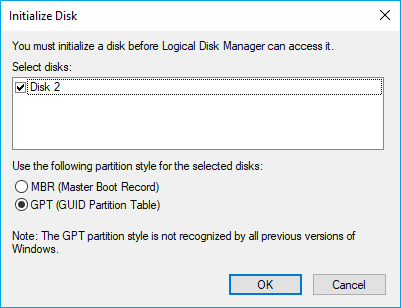
Third, right-click the unallocated space as shown in Method 1 to create new simple volumes on your disk with Disk Management.
Conclusion
Unallocated space is the free and unused physical storage space on a hard drive, SSD, USB, or SD card. It gives you high possibilities to create volumes, extend partitions, and even set up a new hard drive for Windows installation or disk upgrade.
So when you find unallocated space on your disk, don't panic. You can make full use of unallocated space with provided solutions on this page in Disk Management.
How Can We Help You
About the Author
Sherly joined EaseUS in 2022 and she has always loved writing articles and enjoys the fun they bring. She receives professional training here, focusing on product performance and other relative knowledge. She has written over 200 articles to help people overcome computing issues.
Written by Tracy King
Tracy became a member of the EaseUS content team in 2013. Being a technical writer for over 10 years, she is enthusiastic about sharing tips to assist readers in resolving complex issues in disk management, file transfer, PC & Mac performance optimization, etc., like an expert.
Product Reviews
-
I love that the changes you make with EaseUS Partition Master Free aren't immediately applied to the disks. It makes it way easier to play out what will happen after you've made all the changes. I also think the overall look and feel of EaseUS Partition Master Free makes whatever you're doing with your computer's partitions easy.
Read More -
Partition Master Free can Resize, Move, Merge, Migrate, and Copy disks or partitions; convert to local, change label, defragment, check and explore partition; and much more. A premium upgrade adds free tech support and the ability to resize dynamic volumes.
Read More -
It won't hot image your drives or align them, but since it's coupled with a partition manager, it allows you do perform many tasks at once, instead of just cloning drives. You can move partitions around, resize them, defragment, and more, along with the other tools you'd expect from a cloning tool.
Read More
Related Articles
-
5 Ways | Reset Windows 10 Password Without a Disk 🔥
![author icon]() Sherly/2026/06/17
Sherly/2026/06/17 -
How to Fix Dell Stuck on Dell Logo in 7 Ways | Step-by-Step
![author icon]() Cici/2026/06/17
Cici/2026/06/17 -
Best NTFS to exFAT Converter [2026 Top]
![author icon]() Cici/2026/06/17
Cici/2026/06/17 -
How to Enable Secure Boot for Fortnite - Fixed
![author icon]() Sherly/2026/06/17
Sherly/2026/06/17


