
Content
Page Table of Contents
About the Author
Hot Topics
Hard disk will not format showing error 0x8004242d. Any advice gratefully received. - posted by David77Mad from Microsoft
Key Takeaways to Fix We Couldn't Format the Selected Partition (Error 0x8004242d):
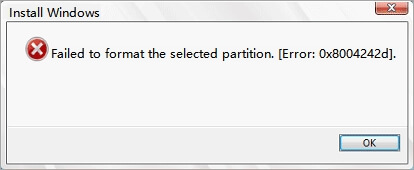
1. Error 0x8004242d comes up with an error message that states as, "Failed to format the selected partition. Error: 0x8004242d" on a popup window during the Windows installation process.
2. The solutions to this issue are as listed below, be sure that you'll be very careful while trying each method.
3. Method 1, EaseUS Partition Master formatting solutions are designed for all levels of Windows users.
Here is quick navigation of all possible fixes. Try the next fixes to get rid of the 0x8004242d error from your computer now:
Error 0x8004242d: We Couldn't or Failed to Format the Selected Partition
If you are having the same issue of being unable to format a selected partition, don't worry. In this part, you'll learn the causes that prevent you from installing Windows OS on the target disk.
So what caused the 0x8004242d error during the Windows installation process? Check the list below.
Causes of We Couldn't or Failed Format the Selected Partition 0x8004242d Error:
- The setup disk has a corrupted file system error.
- Windows is incompatible with a mass storage controller or a mass storage driver.
- A mass storage controller or a mass storage driver is outdated.
- The data cable in the computer is loose.
- The hard disk which you want to install Windows OS on is a dynamic disk.
You May Also Interest In:
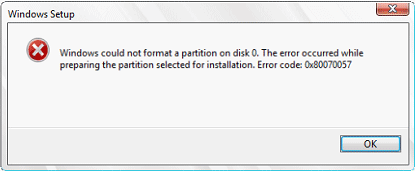
Windows Could Not Format A Partition on Disk 0 - 0x80070057
Besides the 0x8004242d error, there is another similar trouble, named 0x80070057, that may have prevented you from installing Windows OS. Click to fix it Now!
So how do you fix the 0x8004242d error - "Failed to format the selected partition" error and allow Windows to install on the target partition again? Follow to make your disk available for Windows installation again with the fixes in the next part.
How to Fix Failed to Format the Selected Partition | 0x8004242d Error [4 Methods]
After figuring out the reasons that stop you from formatting the disk partition for Windows 10/8/7 installation, it's time to find the best solutions that can help fix the formatting error 0x8004242d.
Quick Fix:
- Open the computer case and check the connection cable.
- If it's loose, tighten the drive cable.
- And restart the PC.
If this quick fix worked, congratulations and you can stop here. If not, don't worry. Move to the guide below, you'll fix this issue.
- Warning
- Note that the upcoming fixes may cause data loss. Please make sure you have created a backup of important files on your target disk. EaseUS file backup software can help.
Fix 1. Format the Selected Partition via EaseUS Formatting Tool
When the target disk contains file system corruption error or unknown disk errors, it'll send the error message "We couldn't format the selected partition (0x8004242d)" when trying to format the partition to install Windows 11/10 or Windows 8/7.
Fortunately, you can download EaseUS Partition Master here to complete the format from a bootable disk, and then finish installing Windows without any trouble.
#1. Create an EaseUS Partition Master Bootable Disk
Step 1. To create a bootable disk of EaseUS Partition Master, you should prepare a storage media, like a USB drive, flash drive or a CD/DVD disc. Then, correctly connect the drive to your computer.
Step 2. Launch EaseUS Partition Master, and find the "Bootable Media" feature on the left. Click on it.
Step 3. You can choose the USB or CD/DVD when the drive is available. However, if you do not have a storage device at hand, you can also save the ISO file to a local drive, and later burn it to a storage media. Once made the option, click the "Create" button to begin.
- Check the Warning message and click "Yes".
Step 4. When the process finishes, you'll see a pop up window, asking if you want to restart computer from the bootable USB.
- Reboot Now: it means you want to restart the current PC and enter EaseUS Bootable Media to manage your disk partitions without OS.
- Done: it means you don't want to restart the current PC but to use the bootable USB on a new PC.
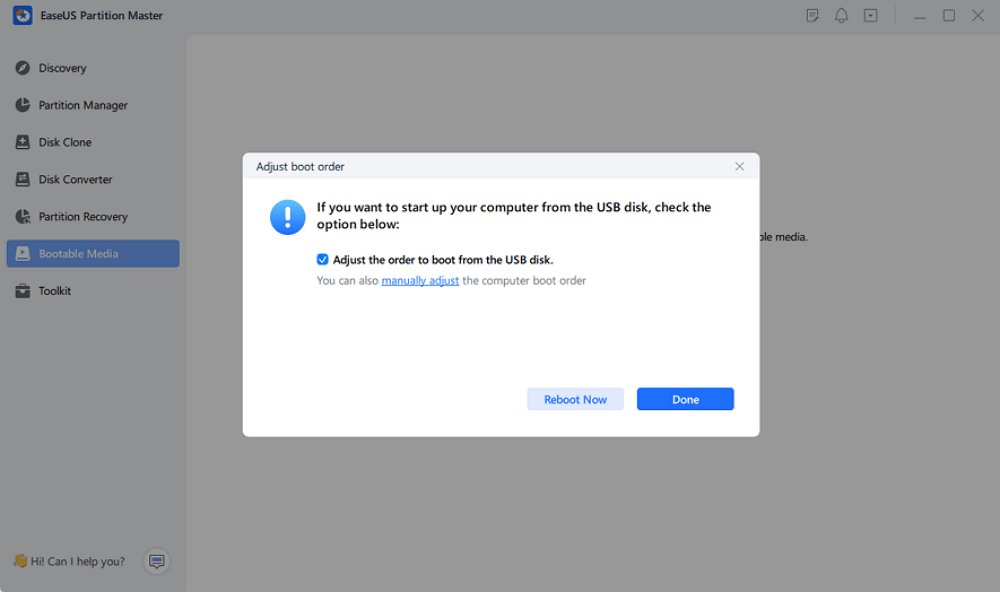
Note: To use the bootable disk on a new PC, you need to resart the target computer and press F2/F8/Del key to enter BIOS, and set the USB bootable disk as the first boot disk.
Wait patitiently and your computer will automatically boot up from the USB bootable media and enter EaseUS WinPE desktop.

#2. Boot PC from EaseUS Bootable Disk
Step 1. Connect the bootable disk USB to your PC.
Step 2. Restart the PC and press F2/F8/Del to enter BIOS.
Step 3. Set EaseUS bootable USB as the boot drive, save the changes and restart the PC.
#3. Format The Target Partition with EaseUS Partition Master
After booting your computer from the bootable disk, you can proceed with the formatting process with EaseUS Partition Master.
Here are the steps to format the target disk with the 'failed to format the selected partition error:
Step 1. Run EaseUS Partition Master, right-click the hard drive partition you intend to format and choose "Format".
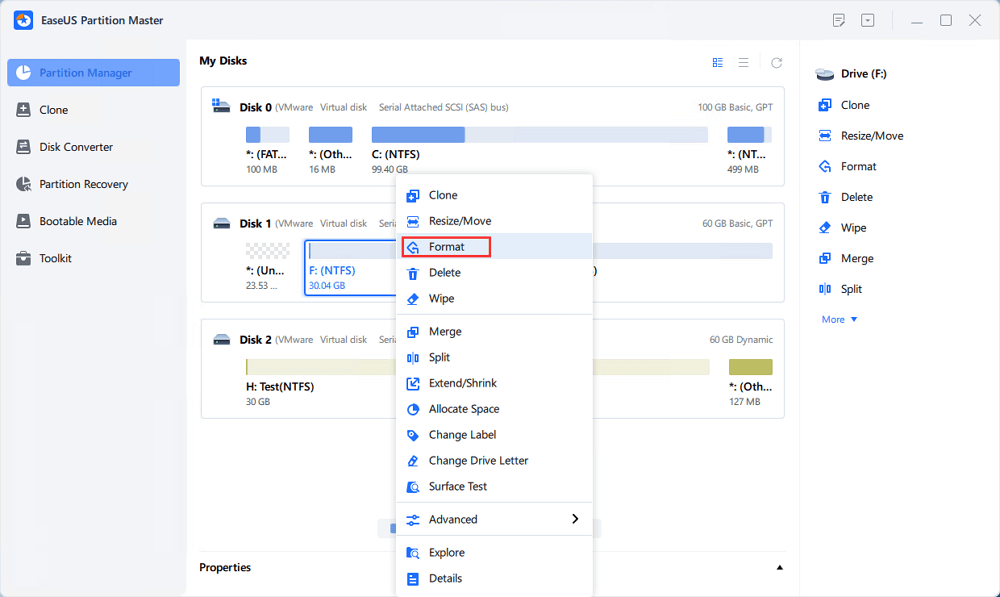
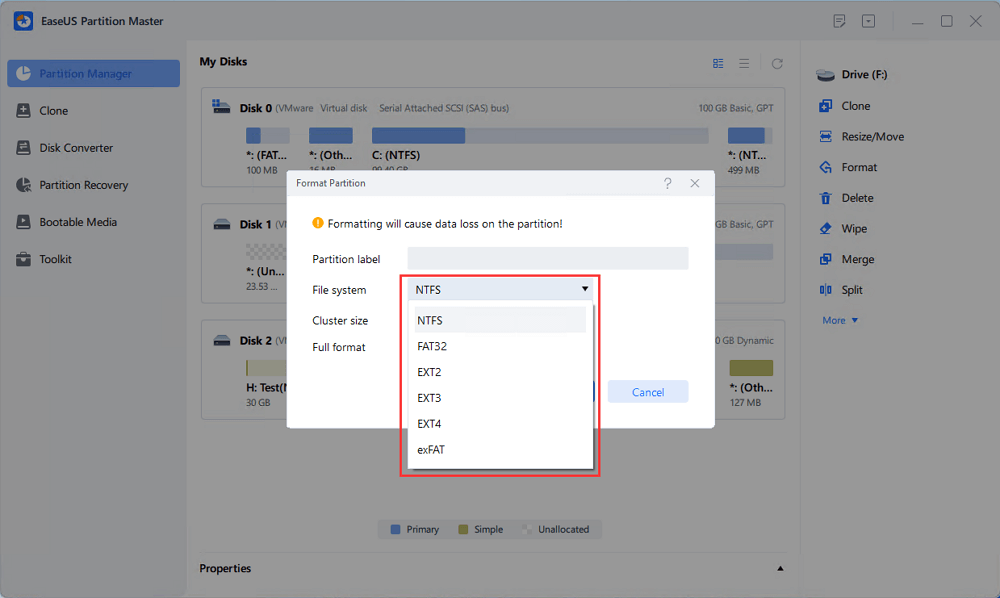
Step 2. In the new window, set the Partition label, File system (NTFS/FAT32/EXT2/EXT3/EXT4/exFAT), and Cluster size for the partition to be formatted, then click "OK".
Step 3. Then you will see a warning window, click "Yes" in it to continue.

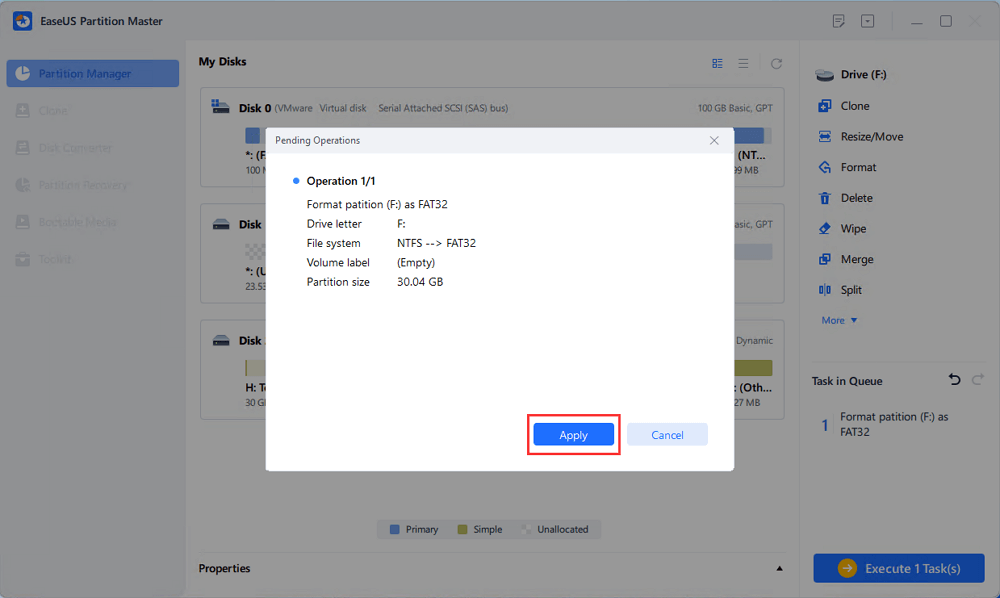
Step 4. Click the "Execute 1 Task(s)" button to review the changes, then click "Apply" to start formatting the partition on your hard drive.
Fix 2. Delete All Partitions and Create a New Volume
Aside from file system corruption error, when the target drive partition contains an unsupported file system that couldn't be recognized by Windows, you may also receive "Failed to format the selected partition" error during the Windows installation process.
To do so, you can still turn to EaseUS Partition Master for help:
#1. Create and Boot PC from EaseUS Partition Master Bootable Disk
Step 1. Create a bootable disk via EaseUS Partition Master.
Step 2. Connect the bootable disk to your PC and reboot the computer.
Step 3. Press F2/F8/Del to enter BIOS, and set the bootable disk as Boot Drive.
Step 4. Save the changes and restart the PC.
#2. Delete All Partitions
Step 1. Launch EaseUS Partition Master, and click "Partition Manager".
Make sure that you've backed up the important data before deleting any partition on your disk.
Step 2. Select to delete partition or delete all partitions on hard drive.
- Delete single partition: right-click on a partition that you want to delete and choose "Delete".
- Delete all partitions: right-click a hard drive that you want to delete all partitions, and select "Delete All".
Step 3. Click "Yes" to confirm the deletion.
Step 4. Click "Execute xx Task" and then click "Apply" to save the change.
0:00 - 0:26 Delete single volumes; 0:27 - 0:53 Delete all partitions.
- Important
- Now, you can enter Disk Management and check if your target disk is Dynamic.
- If yes, you need to convert Dynamic to Basic disk first.
#3. Create A New Volume as NTFS
After making sure your disk is Basic, you can now create a new partition on the drive for Windows installation:
Step 1. Open Disk Management and right-click the unallocated target disk.
Step 2. Select "New Simple Volume", set a new drive letter for the disk, select "NTFS" as the file system.
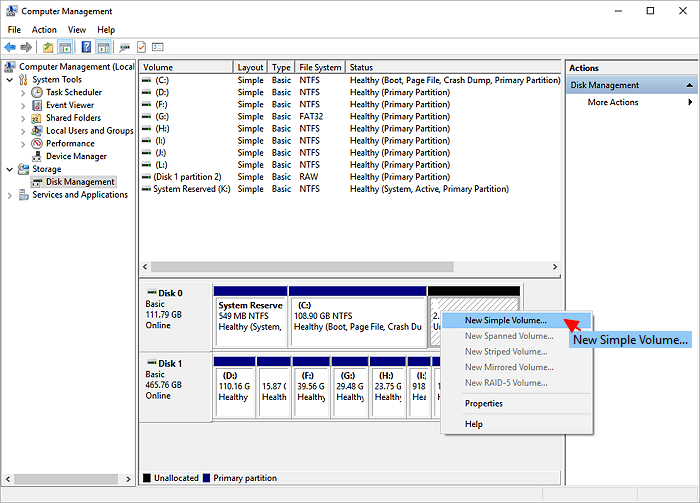
Step 3. Set to add all space into one partition, click "OK" and click "Finish".
After this, you should be able to continue installing Windows OS on the target disk without the 0x8004242d error anymore.
Fix 3. Clean Disk with Diskpart.exe Utility
Cleaning the problematic disk using Diskpart would solve the format error. However, all the partitions and data on the disk will be permanently removed. Back up the drive if the data is useful.
Step 1. Launch a Command Prompt as administrator.
Step 2. Type diskpart into the Command Prompt window, and press "Enter".
Step 3. Type list disk and press "Enter".
Examine the output of the command to identify the number of the disk you want to clean.
Step 4. Type select disk # (replace the # with the number of the disk you are going to clean) and hit Enter.
Step 5. Type clean and press "Enter". This will delete all partitions and data on the selected disk!
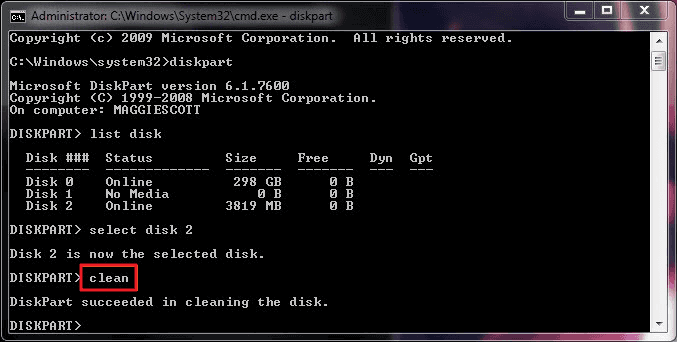
When the "diskpart succeeded in cleaning the disk" message appears, you've wiped the disk partition.
Step 6. Type create partition primary and hit Enter.
Step 7. Type format fs=ntfs and hit Enter.
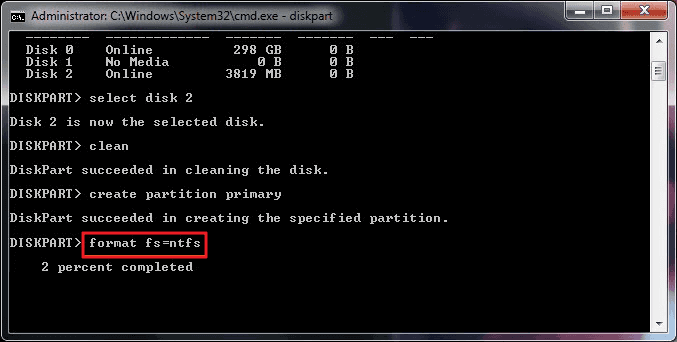
Step 8. Type assign + a new drive letter and hit Enter.
Step 9. Type exit and hit Enter to close Prompt Command.
After this, close the Command Prompt to continue installing Windows OS on the disk.
Fix 4. Format Partition during Window Installation Process
To fix the error like 0x8004242d or 0x80070057, you can choose to delete all partitions first, then create a new partition, and finally format the partition.
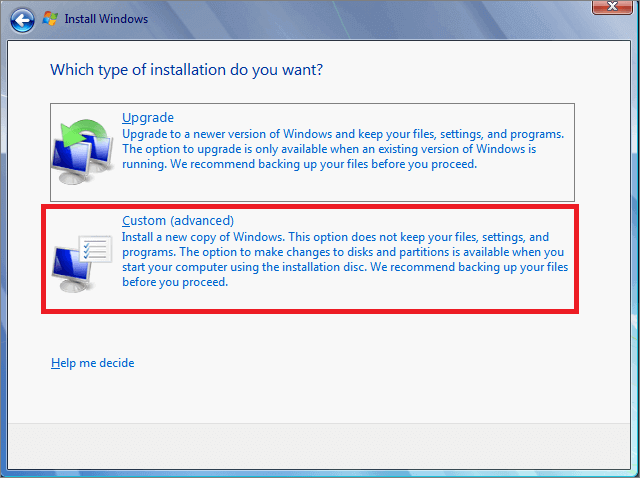
Step 1. Run the Windows installation setup program - like Windows installation media.
Step 2. Click "Install Now". Choose "I accept the terms of license", click "Next".
Step 2. Click "Custom(advanced)".
Step 3. Choose partition and click "Delete".
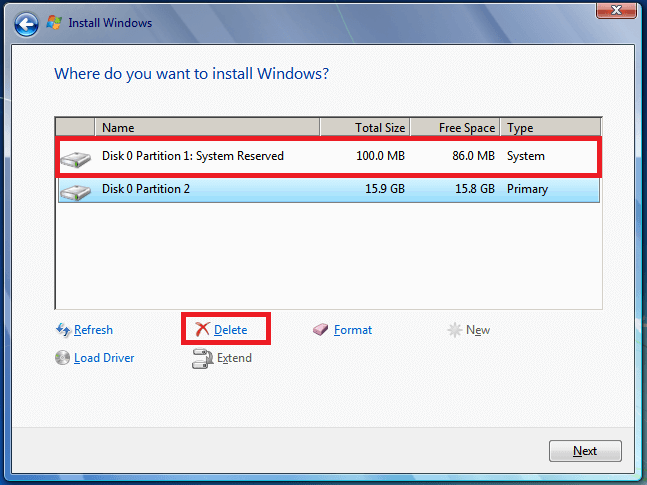
- Notice:
- If you have many partitions, please choose each partition for deleting. Then you can view an unallocated space. Select New.
Step 4. Delete the existing partition on the target disk, click "Create new partition" and select the new partition, click "Format"
What to Do After Fixing 0x8004242d Error? Install Windows on Your Disk
On this page, we collected 4 reliable fixes to help you resolve the Windows installation failure issue with the "Failed to format the selected partition. Error: 0x8004242d" error.
For an efficient and easy way out, EaseUS Partition Master can help you boot PC from a bootable disk and complete the format, getting rid of the 0x8004242d error from your target disk.
After this, the disk is viable for you to install Windows 10/8/7 without any further issues. For a step-by-step guide, you may refer to Fresh Install Windows 10/8/7 for help. During the Windows installation process, you may come across other different issues, such as "We Couldn't Create a New Partition or Locate an Existing One", don't worry and you can contact the EaseUS tech support team by sending an email to [email protected]. Our partition master will be ready to help anytime.
FAQs about 0x8004242d We Couldn't Format The Selected Partition
Some of you may still have questions about solving the 'Fail to format the selected partition' or 'We couldn't format the selected partition' error, please follow and find answers below.
1. How do I fix error code 0x80070057?
When the error 0x80070057 often occurs when the system reserved partition is damaged while installing Windows operating system. The direct solution to this error is to: delete the existing partitions, create a new partition, and continue with the formatting during Windows installation.
2. What is error 0x8004242d?
Error 0x8004242d is an error code that indicates a Windows installation process cannot complete as the setup program couldn't format the selected partition. This error could be generated by multiple causes, including improper plugged-in data cables, outdated storage drivers, corrupted setup disk, and hardware issues, etc.
Don't worry if you are experiencing this issue, you can revert to the above solutions on this page and get rid of this error instantly.
3. How do I completely format a partition?
To completely format a hard drive partition, it's essential that you back up all existing valuable data to another location in advance. Then you can turn to Windows File Explorer, Disk Management, or EaseUS Partition Master to format the partition.
Here, you can try File Explorer for help:
- Open File Explorer, right-click on the target partition, and select "Format".
- Then set a new file system format to the partition and click "Start".
- And, click "OK" to complete formatting the partition.
How Can We Help You
About the Author
"I hope my articles can help solve your technical problems. If you are interested in other articles, you can check the articles at the bottom of this page. Similarly, you can also check my Twitter to get additional help."
Jean is recognized as one of the most professional writers in EaseUS. She has kept improving her writing skills over the past 10 years and helped millions of her readers solve their tech problems on PC, Mac, and iOS devices.
Product Reviews
-
I love that the changes you make with EaseUS Partition Master Free aren't immediately applied to the disks. It makes it way easier to play out what will happen after you've made all the changes. I also think the overall look and feel of EaseUS Partition Master Free makes whatever you're doing with your computer's partitions easy.
Read More -
Partition Master Free can Resize, Move, Merge, Migrate, and Copy disks or partitions; convert to local, change label, defragment, check and explore partition; and much more. A premium upgrade adds free tech support and the ability to resize dynamic volumes.
Read More -
It won't hot image your drives or align them, but since it's coupled with a partition manager, it allows you do perform many tasks at once, instead of just cloning drives. You can move partitions around, resize them, defragment, and more, along with the other tools you'd expect from a cloning tool.
Read More
Related Articles
-
Solved - Windows Not Booting After Installing New SSD
![author icon]() Sherly/2026/06/30
Sherly/2026/06/30 -
Fixes for Windows Stop Code Inaccessible Boot Device 💡
![author icon]() Sherly/2026/06/17
Sherly/2026/06/17 -
4 Quick Fixes to Remove Password in Windows 11🚀
![author icon]() Tracy King/2026/06/17
Tracy King/2026/06/17 -
How to Create a Password Reset Disk for Windows 11/10
![author icon]() Sherly/2026/06/17
Sherly/2026/06/17


