
Content
Page Table of Contents
About the Author
Hot Topics
Overview of Checking Media Fail on Windows Startup
Some Dell, Lenovo, and Toshiba computer users have recently complained that when they try to boot up their computers, they encounter the error 'Checking Media [Fail].' The error message appears on the laptop during bootup, preventing it from starting.
You will see a black screen of death with the error message when you encounter the checking media fail booting error, which prevents you from accessing the operating system as usual.
Usually, a corrupted system file or the incorrect boot order on your computer can cause this booting error. Continue reading this post from EaseUS if you want more information on fixing this error.
Automatically Fix Checking Media Fail on Windows Startup
EaseUS Partition Master Professional is a combined disk management tool and drive partitioning solution. It enables you to fix boot failures caused by various reasons easily. Its boot repair feature can help you remove the checking media failure and boot your Windows PC properly.
During the boot repair, this tool can change the boot order without entering BIOS and check or fix file system errors. Without any computing knowledge, you can fix the checking media failure with simple clicks.
EaseUS Partition Master Professional is easy to use due to its straightforward and user-friendly interface. Thus, beginners can choose this tool to fix the checking media fail error.
Download EaseUS Partition Master Professional for free.
Step 1. Start EaseUS Partition Master after connecting the external drive/USB to your computer, go to "Bootable Media," and click "Create bootable media."

Step 2. Select an available USB Drive or CD/DVD and click "Create." You can also burn the Windows ISO file to the storage media.

Step 3. Connect the created bootable drive to the new computer and reboot the computer by pressing and holding F2/Del to enter the BIOS. Then, set the WinPE bootable drive as the boot disk and press F10 to exit.
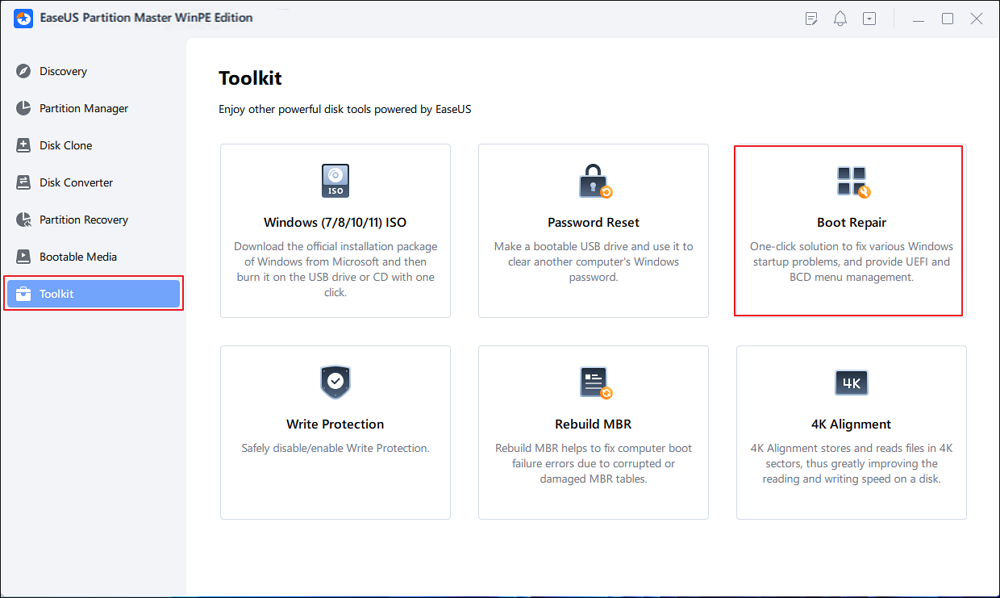
Step 4. Boot the computer again and enter the WinPE interface. Then, open EaseUS Partition Master and click "Boot Repair" under the "Toolkit" option.
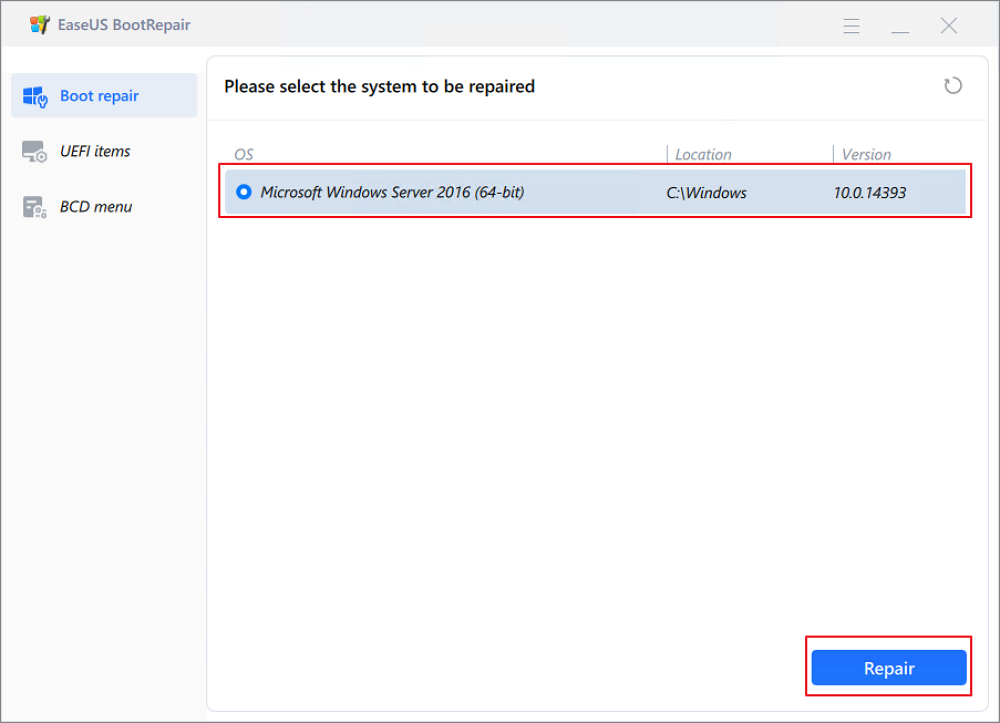
Step 5: Select the system you want to repair and click "Repair."
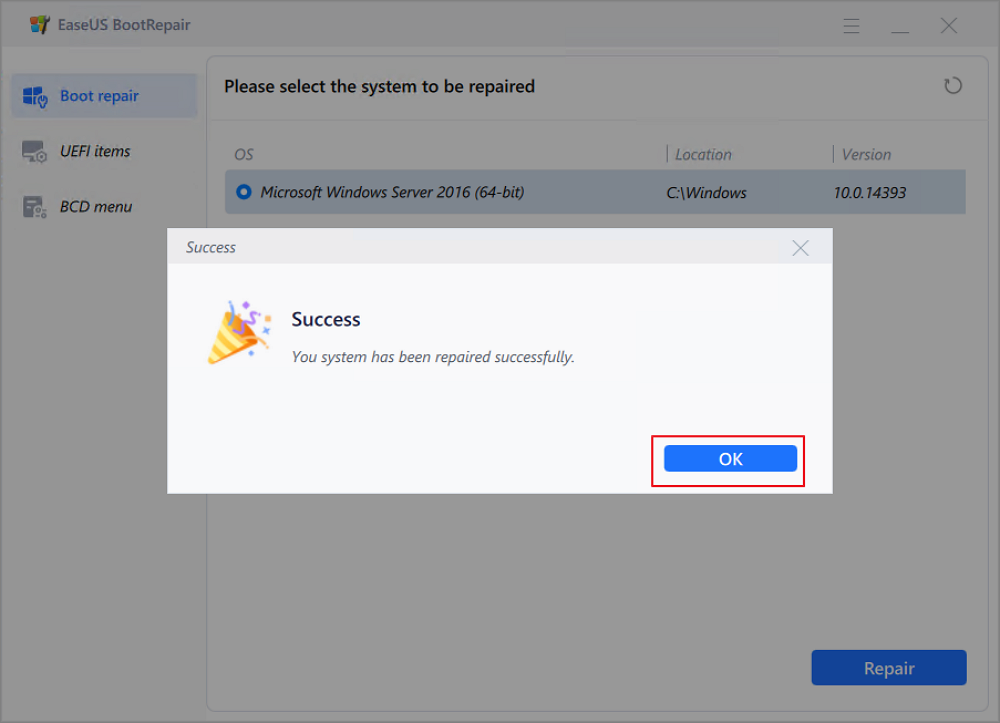
Step 6. Wait a moment, and you will receive an alert that the system has been successfully repaired. Click "OK" to complete the boot repair process.
It is always better to turn to a reliable third-party tool like EaseUS Partition Master Professional since it is easier to use and solve errors, especially for beginners. When your boot device is not found, or you meet other boot issues, such as a black screen or a Windows logo stuck, download it to help.
⭐More Information
Do you still have more queries about this tool and its solution? Feel free to contact EaseUS experts:

EaseUS experts are available to provide you with 1-on-1 manual services (24*7) and help fix Windows boot error, BSOD or computer boot loop issues. Our experts will offer you FREE evaluation services and efficiently diagnose and resolve system boot failure, Windows stop codes and OS lagging issues using their decades of experiences.
- 1. Fix BSOD - blue/black screen of death error due to Windows update or other reasons.
- 2. Get rid of Windows boot error such as no bootable device found, or BCD file corruption.
- 3. Serve to fix 0X000_error codes on Windows system or OS boot loop issues.
Fix Checking Media Fail on Windows Startup Manually
Now that we have covered automatically fixing the checking media fail error using the EaseUS Partition Master Professional third-party tool, let us move on to manually fixing the error on Windows startup:
Fix 1. Change Boot Order
As was previously mentioned, the wrong boot order could be the reason for the checking media failure issue. So, you have to change the boot order to resolve this issue. Let us see how:
Step 1. Restart your PC.
Step 2. As soon as the Lenovo or Dell logo appears, press the F2 button. After that, the BIOS Setup window will appear.
Step 3. Press "Boot Configuration" from the left pane.
Step 4. Under the heading Boot Sequence, you will see four options. Use the arrows next to these options to rearrange them in the order given below:
- Windows Boot Manager
- UEFI Hard Drive
- ONBOARD NIC (IPV4)
- ONBOARD NIC (IPV6)
Step 5. After rearranging the order, save the changes when prompted, and check the error disappears once you restart your PC.
If you find this method helpful, you can always share it with your friends on WhatsApp or any other social media.
Fix 2. Run System File Checker
The checking media fail error can also occur if your computer has corrupted system files. Follow the steps given below to scan and fix the corrupted system files on your PC:
When your computer does not boot up when you get the checking media fail error, the first thing you must do is to make the Windows installation media and then boot from it:
Step 1. Download the Windows Media Creation tool from the Microsoft website to create a Windows installation media. After that, follow the on-screen wizard instructions to proceed.
Read Also:
Step 2. Change the boot order and boot from the Windows installation media by connecting it to the computer.
Step 3. Choose your "language," "keyboard input," "currency format," and "time" to continue.
Step 4. Click "Repair your computer."
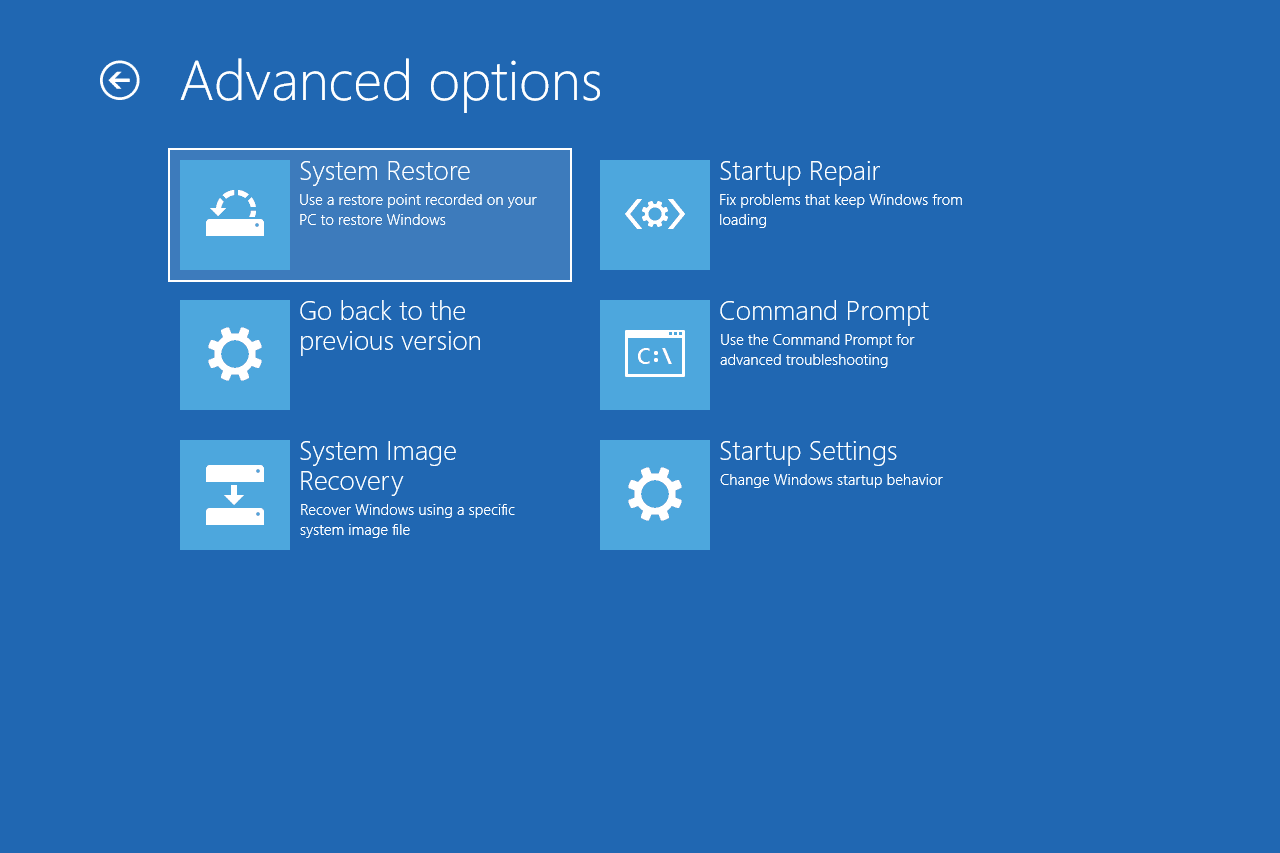
Step 5. Next, select "Command Prompt" under "Troubleshoot"> "Advanced options."
Step 6. To proceed, type the command sfc /scannow /offbootdir=c:\ /offwindir=c:\windows in the command line window and press Enter.
Step 7. The System File Checker will examine and fix your computer's corrupted system files. Please wait until the message verification is 100% complete before closing the command line window.
Once the steps are completed successfully, disconnect the Windows installation media, restart your computer, and see if the check media fail error is resolved.
If you are bored with these command lines, turn to EaseUS Partition Master. This tool can automatically finish checking media presence and fix any error it meets.
Fix 3. Restore the Computer to Earlier Data
If you have made a system restore point, you can also solve the check media fail error to a date when the PC was working without an issue. Follow the steps given below to restore your computer:
Step 1. Use the Windows installation media to boot up your problematic computer. Please see the section above for instructions on how to create it.
Step 2. Select the "language," "keyboard input," "time," and "currency format," and select "Repair your computer.
Step 3. Proceed by selecting "Troubleshoot"> "Advanced Options"> "System Restore."
Step 4. Click "Next" in the pop-up window.
Step 5. Choose the restored point you created. You can select a restore point based on its description and creation time if there is more than one. Click "Next" to continue.
Step 6. To proceed, you have to verify the restore point and then click "Finish."
Step 7. The process of restoring the system will begin. You must not pause the restoration process as your computer might not boot up, and the operating system might get damaged.
Restart the PC, and you should be able to boot and log into your account with the error reappearing.
If you find this method helpful, you can help others by sharing it with others.
Fix 4. Reinstall OS
If none of the fixes mentioned above have resolved the checking media fail error, reinstalling the operating system is an option. Reinstalling the operating system, as everyone knows, will erase the data on your hard drive. Therefore, you must back up your data before continuing.
Therefore, to help you resolve the checking media fail issue, we will walk you through reinstalling the operating system:
Step 1. Boot the unbootable computer from the Windows installation media by connecting it to the device.
Step 2. Select the "keyboard input," "date," "currency format," "time," and "language," and click the "Install Now" button.
Step 3. After entering the product key, select Next. Alternatively, you can select "I don't have a product key" and activate Windows later.
Step 4. Select the Windows OS version you wish to install and press the "Next" button.
Step 5. Accept the license terms and click the Next button.
Step 6. Select Custom: Install Windows only (Advanced).
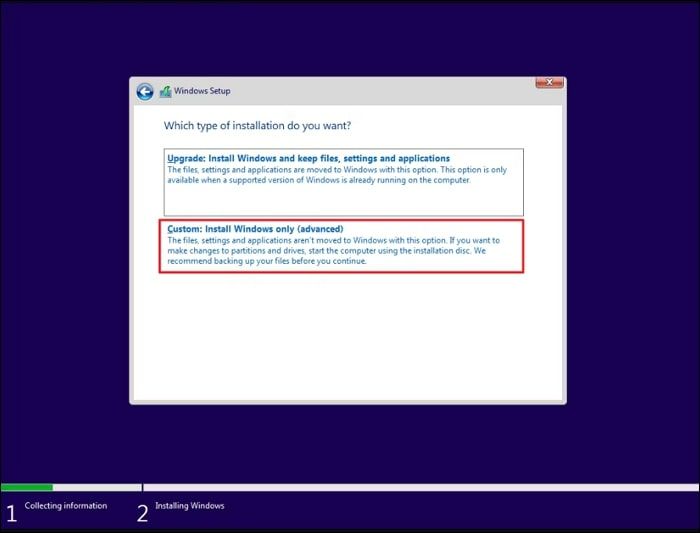
Step 7. Select the partition you wish to install Windows and follow the on-screen instructions to proceed.
Step 8. Wait for the installation procedure to complete.
Step 9. After successfully reinstalling the operating system, restart your computer to see if the check media fail booting error is eliminated.
You also have the option to reset your computer instead of reinstalling the operating system. Do not forget to backup your crucial files as well. Following the repair of the checking media fail error, you can make a system image. If you run into further issues, you can use the image to return the system to its original state.
You May Also Like
Conclusion
This post has provided multiple solutions to address the check media fail issue. One of these methods mentioned above will help you eliminate the error. Also, remember to create a backup of your important files before reinstalling your PC. This may happen when the boot file on your hard disk is missing or corrupted. You may also encounter this error when you are trying to boot your computer from the network but it is unable to connect. So, to fix it, you can enable your boot device, disable wake on LAN in the BIOS, or update the BIOS.
Dell/Lenovo/HP Checking Media Fail FAQS
If you have more questions regarding the check media fail error, check the frequently asked questions and their answers given below:
1. How do you fix no media present?
Checking media presence error often occurs when a computer is attempting to boot from a source drive it cannot reach. This may happen when the boot file on the hard disk is missing or corrupted. You may also encounter this error when you are trying to boot your computer from the network but it is unable to connect. So, in order to fix it, you can choose to enable your boot device, disable wake on LAN in the BIOS, or update the BIOS.
2. What should I do when I'm stuck at checking media presence?
During the network boost, make sure the hard drive is at the top of the menu. Throughout the bootup process, keep pressing the BIOS button. Next, navigate to Setup and choose the Boot menu tab. After positioning the desired boot device at the top, save, close the window, and restart your PC.
3. How do I fix my computer when it says no boot device found?
To access the BIOS interface, restart the computer and press Esc. You can use the arrow keys to open the Boot tab. Press "+" or"-" to move "Hard Drive" to the top of the boot order list. Save changes, and restart the PC.
How Can We Help You
About the Author
Updated by Tracy King
Tracy became a member of the EaseUS content team in 2013. Being a technical writer for over 10 years, she is enthusiastic about sharing tips to assist readers in resolving complex issues in disk management, file transfer, PC & Mac performance optimization, etc., like an expert.
Sherly joined EaseUS in 2022 and she has always loved writing articles and enjoys the fun they bring. She receives professional training here, focusing on product performance and other relative knowledge. She has written over 200 articles to help people overcome computing issues.
Product Reviews
-
I love that the changes you make with EaseUS Partition Master Free aren't immediately applied to the disks. It makes it way easier to play out what will happen after you've made all the changes. I also think the overall look and feel of EaseUS Partition Master Free makes whatever you're doing with your computer's partitions easy.
Read More -
Partition Master Free can Resize, Move, Merge, Migrate, and Copy disks or partitions; convert to local, change label, defragment, check and explore partition; and much more. A premium upgrade adds free tech support and the ability to resize dynamic volumes.
Read More -
It won't hot image your drives or align them, but since it's coupled with a partition manager, it allows you do perform many tasks at once, instead of just cloning drives. You can move partitions around, resize them, defragment, and more, along with the other tools you'd expect from a cloning tool.
Read More
Related Articles
-
What To Do/Test When Buy Used HDD/SSD
![author icon]() Shelly/2026/06/17
Shelly/2026/06/17 -
How to Unlock ASUS Laptop Without Password - Tutorial
![author icon]() Sherly/2026/06/29
Sherly/2026/06/29 -
How to Merge D and E Drive (No Data Loss)
![author icon]() Oliver/2026/06/17
Oliver/2026/06/17 -
How to Remove Write Protection from SD Card and Format It
![author icon]() Jean/2026/07/01
Jean/2026/07/01


