
Content
Page Table of Contents
About the Author
Hot Topics
Can I burn an ISO to a USB flash drive? Yes, sure. In the following, you'll learn what the ISO file is, the benefits of burning ISO image file to USB, and how to burn ISO to your target USB with success.
| 🔢Complex Level: | Simple, Beginners |
| ⏱️Duration: | 5-10 minutes |
| 🎯Applies to: | Burn ISO to USB Windows 10/11 and Windows 7. |
| 🧰Tools: | USB, Windows PC, File Explorer, Windows ISO file, ISO Burning Software |
Key Takeaways of Burning ISO Image to USB:
- First, set the USB as FAT32. You can follow Stage 1 to try. If your USB drive is FAT32, skip to Stage 2.
- Burning ISO image is a complex procedure that requires you to turn to a professional ISO to USB burning tool or software for help. EaseUS Partition Master allows users to write ISO to USB with simple clicks. Install this tool and follow the tutorial to execute the task.
Benefits- Write ISO to USB
Here is a list of benefits of burning a desired ISO file to a USB drive so that you can take a deep view:
- USB is portable and versatile for use in many aspects.
- You can create a bootable USB flash drive for Windows.
- You can repair a PC with the Windows ISO image burned on USB.
- You can make Windows ISO image bootable on USB for Windows transfer, system installation, or reinstallation.
So, how do I make an ISO image file burnt to a USB flash drive? And what should I prepare? In the next part, you'll learn the complete procedure with detailed guide steps. Now, click the link to learn the top five ISO Burners for Windows 10/11 in 2024.
How to Burn ISO to USB on Windows
Here in this part, we'll take Windows ISO image burning as an example to show you the complete guide on how to burn ISO image files to a USB drive on Windows computers.
And we'll break the procedure into three parts, as shown below:
#Stage 1. Make the USB Drive Ready for ISO Image Burning
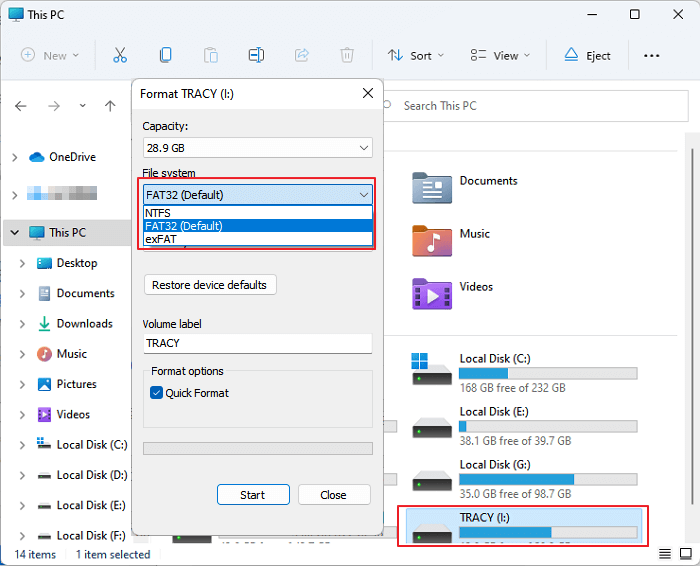
Before we go to make a bootable USB, note that burning Windows ISO image files to a USB drive has a specific file system format request, which is that you need to set the USB flash drive as FAT32 at first. Here is how to prepare a USB drive ready:
Step 1. Connect a USB stick drive with 32GB or larger storage capacity to your PC.
Step 2. Open the USB flash drive and back up all valuable files to another location.
Step 3. Press the Windows + I keys to open File Explorer, and right-click on the USB flash drive.
Step 4. Select the USB file system format as FAT32, and click "Format."
Step 5. Click "OK".
Go straight to write ISO to USB now.
#Stage 2. Download ISO Burning Tool for Help
Some experienced users may suggest to burn ISO image to USB using Windows Media creation tool. However, for Windows beginners, this way is too complex to follow.
Here, we'll share with you a reliable ISO burning software - EaseUS Partition Master with its Burn ISO feature to write ISO to USB in simple clicks. Please note that this powerful tool can help you bypass Windows 11 installation requirements (TPM 2.0, Secure Boot, etc.) if you want to download Windows 11 ISO from Microsoft.
Alongside burning ISO to USB, users can also use this software to set up USB sticks for multiple different purposes, for example, to:
- Format 128GB USB to FAT32
- Fix USB won't format to FAT32 error
- Format USB for PS4, PS5.
- Check for file system errors on USB devices, etc.
- Burn ISO to DVD
So, how do I create a bootable USB from an ISO file? Go to the next guide to start burning the ISO image file to your USB drive and making a bootable USB now.
#Stage 3. Burn ISO to USB
To start burning the ISO to USB, you'll need to download the Windows ISO image file on your PC first. Here is an official link where you can download Windows 10 ISO from Microsoft. Or, you can search the Windows ISO image file online and get secure access to download this image file.
After downloading the Windows ISO image on your PC, you are now good to start writing ISO to USB with the steps here:
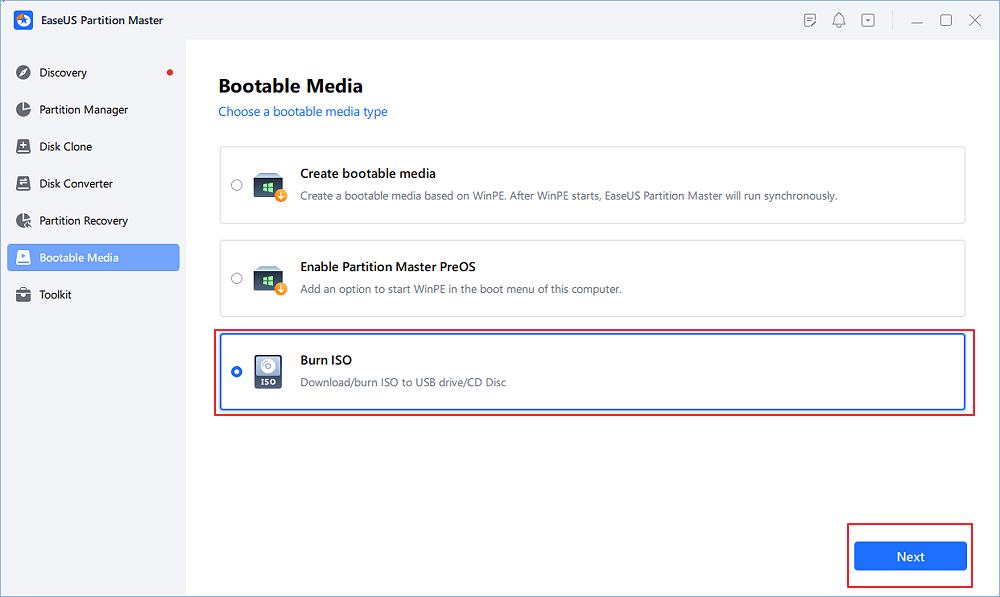
Step 1. Launch EaseUS Partition Master and go to the Bootable Media section. Click "Burn ISO" and click "Next".
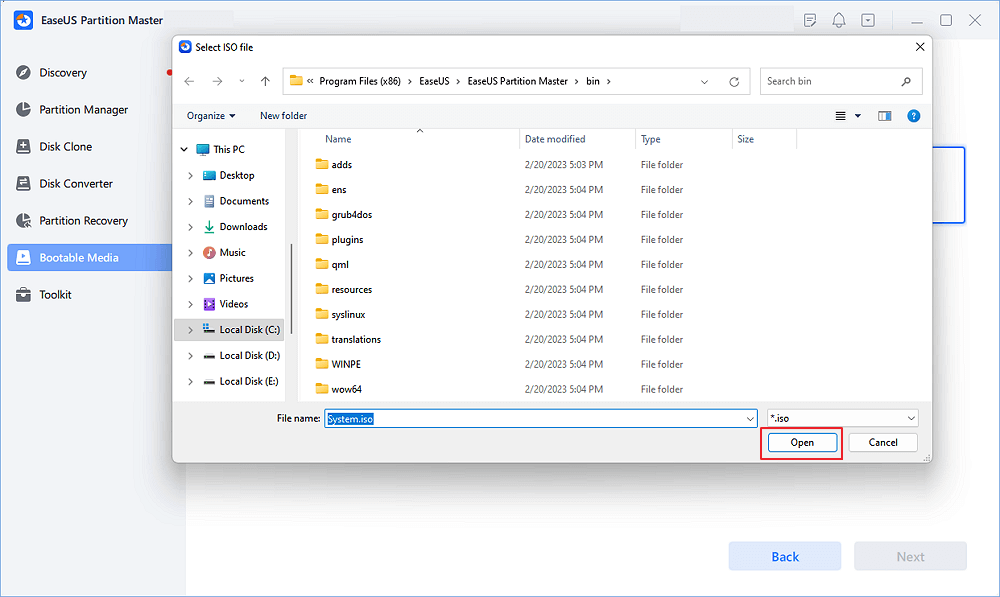
Step 2. Select the ISO image that you have downloaded on your PC, and click "Open".
Step 3. Click "Next" and select the target USB as destination and click "Burn" to execute the operation.
Bonus Tip: If you are interested in how to install the Windows operating system with the burnt ISO image file on your USB drive, you can refer to this guide provided by Microsoft for help: Install Windows from USB.
What Is ISO File
So, what is an ISO image file? Let's have a brief understanding here:
In a word, an ISO file is a file containing all parts of an OS or a program that needs to be built. But the file itself is useless until it is opened, assembled, and used. Typically, you can use ISO to USB tools, such as EaseUS Partition Master, Rufus(Rufus for Mac, Rufus for Linux, or Rufus for Ubuntu), or BalenaEtcher, or burn ISO to USB.
So, what can ISO images be used for? Here is a list of the wide usages of ISO image files:
- Data transfer
- Data backup
- OS migration or system installation/reinstallation
- Program duplication, backup, migration, etc.
Moreover, the most widely way to make an ISO image work is to burn the ISO image to a USB device. So why burn ISO images to a USB drive? Follow the next part, and you'll learn why.
🚩Explore More: How to Burn ISO to External Hard Drive Windows 10
Burning ISO to USB Is Easy, and You Can Do This with Correct Method
On this page, we simplified the procedure of writing ISO images to USB into 3 phrases:
- #1. Set up USB to FAT32
- #2. Download ISO burning software
- #3. Download ISO and burn ISO file to USB in simple clicks and make a bootable USB
For experienced users, you can directly junk stage 2 and start burning ISO files with stage 3 in the Microsoft Official method. However, as for Windows beginners, we suggest that you follow the above guidelines one by one. The entire procedure is easy and simple with the help of reliable ISO image writing tool software - EaseUS Partition Master.
Write ISO to USB FAQS
Here in this part, we also collected some bonus questions that are related to ISO image burning to USB, and if you are interested, follow and find the answer here:
1. Can I use Rufus to burn ISO to USB?
- Download and open the Rufus tool. Insert the USB drive and choose a device. Select Disk or ISO image. Locate and choose the ISO image to burn.
- Under the Image option, choose Standard Windows installation. Choose Start and leave other options alone.
- Wait for Rufus to say "Ready," then close Rufus and remove the USB drive.
2. Can I burn the ISO image to USB?
Yes, sure. You can directly burn a pre-downloaded ISO image to a USB drive with the tips here:
- Connect the USB to your PC.
- Format the USB to FAT32.
- Run an ISO image-burning tool like EaseUS Partition Master.
- Burn the ISO image to USB.
3. How do you burn ISO to USB on Linux?
- Connect a USB to a Linux computer.
- Run the UNetbootin app on a Linux computer.
- Select 'Diskimage' and select 'ISO file' and click 'Download.'
- Click 'Open', click 'USB Drive,' and click 'OK'.
4. How do I burn ISO file to USB on Mac?
- Connect a USB drive to a Mac computer.
- Go to Application and open Terminal utility.
- Type the next two command lines in Terminal and hit Enter each time:
- sudo /Applications/Install\ macOS\
- *.app/Contents/Resources/createinstallmedia --**volume /Volumes/MyVolume
(Replace * with the name of your macOS - Catalina, Mojave, etc. Such as Big\Sur.app. Replace 'volume' 'my volume' with the name of your USB drive.)
- Press 'Y' key and hit the Return key.
- Click 'OK'.
How Can We Help You
About the Author
"I hope my articles can help solve your technical problems. If you are interested in other articles, you can check the articles at the bottom of this page. Similarly, you can also check my Twitter to get additional help."
Written by Tracy King
Tracy became a member of the EaseUS content team in 2013. Being a technical writer for over 10 years, she is enthusiastic about sharing tips to assist readers in resolving complex issues in disk management, file transfer, PC & Mac performance optimization, etc., like an expert.
Product Reviews
-
I love that the changes you make with EaseUS Partition Master Free aren't immediately applied to the disks. It makes it way easier to play out what will happen after you've made all the changes. I also think the overall look and feel of EaseUS Partition Master Free makes whatever you're doing with your computer's partitions easy.
Read More -
Partition Master Free can Resize, Move, Merge, Migrate, and Copy disks or partitions; convert to local, change label, defragment, check and explore partition; and much more. A premium upgrade adds free tech support and the ability to resize dynamic volumes.
Read More -
It won't hot image your drives or align them, but since it's coupled with a partition manager, it allows you do perform many tasks at once, instead of just cloning drives. You can move partitions around, resize them, defragment, and more, along with the other tools you'd expect from a cloning tool.
Read More
Related Articles
-
How to Encrypt an SD Card on Windows & Android
![author icon]() Cici/2026/06/17
Cici/2026/06/17 -
How to Find Hidden Partition or Hide Partition in Windows 10/8/7
![author icon]() Tracy King/2026/07/01
Tracy King/2026/07/01 -
Patriot Formatter | The Best USB Format Tool for Patriot Flash Drive
![author icon]() Brithny/2026/06/17
Brithny/2026/06/17 -
UEFI vs. BIOS: What's the Difference and How to Choose
![author icon]() Jean/2026/06/30
Jean/2026/06/30


