Page Table of Contents
Updated on Feb 26, 2024
What Is A Bootable USB and Why You Need One
A bootable USB is a USB drive that has been configured to contain all the data and files necessary to run an operating system. When you plug the USB drive into a computer, the computer will be able to boot from the USB drive and run the operating system stored on it.
The main advantage of using a bootable USB drive is convenience. It's much easier to carry around a small USB drive than it is to lug around a laptop or desktop computer. Plus, you can use a bootable USB drive on any computer, regardless of whether or not that computer has its own operating system installed.
Another advantage of using a bootable USB drive is that it's much faster to set up a new computer with a bootable USB drive than it is to install an operating system from scratch. And if you ever need to reinstall your operating system, you can just use the bootable USB drive instead of having to go through the entire installation process again.
?Windows Installation Tips:
How to Create a Bootable USB in Linux
The process for creating a bootable USB drive in Linux is fairly simple. First, you'll need to download the ISO file for the operating system that you want to install. Next, you'll need to use a third-party tool to copy the ISO file to your USB drive. Finally, you'll need to configure your computer's BIOS to boot from the USB drive. Here are the detailed steps of how to create a bootable USB in Linux.
Step 1. Downloading the ISO File
The first step is downloading the ISO file for the operating system you want to install. You can usually find these ISO files on the website of the operating system provider. For example, if you want to install Ubuntu, you can download the ISO file from the Ubuntu website. Once you've downloaded the ISO file, make sure to verify its checksum to ensure that it hasn't been tampered with. You can use a tool like 'md5sum' to do this.
Step 2. Copying the ISO File to the USB Drive
Once you've verified the integrity of the ISO file, you're ready to copy it to your USB drive. To do this, you'll need to use a tool called 'dd'. 'dd' is a command-line tool that can be used to create exact copies of data.
To copy the ISO file to your USB drive, open a terminal window and enter the following command:
sudo dd if=path/to/iso/file of=/dev/sdb bs=4M

?This is an example of copying the ISO file command in dd
Make sure to replace 'path/to/iso/file' with the actual path to the ISO file you downloaded and '/dev/sdb' with the actual path to your USB drive. Once you've entered the command, 'dd' will start copying the ISO file to your USB drive. This process could take a while, depending on the size of the ISO file and the speed of your USB drive.
Step3. Configuring the BIOS to Boot From the USB Drive
Once the ISO file has been copied to your USB drive, you'll need to configure your computer's BIOS to boot from the USB drive. The process for doing this will vary depending on the make and model of your computer. However, it's usually a fairly simple process.
First, restart your computer and look for a message that says something like 'Press F2 to enter BIOS settings'. Once you see this message, press the key indicated (usually F2) to enter the BIOS settings.
Once you're in the BIOS settings, look for a setting called 'Boot Order' or 'Boot Priority'. This setting will determine which devices your computer tries to boot from when it starts up.
Make sure that the USB drive is listed as the priority. Once you've done this, save your changes and restart your computer. Your computer should now boot from the USB drive.
How to Create A Bootable USB in Windows
The process for creating a bootable USB drive in Windows is similar to the process in Linux. First, you'll need to download an ISO file for the operating system you want to install. Next, you'll need to use a Rufus tool to copy the ISO file to your USB drive. Finally, you'll need to configure your computer's BIOS to boot from the USB drive.
While on a Windows computer, you can either create a new installation bootable USB drive or a bootable USB drive of your existing system. This part will introduce how to do it one by one.
#1. Create a bootable USB drive using Rufus
Step 1. Download and install Rufus from https://rufus.ie. Then prepare a USB drive that is at least 8 GB.
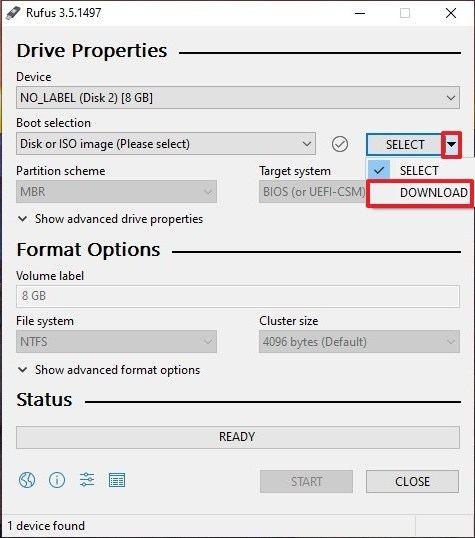
Step 2. Open Rufus. It will automatically detect the available USB drive. Click Device > Select the USB you want from the drop-down menu.
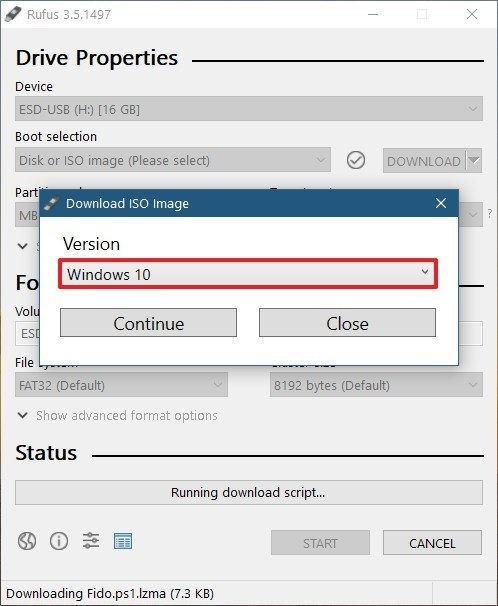
Step 3. Keep the Boot Selection option set to Disk for ISO image. Then click on the Select option. A file explorer browser window will now open for you to locate the ISO image.
*You can download the ISO file from Microsoft's official page.
Step 4. Normally, standard Windows installations created by Rufus will be automatically detected based on the device. So keep the default settings, but you can still change them if needed.
Step 5. Give a name to the Volume label, or use the given name by default. Also, keep the File system and Cluster size settings as they are.
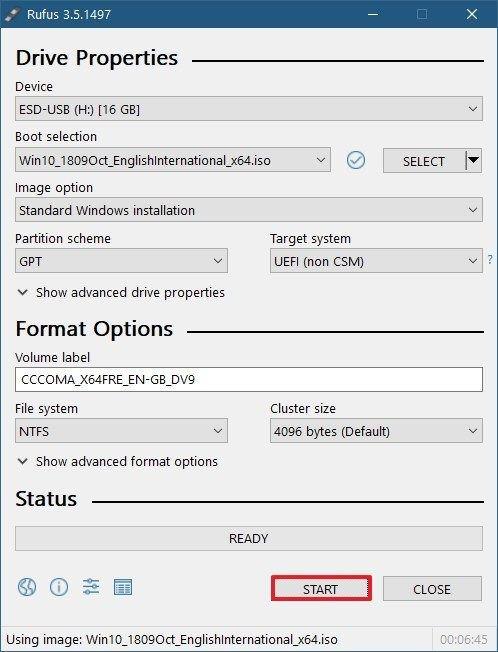
Step 6. After clicking the "Start" button, Rufus may send a warning that the data on the USB will be deleted. This is normal, so click OK, and Rufus will start creating the bootable USB.
#2. Create a bootable USB drive using EaseUS Todo Backup
With Rufus, you are creating a bootable USB drive with the ISO image. However, you can also use your computer's system file to create a bootable USB. It's like putting your computer system on a USB drive so that you can carry it anywhere you like. The creating process is a little bit different from using Rufus. You are copying a downloaded ISO image to a USB drive with Rufus. But putting your computer system on a USB drive, you need to clone your system. To do this, you need a tool - EaseUS Todo Backup.
Why we recommend EaseUS Todo Backup:
- One click to select your system to create a bootable USB
- On-screen wizard guide you to clone the system to a USB drive
- Advanced backup and clone software supports further data protection and hard drive management
Now download EaseUS Todo Backup from the button below. Then follow the detailed guide to creating a bootable USB drive with your own system.
Secure Download
Preparation:
- 1. Check how much disk space is used for the system C drive. Then prepare a qualified USB drive which is larger than the used space.
- 2. Make sure you use an empty USB, because the system clone will overwrite the USB data completely.
- 3. Connect the USB drive to your machine and make sure it can be detected.
Follow the overall process to create a portable Windows USB drive and boot from it:
Step 1. On the main page, find and click "Tools", choose "system clone".

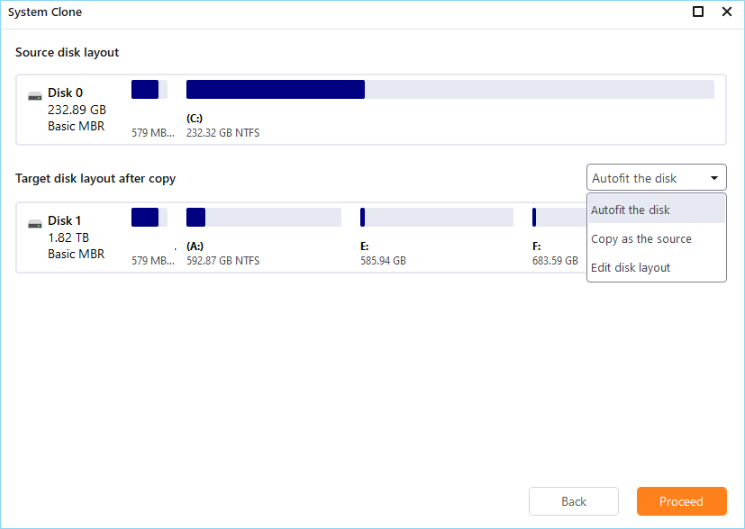
Step 2. The boot and system partition will be selected automatically, you just need to choose the target disk and click "Next."
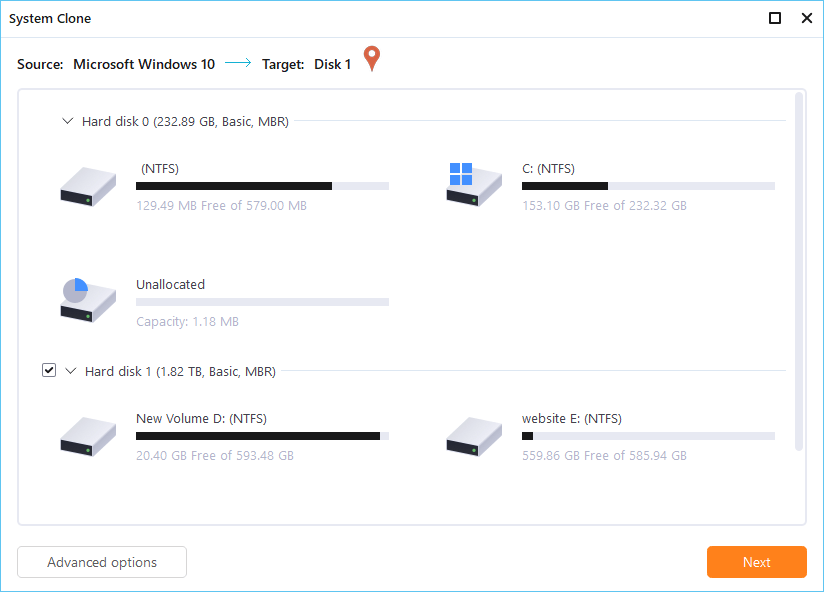
*System clone does not support cloning MBR disk to GPT or vice versa. Make sure that the partition style of the source disk and the target disk are the same.

Step 3. Click "Advanced Options", and choose "Create a portable Windows USB drive".
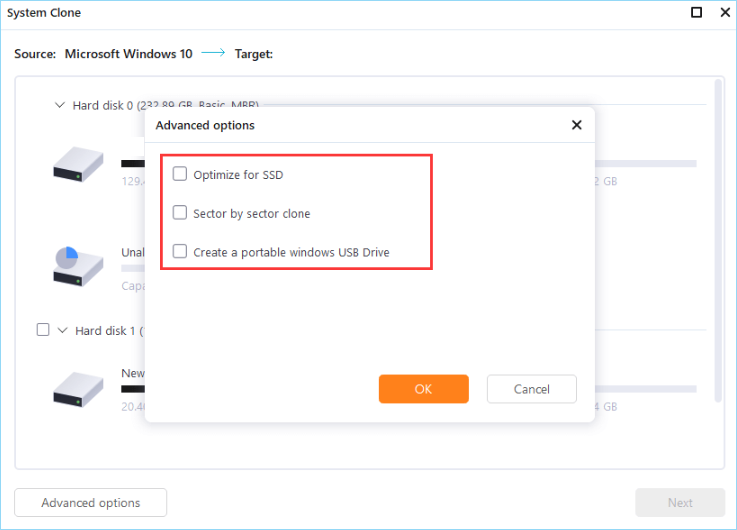
Step 4. Click "Proceed". EaseUS Todo Backup will start to create portable USB.
Step 5. How to boot from the portable USB drive.
- Connect your portable USB to the computer
- Restart the computer and press "Del/F2/F12/F10" to enter BIOS
- Set the PC to boot from the portable USB by changing the boot order in BIOS under the "Boot" tab
- Save changes and you'll see your system booting up from the USB drive
Things to Keep in Mind When Creating A Bootable USB Drive
Now that you know how to create a bootable USB drive in both Linux and Windows, there are a few things you should keep in mind to ensure that everything goes smoothly.
First, it's important to use a high-quality USB drive. A high-quality USB drive will be less likely to fail or corrupt your data.
Second, make sure you create a backup of your data before you create a bootable USB drive. This way, if something goes wrong, you'll still have a copy of your data.
Third, be sure to check the compatibility of the operating system you're trying to install with the computer you're using. Not all operating systems are compatible with all computers.
FAQs
1. How do I create a bootable USB drive for Linux?
Step 1. Download the ISO image file and save it on your computer.
Step 2. Download Etcher and install. Connect the USB drive to the computer.
Step 3. Copy the downloaded ISO file to the USB drive with the software you download (Etcher).
Step 4. Click start and wait until the creating process is finished.
2. Is Rufus available for Linux?
No, Rufus is not available for Linux. However, other software can create bootable USB on Linux, such as Etcher and UNetbootin.
The Bottom Line
Creating a bootable USB drive is not as difficult as you think. With the help of third-party tools, you can create a bootable USB drive in no time. Just follow the steps in this article, and you'll be able to create a bootable USB drive without any problem. If you have any other questions, please leave a comment below.
Secure Download
Was this page helpful? Your support is truly important to us!

EaseUS Todo Backup
EaseUS Todo Backup is a dependable and professional data backup solution capable of backing up files, folders, drives, APP data and creating a system image. It also makes it easy to clone HDD/SSD, transfer the system to different hardware, and create bootable WinPE bootable disks.
Secure Download
-
Updated by
![]()
Daisy
Daisy is the Senior editor of the writing team for EaseUS. She has been working at EaseUS for over ten years, starting as a technical writer and moving on to being a team leader of the content group. As a professional author for over ten years, she writes a lot to help people overcome their tech troubles.…Read full bio -
Written by
![]()
Jean
Jean is recognized as one of the most professional writers in EaseUS. She has kept improving her writing skills over the past 10 years and helped millions of her readers solve their tech problems on PC, Mac, and iOS devices. …Read full bio
Related Articles
![]() Disk Clone vs System Clone: What's The Difference?
Disk Clone vs System Clone: What's The Difference?![]() Boot Device Not Found Hard Disk 3F0 Error on HP [FIXED]
Boot Device Not Found Hard Disk 3F0 Error on HP [FIXED]![]() Cloud Backup vs. Local Backup - Which One Is Better? Or Both?
Cloud Backup vs. Local Backup - Which One Is Better? Or Both?![]() Is Norton a Good Antivirus? | Review of Features & Pros & Cons
Is Norton a Good Antivirus? | Review of Features & Pros & Cons![]() Samsung Data Migration Software Download and Perform
Samsung Data Migration Software Download and Perform![]() How to Change Time Machine Backup Schedule?
How to Change Time Machine Backup Schedule?

EaseUS Todo Backup

Smart backup tool for your files, disks, APPs and entire computer.
Topic Clusters


Interesting Topics