Page Table of Contents
Updated on Mar 15, 2024
Why Do You Need to Change Backup Location?
As you might already know, the built-in backup tools in Windows 7 will automatically save your backup files to the default location. And over time, as you create more and more backup files, the storage space on your backup drive will gradually become depleted.
So, what should you do if you want to change the backup location? This article will tell you how to change backup location in Windows 7.
There are a number of reasons why you might want to change your backup location. For example, you may want to:
- Save space on your primary drive by storing backups on a separate drive
- Improve performance by storing backups on a faster drive (e.g. an SSD)
- Store backups in a more secure location (e.g. an offsite location)
Whatever your reasons for wanting to change your backup location, the process is actually quite straightforward. Let's take a look at how to do it.
Change Backup Location Windows 7/10
If you have created backup files with Windows built-in tools File History and Backup and Restore, you can follow the steps here to change the backup location settings.
There are two ways to change the backup location in Windows 7/10: via the Backup and Restore tool or in the Control Panel.
1. Change Backup Location via Backup and Restore (Works in Windows7/10)
As an alternative to changing the backup location in Control Panel, you can also change it via the Backup and Restore tool. Here's how:
Step 1. Open the Backup and Restore tool by going to Start > All Programs > Accessories > System Tools > Backup and Restore.
Step 2. On the left side of the window, click on "Change settings".
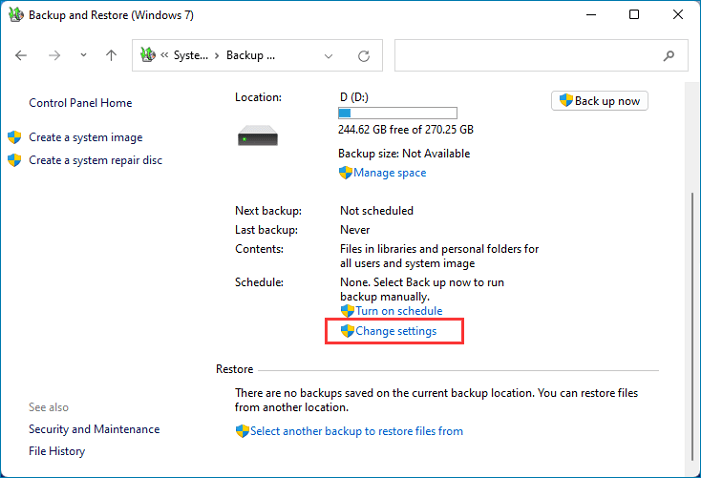
Step 3. It will ask you to re-decide what you want to backup and where to save your backup files.
Step 4. In the window that opens, select the drive you want to use as your new backup location and then click on "Next".
If you want to create a new folder for your backups, click on "Create a new folder" and then enter a name for the folder. Once you've done that, click on "Next".
Step 5. On the next screen, you'll be asked to confirm the destination for your backups. Once you've done that, click on "Start backup" to begin backing up to the new location.
2. Change Backup Location in Control Panel (Works in Windows 8/10)
You can access Windows built-in backup tools from Control Panel. Thus you can also change the default backup location in it. Here are the detailed steps:
Step 1. Pressing the Start button and then typing "control panel" into the search box. Alternatively, you can access the Control Panel from the Start menu by going to Start > All Programs > Accessories > System Tools > Control Panel.
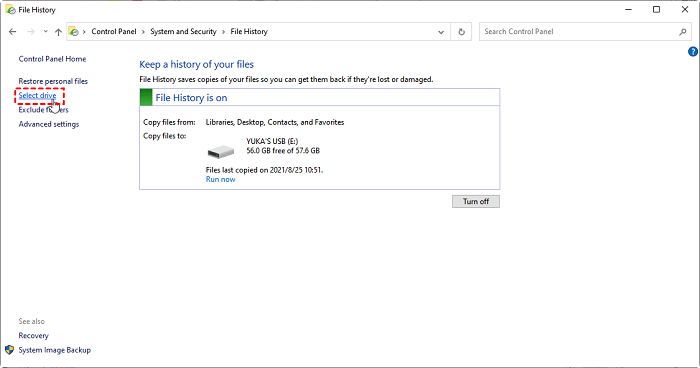
Step 2. In the Control Panel, look for the "System and Security" category and click on it. Then, click on "File History".

Step 3. In the window that opens, click on "Select drive".
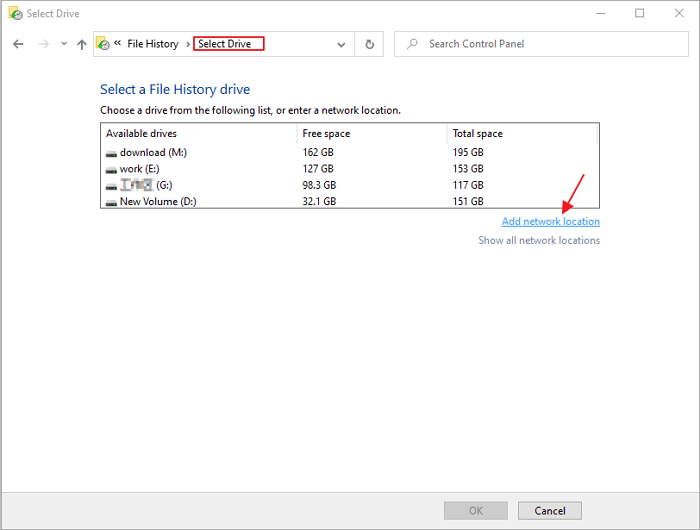
Step 4. Then select the drive you want to use as your new backup location and then click on "OK".
Confirm your new backup location, and File History will start to create a backup in the new drive. The next time you connect your new drive to the computer, File History will automatically create a backup on it.
Backup File Management Tool & Creator - EaseUS Todo Backup
One of the most important reasons why users need to change backup location is that the disk is full and wants to change to a new one. The great news is that many third-party backup tools have solutions to help users manage backup files.
With such backup tools, users have more backup options. They can put the backup files to a local hard drive, cloud drive, and NAS. What's more, when setting up a backup plan, users can choose to delete old backup files to save drive space regularly.
With so much third-party backup software, which one should you choose? A good backup tool should meet the following criteria: easy to use, powerful, compatible with common operating systems, and cost-effective. Based on this standard, we recommend you choose EaseUS Todo Backup.
2. You have various backup location options: local/external drive, cloud drive (Google Drive, Dropbox, OneDrive...), NAS
3. You can set to delete old backup files automatically
4. You can back up more content than using built-in tools
5. You can clone Windows OS to a new SSD with EaseUS Todo Backup (Paid)
Here we will show you how to create backup files and set up backup plans with EaseUS Todo Backup. Download it from the button below, and launch it on your computer to start.
Secure Download
Step 1. For the first time you use EaseUS Todo Backup to back up files, click Create backup on the home screen and then mouse click the big question mark to select backup contents.

Step 2. Since you're going to back up files and folders on your computer, go on with the "File" backup mode, where you can select pictures, videos, documents and all other types of files to back up.

Step 3. Follow the paths to locate the files, folders or directories you want to back up, select them all and click "OK".

Step 4. Now you need to select a backup location to save and retain the backup.

Step 5. EaseUS Todo Backup allows users to save the backup files to every device that is handy for you, like a local hard drive, external USB drive, SD card, network drive, or a NAS drive, plus a cloud drive of the EaseUS brand. We personally recommend users to choose the cloud drive prior to a physical drive to save important backups due to the greater accessibility, flexibility and safety.

To be able to access to EaseUS cloud, all you need is an email registration and login.

Step 6. If you're interested in an automatic and intelligent backup schedule for the next file backup task, go on with the "Options" setting. There you can encrypt a confidential file backup, compress the backup image size, or customize a backup scheme to tell the software in what time to start the next backup.
Customize an advanced and automatic backup task here:

Step 7. Click "Backup Now" to start the file backup process. Your completed backup files are visible on the left area in a card style.

FAQs
1. How to change the backup location on Windows 7?
1. Open Control Panel
2. Select System and Security
3. Select Backup and Restore (Windows 7)
4. Under "Where do you want to save your backup?" click Change
5. Browse to the location where you want to save your backup, and then click OK
6. Click Save settings and run backup
2. Where is my Backup file stored in Windows 7?
The default location for backup files in Windows 7 is: C:\Users\username\AppData\Local\Microsoft\Windows.
Please refer to the steps above to change the location. For more information, you can check this post: Where Are the Backup Files Stored?
The Bottom Line
That's all about how to change backup location in Windows 7. You can follow the steps above to change your backup destination easily.
If you want an easier way to manage your backup files and save storage space, we recommend you use a third-party backup tool like EaseUS Todo Backup. With it, you can set up a backup schedule and delete old backup files automatically.
If you have any questions, please feel free to contact us. We're here to help.
Secure Download
Was this page helpful? Your support is truly important to us!

EaseUS Todo Backup
EaseUS Todo Backup is a dependable and professional data backup solution capable of backing up files, folders, drives, APP data and creating a system image. It also makes it easy to clone HDD/SSD, transfer the system to different hardware, and create bootable WinPE bootable disks.
Secure Download
-
Updated by
![]()
Daisy
Daisy is the Senior editor of the writing team for EaseUS. She has been working at EaseUS for over ten years, starting as a technical writer and moving on to being a team leader of the content group. As a professional author for over ten years, she writes a lot to help people overcome their tech troubles.…Read full bio -
Written by
![]()
Jean
Jean is recognized as one of the most professional writers in EaseUS. She has kept improving her writing skills over the past 10 years and helped millions of her readers solve their tech problems on PC, Mac, and iOS devices. …Read full bio
Related Articles
![]() Factory Reset HP Laptop Windows 7 F11 Not Working
Factory Reset HP Laptop Windows 7 F11 Not Working![]() 5 Best Photo Backup Software for PC in 2024
5 Best Photo Backup Software for PC in 2024![]() How to Run System Restore From Safe Mode in Windows 7 [2024 Guide]
How to Run System Restore From Safe Mode in Windows 7 [2024 Guide]![]() Fake Windows Update Virus Removal and Prevention Tips in 2024
Fake Windows Update Virus Removal and Prevention Tips in 2024![]() Quick Solutions | Windows Defender Missing Windows 11
Quick Solutions | Windows Defender Missing Windows 11![]() Windows Defender vs. Avast: Which Antivirus is Better?
Windows Defender vs. Avast: Which Antivirus is Better?


EaseUS Todo Backup

Smart backup tool for your files, disks, APPs and entire computer.
Topic Clusters


Interesting Topics