Page Table of Contents
Reviews and Awards
The methods to increase file copying speed in Windows 10/11 depend on how you transfer files, whether via a Network, USB, or to a hard drive.
Scenario 1. Network Transfer: Boost network file transfer speeds by disabling Windows Auto-Tuning via Command Prompt and turning off Remote Differential Compression in Windows Features. And update Network Drivers.
Scenario 2. USB Transfer: Enhance USB transfer speed by checking for drive corruption using File Explorer's built-in tool, adjusting the removal policy to "Quick removal" or "Better performance" in Device Manager, and converting the drive from FAT32 to NTFS.
Scenario 3. Hard Drive/Disk Transfer: Disable indexing in File Explorer, convert the file system to NTFS using EaseUS Partition Master Free, and repair system errors with the System Maintenance Troubleshooter.
We are here to help you resolve the slow file transfer issues in Windows 11/10. In this post, we explore the most effective methods to speed up file transfer in Windows 10/11. The following solutions help you to figure out what exactly causes the slow file transfer issue or change the way of Windows 11/10 file transfer on your PC or laptop. You can speed up file transfer via network or cable by using the smart data transfer software - EaseUS Todo PCTrans Free as an all-in-one solution.
Why Is File Transfer So Slow on Windows 10/11?
Windows 10 users often face slow file copying due to outdated drivers, file system issues, or inefficient network protocols. Here are some common user cases on the slow file transfer issue in Windows 10/11 from Reddit.
|
Slow file transfer speeds on Windows 10 or 11 may be related to your computer's hardware setup, software, system settings, file system, and other external factors. It depends on how you're transferring the files. Here's a list of common reasons why Windows 10/11 file transfer is slow.
1️⃣Network: Slow Wi-Fi speeds, network congestion, outdated protocols, or high latency from router limitations.
2️⃣USB: USB 2.0 ports/devices with lower bandwidth, faulty cables, or loose/damaged port connections.
3️⃣Hard Drive: Slower HDDs compared to SSDs, file fragmentation, disk errors, or nearly full storage capacity.
Scenario 1. How to Increase Copying Speed in Windows 10/11 - Network
Some people may find that the network data transfer becomes very slow in Windows 11/10. To solve the slow network transfer speed issue, the three approaches below are worth trying.
1. Disable Windows Auto-Tuning
If you share files over a network, the auto-tuning feature can improve the performance of programs that receive TCP data over a network. However, in some situations, disabling this feature may result in a faster copy speed.
- Notice:
- Disabling Windows Auto-Tuning can improve file transfer speed in some cases. But it may reduce overall network performance in certain applications. Always test after disabling, and be ready to re-enable it if problems arise.
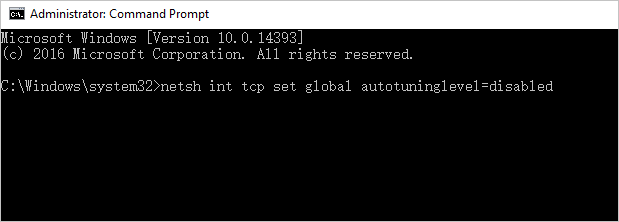
Step 1. Press the Windows key + X and select Command Prompt(Admin).
Step 2. Type netsh int tcp set global autotuninglevel=disabled and press Enter.
Step 3. Now, try to transfer the files and check the data transfer speed. You can go to Command Prompt(Admin) again and type netsh int tcp set global autotuninglevel=normal and press Enter to turn on the Auto-tuning again.
2. Turn off RDC (Remote Differential Compression)
The Remote Differential Compression feature can cause slow network file transfer in Windows 10. To fix this problem, you need to disable this feature on your PCs by doing the following.
- Notice:
- Turning off Remote Differential Compression may result in compatibility issues or slowdowns. It is essential that this setting be changed on all PCs.
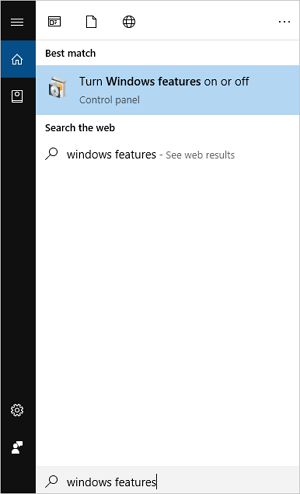
Step 1. Press Windows Key + S and enter Windows Features. Click "Turn Windows features on or off."
Step 2. Find and uncheck Remote Differential Compression and click "OK."
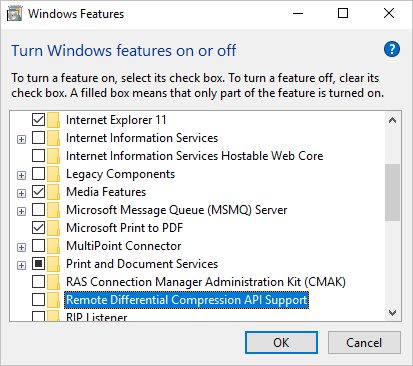
Step 3. Restart your PC. You need to repeat this on all the computers on your network. After that, check if the problem is still there.
3. Update Network Drivers
Make sure your network adapter drivers are current. Use the latest drivers from the manufacturer to ensure optimal network and SMB protocol support.
Here is how you can update network drivers on Windows 10.
1. Open Device Manager (Win + X, then select it).
2. Expand adapters.
3. Right-click your network adapter, select Update driver.
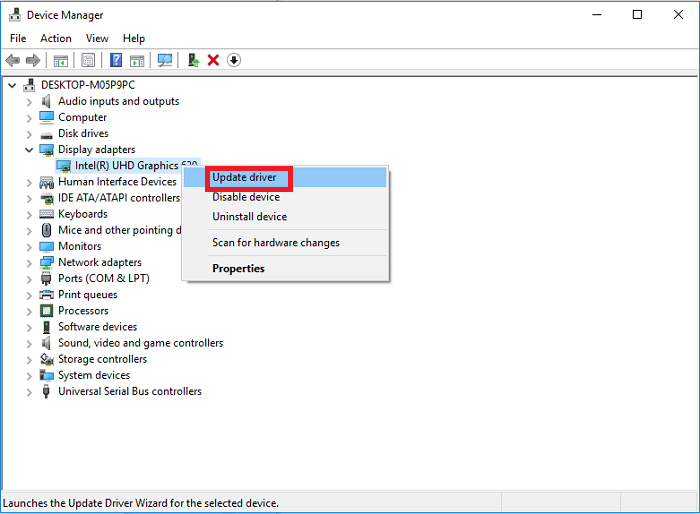
4. Choose "Search automatically for updated driver software."
5. Restart your PC if an update installs.
After the process, you will find that your network data transfers faster. Click the buttons below to share these fixes with others.
Scenario 2. How to Speed Up File Transfer in Windows 10/11 - USB
Copying files between computers via USB drives is one of the most basic ways to share data. But lots of users complain that their PCs are transferring files very slowly on Windows 11/10.
1. Easy Ways to Speed up File Transfer in Windows 10/11
If you find the Windows file transfer slow, you can first try some easy ways to speed up file transfer in Windows 11/10. Check the list of easy ways to increase file transfer on Windows 10/11. These may help you fast fix slow USB transfer speed.
Try using a different USB port or cable:
- For example, plugging your USB drive into a USB 3.0 port (usually blue inside) instead of a USB 2.0 port can dramatically increase transfer speed.
- Also, defective or low-quality cables can cause slow speeds, so swapping the cable can help.
Check and update your USB drivers:
- Open Device Manager, expand Universal Serial Bus controllers, right-click each USB-related device, select Update driver, and let Windows search automatically.
If the situation doesn't improve, continue to use the following advanced solutions.
2. Check the USB or Hard Drive for Corruption
The first step to fix the slow USB transfer issue is to check its state. You can use the Windows built-in tool for help. Once you start the process, it will find the corrupted sectors and fix them if needed.
Step 1. Open "This PC" or "File Explorer".
Step 2. Right-click on the USB drive or hard drive and click "Properties."
Step 3. Click the "Tool" tab. Under the "Error-checking" section, click "Check."

- Relevant reading: How to Fix USB flash drive not showing up in Windows 10/8/7
3. Change the Removal Policy for USB Drive/HDD
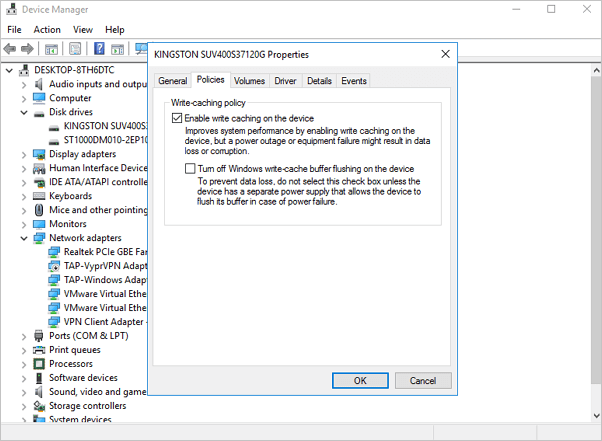
The external USB drive or HDD on your computer provides you with a Quick removal policy that avoids caching and a better performance policy that writes caching. If your USB flash drive is small-sized, you'd better choose the former one. If you are using an external hard drive to move large files, the Better performance policy is more appropriate. Let's see how to change the Removal policy.
Step 1. Plug in your USB or external hard drive to the PC.
Step 2. Click "Start," type Device Manager, and open it.
Step 3. Expand the "Disk drives." Then, right-click on the target drive. Open "Properties" and select "Policy."
Step 4. Choose a Quick removal policy for the USB flash drive and a Better performance policy for the external hard drive.
4. Format USB Flash Drive to NTFS
After you convert the USB drive from FAT 32 to NTFS, there may be visible improvements in the transfer speed. If you don't know how to format a USB flash drive to NTFS, follow this link to see details: Format USB flash drive to NTFS in Windows 10/8/7.
- Notice:
- Before formatting a USB drive's file system, backing up all data is essential since this process may potentially damage stored files.
Share these ways to help others transfer files faster and remove the slow transfer issues.
Scenario 3. How to Increase Copying Speed in Windows 10/11 - Hard Drives/Disks
The slow data transfer can also result from a hardware or computer issue. You might be able to fix this simply by disabling certain antivirus or cleaning up temporary cache files. If these don't work, move to increase the disk transfer speed from the following points.
1. Disable Drive Indexing
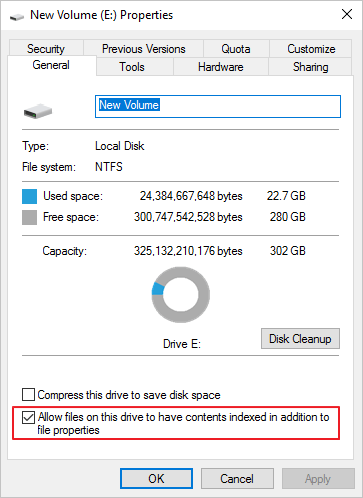
Windows offers a Drive Indexing feature to index all files and substantially reduce the waiting time when you search for them in File Explorer. However, it can slow the data transfer speed if it starts indexing data while the copying is still going on. So, we suggest that you temporarily disable Drive Indexing for a trial.
Step 1. Open "This PC" or "File Explorer."
Step 2. Select the partition you want to turn off the indexing feature. Right-click it and click "Properties".
Step 3. Uncheck the "Allow files on this drive to have contents indexed in addition to file properties" box and restart your PC to enable the function.
2. Convert File System from FAT to NTFS
EaseUS Partition Master Free allows users to convert FAT to NTFS without losing data effortlessly. Now, download this free partition manager software, and let's begin.
Step 1. Install and launch EaseUS Partition Master on your computer.
Step 2. Go to the Disk Converter tab, select "FAT => NTFS" and click "Next."
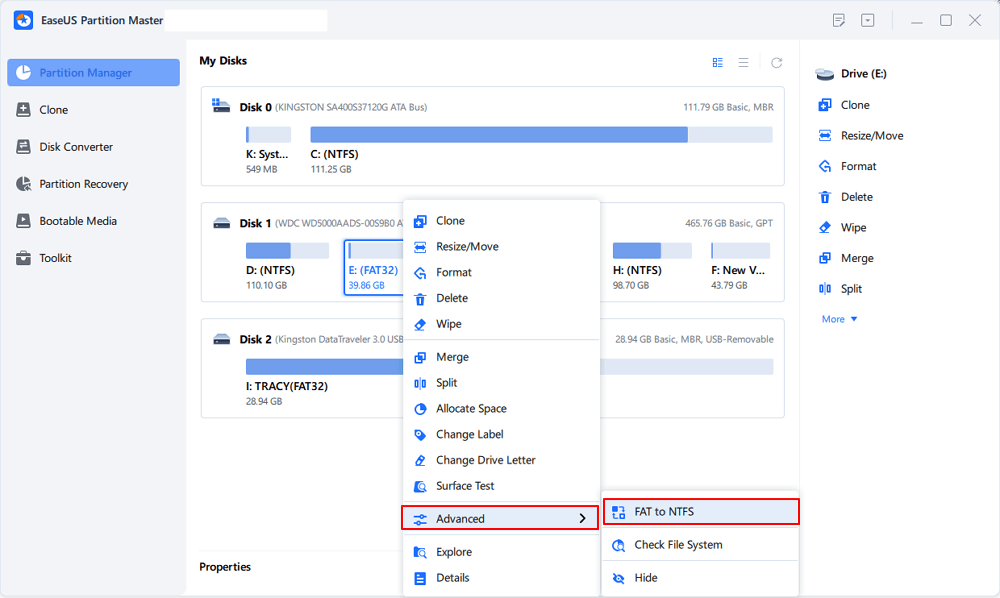
Step 3. Select the partition that you want to convert to NTFS and then click on "Convert." (Tick the "Show More" option in the panel's upper right corner to display the hidden partitions.)
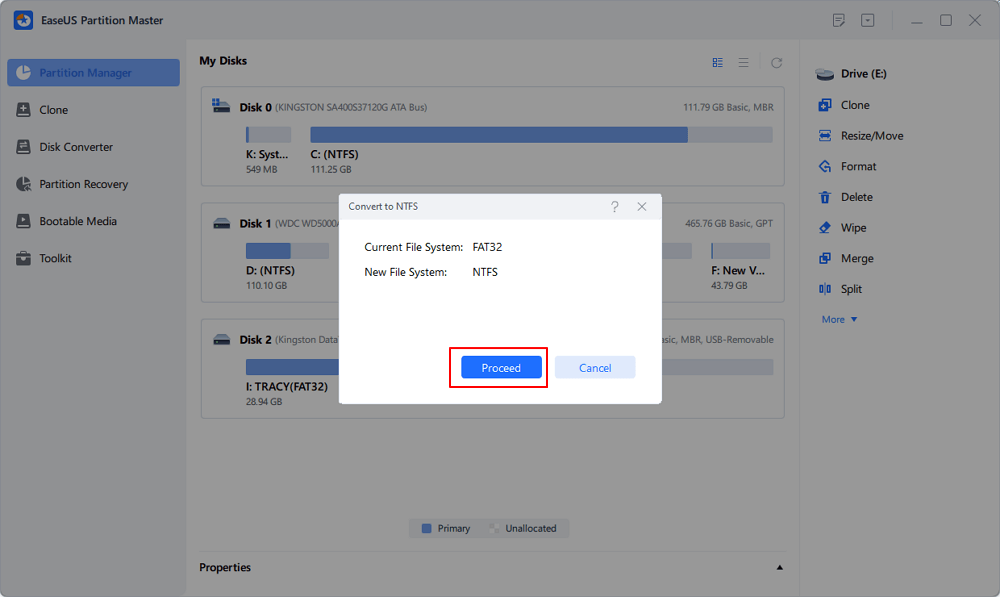
Step 4. Wait until the operation process is finished.
3. Check and Repair System Errors
A corrupted Windows 10 file system could disable, interrupt, or slow down the file transfer speed, so let's use the System Maintenance Troubleshooter to repair the wrong files.
Step 1. Open the Control Panel and click on the Troubleshooting icon.
Step 2. Select View all in the top left corner.
Step 3. Run System Maintenance Troubleshooter.
Make File Transfer Faster Windows 11/10 with Free File Transfer Software
Sometimes, file transfer speed drops to zero on Windows 10. When the file transfer speed slows down on a computer, various reasons may cause it, including network speed, storage capacity of the target drive, file size, etc. A direct way to make the file transfer speed faster in Windows computers is to turn to reliable and fast file transfer software for help.
EaseUS Todo PCTrans Free is a powerful and easy-to-use PC transfer software that can ease you from the slow file transfer issue on your computer. It enables you to migrate files and drive content efficiently via several transfer plans, including:
- Transfer of 2GB and five programs to another computer or drive for free
- Transfer unlimited files quickly from PC to PC or from PC to an external storage device with or without the network.
- Transfer applications between drives/disks locally. For instance, transfer programs from C drive to D drive without any start-up problem.
Here is how to increase copying speed in Windows 10/11:
Step 1. Set Up the Old PC
- First, install and launch EaseUS Todo PCTrans and select Data Transfer on the left panel of the main interface.
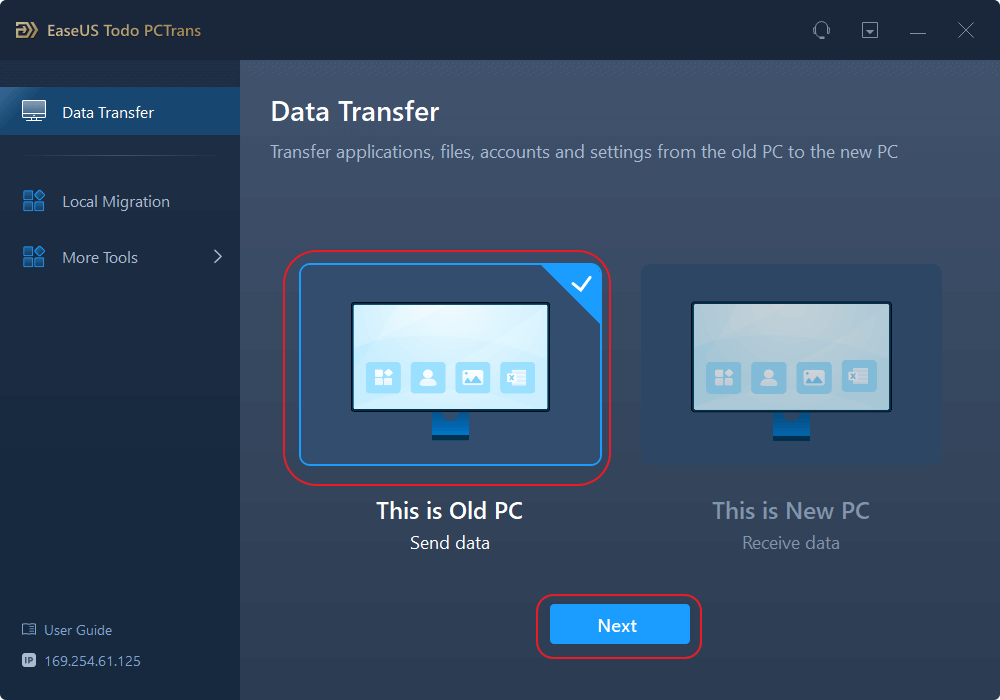
- Select "Transfer Directly" and click "Next" to continue.
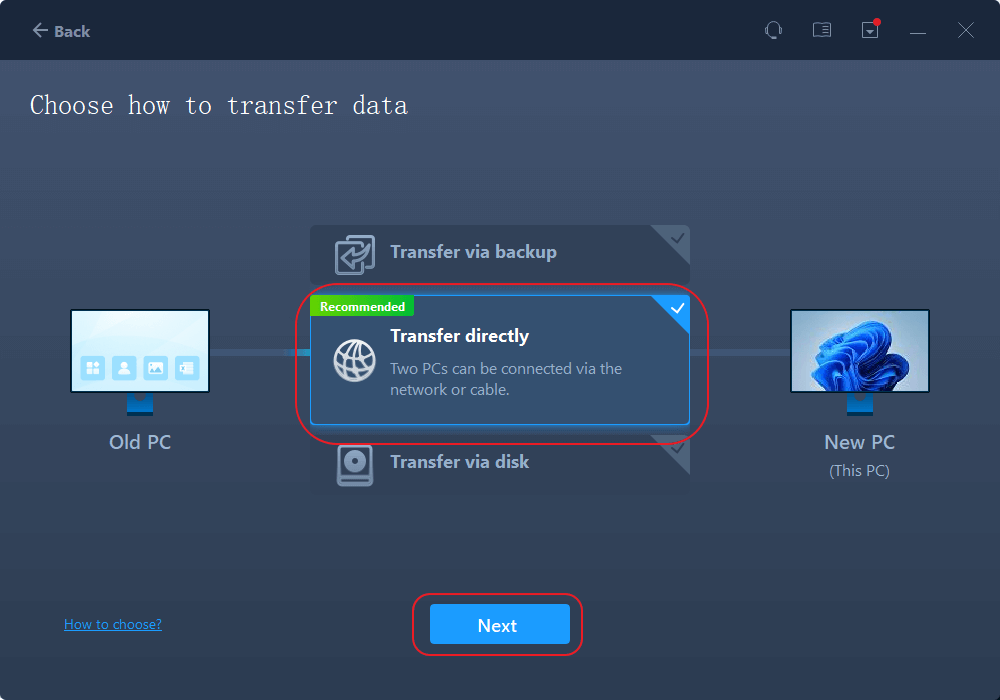
Step 2. Set Up the New PC
- Download and launch EaseUS Todo PCTrans on the new computer; select "This is New PC" and click "Next".
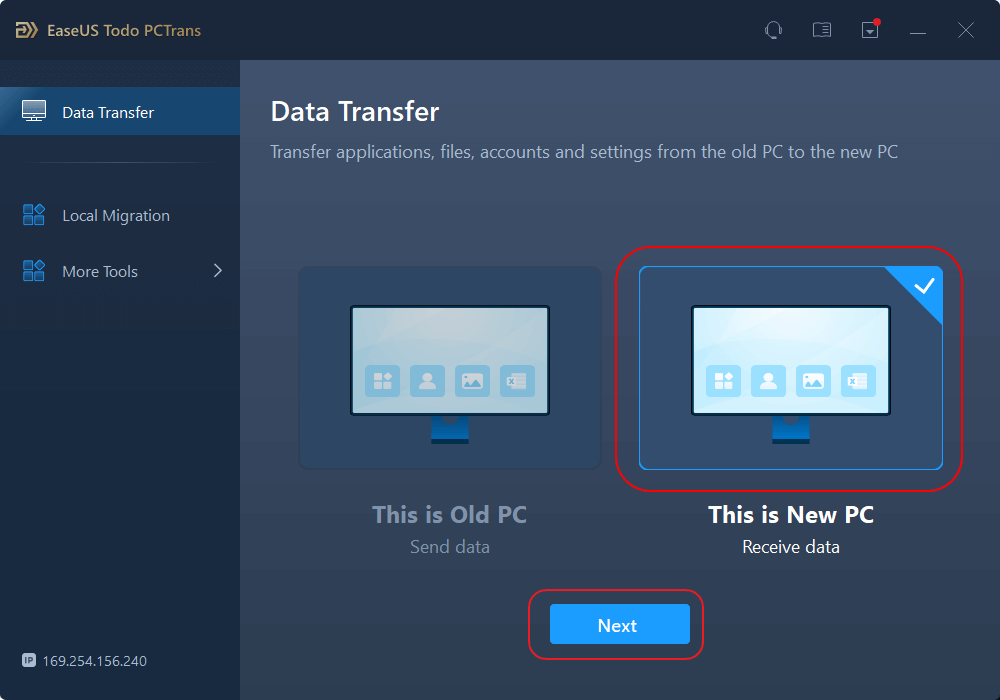
- Select "Transfer directly" and click "Next" to continue.
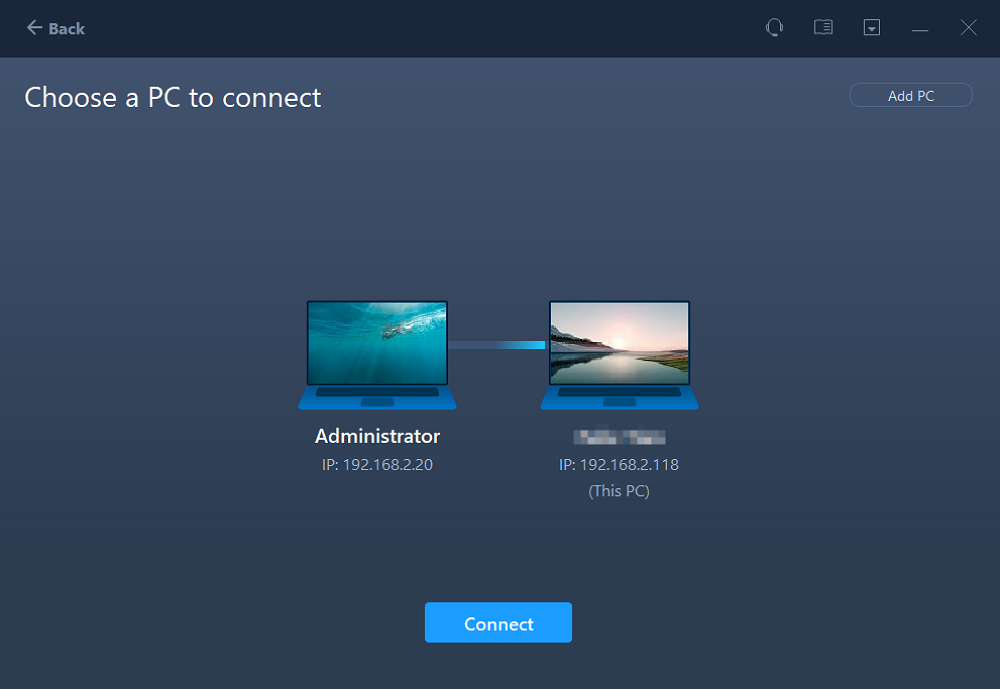
- Select "Network" and click Next to continue. This will automatically scan the old PC. (Make sure the two PCs are connected to the same LAN.)
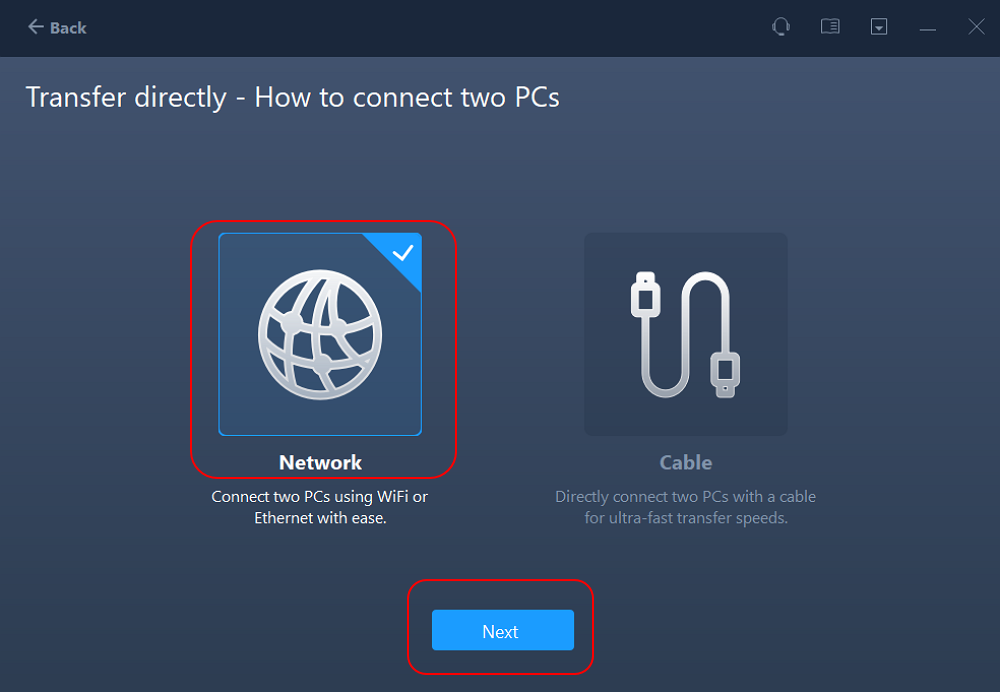
- Select the target PC and click Connect. Then, it will take some time to scan and analyze the data in old PC.
Step 3. Select the Files to Transfer
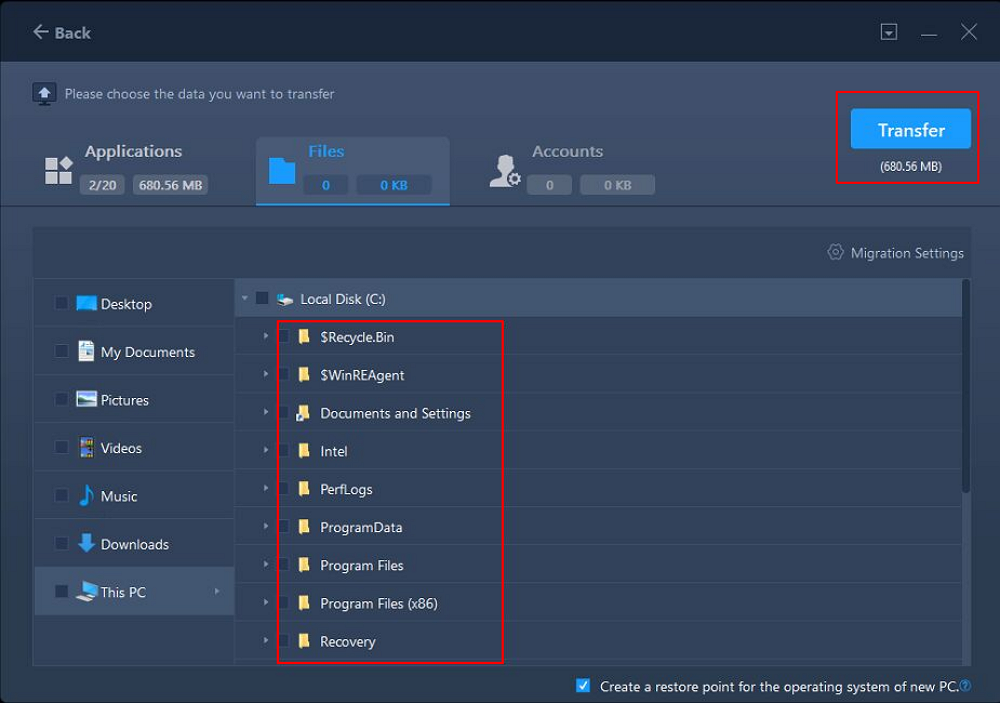
- Finally, on the new PC, select the Files tab, select the files you need to transfer. Then, click "Transfer" to start.
Also, don't forget to share this tutorial online to help more people fix Windows 10 slow file transfer error:
Furthermore, we put three solutions here to cope with the very slow file transfer in Windows 11/10, which include network problems, external drive problems, or computer problems. You can choose the best method for increasing file transfer speed in Windows 11/10. Take it easy and check your methods one by one.
- Important
- Microsoft has confirmed that Windows 10 support will officially end on October 14, 2026. After this date, the system will no longer receive security updates, bug fixes, or technical support. To understand what this means for users, check our Windows 10 End of Support, Stay or Upgrade.
Methods Summary
Whether it involves network transfer, USB data copying, or hard disk data migration, slow file transfer in Windows can be caused by a variety of reasons. If the network transfer is delayed, try to resolve the network and computer issues. If the USB is not moving fast, you can find the reason in the USB drive and your computer. I hope these methods help you effectively speed up file transfers in Windows 10/11.
Finally, if none of the previous solutions help you deal with the slow file copying issue, it's time to try some third-party tools to speed up the transfer. Here, we'd like to recommend you try EaseUS Todo PCTrans.
FAQ about Speed Up Network File Transfer Windows 10
Do you know how to speed up network file transfer on Windows 11/10 now? If you still have any doubts, this part lists three questions to help you. Check them below:
1. How do I fix Windows 10 slow internet?
- Disable Windows Auto-Tuning.
- Turn off Remote Differential Compression.
- Check if your hard drive is corrupted.
- Check your Ethernet cable.
- Stop running unnecessary programs.
2. Why do we encounter Windows 10 slow file transfer over the network?
The network file transfer runs so low that it stems from your network settings and other hardware failures. Sometimes, checking your router settings is a common solution.
If you can not fix slow file transfer in Windows 10, EaseUS Todo PCTrans can help you transfer files from one computer to another without the Internet.
More details:
3. How do I transfer files faster in Windows 10?
To fix Windows 10 slow file transfer, we recommend EaseUS Todo PCTrans to move all your data to another PC at a fast speed.
Step 1. Download EaseUS Todo PCTrans.
Step 2. Choose PC to PC mode, and click Start.
Step 3. Connect two PCs via entering the password or verification mode.
Step 4. Select the files you want to transfer.
About the Author
"I hope my articles can help solve your technical problems. If you are interested in other articles, you can check the articles at the bottom of this page. Similarly, you can also check my Twitter to get additional help."
Jean is recognized as one of the most professional writers in EaseUS. She has kept improving her writing skills over the past 10 years and helped millions of her readers solve their tech problems on PC, Mac, and iOS devices.
Reviews and Awards
-
EaseUS Todo PCTrans Free is a useful and and reliable software solution created to serve in computer migration operations, be it from one machine to another or from an earlier version of your OS to a newer one.
Read More -
EaseUS Todo PCTrans is by the folks at EaseUS who make incredible tools that let you manage your backups and recover your dead hard disks. While it is not an official tool, EaseUS has a reputation for being very good with their software and code.
Read More
-
It offers the ability to move your entire user account from your old computer, meaning everything is quickly migrated. You still get to keep your Windows installation (and the relevant drivers for your new PC), but you also get all your apps, settings, preferences, images, documents and other important data.
Read More
Related Articles
-
Transfer Files from Windows 10 to Windows 11 Without Network [3 Ways]
![author icon]() Joey Albert/2026/01/29
Joey Albert/2026/01/29 -
2 Ways to Move AppData to Another Drive on Windows 10
![author icon]() Sherly/2026/01/29
Sherly/2026/01/29 -
How to Copy Files Using Command Prompt Windows 10 - Guide
![author icon]() Cedric/2026/01/29
Cedric/2026/01/29 -
How to Uninstall Dev Home in Windows 11
![author icon]() Cici/2026/01/29
Cici/2026/01/29