Page Table of Contents
Reviews and Awards
Windows 10 file transfer speed can be slow when copying files between two internal disks, between an internal drive and an external drive, or even between two PCs over a network. What's puzzling is that your computer seems to be functioning normally, with no apparent issues other than the slow file copy speed.
- Important
- Microsoft has confirmed that Windows 10 support will officially end on October 14, 2026. After this date, the system will no longer receive security updates, bug fixes, or technical support. To understand what this means for users, check our Windows 10 End of Support, Stay or Upgrade.
Windows 10 slow transfer can often be caused by file system errors, disk fragmentation, outdated drivers, antivirus settings, and other Windows features. If you frequently transfer files and find the slow copy speed in Windows 10, try the following troubleshooting steps and fixes one by one. Alternatively, consider using a free and safe transfer tool like EaseUS Todo PCTrans to copy multiple files at once with fast speed.
Use EaseUS Todo PCTran
EaseUS Todo PCTrans is here to fix the slow file transfer in Windows 10. Migrate files between drives or computers with this efficient transfer tool. However, that's not all. This tool also lets you move applications and accounts between old and new Windows PCs. So, you can start fresh without leaving anything behind. The best part is that you can move programs and software to another hard drive, SSD, or external disk. You can do this without having to reinstall them.
Key Features:
- Fast Transfer Speed
- No File Size Limit
- User-Friendly Interface
- Perfect Compatibility
Follow the steps:
Guide 1: From Hard Drive to Another
Here is how to use EaseUS Todo PCTrans to transfer files from one hard drive to another:
Step 1. Create a backup file of the source hard drive
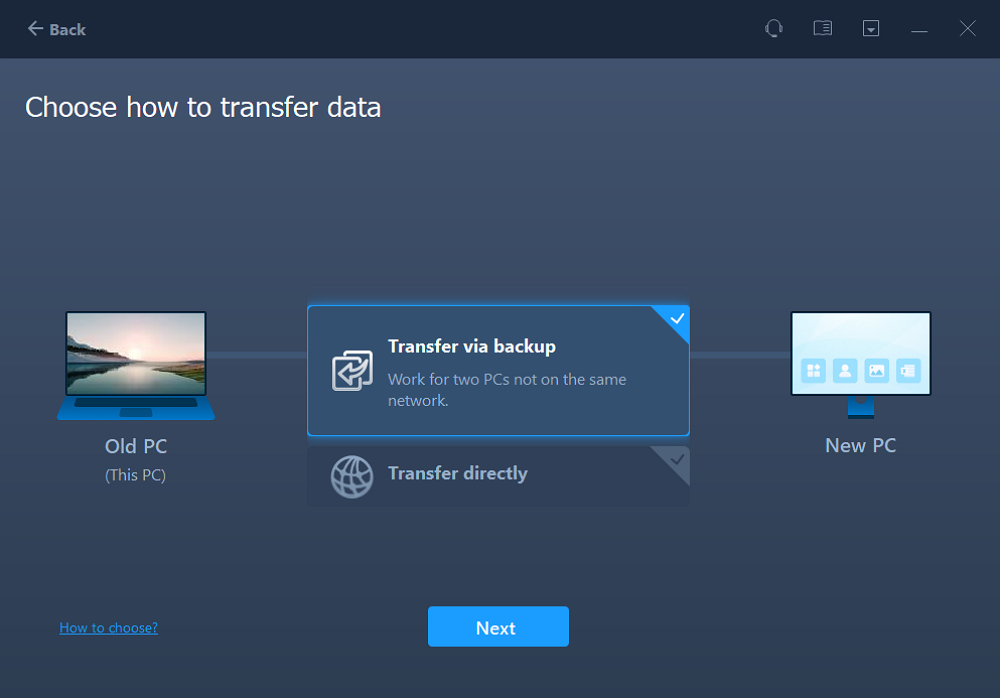
Launch EaseUS Todo PCTrans on your Windows computer. Click "data transfer" and select "Transfer via backup."
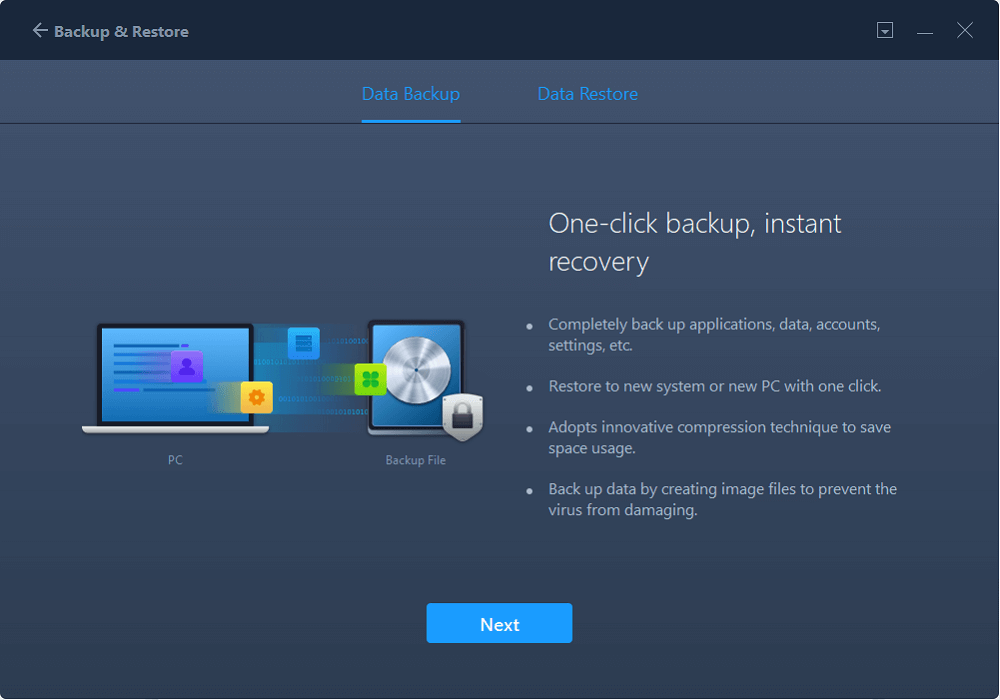
Hover your mouse over "Data Backup", and click "Next". Later, confirm the default settings of the file name and file path, or you can customize the settings on your own.
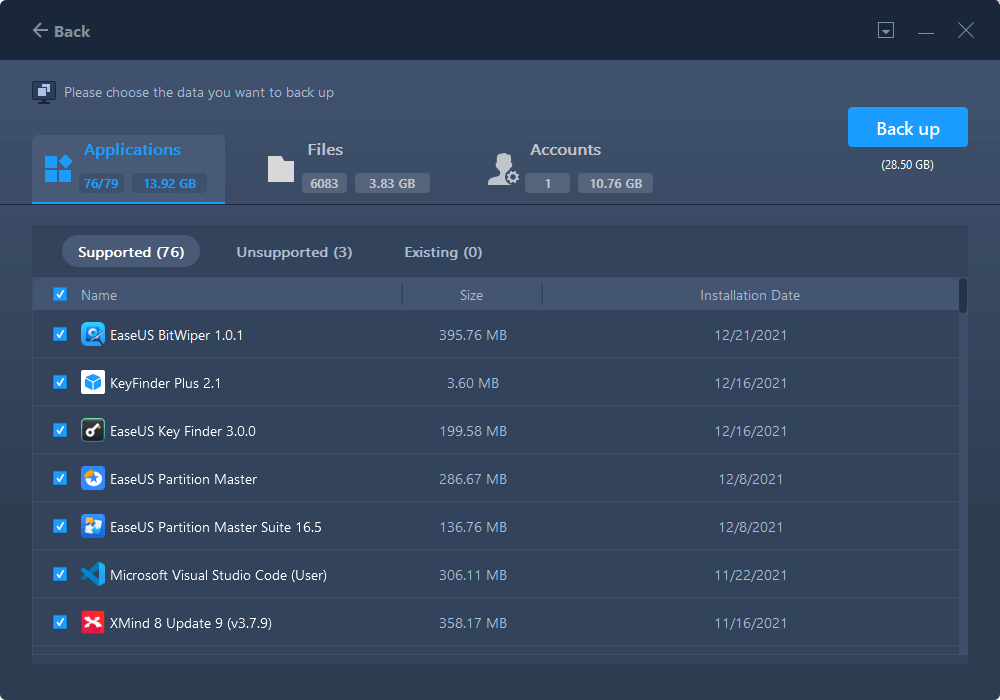
Now select the items you want to transfer to the other hard drive. EaseUS Todo PCTrans allows users to create backup files of multiple file types, including applications, personal data, and user accounts. To transfer files from one drive to another, deselect the "Applications" and "Accounts", hover your mouse over "Files", and click "Edit".
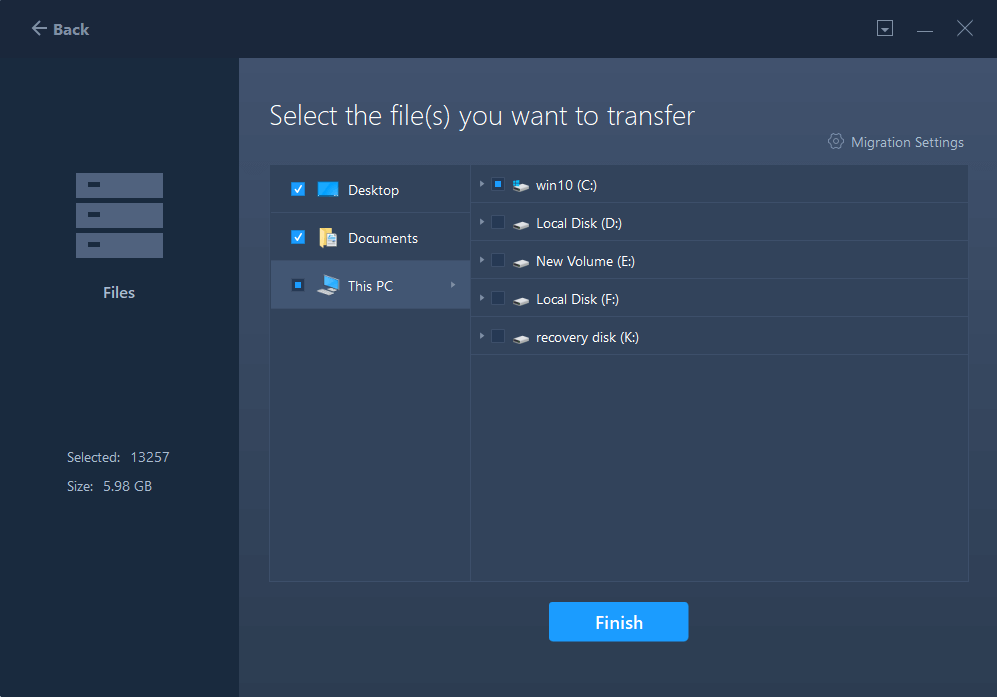
This is where you need to select files on the source drive. Expand the drive so you can selectively choose desired files, after then click "Finish". In the end, click "Backup". Wait for the process completes.
Step 2. Restore the file to the destination drive
Launch EaseUS Todo PCTrans and follow the same way to reach the step of selecting a transfer method. This time choose "Data Restore" and click "Next".
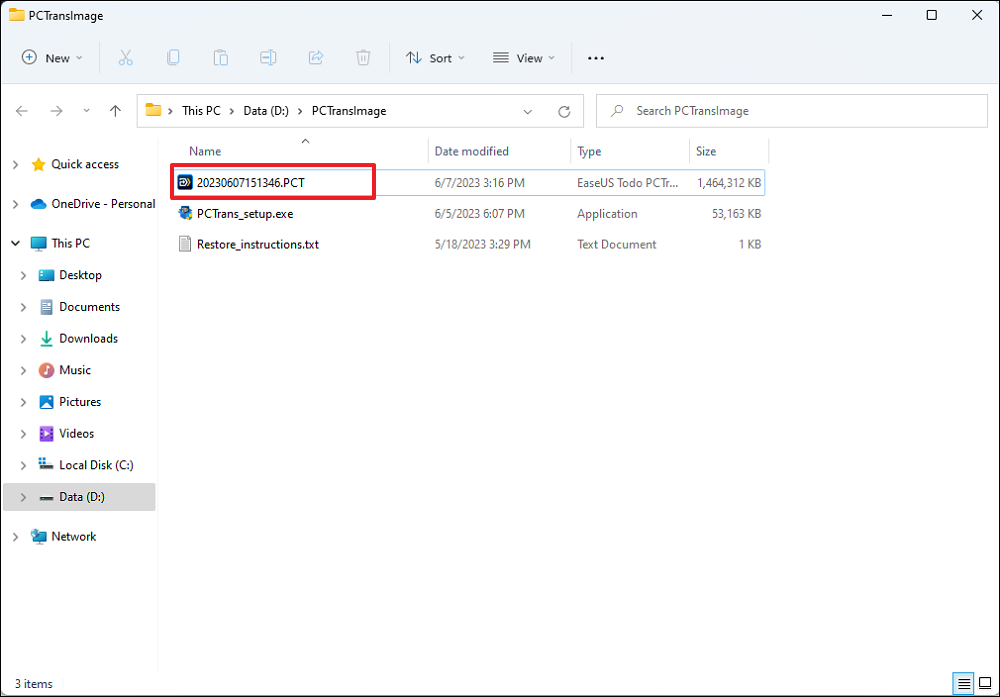
Choose the existing backup file presenting on the interface, or navigate to the exact file path where the backup file is, click "Restore".
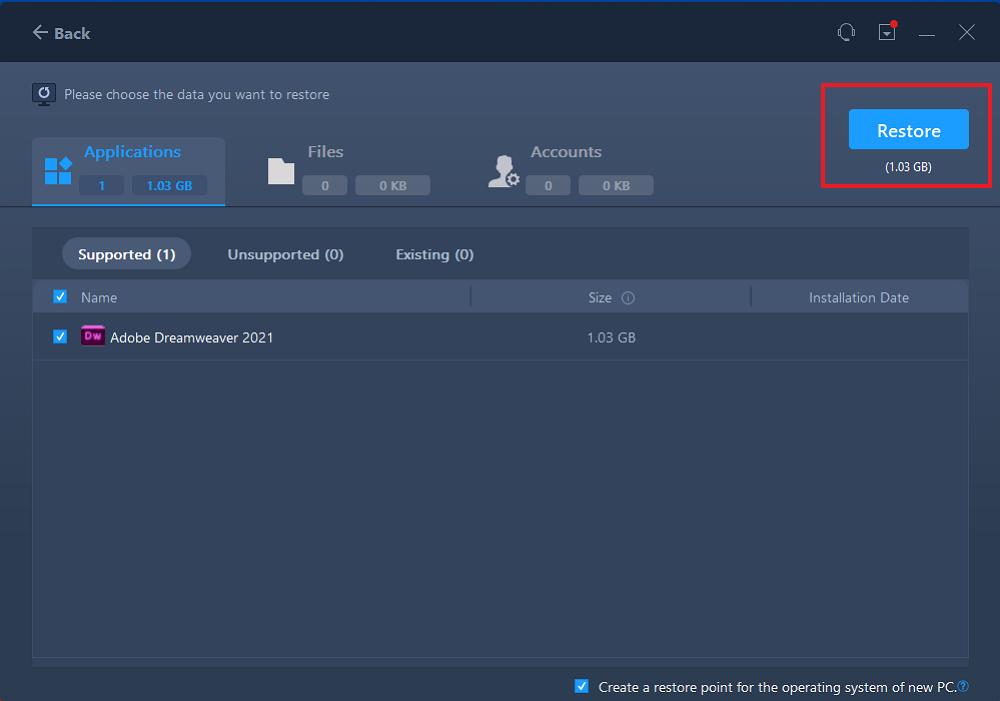
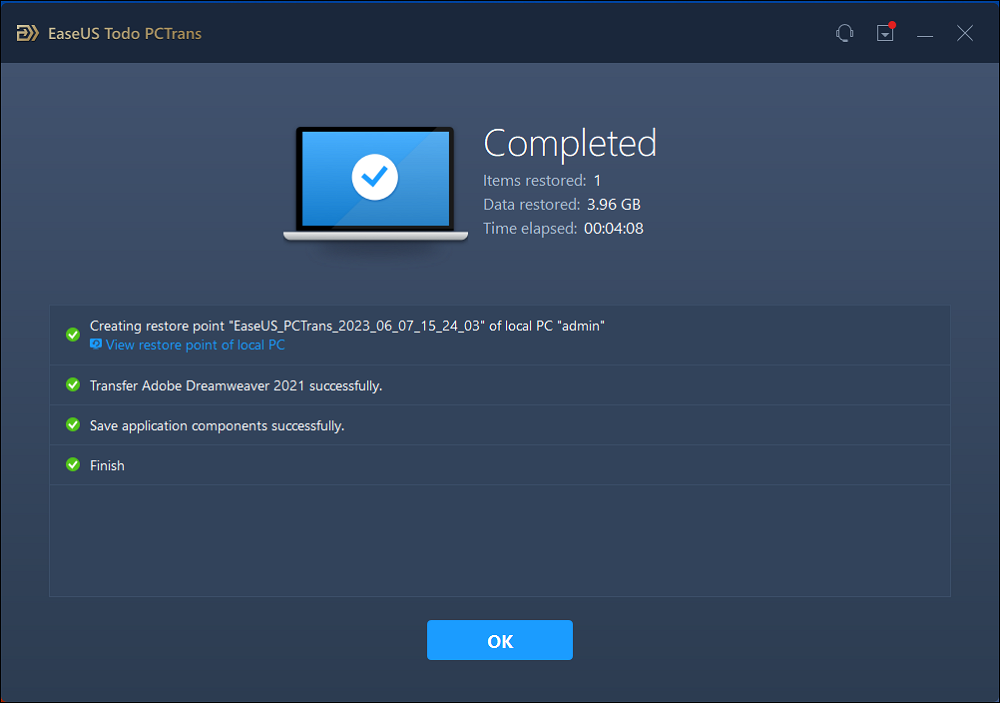
You're back to the "Files", click "Edit" to get in. The backup file is viewable here. You need to click the pencil icon to set the target location, which is the other hard drive, and submit the change. After the basic settings, click "Finish" and finally "Restore". Wait patiently until the transfer process is over.
Guide 2. From PC to PC
EaseUS Todo PCTrans can also avoid the slow transfer speed and transfer files from PC to PC:
Step 1. Set Up the Old PC
- First, install and launch EaseUS Todo PCTrans and select Data Transfer on the left panel of the main interface.
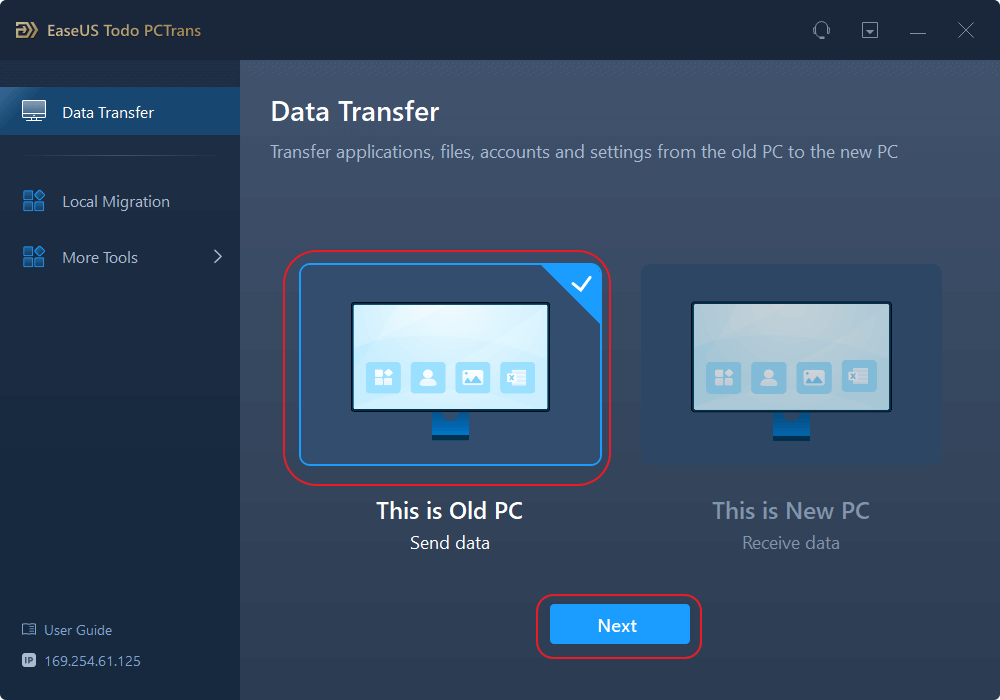
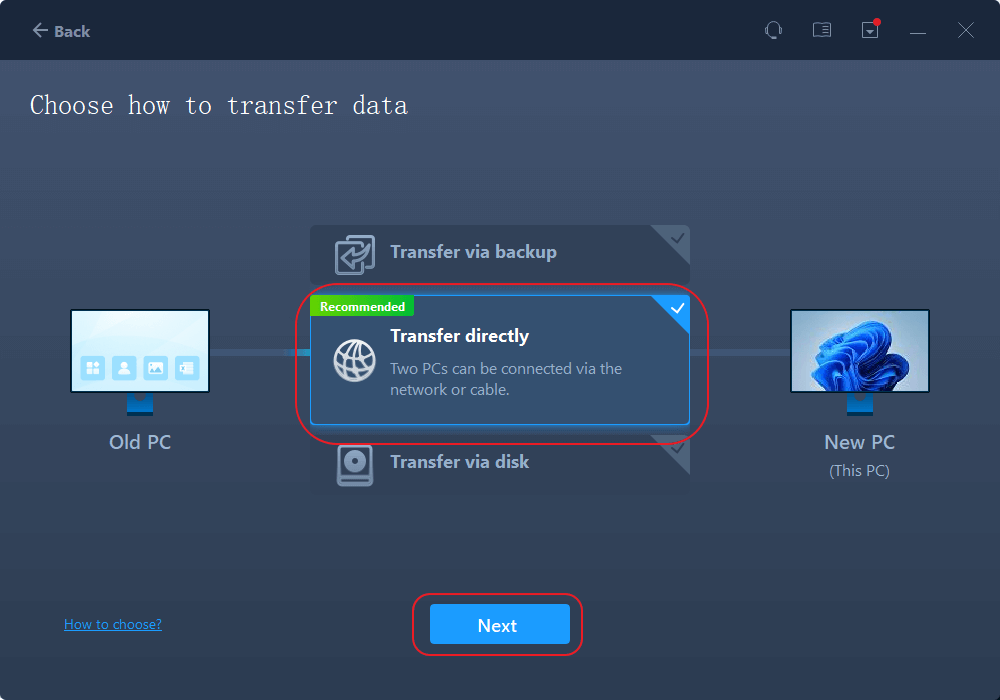
- Select "Transfer Directly" and click "Next" to continue.
Step 2. Set Up the New PC
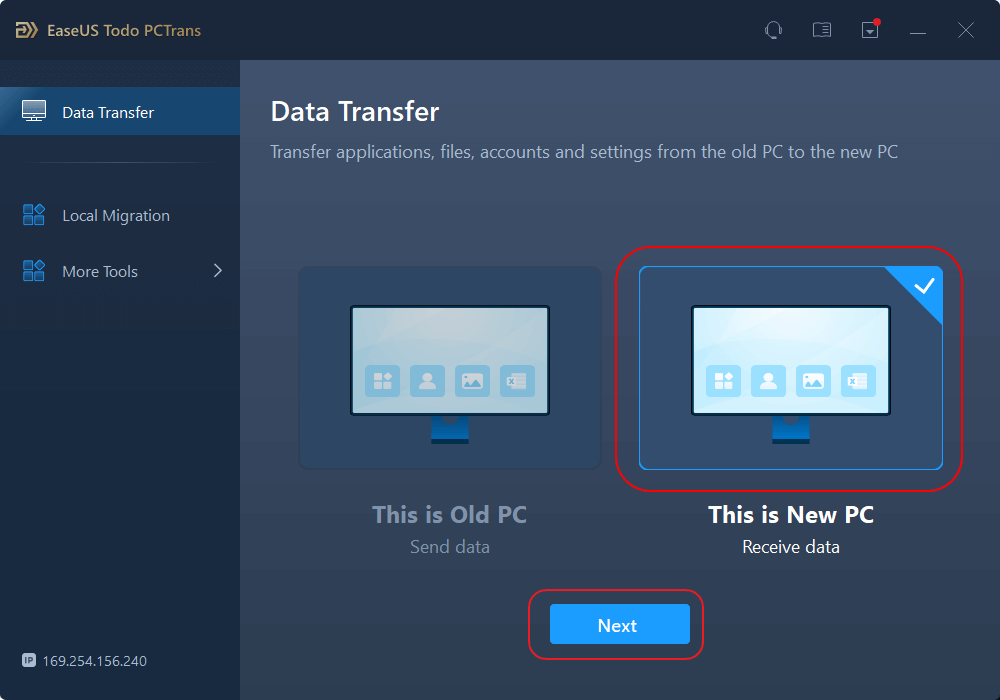
- Download and launch EaseUS Todo PCTrans on the new computer; select "This is New PC" and click "Next".
- Select "Transfer directly" and click "Next" to continue.
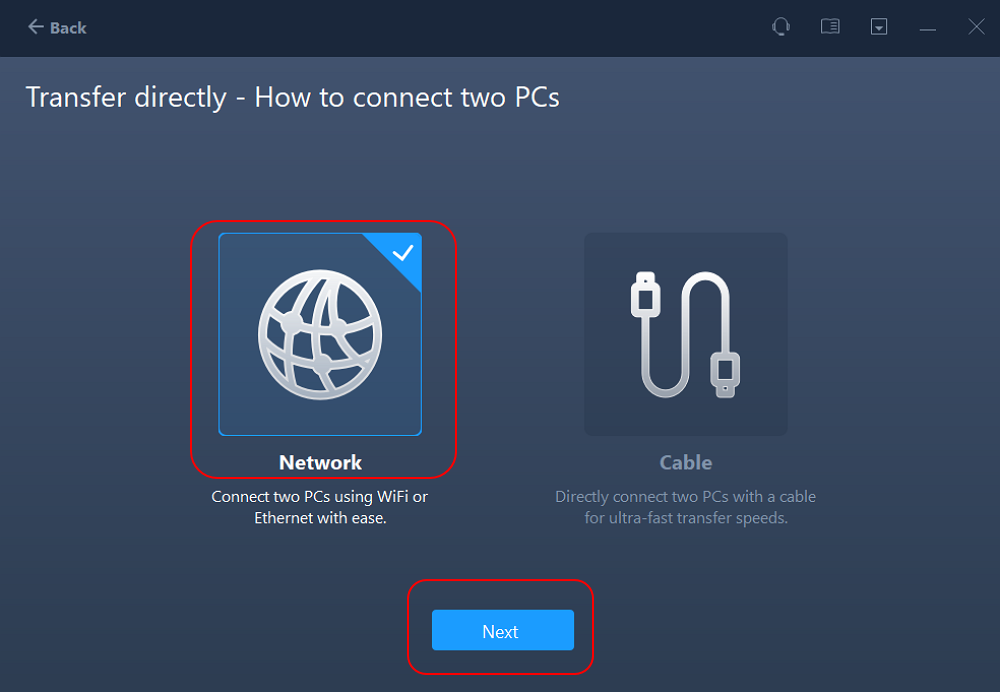
- Select "Network" and click Next to continue. This will automatically scan the old PC. (Make sure the two PCs are connected to the same LAN.)
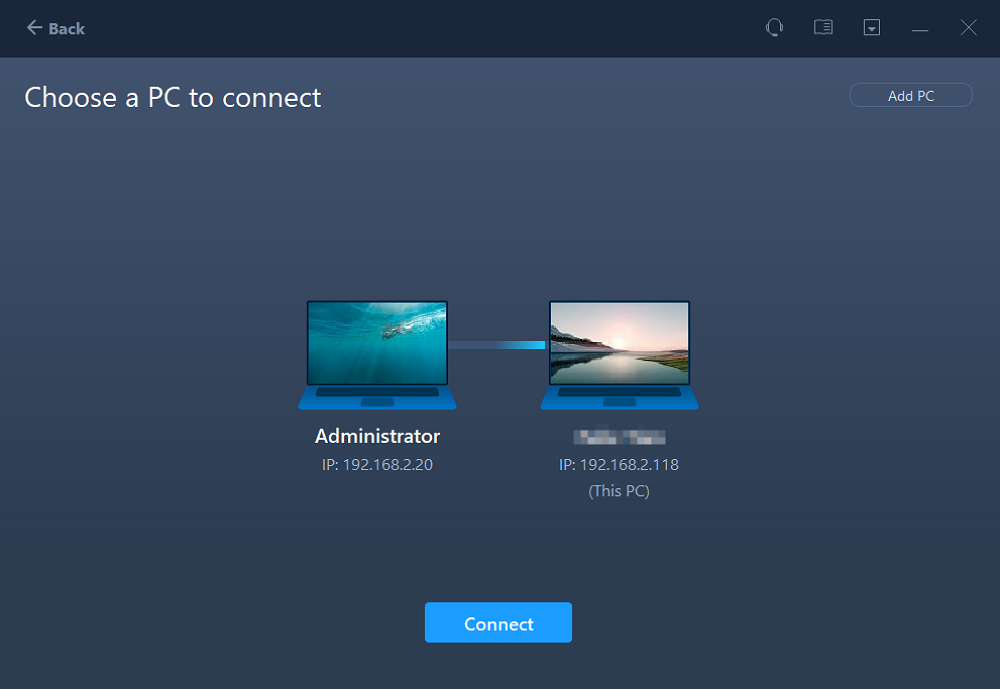
- Select the target PC and click Connect. Then, it will take some time to scan and analyze the data in old PC.
Step 3. Select the Files to Transfer
- Finally, on the new PC, select the Files tab, select the files you need to transfer. Then, click "Transfer" to start.
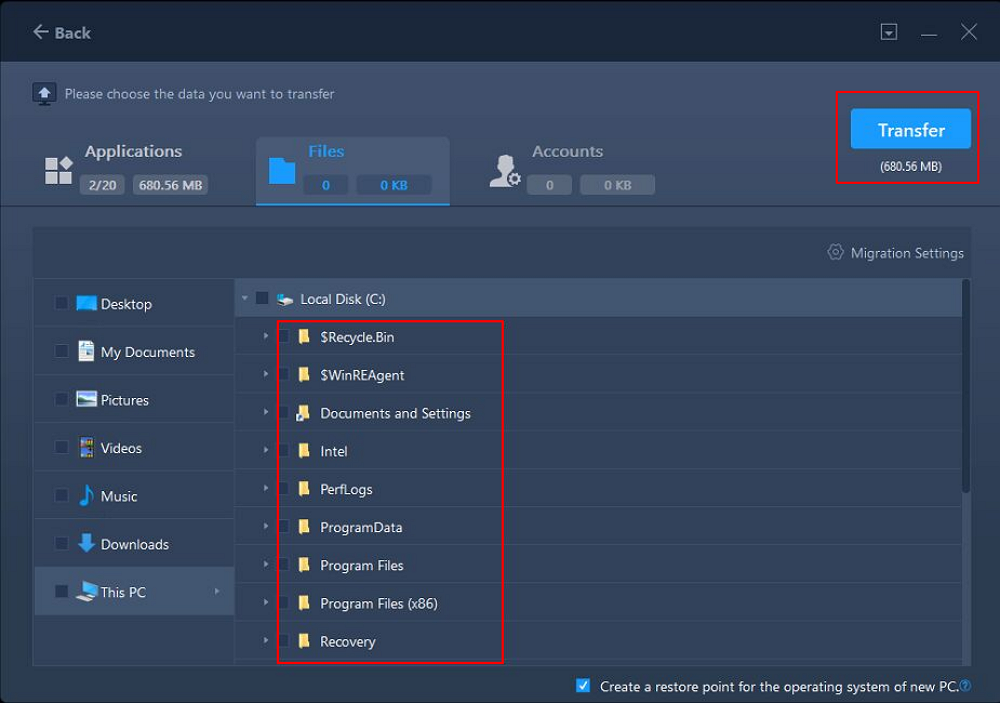
Simplify your file transfer process with EaseUS Todo PCTrans, and download it to enjoy a seamless experience!
How to Fix Windows 10 Slow File Transfer Speed Manually?
Since the exact cause of the slow file copy speed is various, you can try the fixes below, depending on your situation.
Fix 1. Check File System Error
File system errors can significantly slow down file transfer speeds. Checking for and fixing these errors is a good starting point.
Step 1. Open File Explorer and right-click on the disk drive you want to check.
Step 2. Select Properties.
Step 3. Click the Tools tab and Check under the "Error checking" section.
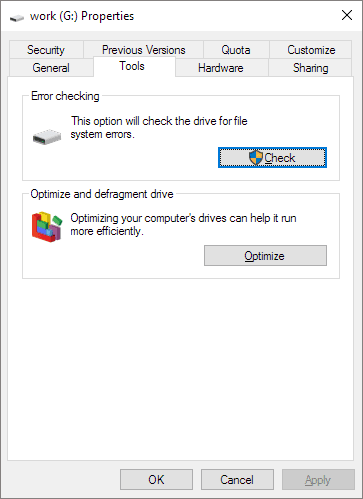
Step 4. Follow the on-screen steps/instructions to fix it.
To increase file transfer speed, you can also disable the real-time protection.
Fix 2. Disable Real-Time Protection
During data transfers, real-time protection scans all files for malware, which can significantly slow down the process. Additionally, it can consume system resources, impacting overall performance. Disabling this feature may help speed up file transfers.
Follow the steps:
Step 1. Open Windows Settings by pressing the Win+I keys.
Step 2. Click "Update & Security".
Step 3. Click "Windows Security" from the left side menu.
Step 4. Click "Virus & threat protection."
Step 5. Under the "Virus & threat protection settings," click "Manage settings."
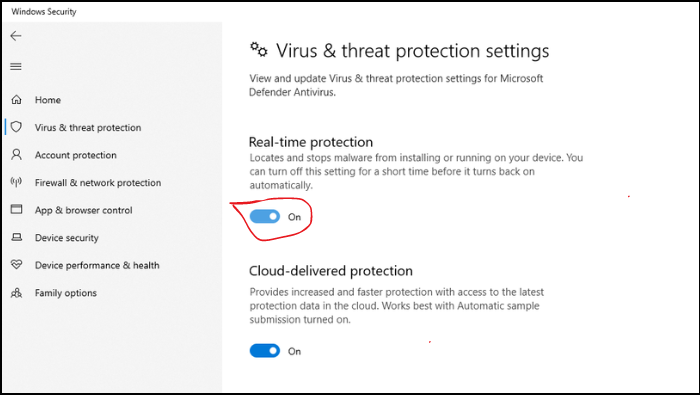
Step 6. Toggle off Real-time protection and try copying files again.
Share these ways and let more users know how to fix "Windows 10 slow file transfer speed."
Fix 3. Optimize the Source Drive
Optimizing your drive can help improve file transfer speeds by defragmenting and organizing data more efficiently.
Follow the steps:
Step 1. Press Win+R to open the Run dialog box.
Step 2. Type "services.msc" and press the Enter button to launch the Services manager.
Step 3. Locate the "Optimize Drives" service, right-click it, and select "Properties."
Step 4. Set the "Startup type" to "Automatic" in the Properties window, and click on the "Start" button under the "Service status" section.
Step 5. Click "Apply" and then "OK".
Fix 4. Disallow Drive Indexing
Windows 10's Drive Indexing feature speeds up file access, but it may interfere with data transfer. Try disabling it to see if it's causing slow file copying.
Follow the steps:
Step 1. Open File Explorer and right-click the drive you're transferring files to or from. Select Properties.
Step 2. In the Properties window, uncheck the box labeled "Allow files on this drive to have contents indexed in addition to file properties." Click Apply, then select "Apply changes to drive X:, subfolders, and files" and confirm with OK.
Step 3. Restart your computer to save and apply the changes and potentially resolve slow file transfer issues in Windows 10.
Fix 5. Disable Windows Auto-Tuning
Auto-Tuning can affect network performance, including file transfers over the network. Disabling it might help.
Follow the steps:
Step 1. Open Command Prompt as an administrator.
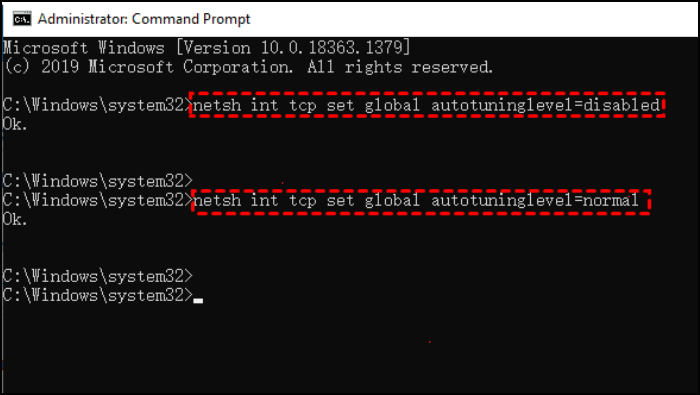
Step 2. Type the following command and press Enter:
netsh int tcp set global autotuninglevel=disabled
Step 3. Now check if the transfer speed is increased. Otherwise, type the following command to return to normal.
netsh int tcp set global autotuninglevel=normal
Fix 6. Disable Large Send Offload
Large Send Offload (LSO) aims to enhance network performance but can hinder data transfer speeds by allowing background applications to use excessive bandwidth. Disabling LSO may help resolve this issue.
Follow the steps:
Step 1. Open Device Manager by searching for it in the taskbar.
Step 2. Expand the Network Adapters section.
Step 3. Right-click your network adapter and select Properties.

Step 4. Navigate to the Advanced tab, locate the Large Send Offload V2 settings (both IPv4 and IPv6), and set them to Disabled. Confirm the changes by clicking OK.
Fix 7. Update USB Driver
Ensure your USB or external hard drive is connected to the correct port, matching its speed (e.g., USB 3.0/3.1). Outdated drivers can also slow down file transfer. Visit your PC manufacturer's website to download the latest USB drivers or update through Device Manager:
Follow the steps:
Step 1. Open Device Manager.
Step 2. Expand Universal Serial Bus controllers.
Step 3. Right-click on your USB driver and select Update driver.
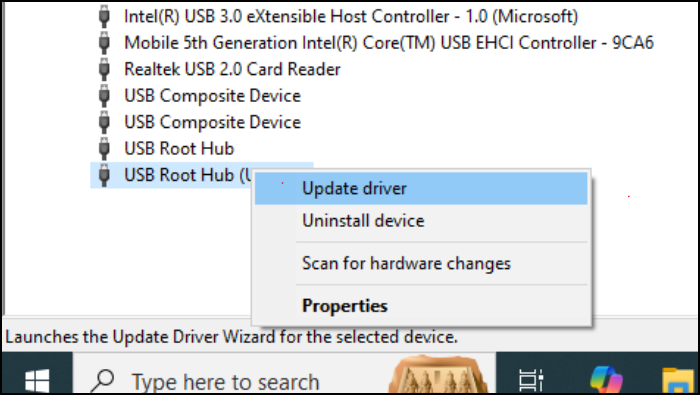
Step 4. Choose Search automatically for drivers.
You may also be concerned about the following topic:
Fix 8. Reformat the USB/External Hard Drive
USB drives are often formatted with FAT32, an older format than NTFS. NTFS has shown faster transfer speeds in benchmark tests. If you want, you can convert your FAT/FAT32 USB drives to NTFS for faster transfer speeds. Make sure to back up your drive first because the formatting process erases all data.
Follow the steps:
Step 1. Connect your USB to your computer, open File Explorer, right-click the connected USB drive, and select Format.
Step 2. In the pop-up windows, select NTFS from the list of File system. Click Start and click OK. Wait a few moments and let it complete the process.

Conclusion
Slow file transfer speed in Windows 10 can consume more time, but you can boost speed by applying different methods. You can start by checking for file system errors. Then, disable real-time protection, optimize your drives, and update your USB drivers. These steps can help resolve the problem and improve your file transfer speeds.
Another great option is to use EaseUS Todo PCTrans. It's a free and reliable tool. It quickly moves files between drives or computers. Its easy-to-use interface and great compatibility make it a fantastic choice. It's for anyone who often transfers files. Try these solutions and tools to enhance your file transfer experience in Windows 10.
FAQs About Windows 10 Slow Transfer
We've learned eight fixes for Windows 10 slow transfer speed error. Have more queries? Check out the FAQs below!
1. Why is file transfer so slow in Windows 10?
File transfer in Windows 10 can be slow due to various reasons, such as disk fragmentation, outdated drivers, antivirus settings, file system errors, and other Windows features.
2. What is the fastest way to transfer files Windows 10?
The fastest way to transfer files in Windows 10 is by using a reliable file transfer tool like EaseUS Todo PCTrans. This tool offers efficient and quick file transfers between drives or computers.
3. How to make USB 3.0 transfer faster?
To make USB 3.0 transfer faster, ensure your USB drive is connected to a USB 3.0 port, update your USB drivers, and consider converting your FAT/FAT32 USB drives to NTFS for faster transfer speeds.
About the Author
Updated by Joey Albert
Joey is an enthusiast of science and technology. With a passion for uncovering the latest tech innovations, she creates clear, engaging how-to guides that make technology accessible and enjoyable for all.
Sherly joined EaseUS in 2022 and she has always loved writing articles and enjoys the fun they bring. She receives professional training here, focusing on product performance and other relative knowledge. She has written over 200 articles to help people overcome computing issues.
Reviews and Awards
-
EaseUS Todo PCTrans Free is a useful and and reliable software solution created to serve in computer migration operations, be it from one machine to another or from an earlier version of your OS to a newer one.
Read More -
EaseUS Todo PCTrans is by the folks at EaseUS who make incredible tools that let you manage your backups and recover your dead hard disks. While it is not an official tool, EaseUS has a reputation for being very good with their software and code.
Read More
-
It offers the ability to move your entire user account from your old computer, meaning everything is quickly migrated. You still get to keep your Windows installation (and the relevant drivers for your new PC), but you also get all your apps, settings, preferences, images, documents and other important data.
Read More
Related Articles
-
How to Change Steam Download Location [Easy Tutorial]
![author icon]() Sherly/2026/01/29
Sherly/2026/01/29 -
How to Move Adobe from C Drive to D Drive? [Workable Solution]
![author icon]() Cici/2026/01/29
Cici/2026/01/29 -
How to Transfer All Data From One Surface Pro to Another [Detailed]
![author icon]() Cici/2026/01/29
Cici/2026/01/29 -
Transfer Microsoft Office to New Computer [Full Guide]
![author icon]() Tracy King/2026/01/29
Tracy King/2026/01/29