Page Table of Contents
Reviews and Awards
The Surface Pro is a versatile device from Microsoft's Surface lineup that combines the features of a tablet and a laptop. In this article, EaseUS will provide various ways to transfer all data from one Surface Pro to another. So, read it thoroughly and learn some effective and easy solutions to simultaneously preserve and transfer all your data without losing anything.
To provide a glimpse of the methods covered, let's consider the following table, highlighting the critical aspects of each way:
| ⏰Duration | 5-8 minutes |
| ⛳Goal | transfer all data from one surface pro to another |
| 🧰Preparations |
✔️Two Surface Pro computers ✔️Download and install EaseUS Todo PCTrans ✔️A USB |
| 🛠️Tools |
1️⃣EaseUS Todo PCTrans - Effective 2️⃣OneDrive - Easy 3️⃣Windows Built-in Tools - Moderate 4️⃣USB - Complicated |
How to Transfer All Data From One Surface Pro to Another?
When it comes to transferring all data from one Surface Pro to another, several methods can simplify this process. Let's explore these methods step by step:
Way 1: Transfer All Data via EaseUS Todo PCTrans
EaseUS Todo PCTrans is a powerful tool to facilitate data migration between devices. It equips with a user-friendly interface and different helpful features to streamline the transfer process. With EaseUS Todo PCTrans, users can avoid the hassle of manual data copying and enjoy a smoother transition to their new Surface Pro. The software is easy-to-use as its intuitive interface ensures a user-friendly experience.
Here's how you can EaseUS Todo PCTrans to transfer data:
Step 1. Set Up the Old PC
- First, install and launch EaseUS Todo PCTrans and select Data Transfer on the left panel of the main interface.
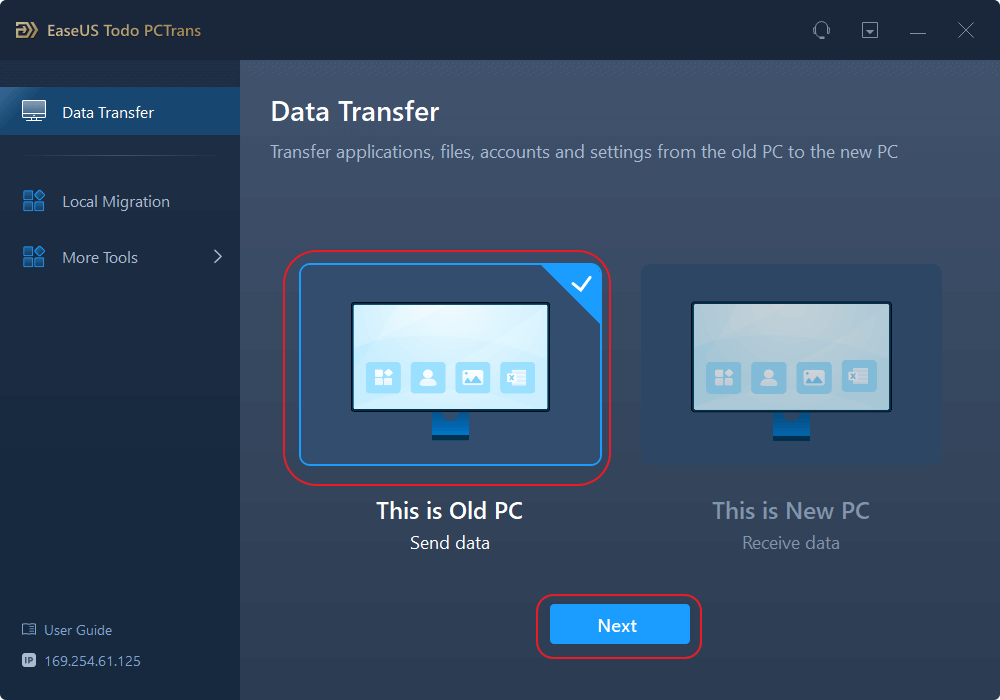
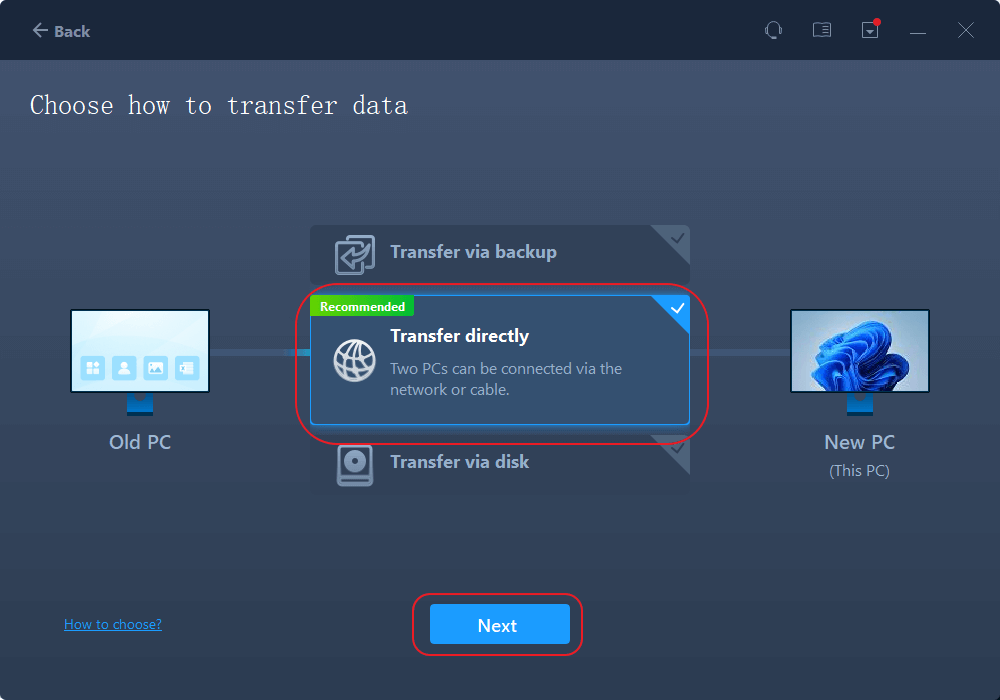
- Select "Transfer Directly" and click "Next" to continue.
Step 2. Set Up the New PC
- Download and launch EaseUS Todo PCTrans on the new computer; select "This is New PC" and click "Next".
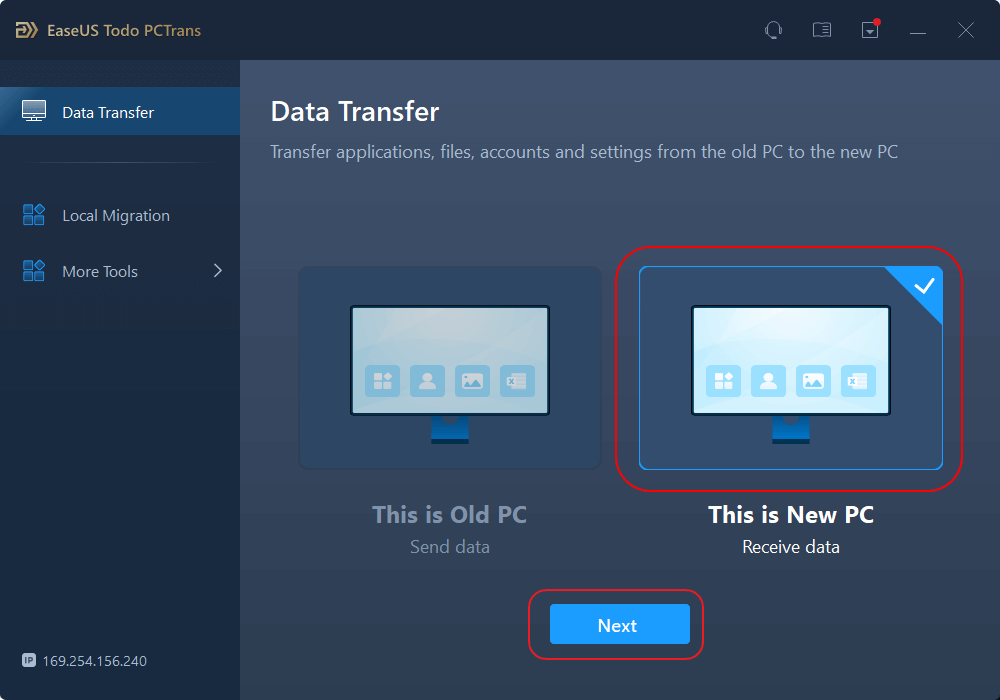
- Select "Transfer directly" and click "Next" to continue.
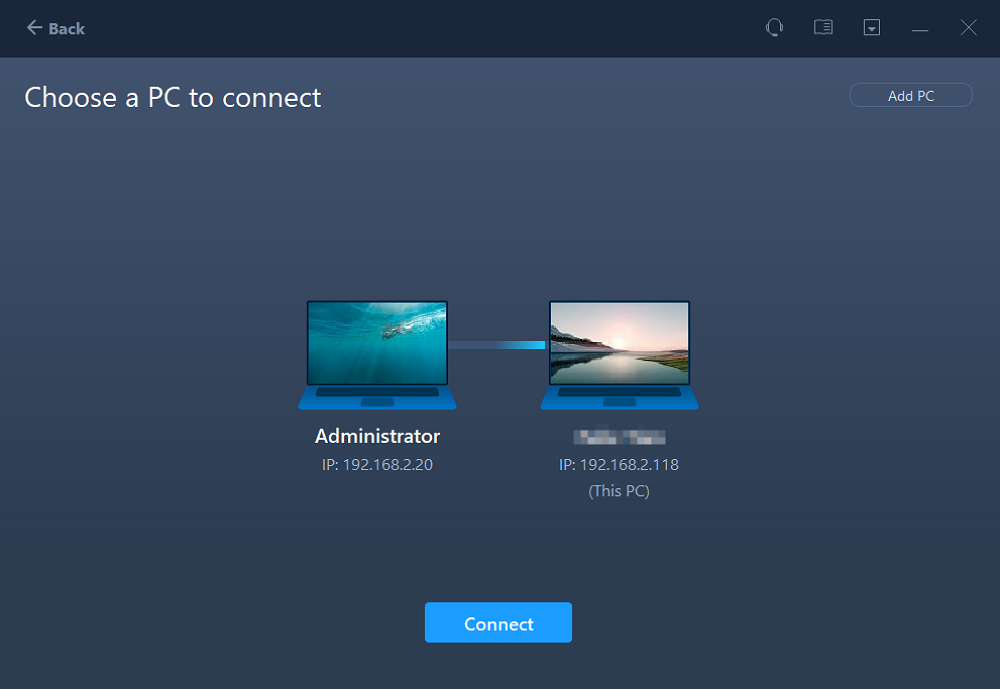
- Select "Network" and click Next to continue. This will automatically scan the old PC. (Make sure the two PCs are connected to the same LAN.)
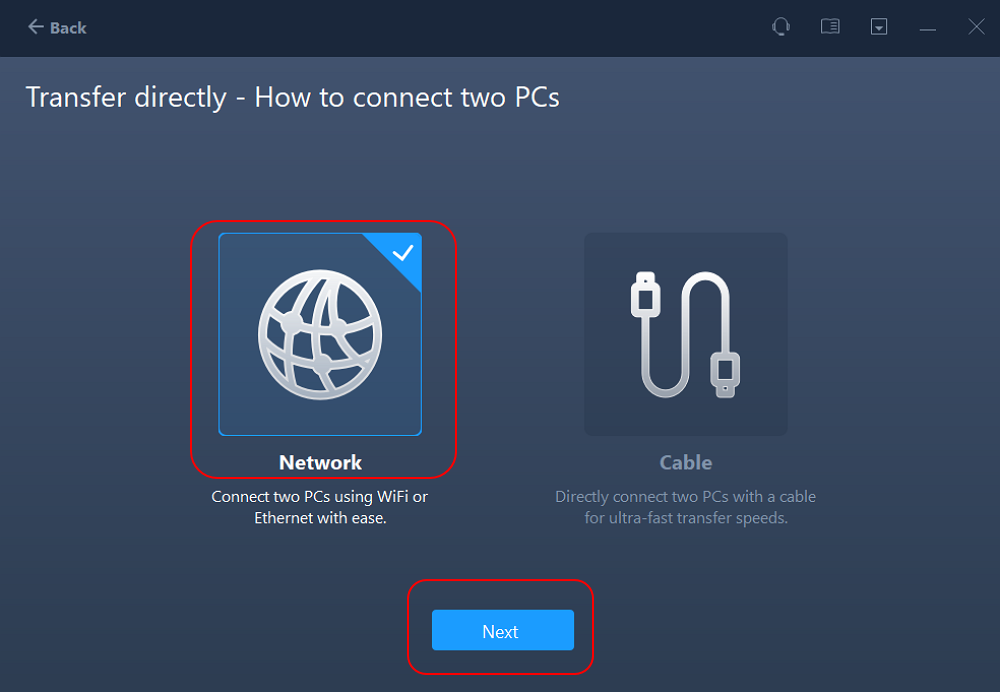
- Select the target PC and click Connect. Then, it will take some time to scan and analyze the data in old PC.
Step 3. Select the Files to Transfer
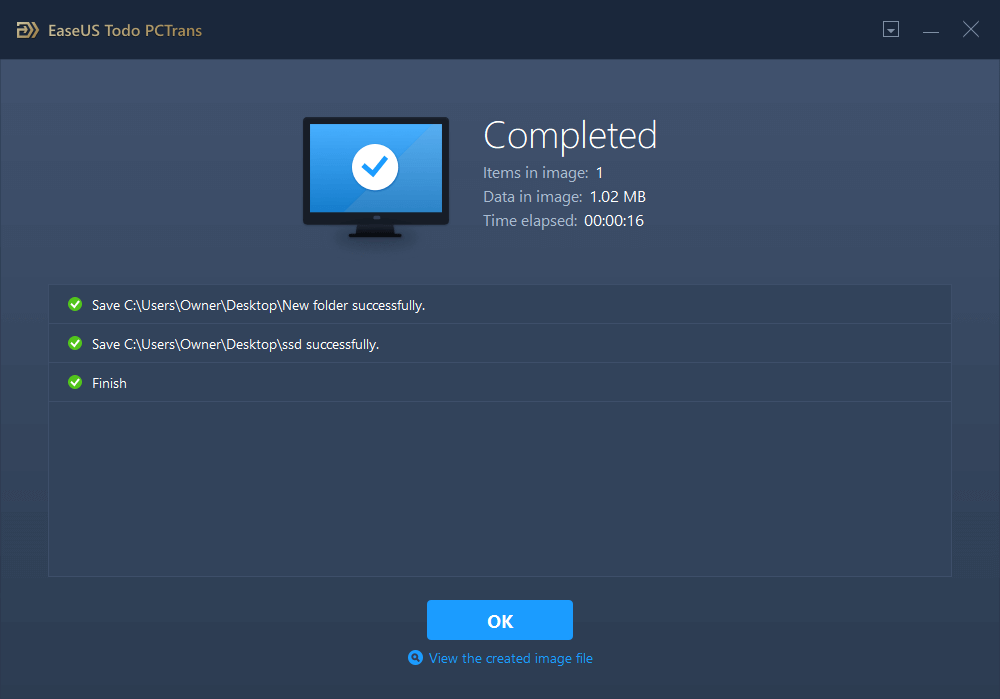
- Finally, on the new PC, select the Files tab, select the files you need to transfer. Then, click "Transfer" to start.

Powerful Features of EaseUS Todo PCTrans
- Copy the installed software and transfer it to another PC.
- Transfer programs and software to another HDD/SSD or external disk without reinstallation.
- Transfer Steam games from PC to PC.
You should try EaseUS Todo PCTrans for a hassle-free data transfer experience.
Way 2. Use One Drive to Transfer All Data
As OneDrive is a cloud storage solution. This way, you should sync the data to your OneDrive account from your Surface Pro device. After syncing the desired data, you have to sign in to the same Microsoft account on your new Surface Pro device and then transfer or copy the data from your OneDrive account.
Follow the instructional steps:
Step 1. Make sure OneDrive should be installed on both of your Surface Pro devices.
Step 2. On your Surface Pro device, go to "File Explorer" and choose the OneDrive location where you want to keep your files.
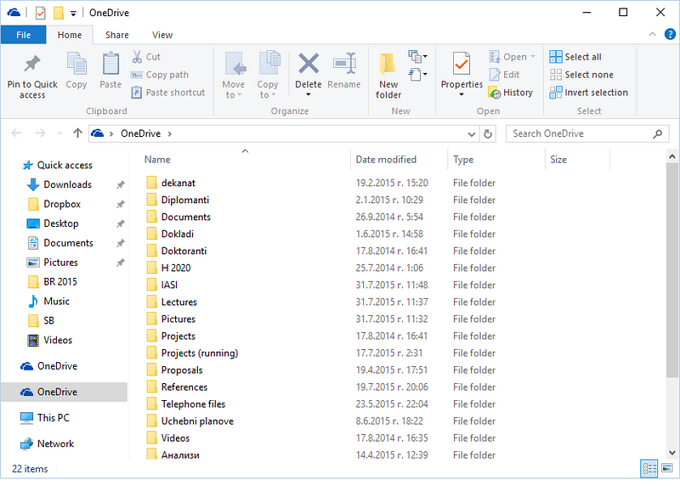
Step 3. Move the files that you want to transfer to that folder.
Step 4. On your other Surface Pro device that you want to transfer the files to. Log into the same OneDrive/Microsoft account.
Step 5. Open the stored folders to access your files and photos. You can transfer these items to your new Surface Pro device from OneDrive.
In addition to surface pro, there is another article that discusses how to transfer files from one laptop to another:
6 Ways to Transfer Files from Laptop to Laptop in Windows 11
It can be challenging to move files from one PC to another. Luckily, there are the best options for you to complete the task.
Way 3. Share All Data with Built-in Tools in Surface Pro
You can use Microsoft's built-in sharing features or tools to transfer all your data from one Surface Pro to another Surface Pro device. These tools are Nearby Sharing, Home Group, and Network Sharing. We'll learn each one.
Follow the instructions for each Windows built-in tool:
#1. Nearby Sharing
Step 1. Turn on Nearby Sharing on Both Surface Pro devices. Navigate to Settings > System > Shared experiences > Nearby sharing on both Surface Pro devices. Toggle the switch to turn on Nearby sharing.
Step 2. Choose Sharing Preferences. Under "Nearby sharing," opt for "Everyone nearby." This setting allows your Surface Pro to share and receive content from all nearby devices, including those not owned by you.
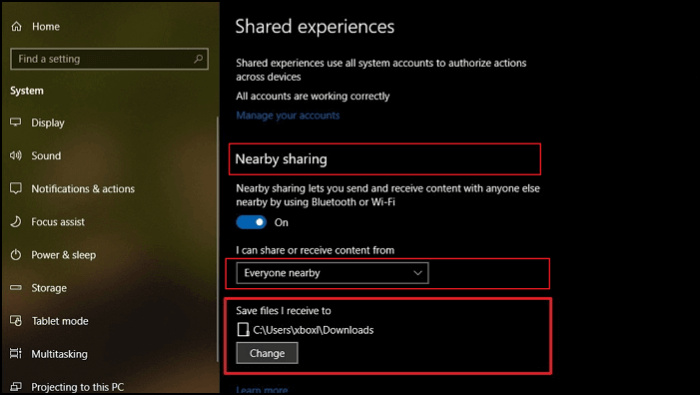
Step 3. Set Save Location. Decide where received files will be stored on your Surface Pro. Choose a target path on your drive for saving content.
Step 4. Transfers are typically stored in the Downloads folder by default. You can change this. Under "Nearby sharing," locate the "Save files I receive to" option and click "Change." Select an alternative folder or drive to save transfers.
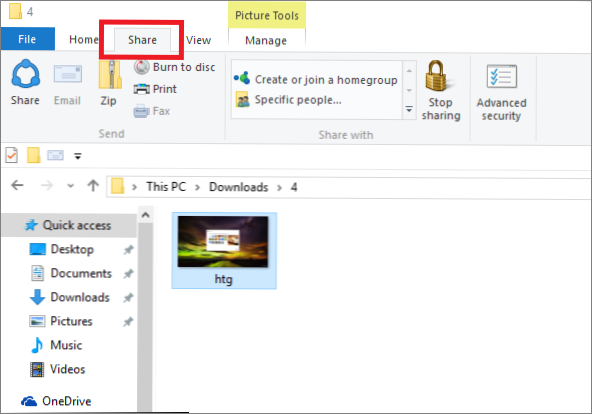
Step 5. Initiate File Sharing. Open "File Explorer" on one of the Surface Pro devices. Right-click the file and folder you wish to share, then select the "Share" option. Pick the target Surface Pro for sharing from the list of available devices.
#2 Home Group
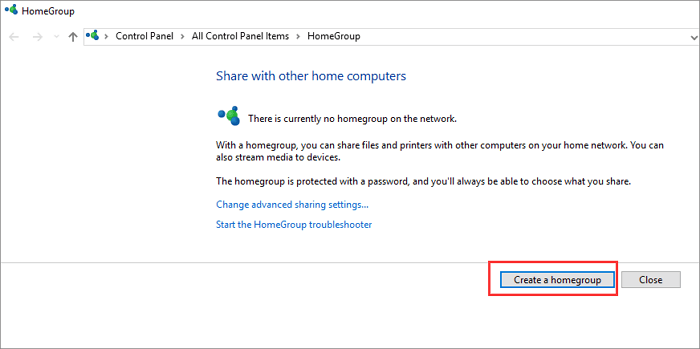
Step 1. Search "homegroup" in the Search box of your source Surface Pro to open it.
Step 2. Within HomeGroup, click the "Create a homegroup" option, then click "Next." Follow the on-screen instructions to set up the HomeGroup.
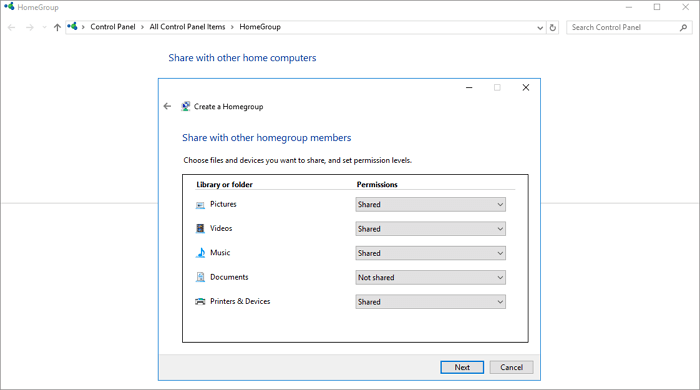
Step 3. Select the specific files and folders you wish to transfer. Toggle the Permissions buttons to "Shared" for the chosen items, then click "Next." Remember to take note of the password displayed on-screen during this step.
Step 4. Move to the target Surface Pro and access HomeGroup settings. Then, you need to click Control Panel > All Control Panel Items > HomeGroup.
Step 5. Join the existing HomeGroup and write the password you noted earlier. Once entered, click "Finish" to complete the process.
Step 6. Now you can access the shared files on your new Surface Pro and move them to a local drive.
#3 Network Share
Step 1. Adjust "Advanced Sharing Settings" on Source PC.
1. Use the search box to find and open "Network and Sharing Center."
2. Inside the Network and Sharing Center, click "Change advanced sharing settings." Check these boxes and save changes:
- Turn on network discovery
- Turn on file and printer sharing
- Turn on sharing so anyone with network access can read and write files in the public folders
- Turn off password-protected sharing

Step 2. Generate a Shared Link for Files.
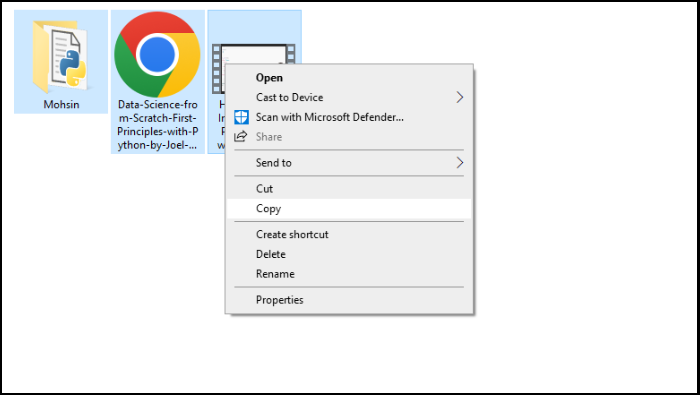
1. Open "File Explorer" and select the files for sharing on the source computer.
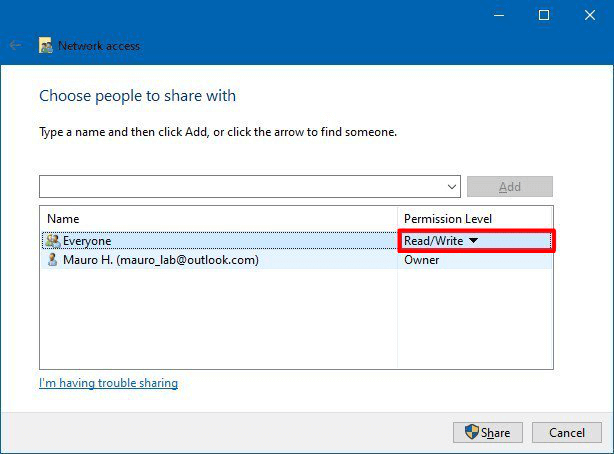
2. Click "Share" > "Specific people..." > "Expand" > "Everyone" > "Add"
3. Click "Everyone," set access to "Read/Write" under Permission Level, and confirm by clicking "Share."
4. Right-click the shared folder path, then click "Copy Link." Share the link with the target PC through email or other methods.
Step 3. Share and Copy Files to another Surface Pro via Network Drive.
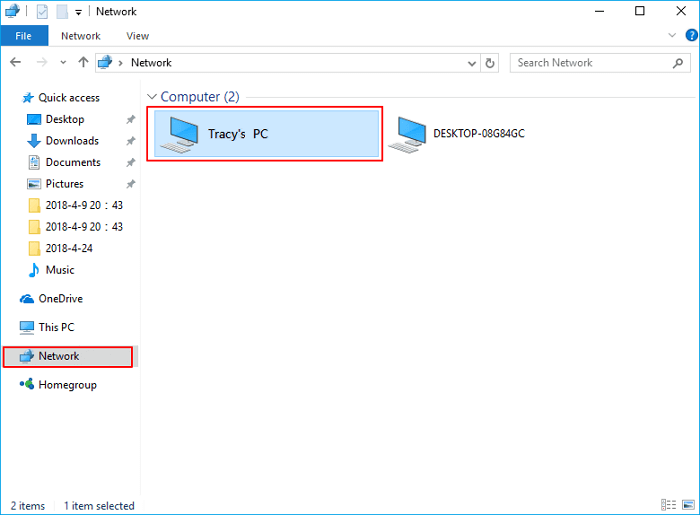
1. Open File Explorer and click "Network."
2. Locate the source computer's name and double-click to access it. Browse and open the shared files. You can view, copy, and save these files to a local drive on the target Surface Pro.
I believe you can successfully transfer all data from one surface pro to another through these practical methods on this page. Then you can share this article on social media to help others:
Way 4. Transfer All Data using a USB
Transferring all data from one Surface to another through an external hard drive or USB is simple and easy. If you want to transfer everything from one Surface Pro to another, you have to make a bootable USB, create a disk image on the old Surface Pro, and save the image on the bootable USB drive. However, if you don't want to create a bootable USB and disk image, you have to connect your USB to your old Surface Pro, copy the desired data and paste it into USB. This way, you can transfer whether you want entire data or partially selected folders/files.
Follow the steps here to transfer data with a USB:
Step 1. Connect a USB drive with your old Surface Pro.
Step 2. Copy the data, files, and folders you want to transfer.
Note: If your folders and files are split into different locations in your Surface Pro, you need to copy each and paste them into USB by visiting each location. You can transfer all data through USB by copying folders. You just have to arrange a USB with enough space according to your requirements.
Step 3. Go to USB, and paste copied data, files, or folders into USB. Once done, eject the USB.
Step 4. Connect the USB with your new Surface Pro.
Step 5. Go to the USB, and copy the files/folders.
Step 6. Paste copied files/folders in the desired locations on your new Surface Pro.
To learn more intuitive or additional methods for transferring all data from one Surface Pro to another, you can click on the video below.
Conclusion
In Surface Pro devices, ensuring a smooth transition while preserving your data's integrity is paramount. In this article, we've delved into various comprehensive methods to seamlessly transfer all data from one Surface Pro to another, regardless of the context – whether upgrading, changing devices, or acquiring a new one.
From taking advantage of cloud storage capabilities through OneDrive to utilizing built-in tools like Nearby Sharing, Home Group, and Network Sharing, we've navigated through each method step by step. Additionally, we've explored the simplicity and versatility of transferring data via USB, highlighting its suitability for both entire data transfers and selective file migrations.
Among all solutions, EaseUSTodo PCTrans is an outstanding solution. It offers robust transfer capabilities encompassing not just files but also applications and settings, and it provides a streamlined path to your new Surface Pro. Just give it a try.
FAQs About How to Transfer All Data From One Surface Pro to Another
Steering data transfer between Surface Pro devices may raise some common queries. Below, we address key questions to ensure a comprehensive understanding of the data transfer process.
1. How do I transfer files from one Microsoft Surface to another?
You can transfer files from one Microsoft Surface to another using OneDrive cloud storage, network sharing, or USB transfer.
Step 1. Choose the method that suits your needs – EaseUS Todo PCTrans for automated and easy transfer, OneDrive for cloud transfer, network sharing for direct device connections, or USB for physical transfers.
Step 2. Follow the step-by-step guide corresponding to the chosen method, ensuring a seamless transfer of your files.
2. How to connect my Surface Pro to another Surface Pro?
You can use network sharing, Home Group, or USB connections to connect two Surface Pro devices. For further details, read the way three entirely.
3. How to transfer installed programs from one Windows computer to another?
Transferring installed programs from one Windows computer to another requires specialized tools like EaseUS Todo PCTrans. For step-wise instructions, please refer to way 1.
About the Author
Oliver is an EaseUS professional writer who dares explore new areas. With a passion for solving tech issues with straightforward guides for common users, Oliver keeps honing his writing craft by developing in-depth solutions for disk and partition management, computer boot-up issues, file transfer, etc.
Cici is the junior editor of the writing team of EaseUS. She accepted the systematic training on computers at EaseUS for over one year. Now, she wrote a lot of professional articles to help people resolve the issues of hard drive corruption, computer boot errors, and disk partition problems.
Reviews and Awards
-
EaseUS Todo PCTrans Free is a useful and and reliable software solution created to serve in computer migration operations, be it from one machine to another or from an earlier version of your OS to a newer one.
Read More -
EaseUS Todo PCTrans is by the folks at EaseUS who make incredible tools that let you manage your backups and recover your dead hard disks. While it is not an official tool, EaseUS has a reputation for being very good with their software and code.
![]() Read More
Read More
-
It offers the ability to move your entire user account from your old computer, meaning everything is quickly migrated. You still get to keep your Windows installation (and the relevant drivers for your new PC), but you also get all your apps, settings, preferences, images, documents and other important data.
Read More
Related Articles
-
Transfer Data From Laptop to Micro SD Card [2026 Tips]
![author icon]() Sherly/2026/01/29
Sherly/2026/01/29 -
Change Location of Desktop Folders on Windows 10/11 2026
![author icon]() Tracy King/2026/05/17
Tracy King/2026/05/17 -
How to Connect Two Computers In Multiple Ways| Step-by-Step
![author icon]() Tracy King/2026/01/29
Tracy King/2026/01/29 -
Transfer Files from Windows 10 to Windows 11 Without Network [3 Ways]
![author icon]() Joey Albert/2026/04/22
Joey Albert/2026/04/22