
Content
Page Table of Contents
About the Author
Hot Topics
There are many reasons why your computer has trouble booting up. Unfortunately, it's really hard to find out the real reason behind the issue. Incompatible hardware, faulty drivers, damaged system files, Windows update issues, etc., could all result in your computer being unable to boot into the system.
| Workable Solutions | Step-by-step Troubleshooting |
|---|---|
| Method 1. Troubleshoot in Safe Mode | Boot into Safe Mode requires only the essential components and programs from your computer...Full steps |
| Method 2. Use Professional Software to Fix Boot Error | Computers having trouble booting into Windows 10 could be caused by various issues. It is hard...Full steps |
| Method 3. Restore the System | The second effective method is to perform System Restore. Of course, the prerequisite is that you...Full steps |
| Method 4. Run the SFC and DISM Commands | The SFC command line can scan Windows DLL files and other essential system files. It will replace...Full steps |
| Method 5. Rebuild Master Boot Record | A black screen with a message saying "Operating System not found" or without any information...Full steps |
| Method 6. Disable Secure Boot | If your computer has trouble booting into the system after you installed a previous Windows...Full steps |
| Method 7. Perform Startup Repair | Startup Repair is a Windows built-in utility that can detect and repair computer errors automatically...Full steps |
| Method 8. Reassign the Drive Letter | Sometimes, computers cannot start up due to a misconfigured drive letter. If you have multiple...Full steps |
Therefore, this comprehensive article from EaseUS will show you multiple practical methods to help you resolve Windows 10 won't boot and access the desktop.
- Tip
- Before you start, you'd better check if the peripherals, like the power source, external devices, CPU, GPU, RAM sticks, etc., are properly installed on your computer. If the boot error turns out to be caused by any faulty connection, you won't need to go through the methods below.
Method 1. Troubleshoot in Safe Mode
Boot into Safe Mode requires only the essential components and programs from your computer. It allows you to identify and resolve the issue in Safe Mode. If you can't boot into Windows but can access Safe Mode, it means that something is loaded and affecting your system during booting. It could be a virus, malware, corrupt programs, etc. Follow the steps here to enter Safe Mode and fix issues.
Step 1. Power on and off your PC 3 to 5 times when you see the Windows 10 loading screen to enter the Windows Recovery Environment.
Step 2. Go to "Troubleshoot" > "Advanced options" > "Startup Settings" > "Restart" and press "4" or "F4" to access Safe Mode.

Step 3. Once you are in the Safe Mode, identify the cause and fix it.
- If you've installed a program before the computer became unbootable, try uninstalling it and see if it fixes the problem.
- If you've installed any drivers before the system went wrong, downgrade or upgrade the driver to fix the incompatibility issues.
- If it's a virus or malware attack, perform an antivirus program to examine and resolve it.
💡Read Also: How to FIx Safe Mode Crashing
Method 2. Use Professional Software to Fix Boot Error
Computers having trouble booting into Windows 10 could be caused by various issues. It is hard for a beginner to find out what is causing the problem. Thus, we want to introduce a powerful tool that can fix multiple boot errors, EaseUS Partition Master Professional.
It has a feature called Boot Repair that can help you resolve many common boot errors like corrupted or missing BCD. With its simple interface and reliable feature, you can fix the error once and for all with a few clicks. Below are the steps to execute Boot Repair.
Step 1. Connect the USB drive/external drive to a working computer, open EaseUS Partition Master (RE), and click "Create Bootable Media."
Step 2. Select EaseUS Boot Toolkits and other components you need. Then, click "Next."

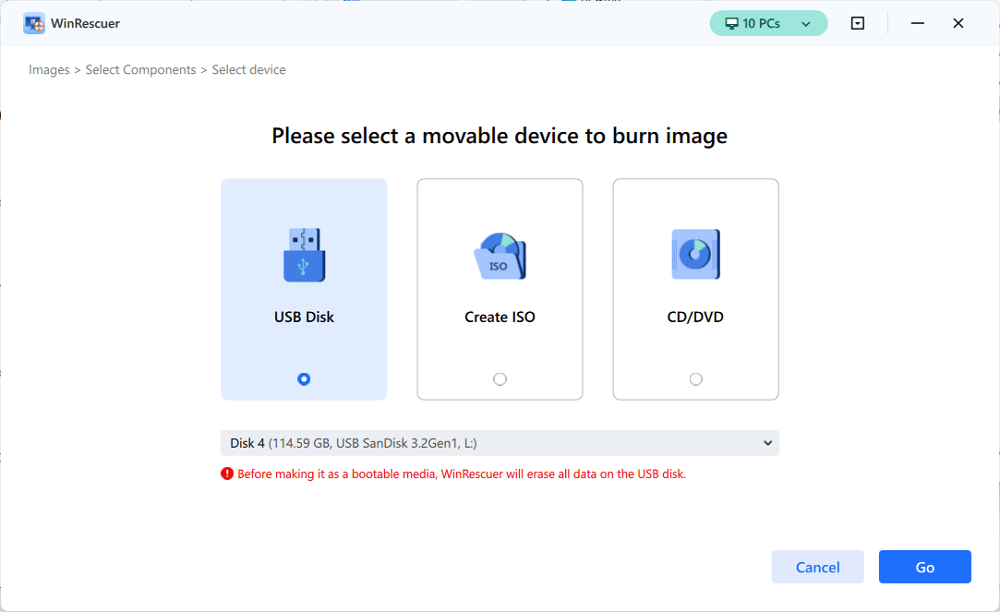
Step 3. Select your movable device and click "Go" to create an image on your USB drive/external drive. You can also burn the Windows ISO file to the storage media.
Step 4. Confirm the warning message and then wait for the creation process to complete.
Step 5. Connect the created bootable drive to the faulty computer and reboot it by pressing and holding "F2"/"Del" to enter the BIOS. Then, set the WinPE bootable drive as the boot disk and press "F10" to exit.

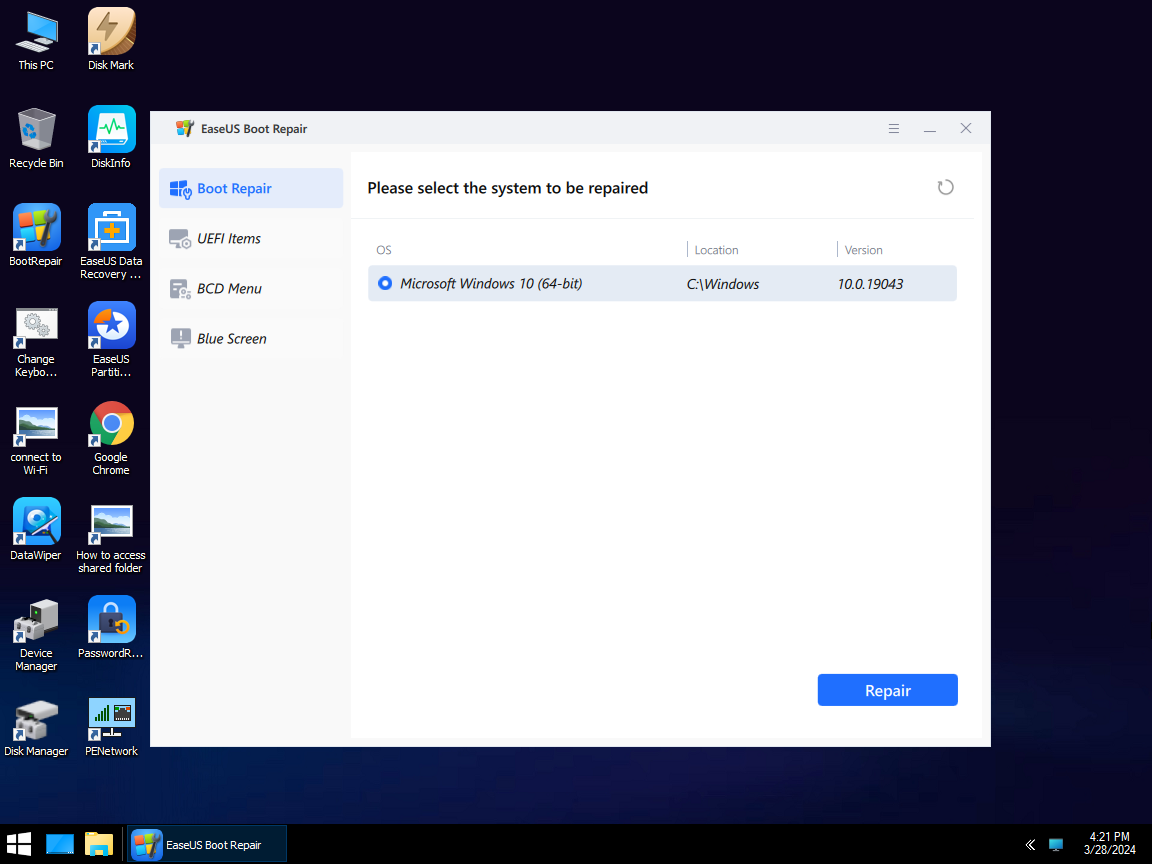
Step 6. Then, the computer will enter WinPE desktop. Open BootRepair, select the system you want to repair, and click "Repair."
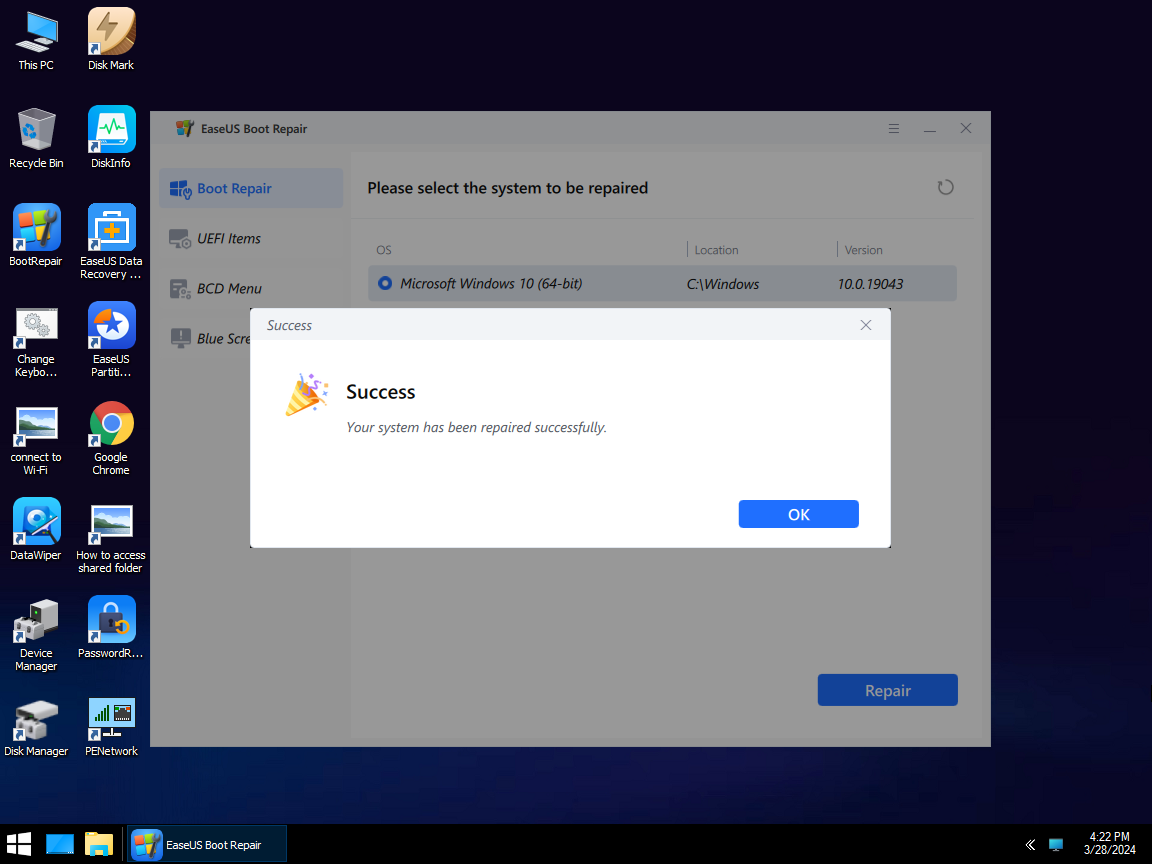
Step 7. Wait a moment, and you will receive an alert that the system has been successfully repaired. Click "OK" to complete the boot repair process.
You can share and recommend this powerful software to your friends who may also need it.
Method 3. Restore the System
Another effective method is to perform System Restore. Of course, the prerequisite is that you have created a restore point in advance or enabled your computer to create them automatically. System Restore can revert your system to the previous state where your computer works fine. So, whether it is an update failure or a corrupted system file, performing System Restore can take your files, drivers, settings, etc., to the last restore point. Follow the guide below to restore your system.
Step 1. Press "F11" during the booting to enter the Windows Recovery Environment. (The hotkey may differ on different computers.)
Step 2. Choose "Troubleshoot" > "Advanced options" > "System Restore."
Step 3. Wait for a moment, and your computer will show you the interface of System Restore.
Step 4. Select your administrator account and enter passwords if you have any. Then, hit "Continue" to move on.
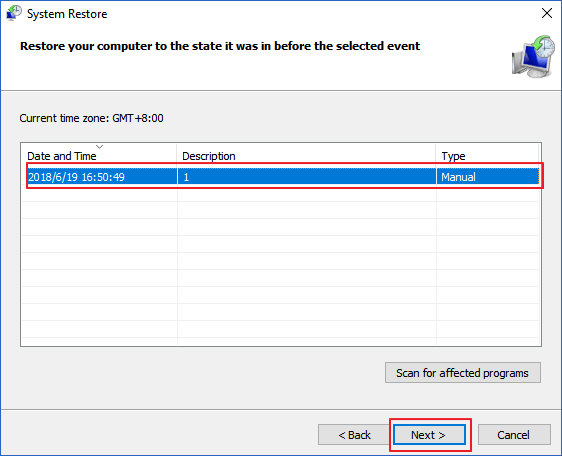
Step 5. Click "Next" and select an available restore point to revert changes. Then, hit "Next" to continue. ("Scan for affected programs." will show you which programs that were installed after the restore point will be removed.)
Step 6. Confirm the restore point and then hit "Finish" and "Yes."
Step 7. Wait for the process to complete, and then you can restart your computer.
If the system restoration process takes too long and you get the message saying, "Please wait while your Windows files and settings are being restored. System Restore is initializing…" read the following article to fix the problem.

6 Ways to Fix System Restore Is Initializing in Windows 11/10
System Restore is an excellent utility that can help you restore the computer to its previous state. But sometimes, it may run into errors and show System Restore is Initializing when you perform System Restore. This article will present multiple solutions to solve the problem. Read more >>
Method 4. Run the SFC and DISM Commands
The SFC command line can scan Windows DLL files and other essential system files. It will replace these files if there's an issue with them. Plus, DISM (Deployment Image Servicing and Management) is another utility you can use when the SFC is unable to repair the error. The DISM can examine and fix Component Store Corruption. Below are the steps for running SFC and DISM command lines.
Step 1. Press "F11" during the booting to enter the Windows Recovery Environment. (The hotkey may differ on different computers.)
Step 2. Choose "Troubleshoot" > "Advanced options" > "Command Prompt."
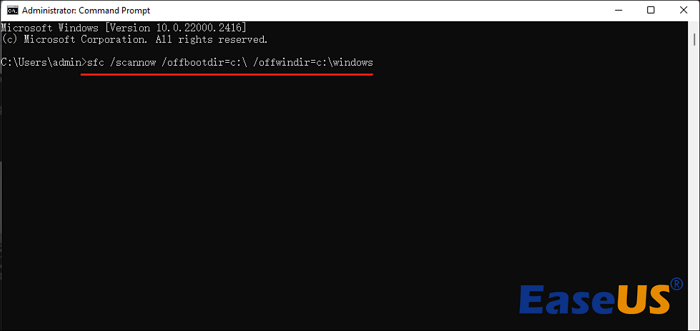
Step 3. Type in the command and press "Enter": sfc /scannow /offbootdir=c:\ /offwindir=c:\windows
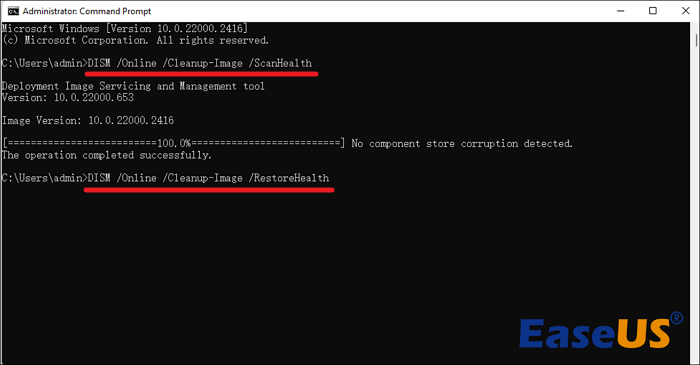
Step 4. Type in the command and press "Enter": DISM /Online /Cleanup-Image /ScanHealth
Step 5. Type in the command and press "Enter": DISM /Online /Cleanup-Image /RestoreHealth
Read also:
Method 5. Rebuild Master Boot Record
A black screen with a message saying "Operating System not found" or without any information on the screen while booting up your computer usually means the Master Boot Record (MBR) is missing or corrupted. Here, I'd like to recommend EaseUS Partition Master again for its Rebuild MBR feature and simple steps that can help a beginner fix such errors without any effort.
Here are the detailed steps to perform Rebuild MBR:
Step 1. Create a WinPE bootable disk
- Launch EaseUS Partition Master, and click "Bootable Media" on the toolbar. Select "Create bootable media".
- Click "Next" to finish the process.

Step 2. Boot EaseUS Partition Master Bootable USB
- Connect the bootable USB or CD/DVD to your PC.
- Press F2 or Del when you restart the computer to enter the BIOS screen. Set and boot your computer from "Removable Devices" or "CD-ROM Drive". And then EaseUS Partition Master will run automatically.
Step 3. Rebuild MBR
- Click "Toolkit" and choose "Rebuild MBR".

- Select the disk and the type of MBR. Then, click "Rebuild".

- After that, you can see "MBR has been successfully rebuilt on Disk X".

Method 6. Disable Secure Boot
If your computer has trouble booting into the system after you installed a previous Windows, unauthorized software, or certain graphic cards, you may need to disable Secure Boot. Although it was designed to provide security for your computer, it sometimes causes such a startup issue. Follow the guide below to disable the Secure Boot.
Step 1. Power up your computer and press a specific hotkey when you see the logo. (It could be "F1", "F2", "F10", "Esc", "Delete", "Ctrl + Alt + Delete", or "Ctrl + Alt + Esc")
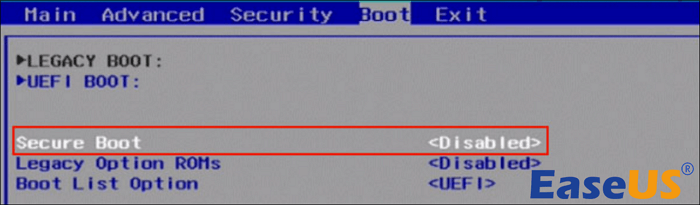
Step 2. Use the arrow keys to locate the Security or Boot tab depending on your BIOS or UEFI settings menu.
Step 3. Set "Secure Boot" as "Disabled."
Step 4. Save changes and restart your computer.
Method 7. Perform Startup Repair
Startup Repair is a Windows built-in utility that can detect and repair computer errors automatically. However, with more and more complex issues coming out, this utility may not be as useful as other methods that specialize in certain problems. Despite that, below are the detailed steps for you to learn how to enter Startup Repair.
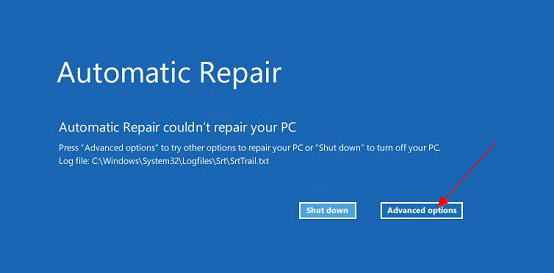
Step 1. Power on and off your PC 3 to 5 times when you see the Windows 10 loading screen to awaken Automatic Repair.
Step 2. Click "Advanced options" to move on.
Step 3. Choose "Troubleshoot" > "Advanced options" > "Startup Repair."
Step 4. Wait for it to do its job, and then you can restart your PC.
While using Startup Repair, you may encounter an issue: "Startup Repair cannot repair this computer automatically." The following article will tell you how to learn how to fix it and more details.

Fix 'Startup Repair cannot repair this computer automatically' in Windows 10/8/7/Vista
If Startup Repair cannot fix your computer's boot-up issue automatically, check here. We will show you a few possible solutions to help you resolve the problem in Windows 10/8/7/Vista. Read more >>
Method 8. Reassign the Drive Letter
Sometimes, computers cannot start up due to a misconfigured drive letter. If you have multiple drives installed on your computer and the drive letter of the boot partition is unassigned by accident, your computer will be unable to boot into Windows 10. Fortunately, you can resolve this with some commands. It may be difficult for beginners, so ensure you follow the steps one at a time.
Step 1. Press "F11" during the booting to enter the Windows Recovery Environment. (The hotkey may differ on different computers.)
Step 2. Choose "Troubleshoot" > "Advanced options" > "Command Prompt."
Step 3. Type in the commands below and press "Enter" after inputting each command line.
- diskpart
- list volume
- select volume X (Replace "X" with the number of boot volume.)
- assign letter=C ("C" is usually the letter of boot volume.)
Don't be shy to share this article on your social media to help more users who are also suffering from Windows startup issues.
Conclusion
If you encountered a black screen, boot loop, stuck on the logo, or other scenarios, you are lucky to find this article because it has provided you with 8 solutions to fix various startup issues on Windows 10 computers or laptops.
The most effective and fastest way to fix Windows 10 won't boot is to launch EaseUS Partition Master and execute its Boot Repair feature. The feature doesn't require you to enter complex commands or perform confusing operations. You can use it to fix many common Windows startup problems.
FAQs on Windows 10 Won't Boot
1. Why is my computer screen black and not turning on?
Black screen errors on your computer could occur for many reasons, like faulty drivers, damaged software, malware attacks, and incompatible Windows updates. You have to try different methods to fix black screen errors since the real cause of the issue is uncertain.
2. Why can't I boot to Safe Mode?
Damaged or Corrupted system files or faulty applications can cause the Safe Mode to be unable to work normally. But you can try running an SFC scan, which will check and restore the corrupted Windows system files and uninstall the faulty apps to make Safe Mode available again.
3. Why does Windows 10 keep booting in recovery mode?
The issue that Windows 10 keeps booting in recovery mode may be caused by a misconfigured or corrupted Boot Configuration. This could occur when there's a software update failure, power outage, or hardware adjustment.
How Can We Help You
About the Author
Roxanne is one of the main contributors to EaseUS and has created over 200 posts that help users solve multiple issues and failures on digital devices like PCs, Mobile phones, tablets, and Macs. She loves to share ideas with people of the same interests.
Oliver is an EaseUS professional writer who dares explore new areas. With a passion for solving tech issues with straightforward guides for common users, Oliver keeps honing his writing craft by developing in-depth solutions for disk and partition management, computer boot-up issues, file transfer, etc.
Product Reviews
-
I love that the changes you make with EaseUS Partition Master Free aren't immediately applied to the disks. It makes it way easier to play out what will happen after you've made all the changes. I also think the overall look and feel of EaseUS Partition Master Free makes whatever you're doing with your computer's partitions easy.
Read More -
Partition Master Free can Resize, Move, Merge, Migrate, and Copy disks or partitions; convert to local, change label, defragment, check and explore partition; and much more. A premium upgrade adds free tech support and the ability to resize dynamic volumes.
Read More -
It won't hot image your drives or align them, but since it's coupled with a partition manager, it allows you do perform many tasks at once, instead of just cloning drives. You can move partitions around, resize them, defragment, and more, along with the other tools you'd expect from a cloning tool.
Read More
Related Articles
-
CHKDSK Cannot Run Because the Volume Is in Use by Another Process
![author icon]() Sherly/2024/06/12
Sherly/2024/06/12 -
How to Fix HP Laptop Running Slow on Windows 11/10 [2024 Newest]
![author icon]() Cici/2024/04/26
Cici/2024/04/26 -
How to Format SSD to exFAT? Full Guide with Pictures
![author icon]() Tracy King/2024/05/16
Tracy King/2024/05/16 -
Nintendo Switch Not Reading SD Card? 10 Fixes Here!
![author icon]() Sherly/2024/07/02
Sherly/2024/07/02
Hot Topics in 2024


EaseUS Partition Master

Manage partitions and optimize disks efficiently