
Content
Page Table of Contents
About the Author
Hot Topics
Updated on May 07, 2026
| Workable Solutions | Step-by-step Troubleshooting |
|---|---|
| Solution 1. Resize Partition Without Losing Data Using Windows 7/8/10/11 Disk Management |
Shrink: Press Windows + R keys to bring up the Run box, type diskmgmt.msc...Full steps Extend: You can directly extend a volume if there is unallocated space on the right side...Full steps |
| Solution 2. Resize Partition Without Losing Data Using a Free Partition Manager |
Shrink: Locate and select target partition to shrink; Adjust to shrink partition...Full steps Extend: Locate the Target Partition; Extend the Target Partition...Full steps |
On this page, you can learn how to resize partitions without losing data by using the [1] native Windows 11/10/8/7 Disk Management and [2] third-party partition manager software - EaseUS Partition Master. Both programs are good at extending or shrinking the NTFS partition. However, if your partition's file system is not NTFS but FAT32, you can only download the third-party program to change the partition size.
Related topic: NTFS vs FAT32
Can You Resize Partition Without Losing Data?
When it comes to resizing a disk partition, data safety is the first thing that strikes people's minds. Since resizing a partition is practically to shrink one partition or extend the other one, it's hard to start the first step before figuring out the risk, and many people are asking, "can you change partition size without losing data?" as well as the following frequently asked questions. You can check the quick answers.
Q1: Does resizing or moving the partition delete data?
Resizing & moving a partition can be two different things. Moving the partition is to adjust the forward and backward position of the partition on the disk and won't delete data. Is it safe to resize the Windows partition? Yes, the resizing partition can be subdivided into extending and shrinking partitions. Both operations don't delete data.
Q2: What does it mean to shrink a volume?
Hard drive shrinking is the practice of reducing the size of your partition to create unallocated space that you can use elsewhere. Before your computer can use the space on the hard drive to store data, the drive needs to be split up into separate areas called partitions.
Q3: Will I lose data if I shrink the volume?
Shrinking the partition won't cause data loss. If the partition includes unmovable files (such as the page file or the shadow copy storage area), the volume will shrink to the point where the unmovable files are located. That is to say, the used space with existing data is unavailable to shrink space.
This article is focused on resizing NTFS partition, if you want to shrink the C drive, click the link to view more details.
How to Shrink C Drive without Losing Data [2024 Full Guide]
How to shrink C drive on Windows 10? You are in the right place if you are looking for a detailed answer about shrinking C drive. On this page, you can get three free tools to successfully shrink C drive without destroying data.
Next, we will continue to give detailed steps to resize the NTFS partition. If you like it, share it with others in need.
Solution 1. Resize Partition Without Losing Data Using Windows 7/8/10/11 Disk Management
Windows Disk Management is, by default, installed on all Windows operating systems and Windows servers, and it offers the very basic functionality of extending or shrinking the volume of an HDD, SSD, or USB external hard drive. The "Shrink Volume" is 100% safe to ensure your data will not be affected. However, it's worth noting that the "Extend Volume" option CAN or CANNOT delete data, depending on whether there is unallocated space on the right side of the partition you're trying to enlarge.
Besides, Windows Disk Management only supports the NTFS file system. The upcoming tutorial is exclusively applicable to resizing NTFS partition only.
To shrink a partition without losing data, follow the step-by-step guide:
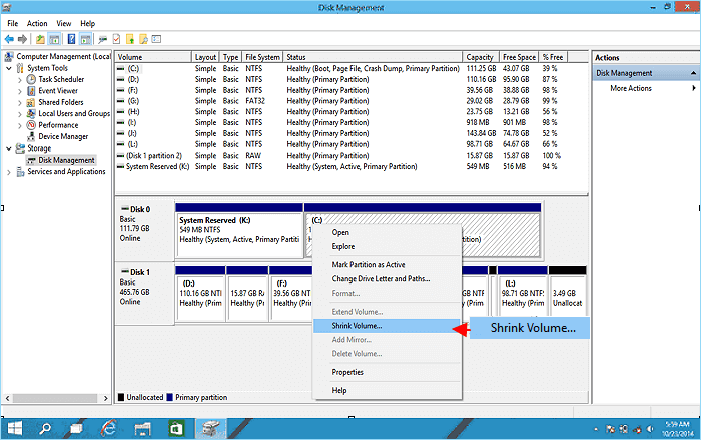
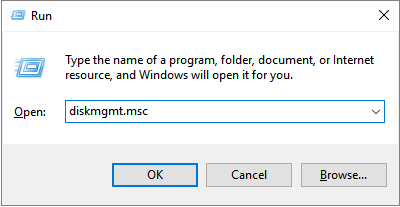
Step 1. Press the Windows + R keys to bring up the Run box, type diskmgmt.msc, click OK to open Windows Disk Management.
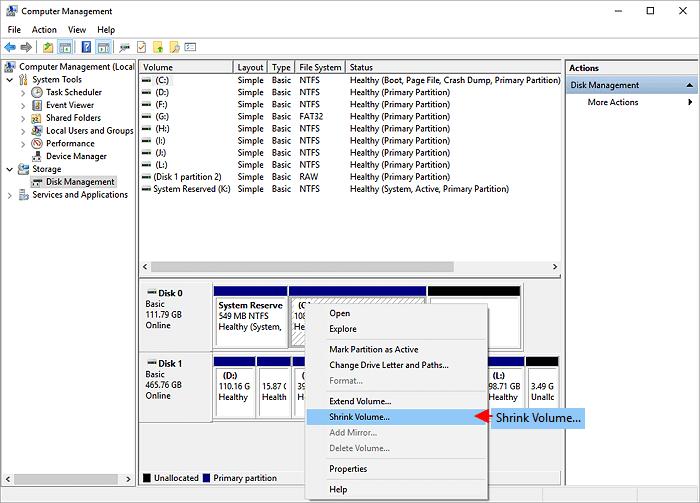
Step 2. Right-click on the partition that you want to decrease its size and select Shrink Volume.
Step 3. On the Shrink volume window, you can see the total size before shrinking and the size of available shrink space. Here, you need to enter the exact amount of space to shrink. Click Shrink, and it will be done in seconds.
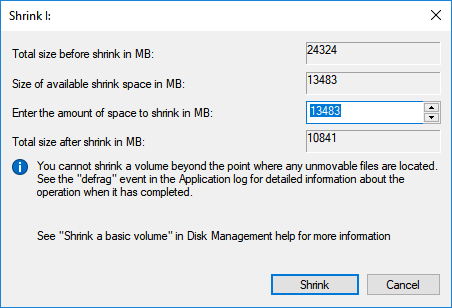
Go back to the Disk Management interface, you can see the disk space has been decreased, and there is unallocated space available now.
To extend a volume without losing data, you need to do it carefully:
You can directly extend a volume if there is unallocated space on the right side of the partition you want to resize. Otherwise, the Extend Volume is grayed out and becomes an invalid option in Disk Management.
If there is no unallocated space next to the partition, you have to delete the adjacent partition to make unallocated space. Deleting a partition will lead to data loss, and you should back up files in advance.
If you do not want to delete the partition but must extend the partition, you can use the "Allocate Space" function of EaseUS Partition Master to directly add free space to the target partition, such as move space from d drive to c drive Windows 11/10.
Solution 2. Resize Partition Without Losing Data Using a Free Partition Manager
EaseUS Partition Master enables you to resize, move, create, and merge partitions with simple clicks without losing data. This partition manager supports both NTFS and FAT file systems. In other words, it allows you to not only resize NTFS partition but also to resize FAT32 partition. Moreover, the "Create partition" utility built in this program can help you create an NTFS/FAT partition. Its "Convert to NTFS" function enables you to convert FAT (FAT12/FAT16/FAT32) to the NTFS file system. Its "Merge partition" function enables you to merge FAT/NTFS partition to another NTFS partition.
Now, download EaseUS Partition Master and follow the steps below to resize a partition without data loss with ease.
How to shrink a partition in Windows 11/10/8/7 without losing data
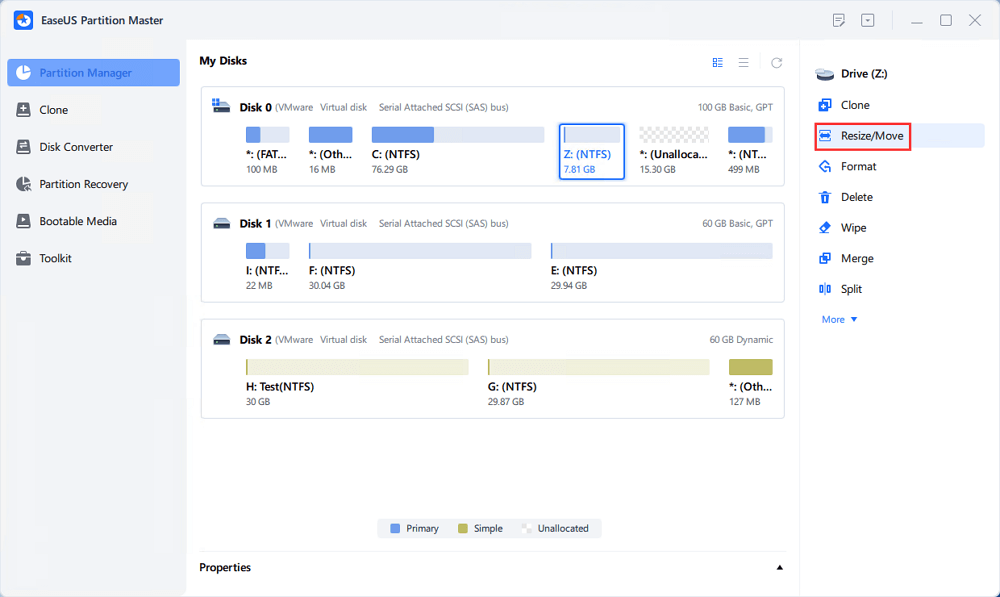
Step 1: Locate and select target partition to shrink
Go to the Partition Manager section, right-click on the partition that you want to shrink and select "Resize/Move".
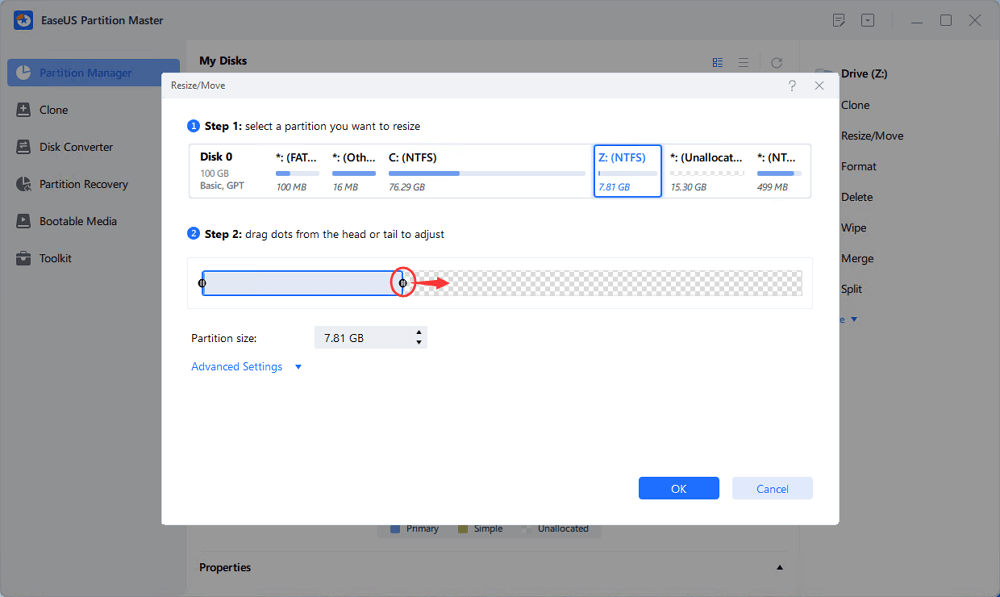
Step 2: Adjust to shrink partition
Use your mouse to drag the end of the target partition to shrink partition space.
You can also adjust the partition size box to shrink the target partition. Once done, click "OK" to continue.
Step 3: Execute operation
Click the "Execute 1 Task(s)" button and "Apply" to keep all changes.
How to extend a partition in Windows 11/10/8/7 without losing data
Step 1. Locate the Target Partition.
Go to Partition Manager, locate the target partition and select "Resize/Move".
Step 2. Extend the Target Partition.
Drag the partition panel rightward or leftward to add the unallocated space into your current partition, or you can click click "fill in all unallocated" to allocate all space to the target partition. Then, click "OK" to confirm.
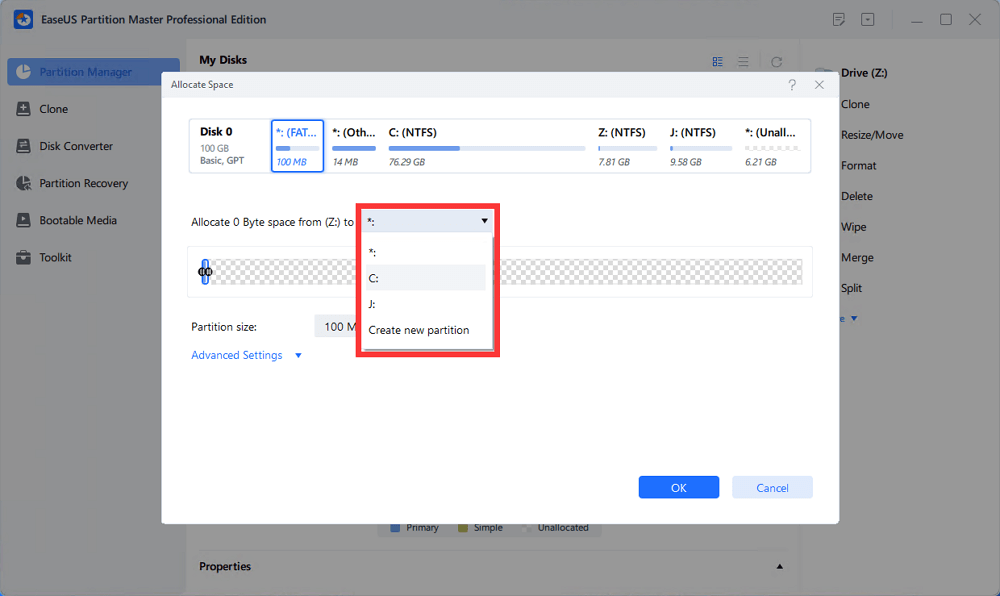
Extra Option: Get Space from Another Drive
If there is not enough unallocated space on your disk, right-click on a big partition with enough free space, select "Allocate space".
Then select the target partition that you want to extend at the allocate space to column.
Step 3. Execute Operations to Extend Partition.
Drag the dots of the target partition into the unallocated space and click "OK".
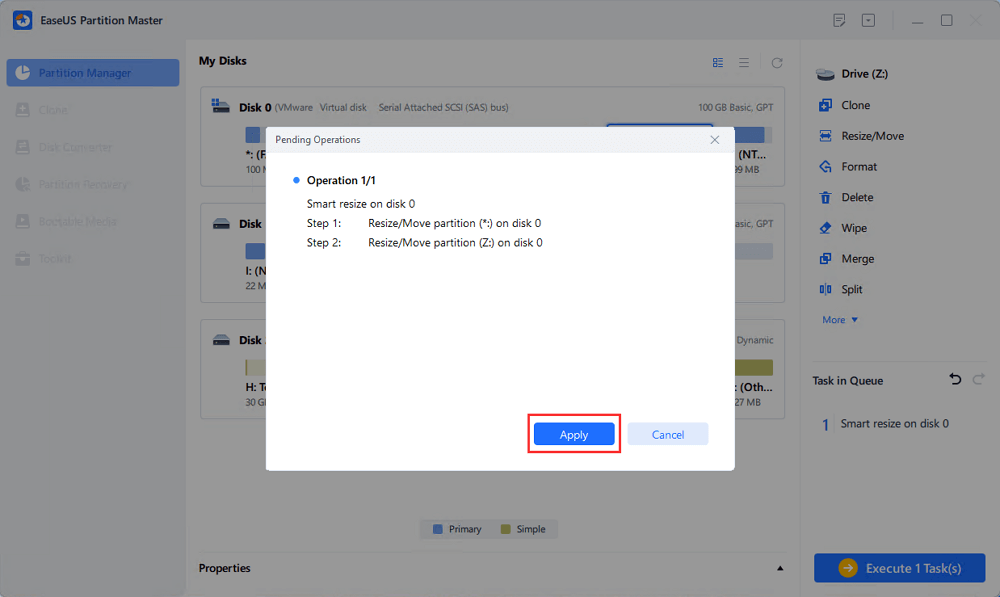
Then Click the "Execute Task" button and click "Apply" to keep all the changes.
Video Tutorial: Resize Partition in Windows 11/10/8/7
You may also follow this video tutorial to resize your partition flexibly on your computer.
You May Also Like: How to Partition a Hard Drive.
Which Way Will You Choose to Resize A Partition?
To sum up, you can use either EaseUS Partition Master or Windows Disk Management to shrink partitions, and no data loss will happen. But if you want to expand the partition, consider the situation. Both methods are feasible if you can generate unallocated space on the right side of the target partition. If there is no unallocated space and you don't want to delete the partition, you'd better use EaseUS Partition Master for data security.
How Can We Help You
About the Author
Updated by Tracy King
Tracy became a member of the EaseUS content team in 2013. Being a technical writer for over 10 years, she is enthusiastic about sharing tips to assist readers in resolving complex issues in disk management, file transfer, PC & Mac performance optimization, etc., like an expert.
Product Reviews
-
I love that the changes you make with EaseUS Partition Master Free aren't immediately applied to the disks. It makes it way easier to play out what will happen after you've made all the changes. I also think the overall look and feel of EaseUS Partition Master Free makes whatever you're doing with your computer's partitions easy.
Read More -
Partition Master Free can Resize, Move, Merge, Migrate, and Copy disks or partitions; convert to local, change label, defragment, check and explore partition; and much more. A premium upgrade adds free tech support and the ability to resize dynamic volumes.
Read More -
It won't hot image your drives or align them, but since it's coupled with a partition manager, it allows you do perform many tasks at once, instead of just cloning drives. You can move partitions around, resize them, defragment, and more, along with the other tools you'd expect from a cloning tool.
Read More
Related Articles
-
Best Memory SD Format Tool Free Download 2026
![author icon]() Brithny/2026/01/29
Brithny/2026/01/29 -
Samsung Format Utility Download Free [With Guide] 🚩
![author icon]() Sherly/2026/04/15
Sherly/2026/04/15 -
M.2 vs. SSD, What's the Difference [New Details]
![author icon]() Tracy King/2026/01/29
Tracy King/2026/01/29 -
The Local Device Name Is Already in Use
![author icon]() Daisy/2026/01/29
Daisy/2026/01/29
Hot Topics


EaseUS Partition Master

Version 20.0 is here - full exFAT support, easier disk partitioning, and PC performance optimization.