
Content
Page Table of Contents
About the Author
Hot Topics
In the following, you will uncover 5 practical ways to convert FAT to NTFS without losing data. Pick up one and follow to switch the file system on your storage device to NTFS by keeping your data intact now:
| Duration: | 3-8 minutes |
| Supported Devices: | SD cards, USB flash drives, external or internal hard drives, etc. |
| Supported OS: | Windows 11/10/8/7/XP/Vista, and Windows Servers. |
| Tools: |
|
Selection Tip: If you want to optimize the usage of your computer's hard drive, set your disk with a more reliable file system - NTFS- without losing any data. The FAT to NTFS conversion feature in EaseUS Partition Master can fulfill your task. For more details, you may directly move to Method 1 for help.
Let's get started.
How to Convert FAT32 to NTFS (FAT16, FAT12 Available)
Changing a volume file system is not an easy task for those who are not familiar with computer management and the command line. Thus, an easy and safe solution is needed. In this part, you will find two reliable FAT to NTFS conversion methods without losing any data. Pick up either method to get the desired file system for your drive now.
Method 1. Convert FAT to NTFS without Data Loss [Free]
Applicable for: all levels of users - beginners, amateur, and professional computer users, free & 3-step operation.
Free and comprehensive partition manager software - EaseUS Partition Master Free can fully meet this requirement with its Convert to NTFS feature. It enables you to convert FAT to NTFS without any data loss. Changing the device file system format won't require formatting and keeping all valuable device content intact.
EaseUS Partition Master Free Edition is incredibly simple to use, one of many reasons that you should consider it when looking for a good free disk partitioning tool. from Lifewire
If you need to convert a storage device such as an external hard drive or USB drive to NTFS, insert it into your PC first. All Windows users can execute this task with the following steps:
Step 1. Install and launch EaseUS Partition Master on your computer.
Step 2. Go to the Disk Converter tab, select "FAT => NTFS" and click "Next."
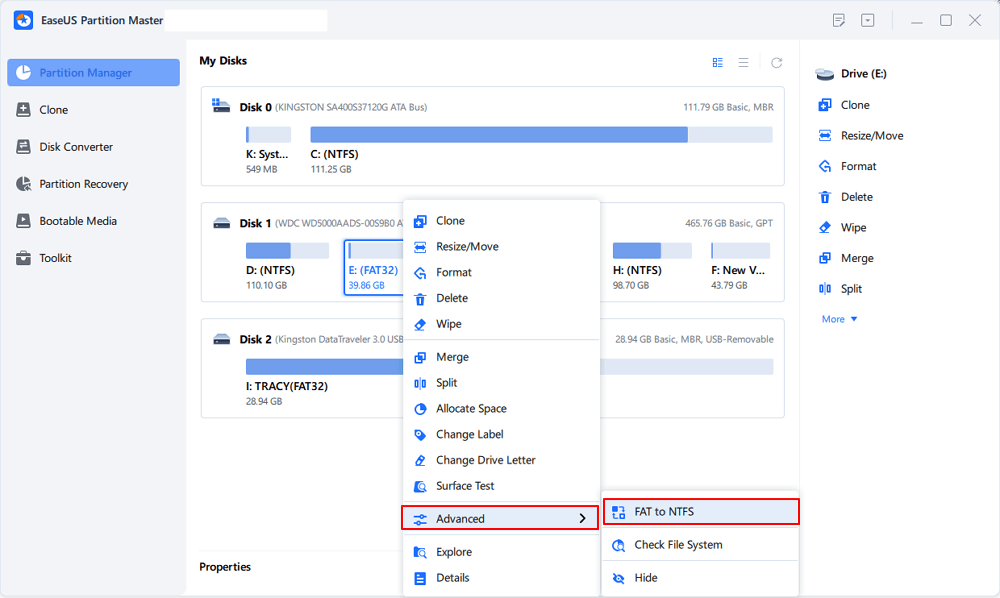
Step 3. Select the partition that you want to convert to NTFS and then click on "Convert." (Tick the "Show More" option in the panel's upper right corner to display the hidden partitions.)
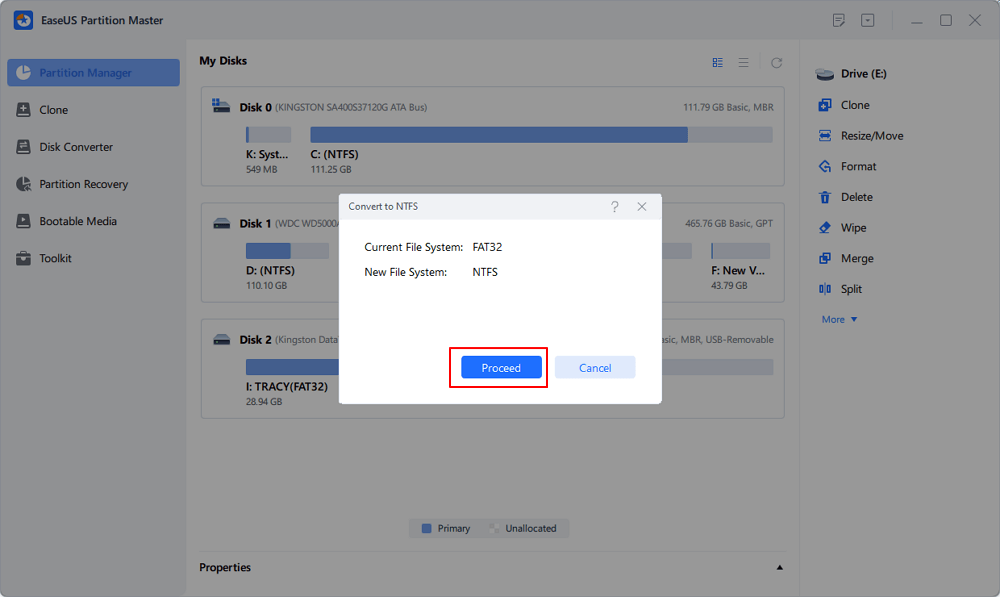
Step 4. Wait until the operation process is finished.
Apart from converting FAT to NTFS, EaseUS Partition Master Free also allows users to change file systems to other formats, such as: Convert NTFS to FAT32, Convert exFAT to FAT32, etc.
If you love the provided method here, feel free to share and help more people around you online:
Method 2. Convert FAT32 to NTFS by Using CMD [Manual]
Applicable for: experienced computer users who know Command Prompt lines very well.
Users who are familiar with computer management can use the CMD convert command to switch the FAT partition or storage device to NTFS.
How to Convert a FAT or FAT32 drive to NTFS:
- 1. Open a command prompt window by typing Command Prompt in the search box
- 2. Right-click Command Prompt and select "Run as Administrator."
- 3. Type help convert and then press "Enter."
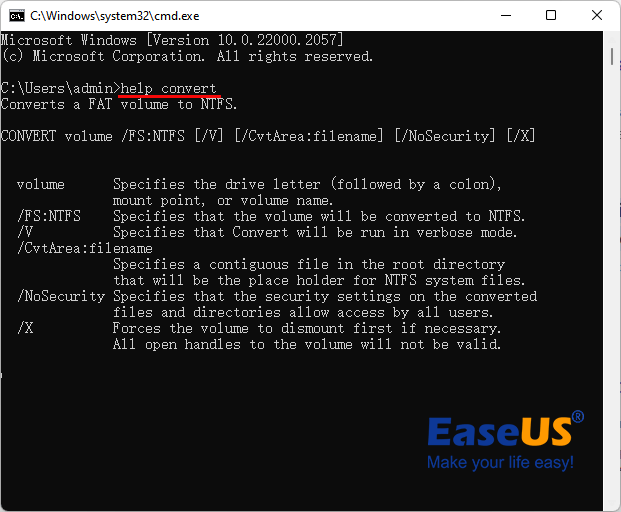
Information about converting FAT volumes to NTFS is made available as shown below.
- 4. Type in convert drive_letter: /fs:ntfs and press Enter.
- Replace the drive letter of the target drive you are converting, such as convert J: /fs:ntfs.
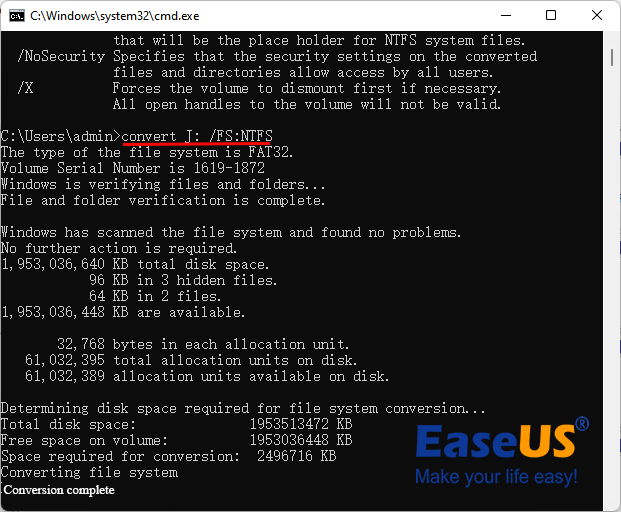
- 5. Type exit when the converting process is complete.
The file system of the target device is now NTFS. You can view and use the saved data on the drive again.
Besides using CMD or third-party conversion software, there are three other 3 ways presented below that can help users change their device file system. It is to format storage devices from FAT to NTFS.
- Notice:
- As we know, the formatting operation will cause file loss on devices. Therefore, if you plan to format the device to switch the file system, remember to back up valuable data to another secure location in advance.
If you find it too difficult to run CMD commands, choose EaseUS Partition Master instead.
Method 3. Format to NTFS in File Explorer
Applicable for: Windows beginners, non-technical users
Windows File Explorer is reliable and easy for Windows beginners and non-technical users to switch from a FAT32 format device to NTFS by formatting efficiently. Here is how to do so:
Step 1. Connect your external storage device to your PC and open Windows File Explorer.
Step 2. Locate and right-click the target device and select "Format".
Step 3. Tick "Quick Format," set the file system as "NTFS," and click "Start" to begin the formatting.
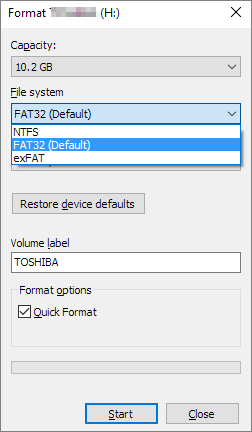
When the formatting finishes, close the formatting window. It's now NTFS, and you can copy the backed-up files back to the formatted device.
You can share this article to help others convert to NTFS from FAT32.
Method 4. Format FAT32 to NTFS in Disk Management
Applicable for: Windows experienced users
Connect your external hard drive or USB drive to the PC before you start the formatting with the following steps:
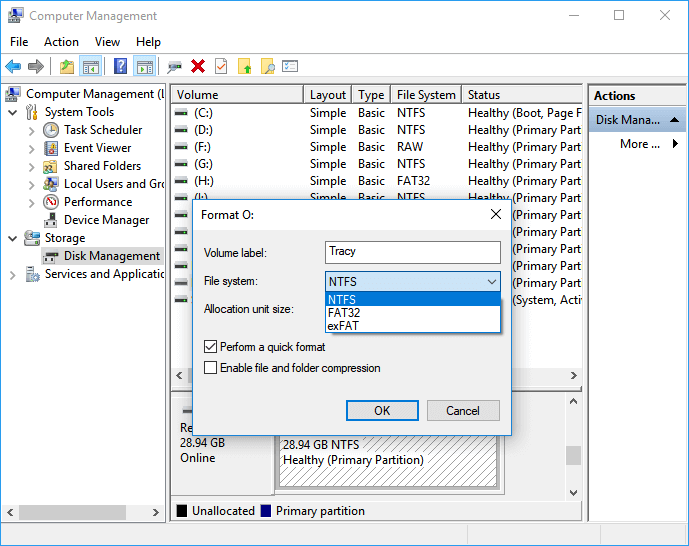
Step 1. Right-click This PC or My Computer, and select "Manage".
Step 2. Enter Device Manager and click "Disk Management".
Step 3. Open Disk Management and, right-click the target device, select "Format".
Step 4. Set "NTFS" for the selected device, tick "Quick Format," and click "OK" to confirm.
Method 5. Quick Format FAT32 Device to NTFS in CMD
Applicable for: Advanced users, professionals
DiskPart command lines are designed for advanced users and professional developers in quickly procedue orders to the operating system so to format the target device to NTFS. Do be careful while typing the command lines as listed in the below step guide:
Step 1. Right-click on the Windows icon, select "Search" and type cmd.
Step 2. Right-click to run Command Prompt as administrator, type diskpart, and hit Enter.
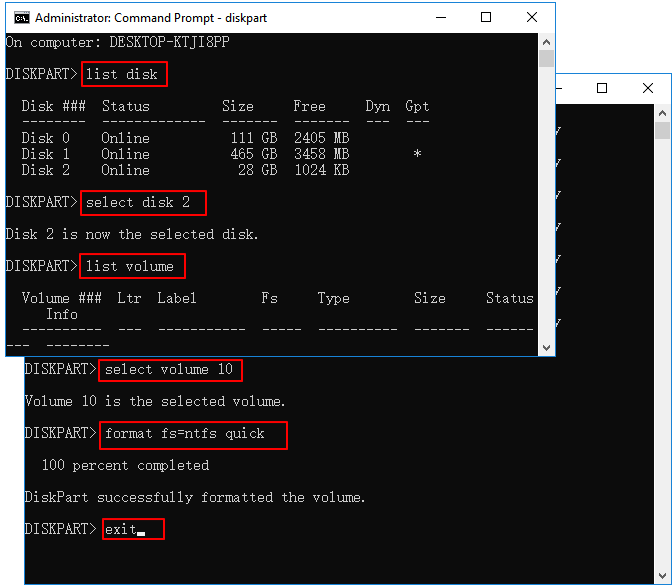
Step 3. Type below command lines and hit Enter each time:
- list disk
- select disk 2 (Replace 2 with your USB disk number)
- list volume
- select volume 11/10 (Replace 11/10 with the volume number of the USB drive that you want to format)
- format fs=ntfs quick
Step 4. Type exit and hit Enter to close DiskPart when it reports to successfully format the volume.
Click the button below to quickly turn to EaseUS Partition Master.
Why Do You Need to Convert FAT32 to NTFS
Many ordinary people don't know how to choose the right file system for their storage devices. If you are having the same issue of not knowing how to set NTFS or FAT32 for your external hard drive, USB, or SD card, continue reading, and you will learn.
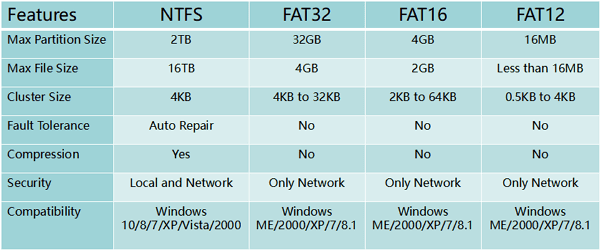
NTFS vs. FAT, Which Is Better
Here is a comparison table of NTFS, FAT32, FAT16, and FAT12 that can help you decide which format suits your device the best.
NTFS or FAT32, Which Is for My Device?
It doesn't matter if you are still unclear about setting which format for your drive; here is a suggestion provided by the EaseUS editor:
- NTFS: Support for transferring big files with no limit. The ideal file system for hard drives and external hard drives.
it's clear that NTFS contains more advanced features than FAT, for example, in performance, security, and reliability. NTFS supports big file storage on high-capacity storage devices like an internal or external hard drive.
- FAT32: Support for transferring a single file within 4GB. Used as the file system for SD card and USB flash drive.
For SD cards and USB flash drives, FAT32 will be the best.
Conclusion
This page covers the answers of which is better between NTFS and FAT32 and offers two reliable methods to assist users in converting FAT32, FAT16/12 to NTFS without formatting by using the EaseUS partition manager free software or CMD conversion command.
Apart from the two FAT32 to NTFS conversion methods, this tutorial article also shows the other three manual formatting ways to help you format the device from FAT32 to NTFS. If you choose the formatting way, remember to back up data from the target device to another location first.
Note that if you format the device without backup, always remember to apply a reliable file recovery software like EaseUS Data Recovery Wizard for help.
People Also Ask about Converting FAT32 to NTFS
Besides converting FAT to NTFS, some people have more questions about file system conversion between FAT32 and NTFS. Here below, we collected 4 top concerned questions and left answers below each question. Let these answers release your doubts and help you out.
1. Can I convert NTFS back to FAT32 after FAT32 to NTFS conversion?
Once you converted FAT to NTFS, you cannot simply convert it back to FAT or FAT32. You will need to reformat the drive or partition which will remove all saved data, including programs and personal files, on the partition.
You can also refer to this page to find solutions for converting NTFS to FAT32. Remember that it is always a good idea to back up your data before the conversion.
2. Will converting from FAT32 to NTFS erase data?
If you choose to use the CMD convert command line convert G: /fs:ntfs (G is the drive letter of the target device) or use the Convert to NTFS feature in EaseUS Partition Master, your data will be securely saved on the device. No data will be erased.
However, if you prefer to use the formatting method, your saved data on the target device will be formatted. To avoid this issue, you should always remember to back up your valuable files in advance.
3. How can I change FAT32 to NTFS without losing data?
The best way to protect your data from loss while converting FAT32 to NTFS is to create a backup in advance.
You can also use the Convert to NTFS feature in EaseUS Partition Master Free or CMD conversion command, as shown on this page, for help. No data loss will happen by using either method.
4. How do I change my USB from FAT32 to NTFS without formatting?
The ways to change the USB from FAT32 to NTFS are similar to the ones provided on this page. If you prefer a conversion method rather than formatting, both the Convert to NTFS feature in EaseUS Partition Master Free and the CMD conversion command, as recommended on this page, can all help.
- Using EaseUS Partition Master Free: Connect USB to PC > Run EaseUS Partition Master and right-click USB > Select "Convert to NTFS" > Execute the operation.
- Using CMD: Open Diskpart > Type list disk and hit Enter > Type select disk 2 (Replace 2 with USB disk number) and hit Enter > Type help convert and hit Enter > Type convert G: /fs:ntfs (Replace G with a USB drive letter) and hit Enter.
How Can We Help You
About the Author
Updated by Tracy King
Tracy became a member of the EaseUS content team in 2013. Being a technical writer for over 10 years, she is enthusiastic about sharing tips to assist readers in resolving complex issues in disk management, file transfer, PC & Mac performance optimization, etc., like an expert.
Jean is recognized as one of the most professional writers in EaseUS. She has kept improving her writing skills over the past 10 years and helped millions of her readers solve their tech problems on PC, Mac, and iOS devices.
Product Reviews
-
I love that the changes you make with EaseUS Partition Master Free aren't immediately applied to the disks. It makes it way easier to play out what will happen after you've made all the changes. I also think the overall look and feel of EaseUS Partition Master Free makes whatever you're doing with your computer's partitions easy.
Read More -
Partition Master Free can Resize, Move, Merge, Migrate, and Copy disks or partitions; convert to local, change label, defragment, check and explore partition; and much more. A premium upgrade adds free tech support and the ability to resize dynamic volumes.
Read More -
It won't hot image your drives or align them, but since it's coupled with a partition manager, it allows you do perform many tasks at once, instead of just cloning drives. You can move partitions around, resize them, defragment, and more, along with the other tools you'd expect from a cloning tool.
Read More
Related Articles
-
Format/Reformat Seagate External Hard Drive on Windows or Mac
![author icon]() Tracy King/2026/06/17
Tracy King/2026/06/17 -
How Do I Fix Windows 10 BSOD: Blue Screen of Death Error? Here Is The Guide
![author icon]() Tracy King/2026/06/30
Tracy King/2026/06/30 -
How to Perform Xbox One SSD Upgrade [Full Guide]
![author icon]() Cici/2026/06/30
Cici/2026/06/30 -
HP Pen Drive Repair Software Free Download |100% Safe
![author icon]() Sherly/2026/06/21
Sherly/2026/06/21


