
Content
Page Table of Contents
About the Author
Hot Topics
Burning ISO to USB on Windows 8 can be a complicated process for those who don't have technical expertise and lack computer knowledge. But don't worry, in this tutorial, we're going to make it easy for everyone, whether they come from a non-technical background. We'll properly guide you throughout the process of how to burn ISO to USB on Windows 8 efficiently and answer your curious questions.
If you're looking for an easy and comfortable way, EaseUS Partition Master offers an easier operation process compared to the Windows USB/DVD Download Tool. It is considered the best and easiest way to burn a Windows 8 ISO to a USB drive due to its user-friendly interface and simplicity of use.
Before proceeding, users should ensure they have the following preparations:
- Important
- USB: A USB drive with a capacity of at least 8-16GB formatted with the FAT32 file system. To format the USB drive to FAT32, you can right-click on the USB drive in Windows Explorer, select "Format," and choose FAT32 as the file system.
- Windows 8 ISO file: The Windows 8 ISO file can be downloaded from the official Microsoft website or other trusted sources.
Finally, you should connect the USB drive to the PC. Simply plug it into an available USB port on the computer or laptop.
How to Burn ISO to USB on Windows 8
There are two guides mentioned in this part. And here is a table for you to learn more details about the two ways:
| ⚙️Comparison | ||
|---|---|---|
| ✏️Complex Level |
Low, for beginners |
A little bit complicated |
| 💻Applies to |
Burn Windows 8/8.1/10/11/7 to USB |
Burn Windows 7/8 to USB |
| ⏱️Duration |
1-3 Minutes |
3-5 Minutes |
| 🚩Interface |
Clear, with prompts |
Not that clear |
We'll learn two methods to burn a Windows 8 ISO to a USB drive on Windows 8. The first way is through EaseUS Partition Master, the easiest way for beginners and non-technical individuals. The second way is the Windows USB/DVD Download Tool, which is not that friendly to beginners. Hence, if you are not a pro, turn to EaseUS Partition Master. We'll show you step-by-step instructions.
Guide 1. Burn Windows 8 ISO to USB Using EaseUS Partition Master
EaseUS Partition Master is a powerful and user-friendly partition management tool that also offers the ability to burn ISO files to a USB drive. It provides a straightforward and efficient path to burn Windows 8/8.1 to a USB.
To burn Windows 8 ISO files to a USB using EaseUS Partition Master, follow these steps:
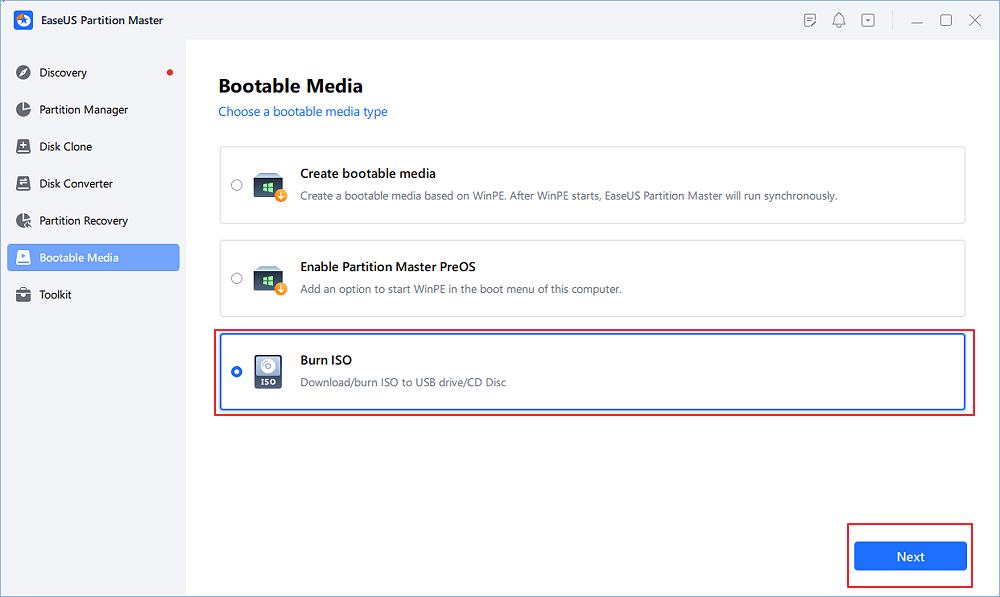
Step 1. Launch EaseUS Partition Master and go to the Bootable Media section. Click "Burn ISO" and click "Next".
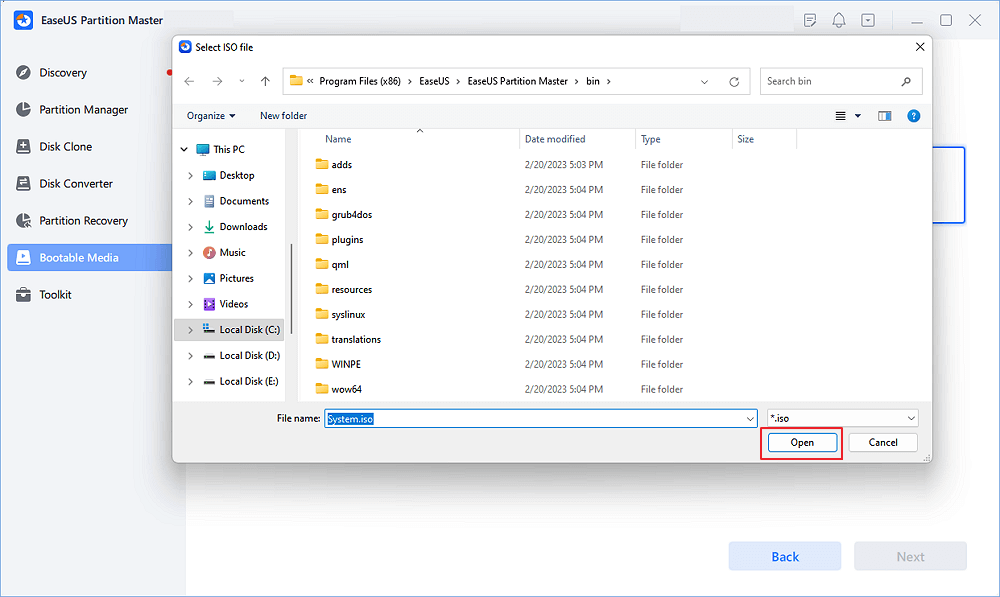
Step 2. Select the ISO image that you have downloaded on your PC, and click "Open".
Step 3. Click "Next" and select the target USB as destination and click "Burn" to execute the operation.
You have successfully burned Windows 8 to your USB now. It's time to learn more features of EaseUS Partition Master.
Key Features of EaseUS Partition Master:
- Burn ISO to USB on Windows 10
- Format USB to FAT32
- Create a bootable USB
- Burn Windows 7 ISO to USB
- Initialize a hard drive to install Windows 8
EaseUS Partition Master is known for its ease of use, making it suitable for users of all levels of experience. You can download the EaseUS Partition Master now and benefit from its user-friendly interface, options, and several useful features to simplify your routine tasks. For older computers, EaseUS Partition Master can bypass Windows 11's system requirements during installation.
Guide 2. Burn Windows 8 ISO to USB Using Windows USB/DVD Download Tool
Microsoft's USB/DVD download tool allows you to burn Windows 8 ISO to USB for installing Windows 8.
Follow the steps below to burn Windows 8 ISO to USB using Windows USB/DVD download tool:
Step 1. Download, install, and run the Windows USB/DVD Download Tool on your PC/Laptop.
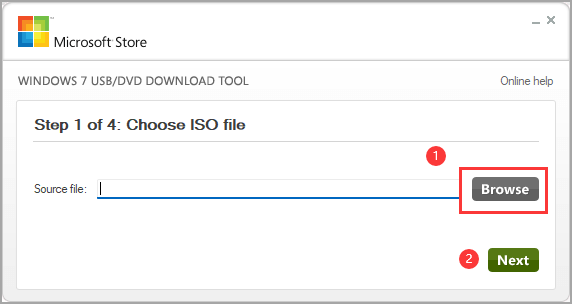
Step 2. On the initial screen of the Download Tool (Step 1 of 4), choose the ISO file for Windows 8. Make sure the file has the ".iso" extension.
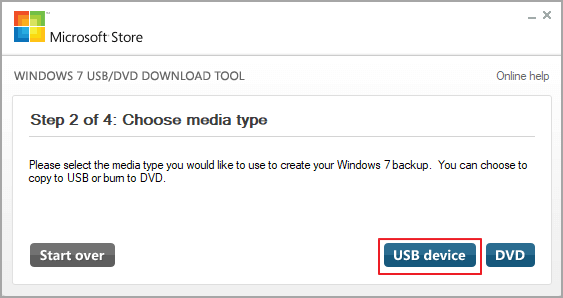
Step 3. In Step 2 of 4, select the type of media you want to use and choose the USB drive where you want to set up your Windows 8 installation.
Step 4. Proceed to Step 3 of 4 by inserting the USB device into your computer. Once inserted, click the "Begin copying" button. Remember, this process will erase/delete the USB drive and the entire stored data. So it's essential to back up your valuable data to preserve it.

Step 5. Finally, the Download Tool will automatically begin creating the bootable USB device (Step 4 of 4). Wait for a few minutes and let it complete.
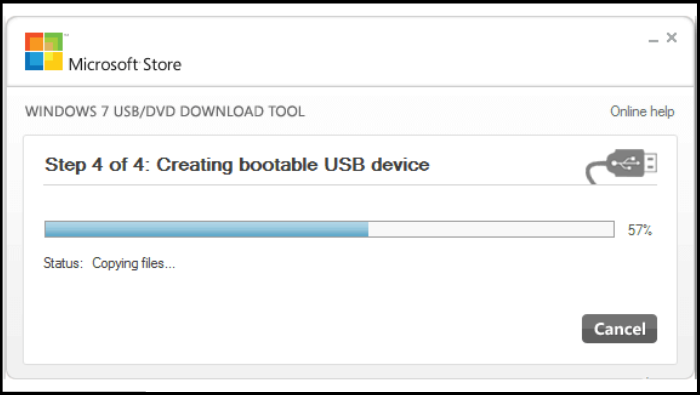
- Notice:
- The steps provided are applicable to Windows 8 and Windows 8.1, although the screenshots are based on the Windows 7 USB/DVD Download Tool. Please follow the instructions accordingly to burn the Windows 8 ISO to a USB drive.
If you aren't experienced with computing or desire a more user-friendly option. You have to use EaseUS Partition Master to burn the Windows 8 ISO to a USB drive easily and quickly.
Remember, after burning the ISO to the USB drive, you need to set the bootable USB as the primary boot drive in your computer's BIOS settings to ensure that your PC/laptop boots from the USB drive and initiates the Windows 8 installation process. If you ignore this step and setting, Windows 8 can't boot from the USB.
How to Install Windows 8 From the Bootable USB
Once you have successfully burned Windows 8 on the USB, you can go ahead and install Windows 8 on another computer from this bootable USB. Here is how to install Windows 8 from the bootable USB:
Step 1. Insert the USB bootable drive into the computer where you plan to install Windows 8.
Step 2. Power on the target computer and set it to boot from the attached USB at startup. In order to accomplish this, you may need to adjust your BIOS settings to enable the USB flash drive as a boot option.
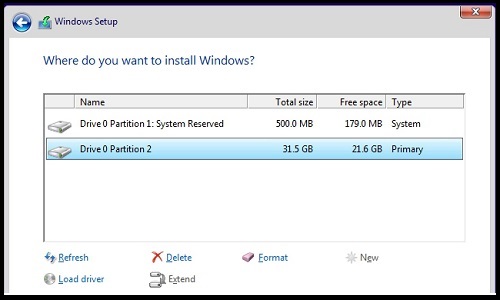
Step 3. Then, follow the on-screen prompts to set the language and other details of Windows 8 using USB.
You can learn more details about installing Windows from the article below:
Where Do You Want to Install Windows and How [2023 New]
Ensuring your Windows 11/10/8/7 operating system is installed and running on the correct storage drive has always been important.
Why Burn ISO to USB on Windows 8
Many users are looking for a way or a tool to help burn ISO to USB on Windows 8. However, why? So, first of all, let's take a look at the advantages of burning ISO to USB on Windows 8. You can click the buttons to let others know about the advantages:
- Portability: USB drives are compact and easy to carry, allowing you to take your Windows 8 installation or bootable drive anywhere you go.
- Speed: Installing Windows 8 from a USB drive is generally faster compared to using optical media like DVDs.
- Reusability: USB drives can be easily formatted and reused for different purposes, such as creating bootable drives for other operating systems or storing data.
- Compatibility: USB drives are widely supported by modern computers and can be used on various devices, making it convenient to install Windows 8 on different systems.
- Reliability: USB drives are more durable than optical media, reducing the risk of damage or data corruption during the installation process.
- Easy Updates: By using a USB drive, you can easily update your Windows 8 installation files or create new bootable drives with the latest updates.
- Flexibility: Burning an ISO to a USB drive allows you to customize the installation process, add additional software or drivers, and personalize the setup according to your preferences.
These advantages make burning an ISO to a USB drive a preferred method for installing Windows 8 on Windows 8-compatible devices. You can read the guides above to learn the details.
Conclusion
Burning ISO to USB on Windows 8 offers several advantages, such as portability, speed, reusability, compatibility, reliability, easy updates, and flexibility. We discussed two methods to achieve this; using EaseUS Partition Master and the Windows USB/DVD Download Tool. EaseUS Partition Master provides a user-friendly interface and simplifies the process, making it suitable for beginners. On the other hand, the Windows USB/DVD Download Tool is a Microsoft tool specifically designed for burning ISO files to USB drives. Both methods require proper preparation, and selecting the USB drive as the primary boot option in the computer's BIOS settings is crucial.
We hope you find this article helpful and informative. Please don't forget to share this article with your colleagues/friends to help them efficiently burn ISO to USB on Windows 8.
You may also like:
Burn ISO to USB on Windows 8 FAQs
If you have further questions regarding burning ISO to USB on Windows 8, please follow the below FAQs.
1. Can I create a bootable USB for Windows 8 from an ISO?
Yes, you can create a bootable USB for Windows 8 using the Windows USB/DVD Download Tool.
Follow these steps:
Step 1. Download and install the Windows USB/DVD Download Tool.
Step 2. Launch the tool and select the Windows 8 ISO file.
Step 3. Select the USB drive as the destination for creating the bootable USB.
Step 4. Follow the on-screen instructions to complete the process.
2. Which tool can I use to burn Windows 8 iso image to a bootable USB?
There are numerous tools to burn the Windows 8 ISO image to a bootable USB drive. One commonly used tool is the Windows USB/DVD Download Tool. Although, EaseUS Partition Master is the best ever tool to perform such types of operations easily on any Windows version.
3. How do I burn an ISO file on Windows 8?
To burn an ISO file on Windows 8, you can follow these steps:
Step 1. Pick a reliable ISO burning software such as EaseUS Partition Master. Install it on your PC/Laptop.
Step 2. Open the software and select the option to burn an ISO image.
Step 3. Locate the ISO file on your computer.
Step 4. Choose the USB drive as the destination for burning the ISO file.
Step 5. Initiate the burning process.
How Can We Help You
About the Author
Updated by Joey Albert
Joey is an enthusiast of science and technology. With a passion for uncovering the latest tech innovations, she creates clear, engaging how-to guides that make technology accessible and enjoyable for all.
Sherly joined EaseUS in 2022 and she has always loved writing articles and enjoys the fun they bring. She receives professional training here, focusing on product performance and other relative knowledge. She has written over 200 articles to help people overcome computing issues.
Product Reviews
-
I love that the changes you make with EaseUS Partition Master Free aren't immediately applied to the disks. It makes it way easier to play out what will happen after you've made all the changes. I also think the overall look and feel of EaseUS Partition Master Free makes whatever you're doing with your computer's partitions easy.
Read More -
Partition Master Free can Resize, Move, Merge, Migrate, and Copy disks or partitions; convert to local, change label, defragment, check and explore partition; and much more. A premium upgrade adds free tech support and the ability to resize dynamic volumes.
Read More -
It won't hot image your drives or align them, but since it's coupled with a partition manager, it allows you do perform many tasks at once, instead of just cloning drives. You can move partitions around, resize them, defragment, and more, along with the other tools you'd expect from a cloning tool.
Read More
Related Articles
-
M.2 Temperature Monitor | How to Check M.2 Temperature [Step-by-Step]
![author icon]() Cici/2026/06/29
Cici/2026/06/29 -
How to Merge D and E Drive (No Data Loss)
![author icon]() Oliver/2026/06/17
Oliver/2026/06/17 -
ScanDisk Windows 10: How to Scan and Repair Drive Windows 10/8/7
![author icon]() Jean/2026/06/30
Jean/2026/06/30 -
Hard Drive Failure: How to Check & What to Do
![author icon]() Sherly/2026/06/30
Sherly/2026/06/30


