
Content
Page Table of Contents
About the Author
Hot Topics
If your Windows 11 PC shows low disk space, you may need to extend a partition to free up room for new files and programs. Windows includes an "Extend Volume" feature in Disk Management to enlarge partitions. However, many users find the option greyed out.
If this happens to you, don't worry. This guide explains why "Extend Volume" becomes unavailable in Windows 11 and shows alternative methods to fix it, including how to extend C drive Windows 11. So, let's begin right away!
Why Extend Volume Greyed Out
When Windows 11 system drive is entirely full, you can shift or transfer your files and programs to free up some disk space. You can extend it with unallocated on the hard drive. But, here is the deal. The "Extend Volume" option under the Disk Management tool is only active when there is adjoining unallocated space available in the volume you wish to extend. Thus, the option of extend volume greyed out windows 11 due to the following reasons:
- The hard drive partition that you want to enlarge is not an NTFS file system partition. It is because Microsoft enables the Extend Volume feature in the Disk Management Utility when there is RAW or NTFS partition
- There is no contiguous unallocated space behind the primary partition that you want to extent
- When no unallocated space is available on dynamic disks
Next, we will discuss some useful solutions to fix extend volume greyed out. If you think this passage is helpful, click the social buttons below to share it with other people.
How to Fix Extend Volume Greyed Out
In order to fix the issue of extend volume greyed out windows 11, you can use two methods. Now, let's discuss them one by one.
Option 1: Fix Extend Volume Greyed Out Windows 11 with No Adjacent Unallocated Space
Option 2: Free Up Space Next to Drive
Option 3: Fix Extend Volume Greyed Out Windows 11 with "Shrink Volume"
Option 1: Fix Extend Volume Greyed Out Windows 11 with No Adjacent Unallocated Space
If you don't have unallocated space right next to your primary volume, then you can solve the issue of extended volume greyed out Windows 11 with EaseUS Partition Master. It is one of the best, most reliable, and fastest ways to extend partition. You can use the "Resize/Move" feature to add free or unallocated space. The steps to use this professional tool are easy to execute. Thus, you don't require any skills to use EaseUS Partition Master. Below are the instructions that you'll have to follow:
Step 1. Right-click on the D: partition with enough free space and select "Allocate Space".
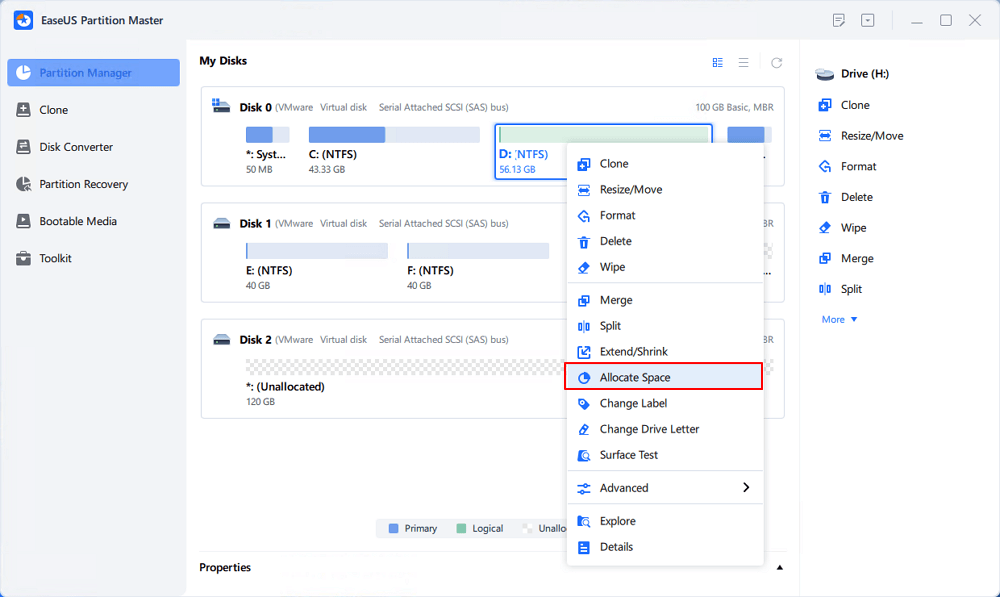
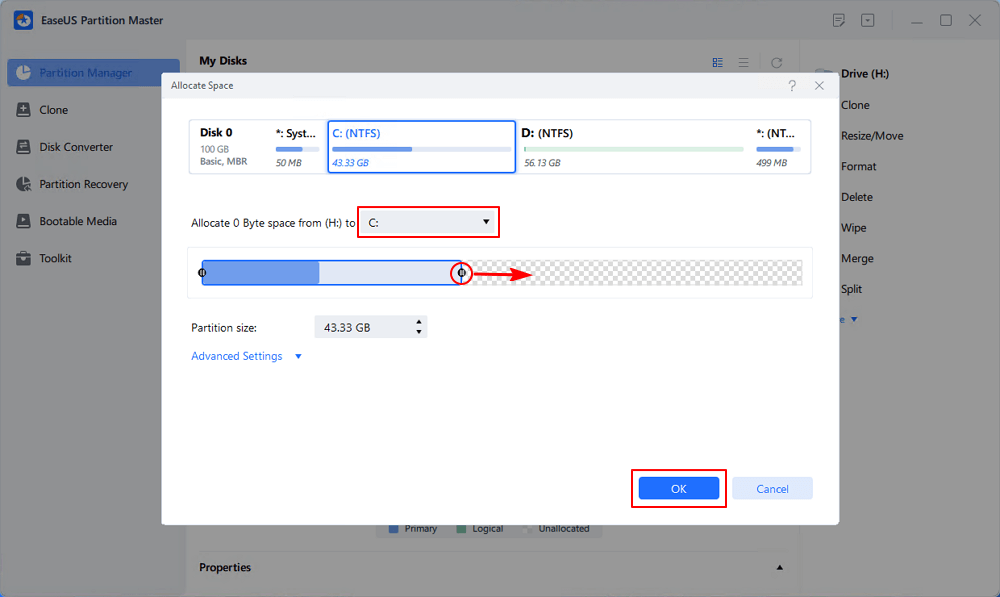
Step 2. Select the target partition - C: drive and drag the partition panel rightward to add the free space from D: drive to C: drive. Then click "OK" to confirm.
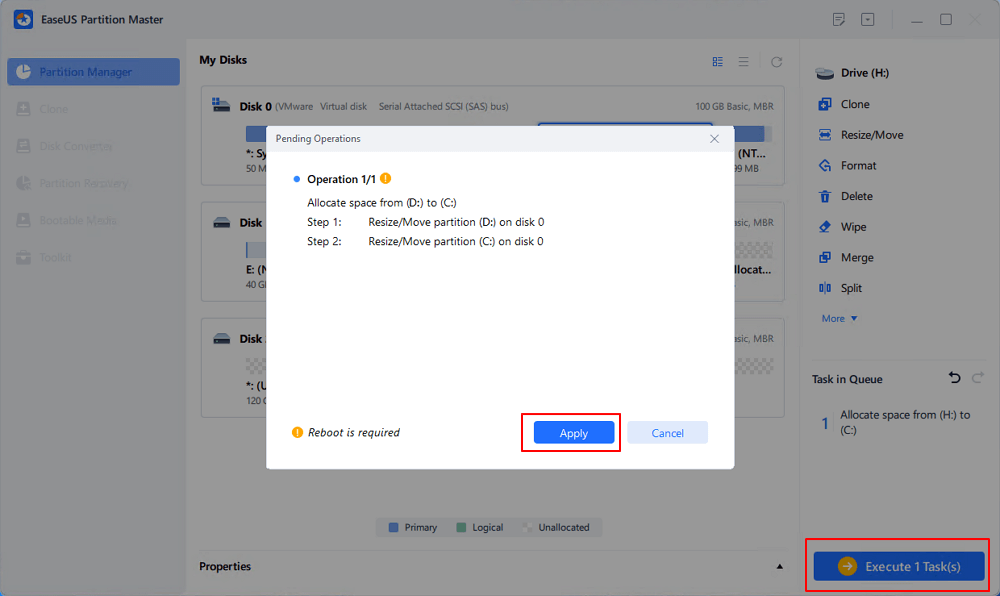
Step 3. Click the "Execute Task" button and click "Apply" to start the process of moving free space from D: drive to C: drive.
Isn't it easy to get rid away with the issue of extended volume greyed out Windows 11 with EaseUS Partition Master? Indeed it is! Relax if you are unable to extend C drive with the same error on Windows 11 computers, take EaseUS partition manager software and follow this tutorial page to fix unable to extend C drive successfully. On the contrary, if you want to partition a hard drive, EaseUS Partition Master can also help you.
Option 2: Free Up Space Next to Drive
If you want to extend C drive volume but you find that extend volume is greyed out in Windows 11, that's because there is no free or unallocated space after the drive C partition. Thus, you need to delete a blank or useless partition. It will leave free space or unallocated space next to the primary volume. So, to get rid of the issue of extend volume greyed out windows 11 with Disk Management Utility, follow the below mentioned instructions:
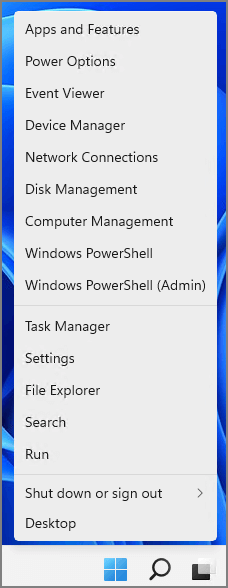
Step 1: Press the combination of "Windows + X" keys and click on the "Disk Management" option.
Step 2: Right-click on the empty or useless partition next to the primary volume. Click on the "Delete Volume" option.
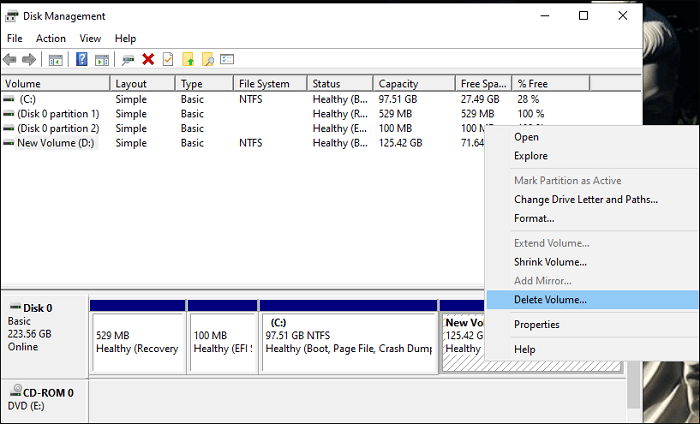
Note: Go with the delete option only if it doesn't have your data, or you can move the files of the partition to another one before deleting.
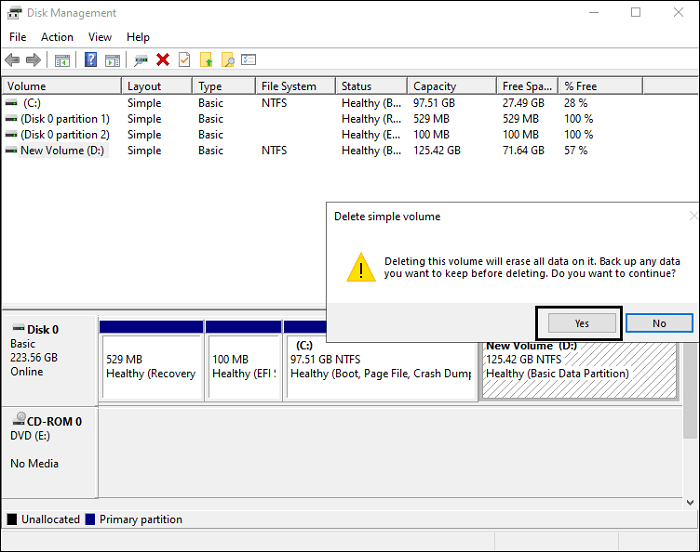
Step 3: Click on the "Yes" option on the warning message. You'll see that the partition has free space.
Step 4: Click on the "Delete Partition" option once more.
With this, you will be able to extend the volume of the primary partition. Moreover, you will not face the issue of extend volume greyed out windows 11.
Option 3: Fix Extend Volume Greyed Out Windows 11 with "Shrink Volume"
If you do not wish to use the "Delete Volume" option under the Disk Management utility, then you can shrink the volume of the partition in order to get free or allocated space. It will solve your issue of how to fix extend volume greyed out windows 11. Here is what you are required to follow:
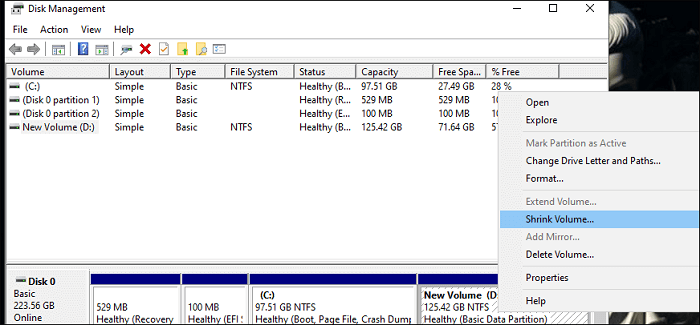
Step 1: With the "Windows + X" keys, click on the "Disk Management" option.
Step 2: Right-click on the neighboring partition that has sufficient space and click on the "Shrink Volume" option.
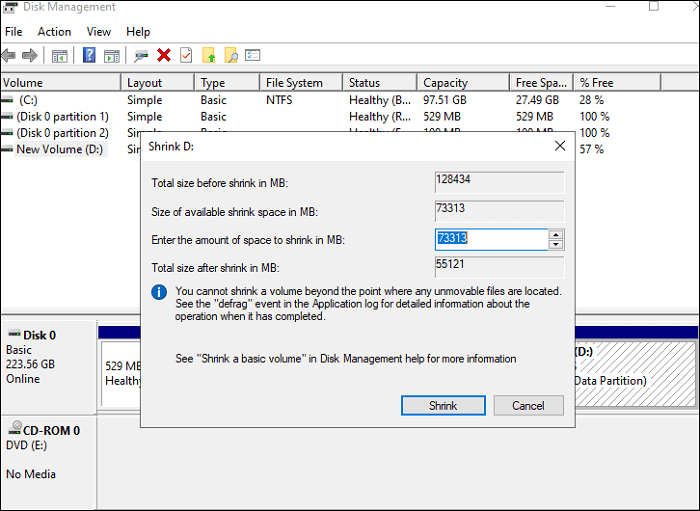
Step 3: Write the amount of space that you want to shrink. Click on the "Shrink" option and hit "Ok" to confirm.
Now, you can extend the volume of the target partition without facing the error of extend volume greyed out Windows 11.
Conclusion
That's all about solving extend volume greyed out windows 11. All the above-mentioned options will help you in fixing the error of Extend Volume greyed out. But, if you are looking around for a reliable and effective tool, then look no further than EaseUS Partition Master tool. With this, you will not have to delete any partition even when you don't have enough allocated space. Moreover, while using this partition master, your data will also remain safe from data loss.
FAQs
In addition, this part lists several relevant tips about this topic. Please get an overview of them below if you're interested.
1. Why is Extend Volume greyed out in Windows 11?
Because there is no unallocated space immediately next to the partition you want to extend. Disk Management only supports extending into adjacent unallocated space.
2. Can I extend a partition if the unallocated space is on the left side?
No, Disk Management requires unallocated space to be on the right (after) the partition. If it’s on the left, the option will be greyed out.
3. Does the file system affect Extend Volume availability?
Yes, only NTFS (and ReFS in some cases) supports extending. FAT32, exFAT, or other file systems will disable the “Extend Volume” option.
4. Why can't I extend the C drive in Windows 11?
Because a Recovery Partition or another system partition is blocking the unallocated space. This prevents Disk Management from extending C:.
5. Can I move partitions to enable the Extend Volume option?
Not in Disk Management. You need a third-party tool like EaseUS Partition Master to move partitions and make unallocated space adjacent.
6. Does MBR vs. GPT affect extending volumes?
The answer is YES. MBR disks have more limitations (a maximum of 2 TB per partition and only 4 primary partitions). These restrictions can cause the Extend Volume to be greyed out.
How Can We Help You
About the Author
"I hope my articles can help solve your technical problems. If you are interested in other articles, you can check the articles at the bottom of this page. Similarly, you can also check my Twitter to get additional help."
Written by Tracy King
Tracy became a member of the EaseUS content team in 2013. Being a technical writer for over 10 years, she is enthusiastic about sharing tips to assist readers in resolving complex issues in disk management, file transfer, PC & Mac performance optimization, etc., like an expert.
Product Reviews
-
I love that the changes you make with EaseUS Partition Master Free aren't immediately applied to the disks. It makes it way easier to play out what will happen after you've made all the changes. I also think the overall look and feel of EaseUS Partition Master Free makes whatever you're doing with your computer's partitions easy.
Read More -
Partition Master Free can Resize, Move, Merge, Migrate, and Copy disks or partitions; convert to local, change label, defragment, check and explore partition; and much more. A premium upgrade adds free tech support and the ability to resize dynamic volumes.
Read More -
It won't hot image your drives or align them, but since it's coupled with a partition manager, it allows you do perform many tasks at once, instead of just cloning drives. You can move partitions around, resize them, defragment, and more, along with the other tools you'd expect from a cloning tool.
Read More
Related Articles
-
How to Check SSD Speed [Step-by-Step Guide]
![author icon]() Sherly/2026/06/17
Sherly/2026/06/17 -
How to Clone A Hard Drive on Windows 11? 2026 Guide
![author icon]() Tracy King/2026/06/17
Tracy King/2026/06/17 -
Samsung Data Migration Download for Windows 11/10🔥
![author icon]() Tracy King/2026/06/17
Tracy King/2026/06/17 -
Fix High RAM Memory Usage Issue on Windows 11/10 [10 Practical Fixes]
![author icon]() Brithny/2026/06/17
Brithny/2026/06/17


