
Content
Page Table of Contents
About the Author
Hot Topics
C drive will be out of space after installing too many programs or updating the Windows system, which is the most common issue in Windows-based computers. To fix this problem, you can use the Windows Disk Management tool to extend the C drive with free space. However, you may find the extend volume option greyed out, and cannot extend the C drive.
The reasons why you are unable to extend the C drive vary. Calm down. In this guideline, EaseUS will explain all the potential reasons why this happens and provide four solid methods that apply for different reasons.
How to Fix Unable to Extend C Drive - 4 Methods
Before coming straight to the point, let's look at the overview of these four methods in the following basic information table:
| ⏱️Duration | 5-8 Minutes |
| 💻Goal | Solve unable to extend C drive |
| 🧰Required tool |
Disk resize tool - EaseUS Partition Master🥇 Windows built-in tool - Disk Management🥈 |
| 🛠️Methods |
If you cannot extend the C drive, the following potential reasons may cause this problem:
- No unallocated space on your disk: If your C drive has no free space, follow the Way 1/2/4.
- No adjacent unallocated Space: If you already have free space but not next to the C drive, go for Way 1 or 2 to learn how to fix it.
- System restriction: Windows won't allow users to allocate the space from the extended partition to extend the C drive. Try Way 1 or 2.
- The disk only has one partition(C drive): In this case, you can allocate space from another disk using EaseUS Partition Master, following way 3.
Way 1. Extend C Drive with or without Adjacent Unallocated Space
Windows only allows users to extend a partition with free space beside or behind it. Don't worry. If you have unallocated space on the hard drive, whether adjacent or non-adjacent to the C drive, you can retort to EaseUS Partition Master Professional, which is your most reliable disk space management software.
It can provide multiple solutions to fix the "unable to extend the C drive" issue. First, its "Resize/move" tool empowers users to resize the C drive with or without non-adjacent space. EaseUS Partition Master also helps partition a hard drive.
Here are the steps on how to resize the C drive space:
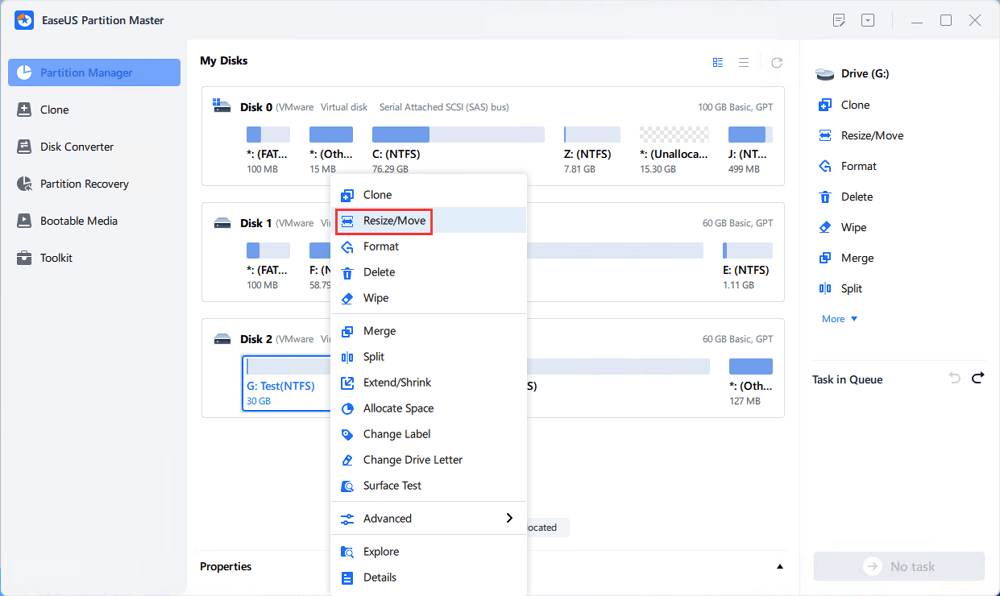
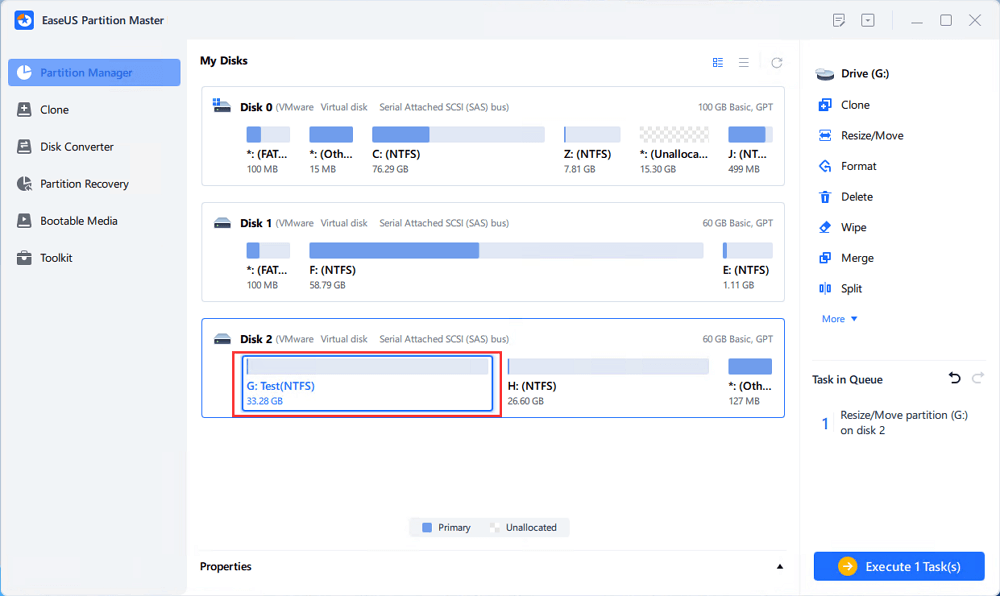
Step 1: Locate and select the target drive/partition
Launch EaseUS Partition Master and go to Partition Manager, select the target drive or partition you need to adjust its size, right-click on it and choose "Resize/Move".
Step 2: Resize or move the partition
1.To shrink the partition, simply drag one of its ends to free up unallocated space. Once done, click "OK".
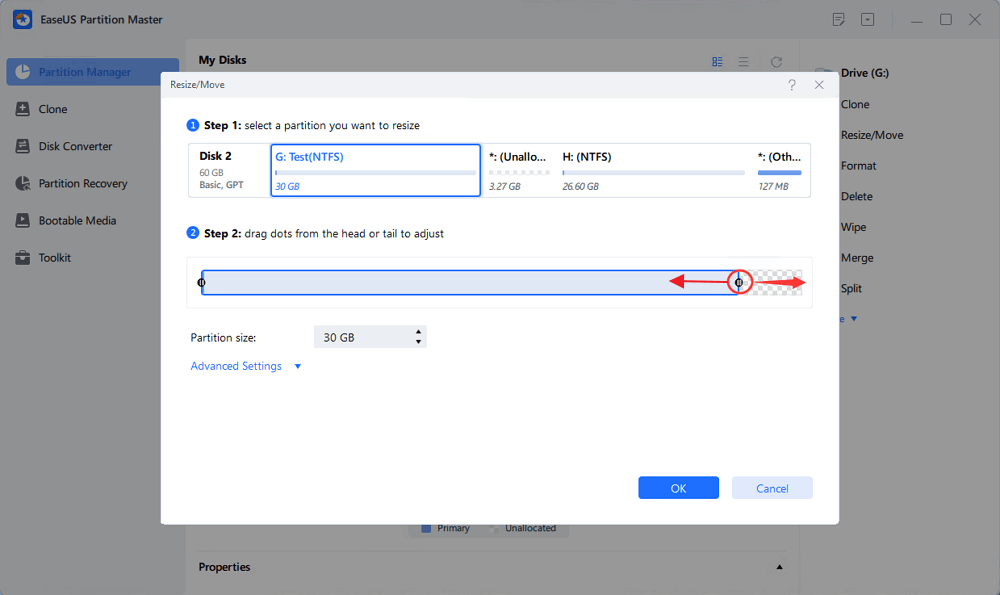
2. To extend the partition, make sure that there is unallocated space aside (if there isn't, follow the above steps to create some). In the same way, drag your mouse into the unallocated space. Click "OK".
3. To move a partition position, suppose you have created and left the unallocated space next to the target partition. If no, free up some unallocated space first.
Then, right-click the target partition, select "Reize/Move". Then drag the whole partition leftward or rightward to adjust its position. Click "OK" to confirm.
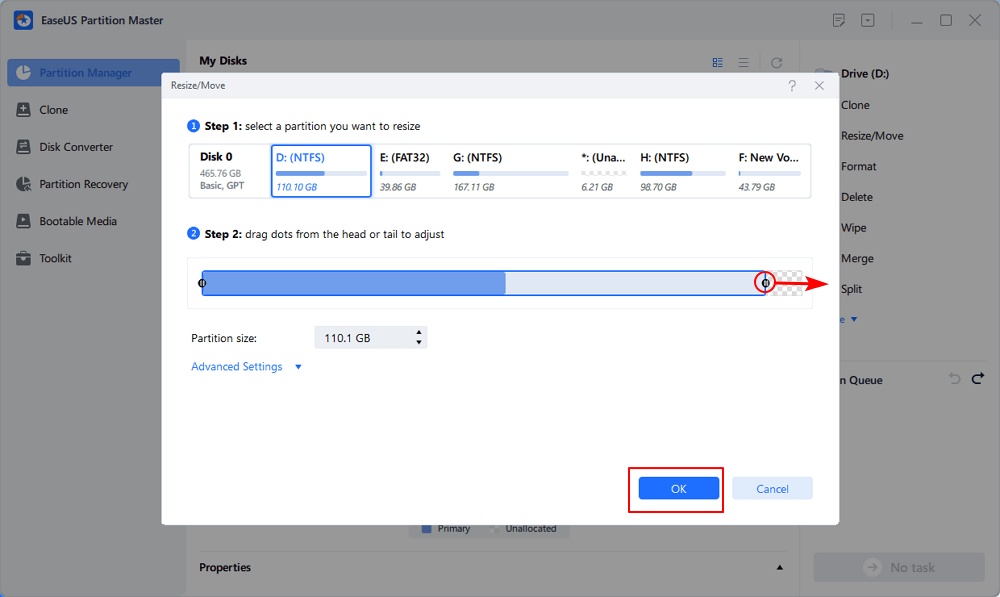
Step 3: Confirm the result and apply changes
At this step, you will see the new disk partition information & diagram.
To save changes, click the "Execute Task" button and then "Apply".

If these instructions don't fully address your situation, our customer support experts are prepared to offer tailored advice.
EaseUS System Volume or Disk Partitioning Services
Click here to contact EaseUS Partition Master experts for free
EaseUS experts are available to provide you with 1-on-1 manual services (24*7) and help extend C drive or disk partitioning issues. Our experts will offer you FREE evaluation services and efficiently diagnose and resolve low disk space in C drive or other partition problems using their decades of experiences.
- 1. C drive gets full but unable to extend it with unallocated space.
- 2. Extend volume greyed out and unable to increase C drive space.
- 3. To extend C drive with a second disk without losing any data.
Way 2. Allocate Unallocated Space from Another Partition
If you don't have any unallocated space on your hard drive, you can apply EaseUS Partition Master to extend the partition without unallocated space. With its "Allocate Space" tool, you can easily merge free space from another partition to extend the C drive.
Follow the simple tutorial to allocate space and extend the C drive:
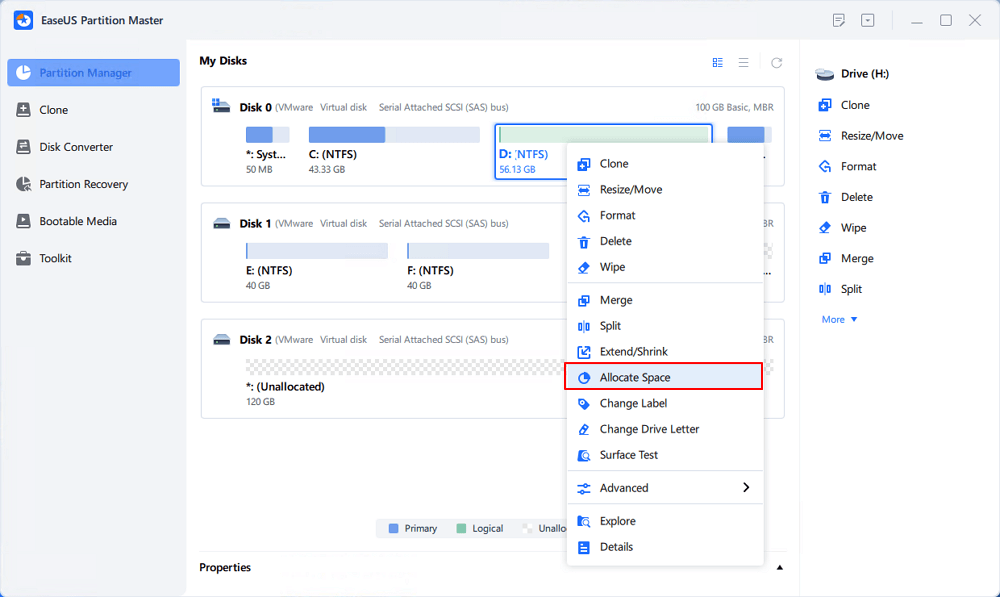
Step 1. Right-click on the D: partition with enough free space and select "Allocate Space".
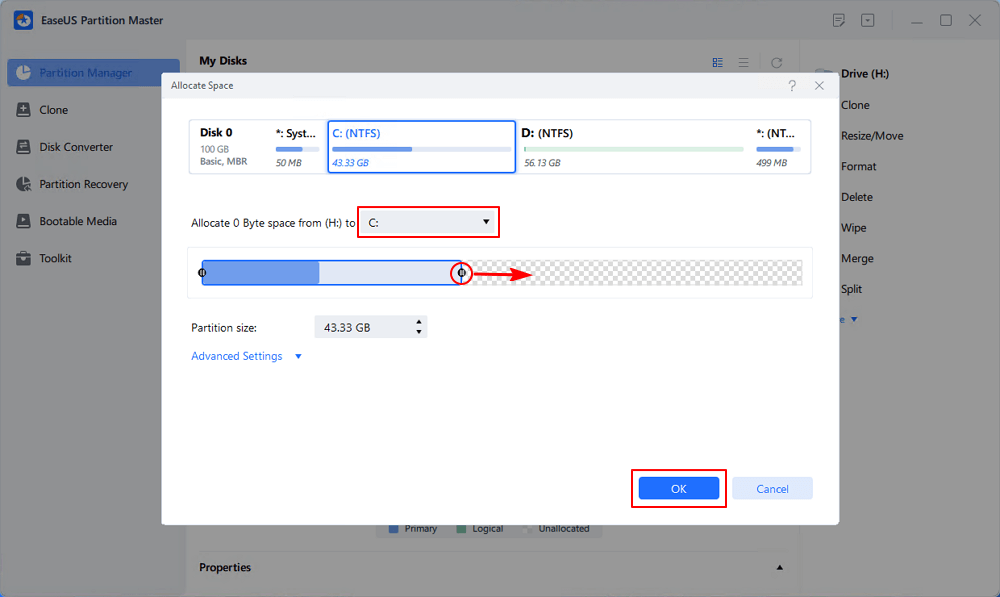
Step 2. Select the target partition - C: drive and drag the partition panel rightward to add the free space from D: drive to C: drive. Then click "OK" to confirm.
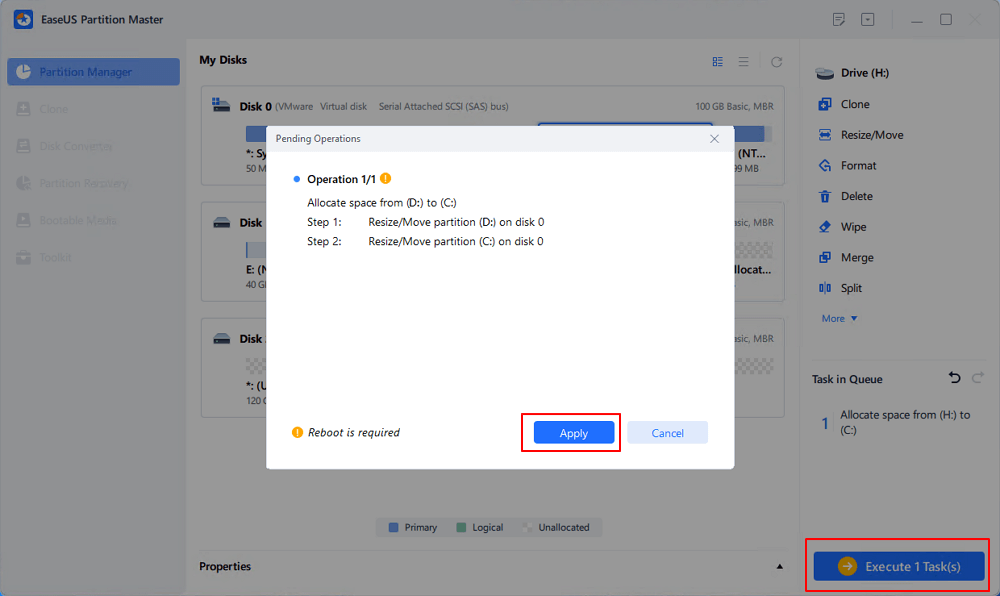
Step 3. Click the "Execute Task" button and click "Apply" to start the process of moving free space from D: drive to C: drive.
Way 3. Extend C Drive with a Second Drive
EaseUS Partition Master can help you extend the C drive with a send disk. Below is your specific guide:
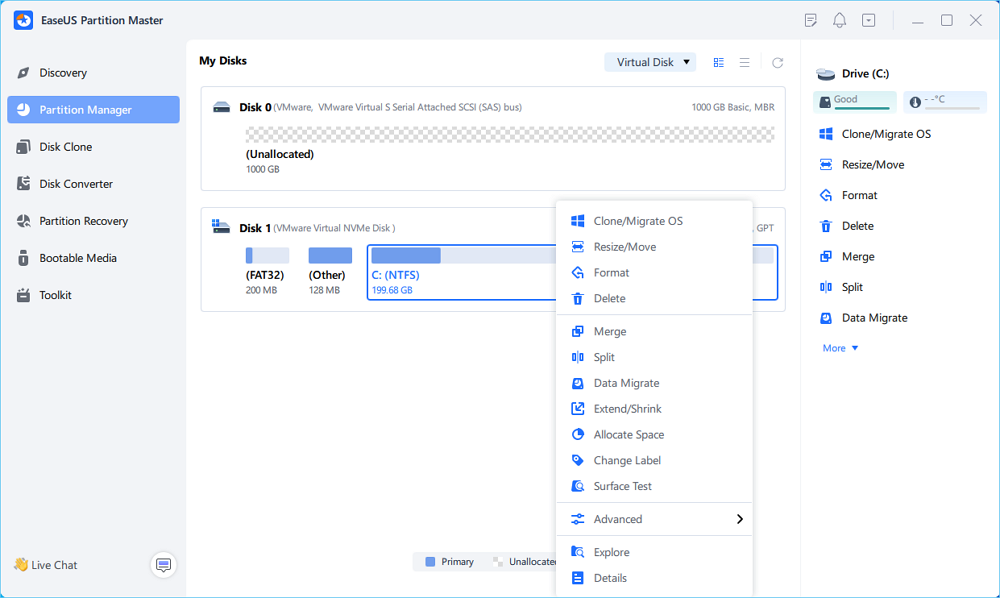
Step 1. Launch EaseUS Partition Master, navigate to "Partition Manager," right click the C drive, and select "Data Migration."
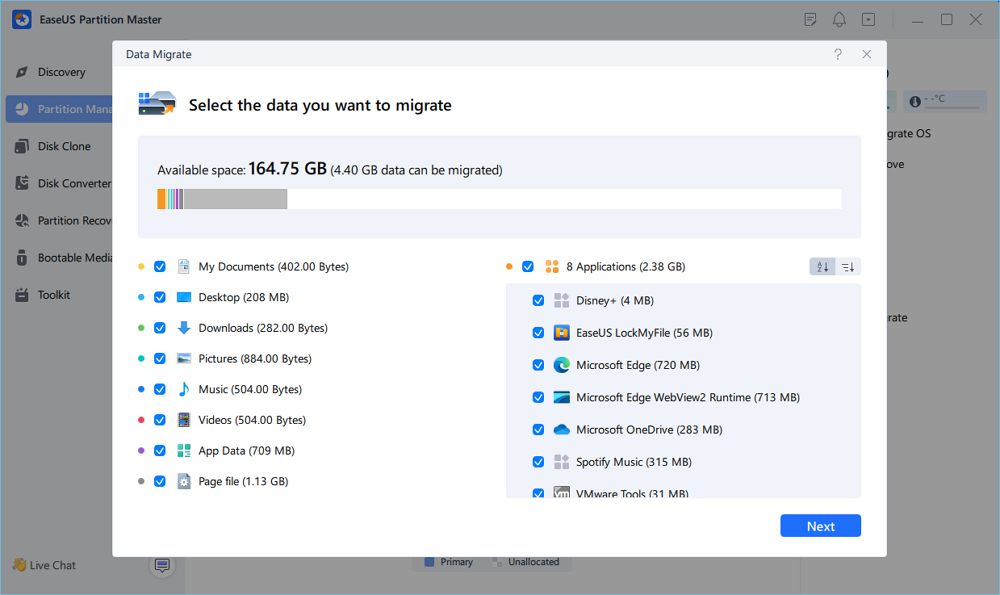
Step 2. Select the data you want to migrate and click "Next" to continue.
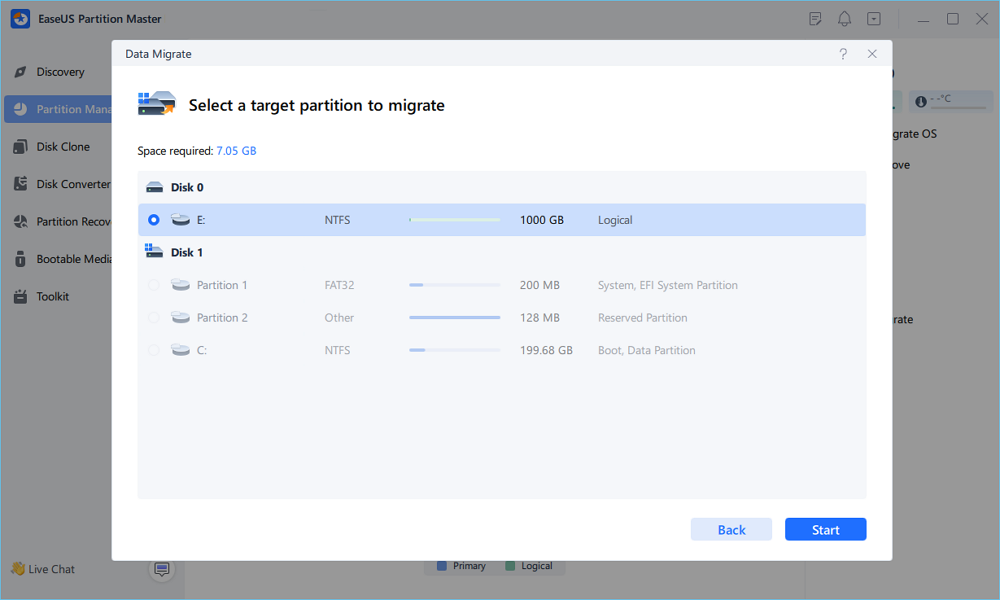
Step 3. Select a target partition to migrate and click "Start" to execute the task.
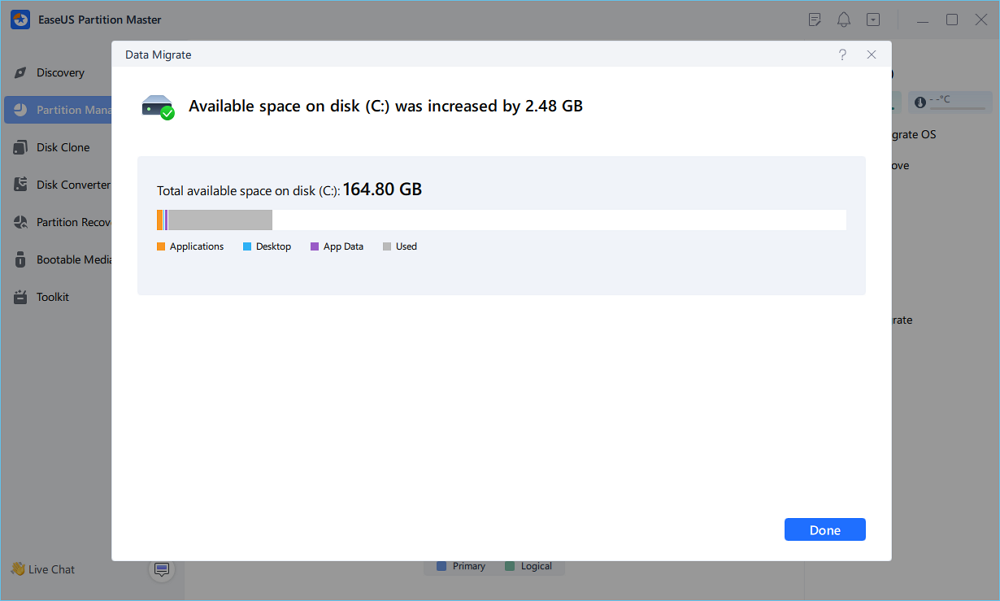
Step 4. After the migration, the available space on the C drive will be increased.
If you like this tool and it does help you allocate space to increase C drive, share it to help more of your friends online:
Read Also: If you are a Windows 11 user, EaseUS Partition Master also helps to extend your C drive size.
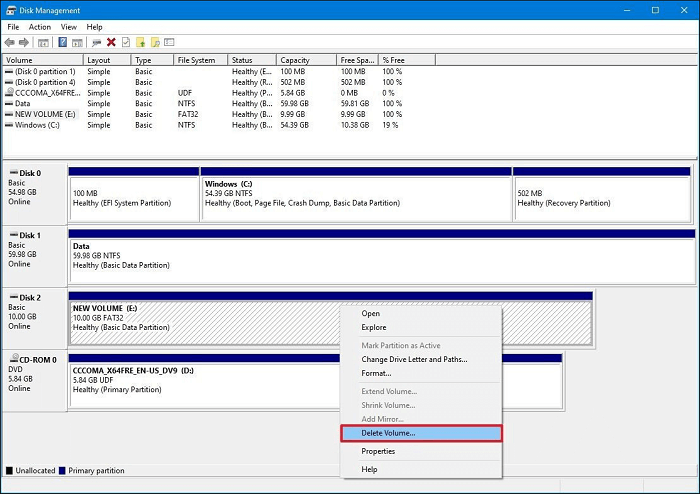
Way 4. Delete Volume to Create Unallocated Space
If you prefer Disk Management, you need to remove or shrink the adjacent partition to create unallocated space behind the C drive, which is complicated and tends to lose data. Thus, the first move is to back up your data unless this partition is useless or empty. Below is the full guide on how to delete volume via Disk Management:
Stage 1. Delete volumes to create free space.
- Press the "Windows + X" keys to launch "Disk Management."
- Right-click the partition next to the target C drive, choose "Delete Volume," and click "OK."
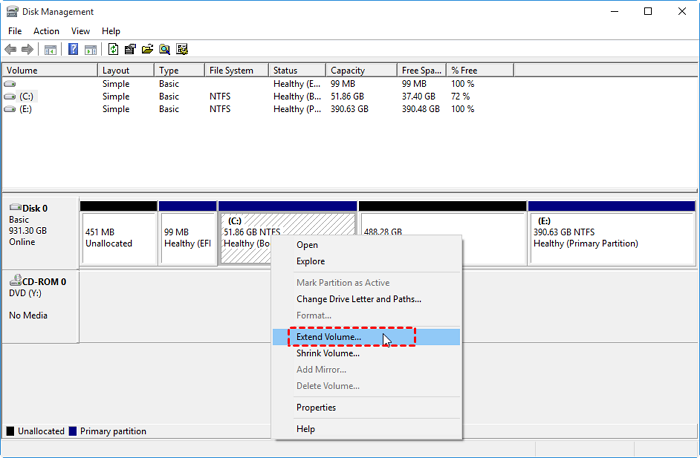
Stage 2. Increase the space of the C drive.
- Right-click the C drive and select the "Extend Volume" feature to adjust its size.
- Click "OK" to confirm the process.
If you have partitions with a lot of space, you can choose to shrink them and make unallocated space, referring to the related article:
How to Shrink Partition in Windows 11/10
This article will introduce three ways of shrinking partitions in Windows 10/11 to address the problem of "insufficient unallocated space."
Why Unable to Extend C Drive?
After successfully solving the "unable to extend the C drive" problem, let's explore the reasons for this issue in detail. Continue to read and view the main reasons listed below to learn why the extend volume option is greyed out in your Disk Management.
- Without Unallocated Space: To extend a partition with Disk Management, you must ensure enough unallocated space on the target disk.
- Non-adjacent Unallocated Space: Due to the Windows limitation, Disk Management can only support increasing the partition size with contiguous unallocated space.
- Only Supported NTFS/Raw File System: Extend Volume in Disk Management only applies to RAW or NTFS partitions. Thus, you cannot extend a FAT or other file systems on a Windows system.
Here are the mainstream social media platform links that enable you to share this helpful post quickly:
Conclusion
When there is no unallocated space or contiguous free space on your hard drive, the extend volume option will become greyed out, and you cannot extend the C drive. Beyond the two reasons, this post also mentioned two more reasons, including the 2 TB restriction of MBR and the incompatible file system.
Additionally, we offered five helpful ways to fix this problem caused by the four common reasons. As a versatile disk utility, EaseUS Partition Master provides all-around solutions that empower you to break the limitations of Windows and fix the "unable to extend the C drive" issue. Moreover, we prepared some passages introducing other fantastic features of the EaseUS Partition Master.
FAQs About Unable to Extend C Drive
You may have solved the inability to extend the C drive problem using the above-mentioned methods. In this part, we have listed several related questions, and you can check the answers below:
1. How do I force extend my C drive?
If your hard disk has insufficient unallocated space, you can allocate space from another drive using a professional drive manager - EaseUS Partition Master. Below is a detailed guide on how to do it:
Step 1. Download this tool, right-click on another partition with enough free space, and select "Allocate Space."
Step 2. Set the target partition as the C drive and drag the partition panel rightward to add the free space from another drive to the C drive. Then click "OK" to confirm.
Step 3. Click the "Execute Task" option and choose "Apply" to allocate free space.
2. How do I extend the C drive with my recovery partition?
The recovery partition is the last resort for restoring a crashed computer. So, deleting the recovery partition to extend the C drive is not recommended. You can use EaseUS Partition Master to merge non-adjacent space to the C drive. Learn the specific tutorial below:
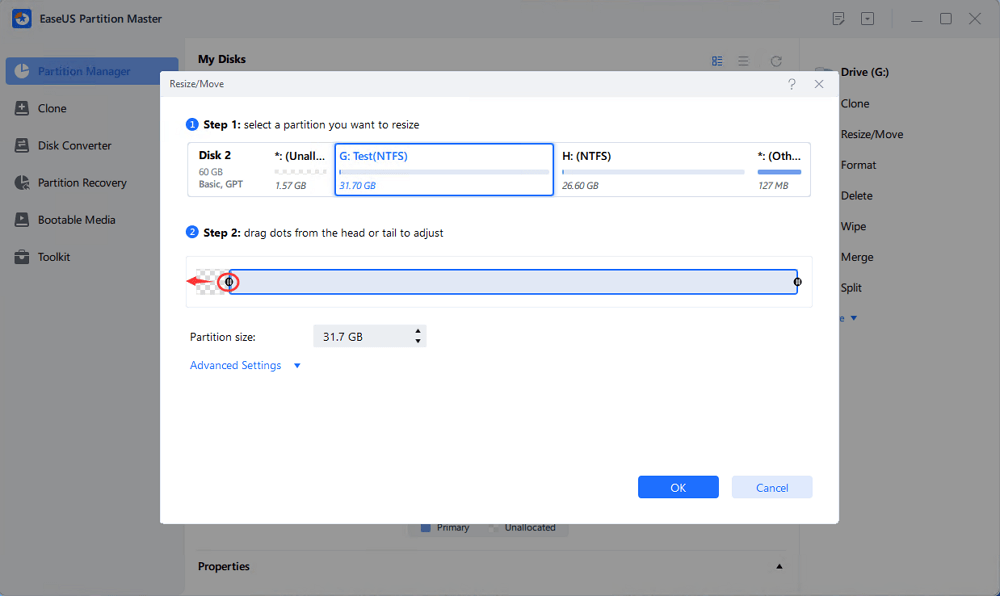
Step 1. Go to Partition Manager to locate the C drive and apply the "Resize/Move" feature.
Step 2. Drag the partition end to add the unallocated space into the C drive and click "OK" to ensure.
Step 3. Hit the "Execute Task" button and click "Apply" to proceed.
3. Why is my extended volume option greyed out?
When the Extend Volume option on your computer is grayed out, it's because there is no unallocated space on your hard drive, or no available free space, which means it is not adjacent to the partition you want to extend. That's why the "Extend Volume" option is disabled and greyed out.
How Can We Help You
About the Author
Updated by Joey Albert
Joey is an enthusiast of science and technology. With a passion for uncovering the latest tech innovations, she creates clear, engaging how-to guides that make technology accessible and enjoyable for all.
Cici is the junior editor of the writing team of EaseUS. She accepted the systematic training on computers at EaseUS for over one year. Now, she wrote a lot of professional articles to help people resolve the issues of hard drive corruption, computer boot errors, and disk partition problems.
Product Reviews
-
I love that the changes you make with EaseUS Partition Master Free aren't immediately applied to the disks. It makes it way easier to play out what will happen after you've made all the changes. I also think the overall look and feel of EaseUS Partition Master Free makes whatever you're doing with your computer's partitions easy.
Read More -
Partition Master Free can Resize, Move, Merge, Migrate, and Copy disks or partitions; convert to local, change label, defragment, check and explore partition; and much more. A premium upgrade adds free tech support and the ability to resize dynamic volumes.
Read More -
It won't hot image your drives or align them, but since it's coupled with a partition manager, it allows you do perform many tasks at once, instead of just cloning drives. You can move partitions around, resize them, defragment, and more, along with the other tools you'd expect from a cloning tool.
Read More
Related Articles
-
Unable to Extend C Drive Windows 11? Fix It Now!
![author icon]() Sherly/2026/06/17
Sherly/2026/06/17 -
How to Fix Hard Drive Very Slow in Windows 10/8/7
![author icon]() Jean/2026/07/01
Jean/2026/07/01 -
3 Effective Tools to Resize C Drive in Windows 7 [2026 Tutorial]
![author icon]() Tracy King/2026/06/17
Tracy King/2026/06/17 -
How to Clone Windows 11 to New Computer [Step-by-Step Guide]
![author icon]() Sherly/2026/06/17
Sherly/2026/06/17


