- Applies to: upgrade and clone Windows Server disk to a bigger, newer, and faster HDD/SSD without data loss.
- Duration: 30 minutes - 1 hour.
- Support: Windows Server 2022, 2019, 2016, 2012/2012 r2, 2008/2008 r2, etc.
Can you clone a Server hard drive? This page covers the complete guide that helps you clone a disk in Windows Server computers to a larger or bigger new hard drive or SSD without data loss or Server OS reinstallation.
If you have the same requests, follow the tips below and start your disk upgrade process now.
How Do I Clone a Windows Server Disk? 2 Methods Available
Here, we collected two reliable methods that you can turn to either method to execute disk upgrades in Windows Servers:
Which disk clone tool to choose? Here is EaseUS Editors' pick:
- For an easier way out, Method 1 with a third-party disk cloning software like EaseUS Partition Master Enterprise is more suitable for different levels of Windows Server administrators.
100% Secure
Free Inquiry
- Windows Server Backup deserves a try as it's 100% free to migrate Windows Server disk data to another drive with an even more complex process compared to Method 1.
- If you are trying to clone the entire Server OS disk to a new drive, the 1st solution can fulfill your task and ensure Windows programs and installed software are bootable after cloning.
Before You Start: Get a New Hard Drive or SSD Ready
So how do I clone a disk in Windows Server and upgrade to a larger or faster new HDD or SSD? Before you start, you need to get the new disk ready for disk upgrade cloning. Here is a list of quick guides that you can follow to get the new disk ready:
- Prepare a new mechanical hard drive or hybrid HDD-SSD with an even larger storage capacity to upgrade the Windows Server data disk.
- Prepare a faster and even larger SSD if your goal is to move Windows Server OS disk.
- Install and initialize the new disk in Windows Server.
So how to initialize a new disk in Windows Server? First, you can directly install the new disk to Windows Server and open Disk Management to initialize HDD or SSD for free.
Let's get started cloning your disk on the Windows Server now. Also, don't forget to share this tutorial guide to help more Server owners online:
#1. Clone Windows Server Disk with Disk Cloning Software
- Tool: 3rd party disk cloning software - EaseUS Partition Master Enterprise with its Disk Copy feature.
- Supported: Windows Server 2022/2019/2016/2012/2008, etc.
The most efficient way to upgrade and clone a disk in Windows Server computers is turning to reliable Windows Server disk clone software. EaseUS Partition Master Enterprise with Disk Cloner feature enables any Windows Server users to clone and upgrade the disk to a new one with success.
100% Secure
Free Inquiry
Here is the complete guide of cloning a Windows Server disk to a new and larger SSD or HDD:
Step 1. Select the source disk.
- Click the "Clone" from the left menu. Select the "Clone OS Disk" or "Clone Data Disk" and click "Next".
- Choose the source disk and click "Next".
Step 2. Select the target disk.
- Choose the wanted HDD/SSD as your destination and click "Next" to continue.
- Read Warning message and confirm "Yes" button.
Step 3. View the disk layout and edit the target disk partition size.
Then click "Continue" when the program warns it will wipe out all data on the target disk. (If you have valuable data on the target disk, back up it in advance.)
You can select "Autofit the disk", "Clone as the source" or "Edit disk layout" to customize your disk layout. (Select the last one if you want to leave more space for C drive.)
Step 4. Click "Start" to start the disk cloning process.
After this, you can reboot the PC, and your data will be completely cloned to the new disk in Windows Server. Well, you can get support from our experts by clicking the link below.
EaseUS OS or Disk Cloning Online Services
Click here to contact EaseUS Partition Master experts for free
EaseUS experts are available to provide you with one-on-one manual services (24*7) and help solve system or disk cloning startup issues. Our experts will offer you free evaluation services and efficiently diagnose and resolve disk cloning or system disk boot problems using their decades of experiences.
- 1. Target disk becomes unbootable or SSD won't boot after clone.
- 2. Target disk is unable to boot after performing customized partition operations.
- 3. To seamlessly clone OS disk to new drive and boot PC without any issues.
Stay calm if some of you cloned the Windows Server OS disk to a new drive, but the computer fails to boot after cloning. It could be two issues that stop you from accessing and running Windows Server systems:
- 1. You failed to configure the newly cloned disk as a boot drive. Read: Set Cloned Drive as Boot Drive.
- 2. You need to configure boot mode for the OS disk: MBR - Legacy, GPT - UEFI. Read: Disable/Enable UEFI Mode.
Aside from cloning disk in Windows Server, EaseUS Partition Master Enterprise can also help you better manage disk partition space with the following features:
- Fix "Can't Extend Volume" error in Windows Server
- Extend C drive or Increase Partition Size
- Convert GPT to MBR or Convert MBR to GPT without Losing Data
- Wipe or erase hard drive partition in Windows Server
100% Secure
Free Inquiry
#2. Back Up Server Data and Restore to A New Disk with Windows Server Backup
- Tool: Microsoft Windows Server Backup.
- Supported: Windows Server 2022/2019/2016/2012/2008, etc.
Windows Server users may turn to Windows Server Backup for a free disk upgrade solution for help. Though Windows Server Backup is a disk partition data backup tool, it's still a perfect alternative solution for Windows Server disk clone.
Experienced Windows Server users can turn to this method for a try. And here is the complete procedure of backing up and restoring hard drive data to another drive:
First, Backup Windows Server Hard Drive
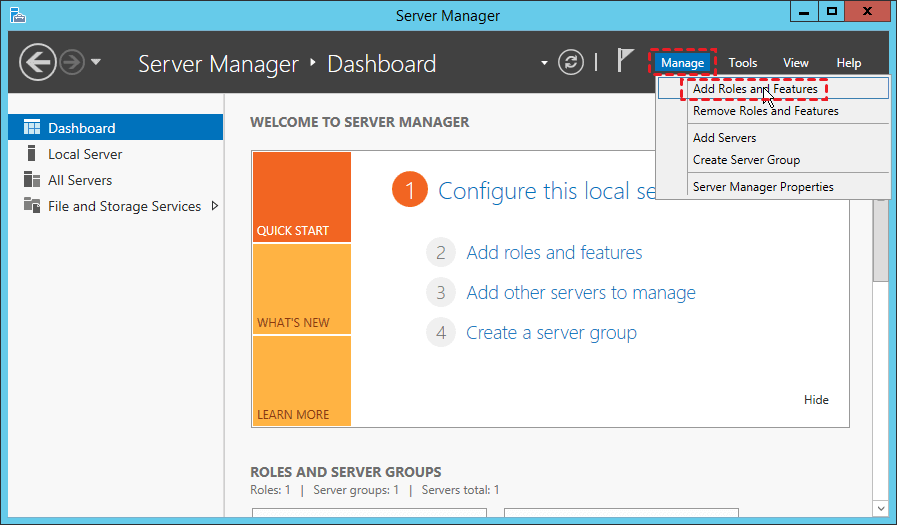
- Lanch Windows Server Manager, go to Server Manager, click "Manage", and select " Add Roles and Features".
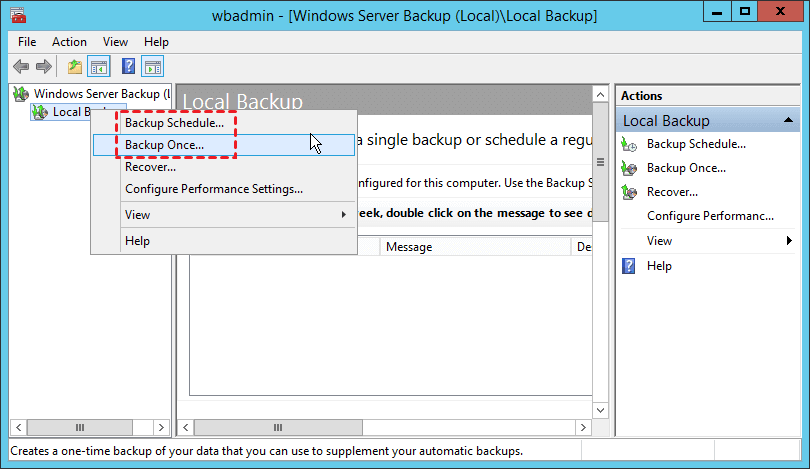
- Click "Tools" in Server Manager, select "Windows Server Backup" and click "Local Backup".
- Select "Backup Schedule..." or "Backup Once...", here you can select "Backup Once...".
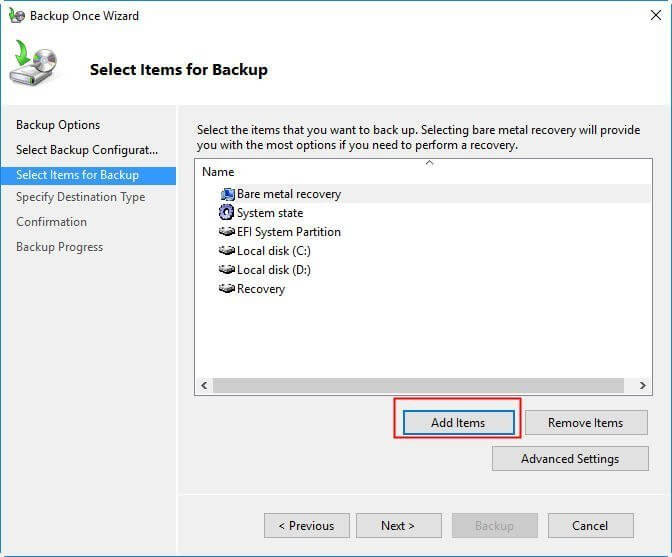
- Click "Select Items for Backup" on the left pane, basically "Bare metal recovery" is the default option that most users may choose as it provides you with the most options for recovery.
- Click "Add Items" > "Backup" to stat back up your disk.
Next. Restore Disk Content Backup to Another Drive
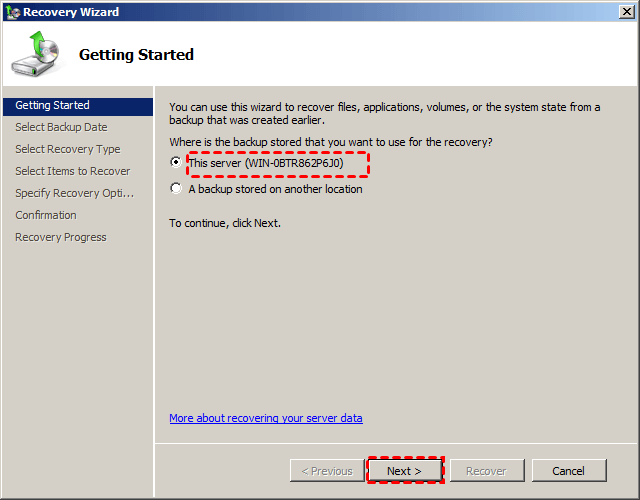
- Open Windows Server Backup, click "Local Backup" and select "Recover".
- On the Getting Started window, select "This Server" and click "Next" to start the disk backup recovery.
- Select the backup date, recovery time, items to restore, and navigate to restore the backup to a new disk that you added to the computer. Click "Recovery" to start.
After this, all you need is to wait for the process to complete.
Bonus Tip: What to Do with the Old Drive after Disk Clone
What will you do with the old drive after you successfully cloned or moved all disk data to the new drive? To clean up the old drive is the basic need. However, some of you may also want to use the disk. So how to manage the old drive?
EaseUS disk manager software - Partition Master Enterprise provides you with a complete resolution to clean up and re-partition the old drive in a few simple clicks.
100% Secure
Free Inquiry
1. Clean Up Old Drive
We've set two options for you to wipe data. Choose the one you need.
Option 1. Wipe Partition
- Right-click the partition you want to erase data from, and choose "Wipe".
- In the new window, set the time for which you want to wipe your partition, then click "OK".
- Click the "Execute 1 Task(s)" button in the lower right corner, check the changes, then click "Apply".
Option 2. Wipe Disk
- Select the HDD/SSD. And right-click to choose "Wipe Disk".
- Set the number of times to wipe data. (You can set to 10 at most.) Then Click "OK".
- Click "Execute 1 Task(s)" and then click "Apply".
2. Partition Cleaned Drive
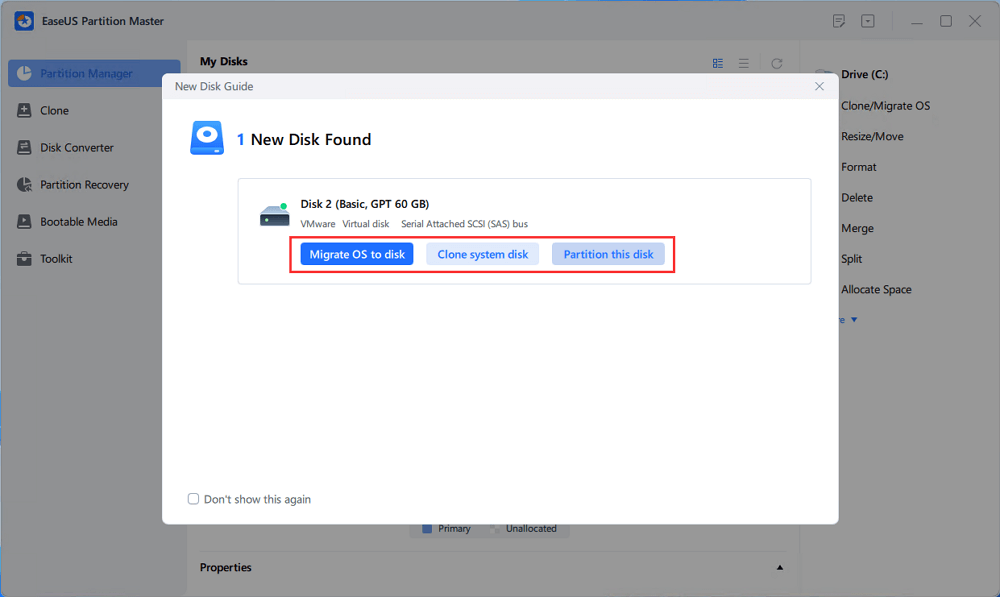
Step 1. Open EaseUS Partition Master, go to Partition Manager and click "Partition this disk" on the popped-up New Disk Guide window.
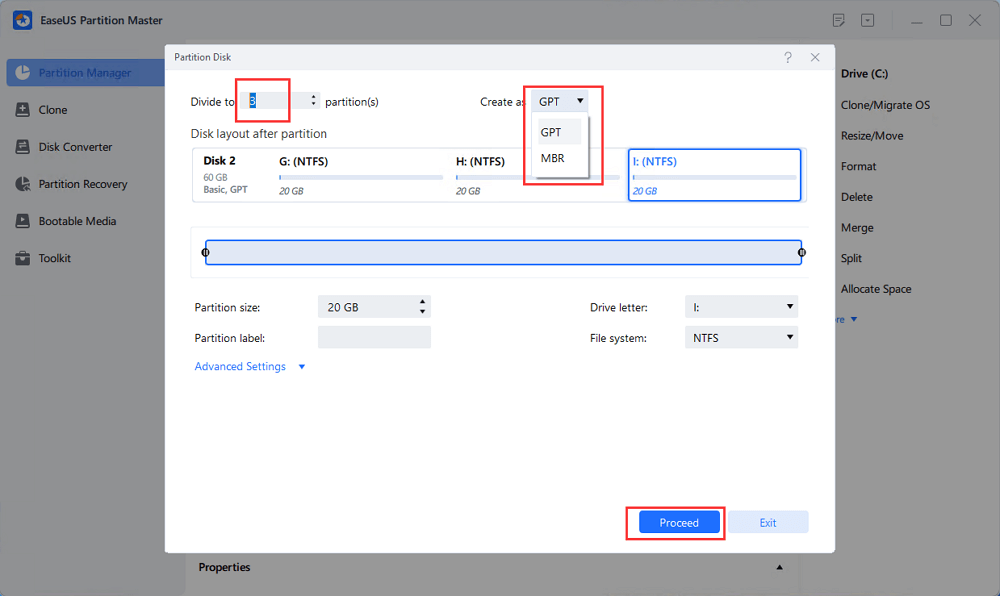
Step 2. Set the number of partitions you need to create, and set the partition style to your disk - MBR or GPT.
Or, you can accept the default setting offered by EaseUS Partition Master. Once done, click "Proceed".
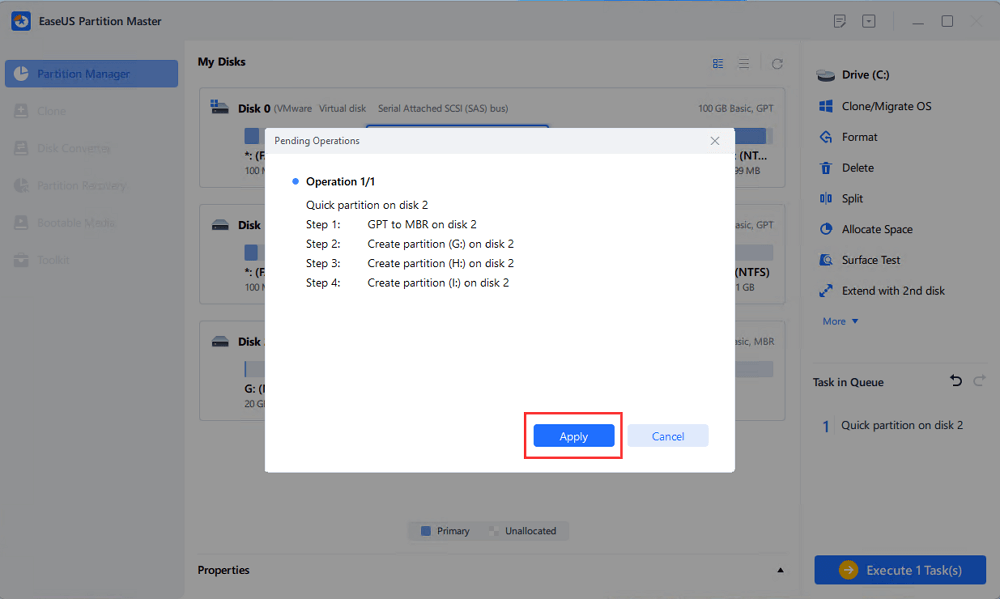
Step 3. Click "Execute 1 Task" and "Apply" to finalize partitioning the new HDD/SSD or external disk.
Clone Disk in Windows Server Is Easy with Reliable Disk Cloning Software
When you are with the listed issues in the Windows Server disk, it's time that you should clone to upgrade the Server disks:
- Data or system disk becomes full.
- Windows Server computer slows down as the disk is getting full.
- System C drive gets full in Windows Server without further free space to extend.
On this page, we provide the complete guide to help Windows Server users clone and upgrade their Server computer disks to a larger and newer drive with ease. As long as you get the new drive ready, you can turn to either method provided on this page to succeed in the disk upgrade operation.
For an easier solution, don't miss the free disk cloning software - EaseUS Partition Master Enterprise, and pick the right edition to upgrade your disk instantly.
100% Secure
Free Inquiry
FAQs About Clone Windows Server Disk
If you have other questions of cloning Windows Server disks, take a view of the following questions and find answers below quickly.
1. Can you clone a Windows Server?
Yes, you can clone a Windows Server disk to another drive with reliable disk cloning tools. On this page, we offered you two methods: 1. EaseUS Partition Master Enterprise - for all levels of Windows Server owners, IT services providers and business owners. 2. Windows Server backup - upgrade disk with Server built-in tool.
2. How do I clone a physical Windows Server?
To clone a physical Windows Server, you need to first think about if you want to clone the entire Windows Server disk to a new drive or you merely need to clone and migrate the Windows Server system to a new disk.
If you simply want to clone the Windows Server disk to another drive, revert to the guide above on this page, you have two disk cloning methods for help.
If you want to transfer the Windows Server system to another disk, you can turn to this tutorial page for a guide: Migrate Windows Server OS to new Drive.
3. How do I clone a Windows Server 2016 to another drive?
To clone Windows Server 2016 disk to another drive, follow the guide on this page for help.
To clone Windows Server 2016 OS only to another drive, here is the guide:
- Connect or install a new disk to your Windows Server 2016.
- Initialize the new disk to the same partition style as the Windows Server 2016 OS disk - MBR or GPT.
- Run EaseUS Partition Master Enterprise and select "Clone", click "Clone OS".
- Select the target new disk and click "Execute 1 Task".
- Click "Apply" to start cloning and migrating Windows Server 2016 to a new disk.
Was This Page Helpful?
Updated by Tracy King
Tracy became a member of the EaseUS content team in 2013. Being a technical writer for over 10 years, she is enthusiastic about sharing tips to assist readers in resolving complex issues in disk management, file transfer, PC & Mac performance optimization, etc., like an expert.
Related Articles
-
Download Partition Magic Freeware for Windows 10/11 Disk Partitioning [Don't Miss It]
![author icon]() Tracy King/Jun 29, 2026
Tracy King/Jun 29, 2026 -
How to Partition SD Card for Android
![author icon]() Daisy/Jun 17, 2026
Daisy/Jun 17, 2026 -
Why Can't Format USB to NTFS? Follow to Learn the Causes and Fixes [2026 Tutorial]
![author icon]() Tracy King/Jul 01, 2026
Tracy King/Jul 01, 2026 -
Windows 11 Install: Windows Cannot be Installed to This Disk GPT
![author icon]() Tracy King/Jun 17, 2026
Tracy King/Jun 17, 2026