
Content
Page Table of Contents
About the Author
Hot Topics
Are you looking for a way to install Windows 10/11 on Steam Deck? Don't worry. EaseUS Software provides a complete guide to install Windows on Steam Deck on SD card or SSD. In the following article, you will have a detailed understanding of installing Windows OS on Steam Deck, including a step-by-step guide and some troubleshooting options.

View the Necessary Information to Install Windows on Steam Deck:
| ⏱️Duration | depending on the situation, at least an hour or more is required |
| 🧑💻Use for | Install Windows 10/11 on Steam Deck |
| ✍️Required Tools | SD card, USB drive, Windows computer, Windows license... |
| ✂️Step-by-step guide |
1️⃣Stage 1. Download the Windows ISO File 2️⃣Stage 2. Install Windows on the SD Card 3️⃣Stage 3. Download the Steam Deck Driver on Windows |
For other solutions to install Windows without product key, please check the following article:
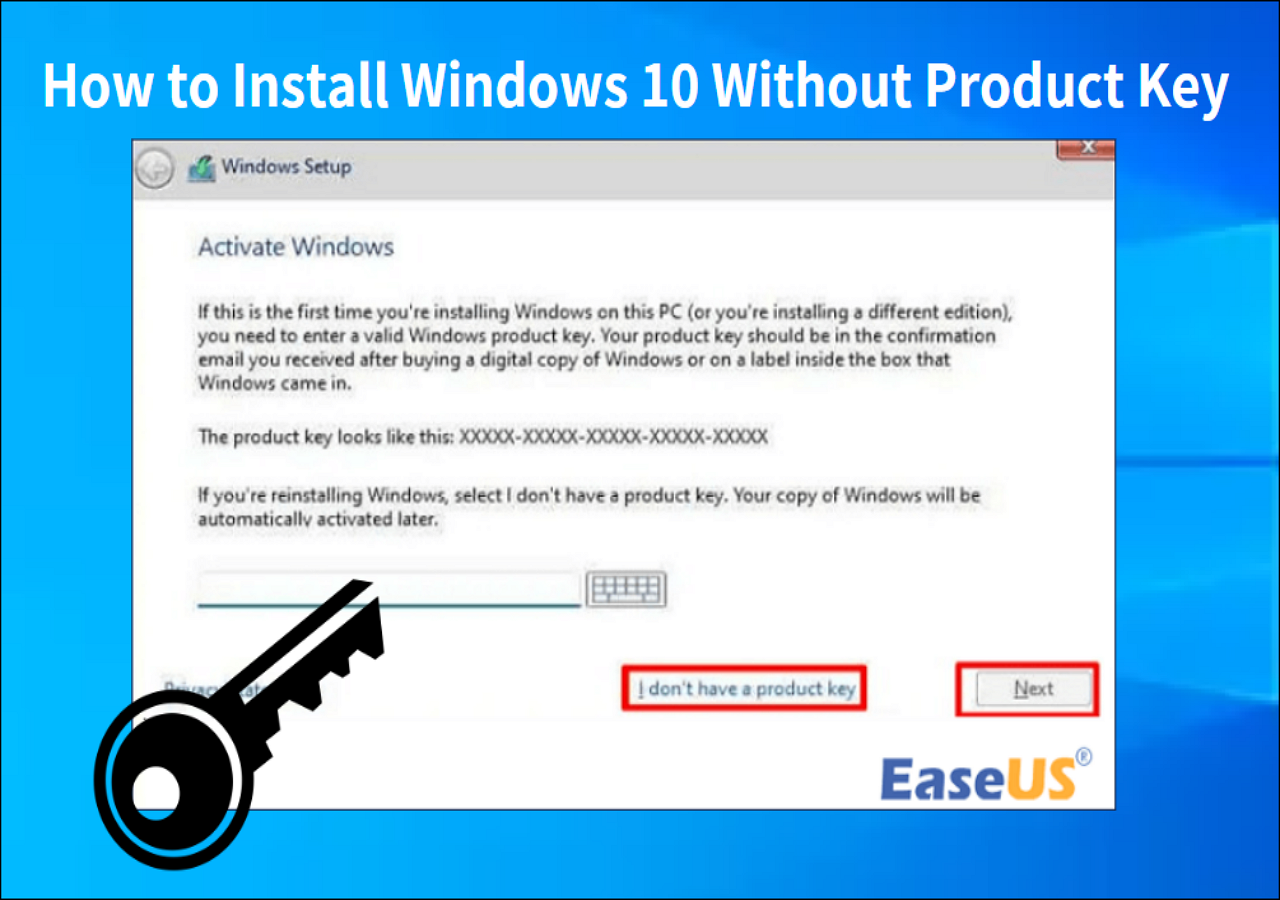
How to Install Windows 10 Without Product Key
You can install Windows 10 without product key by downloading the Windows 10 ISO from Microsoft. This page will offer a comprehensive solution on how to do it.
Can I Install Windows on Steam Deck?
Of course, Windows 11 and Windows 10 will also work on Steam Deck with the official Vale drivers. Some users have sought help with the issue on the forums:
The user just wants to install Windows on Steam Deck and has succeeded. The case confirms that this operation is feasible. Installing Windows on Steam Deck allows you to turn Steam Deck into a laptop replacement and dual boot Windows OS and SteamOS.
If you are not sure about the process, don't worry. Follow this page to learn how to install Windows on your Steam Deck onto an internal solid-state drive (SSD) and microSD card. If you found this guide helpful, please click the button below to share this article to help more people.
What Do I Need Before Install Windows on Steam Deck?
Windows isn't perfect on Steam Deck, and Valve's support team won't cover these issues. That's why we need to be 100% successful when installing. The process is complex, and there are a few preparations we need to make before we can officially begin:
- Windows license and Windows PC
- Micro SD card of 32GB or more and an SD card reader
- Wired keyboard and mouse (optional)
- If you have a USB-C docking station with a card reader, you can also install Windows on an SSD.
- If you want to replace SteamOS with Windows, you'll need a separate USB drive larger than 16GB.
Once you've done the above, read on to install Windows on Steam Deck.
How to Prepare the Steam Deck SD Card to Install Windows
In addition to the above requirements, you must format your SD card to the correct file format before installing Windows 10/11 on Steam. This requirement needs to be completed by you on Windows: if you are only going to install Windows on Steam Deck, be sure to format it in NTFS format.
If you're unsure how to format your SD card, we recommend using EaseUS Partition Master Professional. This software lets you quickly format your SD card into NTFS from any other file format. Even if you're new to computers, you can master the format function.
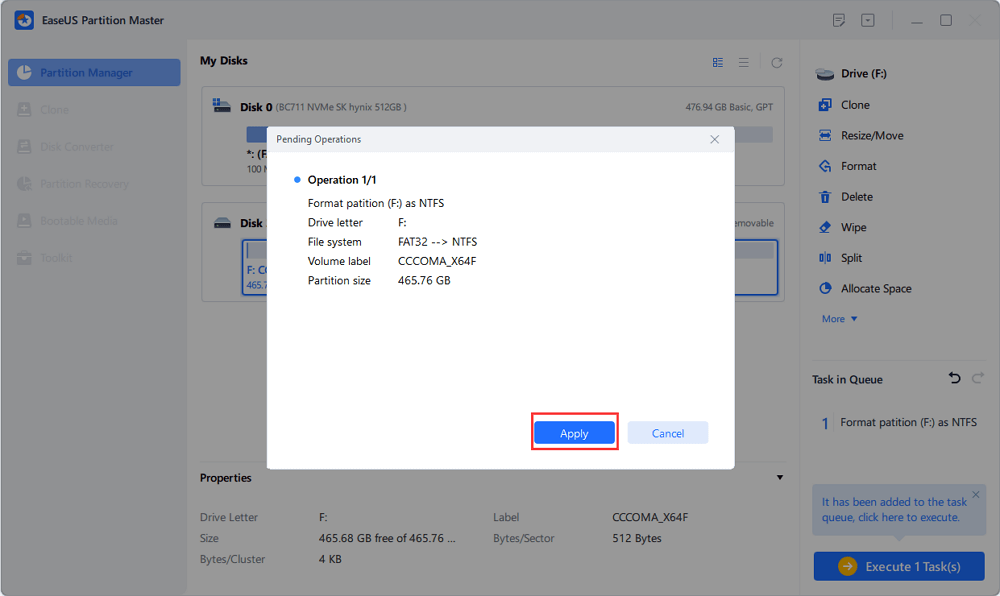
Step 1. Launch EaseUS Partition Master, right-click the partition on your external hard drive/USB/SD card which you want to format and choose the "Format" option.
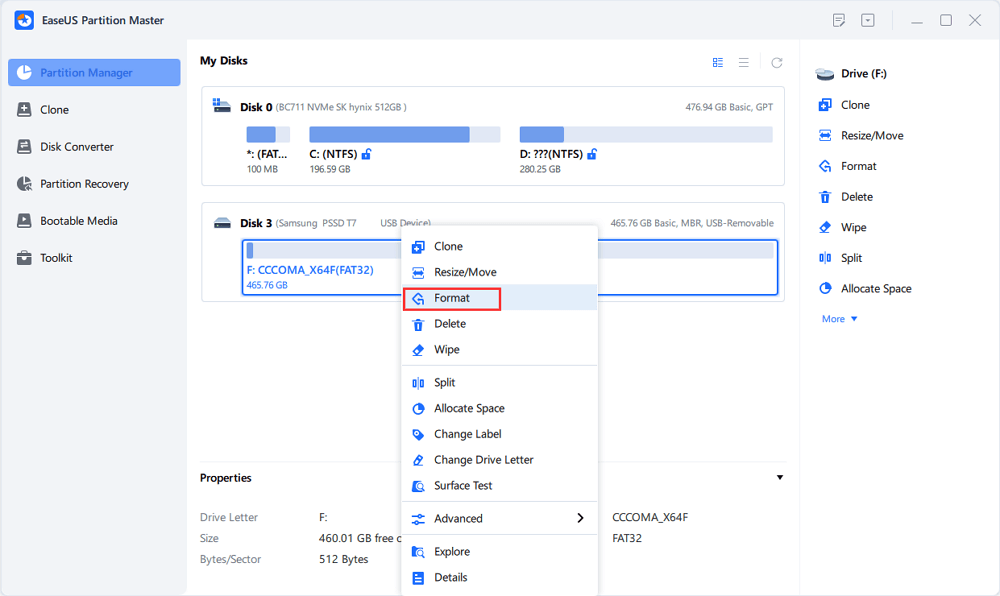
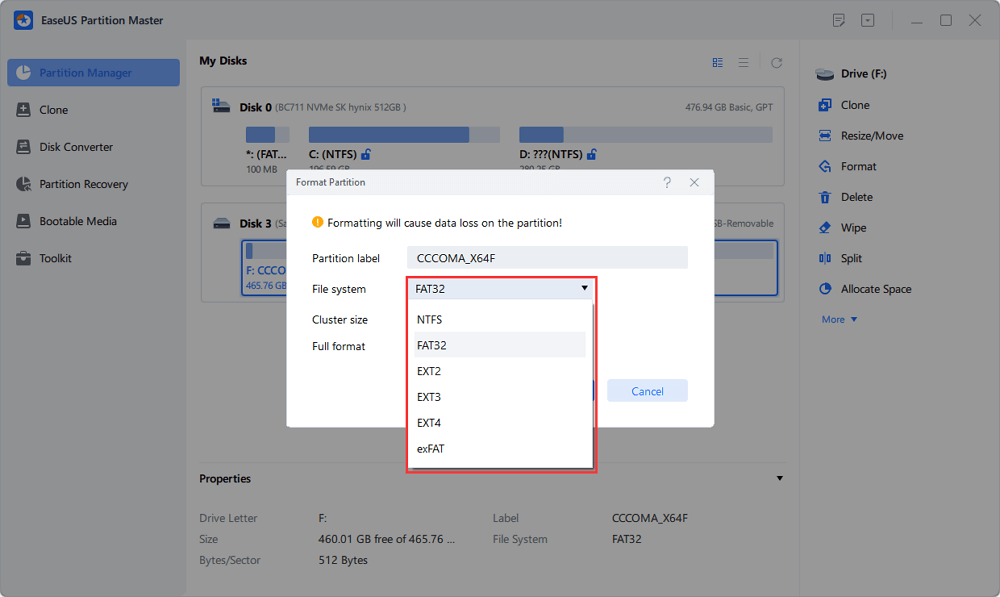
Step 2. Assign a new partition label, file system (NTFS/FAT32/EXT2/EXT3/EXT4/exFAT), and cluster size to the selected partition, then click "OK".
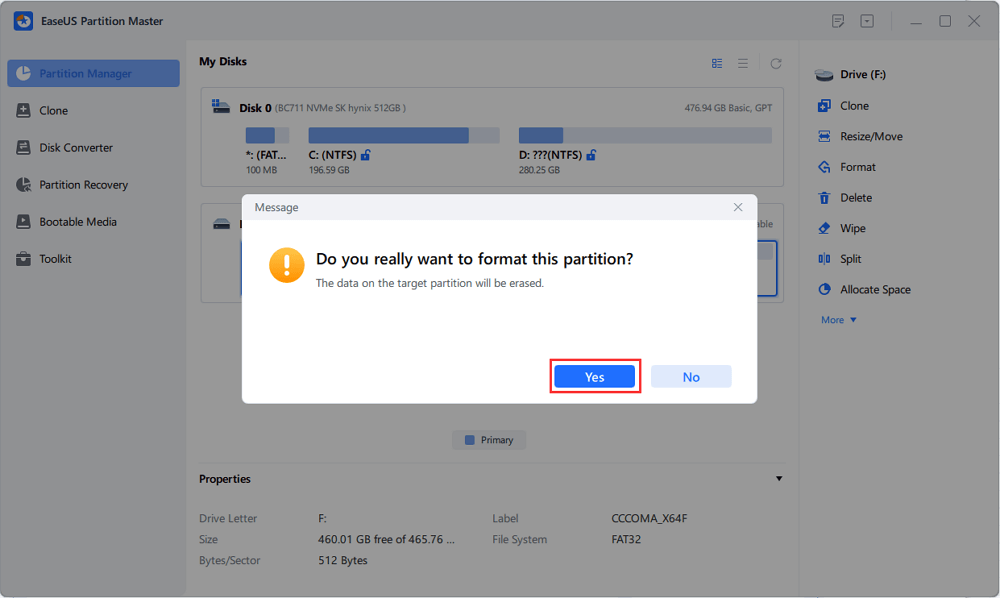
Step 3. In the Warning window, click "Yes" to continue.
Step 4. Click the "Execute 1 Task(s)" button in the top-left corner to review the changes, then click "Apply" to start formatting your external hard drive/USB/SD card.
How to Install Windows on Steam Deck - 3 Efficient Ways
There are three scenarios for installing Windows on Steam Deck:
- Install Windows on Steam Deck on the microSD card and dual boot the system: this scenario does not affect SteamOS installation.
- Install Windows on the Steam Deck's Internal SSD: in this way, you will erase the old SSD in the Seam Deck and install Windows only. We do not recommend this.
- Dual Boot Windows 11 and SteamOS: If you want to install Windows OS and SteamOS on the same partition, shrink the partition of the SteamOS SSD and install Windows along with SteamOS. This option will be more of a hassle.
Whichever option you choose, we'll provide you with the most comprehensive guidance possible. We recommend you choose the first option, where you can dual-boot Windows 11 and SteamOS by installing Windows externally on the microSD card.
Method 1. Install Windows on Steam Deck on SD Card
Installing Windows on the SD card may result in bad performance. But this is a good way to try out Windows on the Steam Deck before you decide to install it on your main system. In total, there are five stages as follows:
Stage 1. Download the Windows ISO File
On Microsoft's Windows installation media download page, select the Windows system you need and download the ISO files. The installation process is the same whether you choose Windows 11 or 10.
Download link:
- For Windows 11: https://www.microsoft.com/software-download/windows11
- For Windows 10: https://www.microsoft.com/en-hk/software-download/windows10
Step 1. Next to the option to Create Windows 11 Installation Media, click the "Download Now" button.
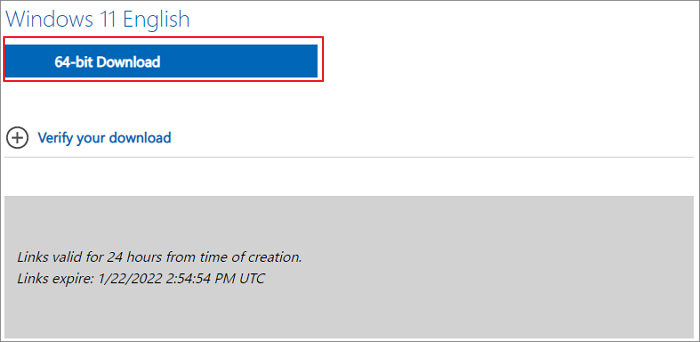
Step 2. Download the media creation tool and accept the license terms.
Step 3. Select the "ISO File" option and choose where to save it.
Stage 2. Install Windows on the SD Card
Once you have downloaded the ISO file, you must use a specialized tool to help you install Windows. Rufus can help create a bootable USB flash or SD card drive.
Download link: https://rufus.ie/
Step 1. Download the Rufus executable and run it.
Step 2. With Rufus open, select the microSD card and then select Disk or ISO Image under the Boot Selection button. Select and open the Windows ISO file.
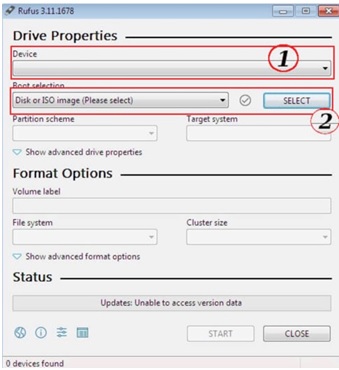
Step 3. In the Image Options option, select the Windows To Go option.
Step 4. Select the version of Windows you want to install in the new dialog window.
Step 5. Launch all options. You can leave the second box unchecked to use a Microsoft account.
Step 6. Click OK to start the installation process.
Stage 3. Download the Steam Deck Driver on Windows
Since Windows lacks native drivers for Wi-Fi, audio, and other key parts of the Steam Deck, you'll need to install the Steam Deck drivers on Windows:
Step 1. Go to the Valve website and download all the drivers.
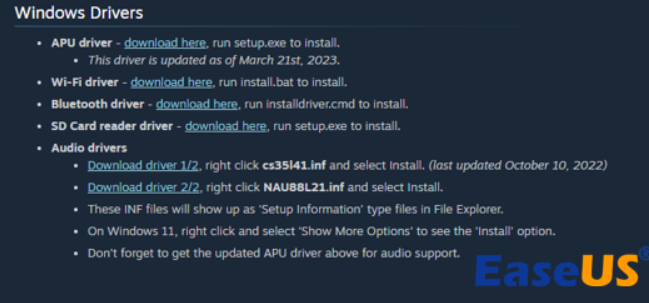
Step 2. Extract all the drivers after downloading them.
Step 3. Create a new "Steam Deck Drivers" folder on your desktop and store all extracted drivers in the same folder.
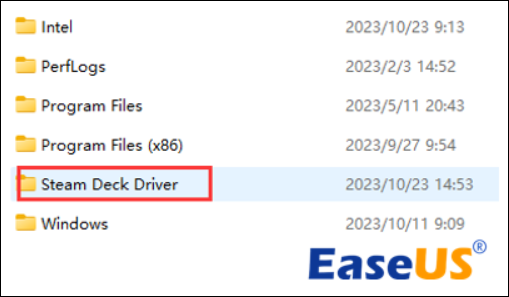
Step 4. Paste the Steam Deck Drivers folder into the microSD card you created earlier.
Stage 4. Install Windows on Steam Deck
Once you have done all the previous preparations, you can successfully install Windows on Steam Deck. Please boot from the SD card on Steam Deck first:
Step 1. Connect the SD card to Steam Deck correctly.
Related Reading: SD Card Not Showing Up on Steam Deck
Step 2. Press and hold the Volume Down and Power buttons on the Steam Deck and release both buttons when you hear a sound.
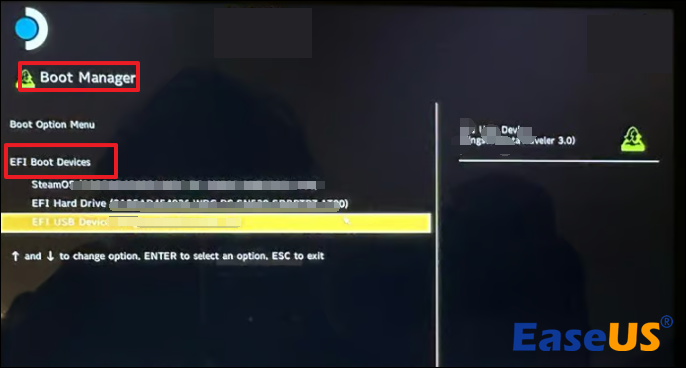
Step 3. Go to the Steam Deck Boot Manager and select the microSD card you created from the list of boot options.
Step 4. Reboot the Steam Deck from the microSD card, and you should turn the Steam Deck vertically.
Step 5. Follow the on-screen instructions to install Windows.
- Notice:
- The screen will be in portrait mode if you do not have the Deck connected to an external monitor. If your touchscreen is not responding or you are experiencing problems, plug your Steam Deck into a USB-C dock and use an external keyboard and mouse.
Step 6. Once the installation begins, select the desired options. A Wi-Fi connection is not recommended due to slow Wi-Fi speeds until the official drivers are installed. Click the I don't have Internet button in the Connect You to a Network dialog box.
Step 7. Click the Continue Limited Installation button and start Windows for the first time.
Step 8. On the desktop, change the screen orientation to landscape: Adjust it in Display Settings > Scale and Layout > Display Orientation.
Stage 5. Install the Necessary Drivers
After entering the Windows desktop, proceed to allow Windows successfully by installing the necessary Windows drivers:
Step 1. Double-click the inserted microSD card and navigate to the Steam Deck Drivers folder.
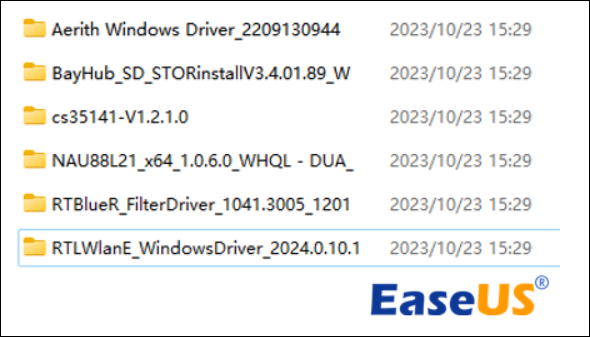
Step 2. Open a different folder to install the drivers:
- Select the first folder, Aerith Windows Driver, to install the APU driver.
- Select "BayHub_SD_STOR_install" to install the driver for SD card storage.
To install both drivers, locate the "Setup" executable files (EXE) and double-click on them.
- Right-click on the "cs35I41" file and select "Install" to install the first audio driver.
- Right-click on the "NAU88L21" file to install the second audio driver.
Installing the audio drivers will help you avoid the common problem of no audio on TVs running Steam Decks for Windows.
- Click on the RTBlueR_FilterDriver file to install the Bluetooth driver: run the installdriver.cmd file.
- Click on RTLWlanE_WindowsDriver to install the Wi-Fi driver: run installer.bat
The above steps will help you to run Windows on Steam Deck's microSD card successfully!
You May Also Like a Manual Service for Windows Installation on Steam Deck
To simplify the procedure and get Windows installed on Steam Deck, you can also try to customize a service from the EaseUS tech support team. You can handle everything to EaseUS experts and let them take the rest task for you.
EaseUS Windows Configuration Services
Click here to contact EaseUS Partition Master experts for free
EaseUS experts are available to provide you with 1-on-1 manual services (24*7) and help fix different Windows configuration issues. Our experts will offer you FREE evaluation services and efficiently diagnose and resolve Windows update errors, Windows installation, or daily OS issues using their decades of experience.
- 1. Fix Windows update errors, such as update failure, unable to upgrade Windows, etc.
- 2. Serve to download and install the latest Windows operating system on PC with success.
- 3. Provide fixes for daily Windows system errors with drivers, permission, account settings, etc., issues.
Method 2. Install Windows on the Steam Deck's Internal SSD
If you want to install Windows on the Deck's internal SSD, you will delete all data on the Steam Deck's internal drive, so please back up important data ahead of time. You will follow many of the same steps as the SD card method. However, there are some differences in the Rufus setup.
Stage 1. Download Windows Installation Media
Refer to Method 1 for Stage 1.
Stage 2. Create Bootable Installation Media
The fastest way to create Windows bootable installation media is to burn Windows ISO files to a USB drive by a professional tool. EaseUS Partition Master, as a professional yet convenient ISO Burner, allows you to burn Windows 11/10 to USB/CD and install Windows from it.
Download the tool for free and follow the steps below to create bootable installation media. The tool has a simple interface, so you don't need to worry about the difficulty of operation.
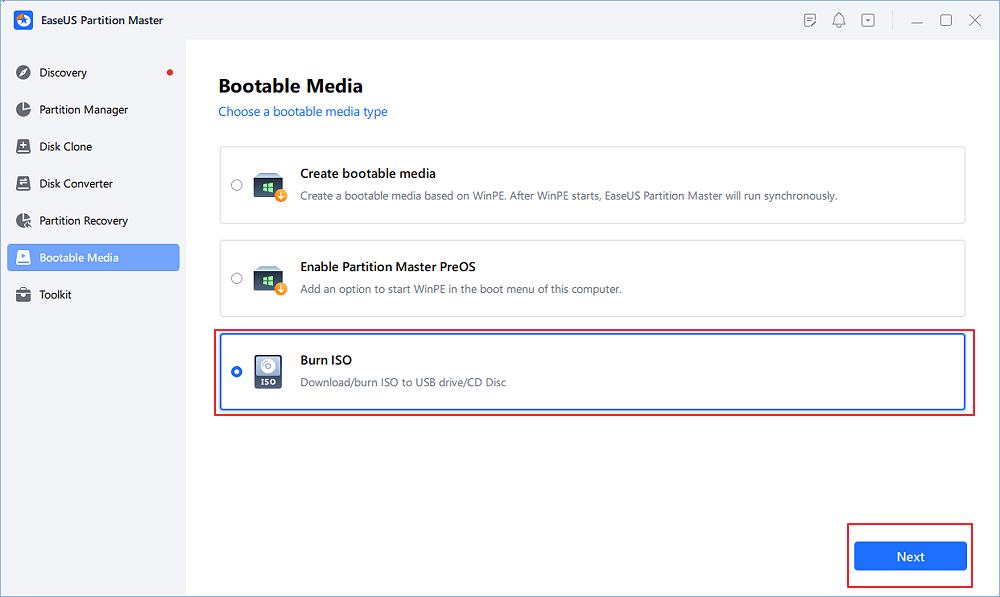
Step 1. Launch EaseUS Partition Master and go to the Bootable Media section. Click "Burn ISO" and click "Next".
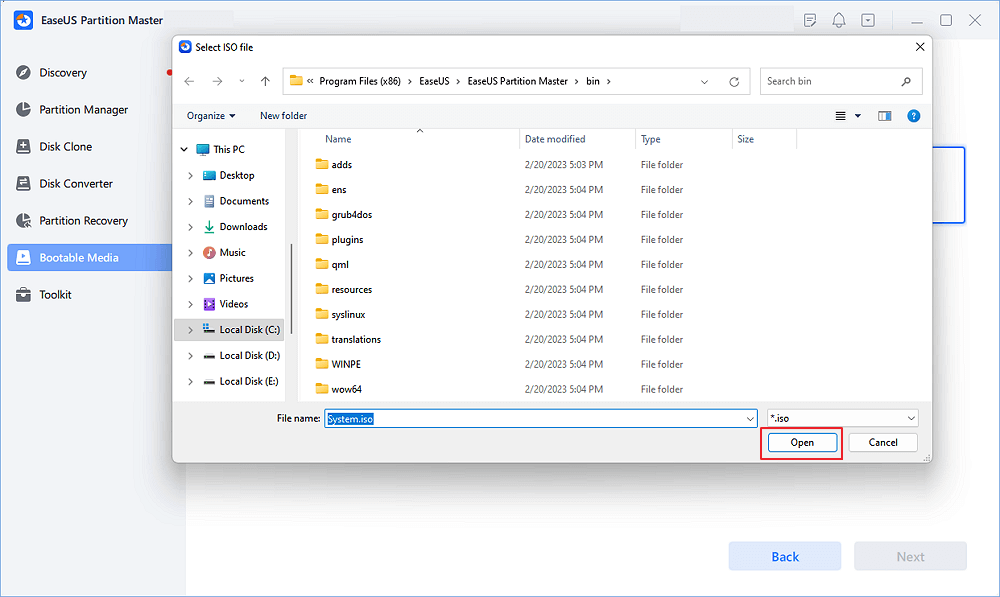
Step 2. Select the ISO image that you have downloaded on your PC, and click "Open".
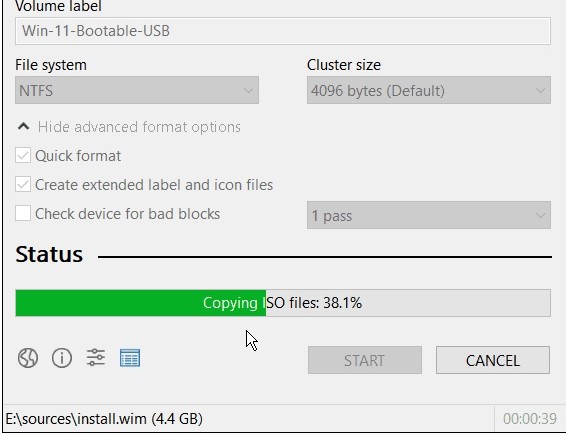
Step 3. Click "Next" and select the target USB as destination and click "Burn" to execute the operation.
The create bootable installation dedia feature provided by EaseUS Partition Master can help install Windows under many conditions:
Stage 3. Boot Steam Deck from a USB Drive and Install Windows
Now, follow the previous steps to access Steam Deck Boot Manager and install Windows:
Step 1. Select the USB drive you created in the list of boot options.
Step 2. Select Install Now and enter the Windows product key and the version of Windows for which you have a license.
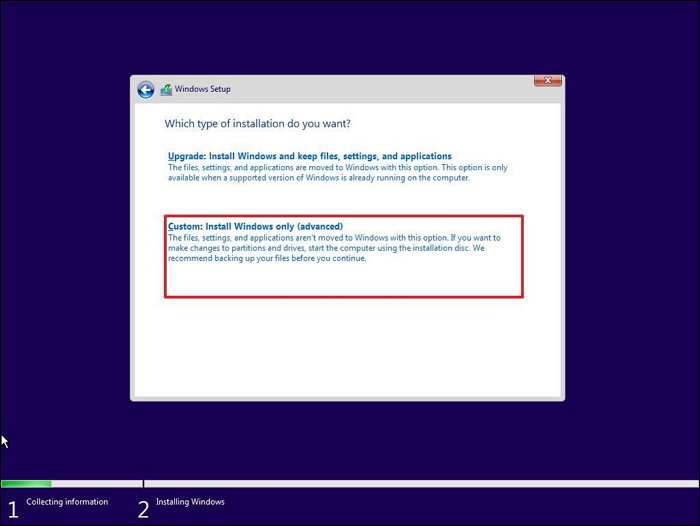
Step 3. Agree to the terms and select Install Windows only.
Step 4. Delete all partitions and create a new one.
Step 5. Follow the on-screen steps to install Windows and sign in with your Microsoft account.
Complete Guide: Install Windows 10 from USB
Stage 4. Install the Steam Deck Driver
Refer to Stage 5 of Stage 5.
After installing these drivers, you should be ready to go. Your Steam Deck will now be up and running on Windows, running on the internal SSD.
Method 3. Dual Boot Windows 11 and SteamOS
If you want to dual-boot two systems on Steam, you can partition the Steam Deck SSD for both operating systems. You should perform this operation on a 256GB or 512GB model of Steam Deck to ensure enough storage space. If the space is insufficient, add the storage to Steam Deck.
Stage 1. Prepare the Necessary Tools
- Two flash drives
- Additional tools such as G-Parted and Rufus.
- Windows PC
- A Steam Deck dock for easy insertion of these drives.
Stage 2. Prepare the USB Drives
Step 1. Login to Rufus and select your connected USB drive under Devices.
Step 2. Select gparted-live under Startup Options.
Step 3. Wait for the drive to complete.
Stage 3. Launch Steam Deck And Go to the Boot Menu
After inserting the USB drive, you created into the SteamDeck and pressing and holding the power and volume buttons to enter the boot menu. You may also need to rotate the screen and use an external keyboard and mouse during this step.
Step 1. Select the flash drive you created
Step 2. Press A four times repeatedly.
Step 3. Select Internal Drive from the drop-down menu in the upper right corner.
Step 4. Select the home partition of ext4 home and resize it.
Step 5. If the space is unallocated, click on it and choose "Partition."
Step 6. Create a new partition and set it to not NTFS format.
Step 7. Save and exit.
Stage 4. Download the Windows ISO File
Refer to Method 1 of Stage 1.
Stage 5. Create Windows Bootable Installation Media
In this stage, please refer to Stage 3 of Option 2 to create bootable installation media. EaseUS Partition Master provides the Burn ISO function to burn ISO to USB, which is faster and safer to help you burn the ISO file successfully.
If you are used to using Rufus, please refer to the following steps.
Step 1. Open Rufus and select your USB drive as the target device.
Step 2. Select "Disk or ISO Image" in the "Startup Selection" button and open the Windows ISO file.
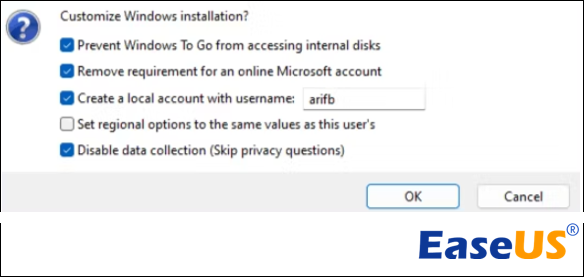
Step 3. Select "Standard Windows Installation," then rename the USB flash drive and click START.
Step 4. Select the Windows version and enable the check box.
Step 5. Select the Local Account checkbox and remove the requirement for an online Microsoft account.
Step 6. Wait for the process to complete.
Read Also: Can't Burn ISO File to USB on Windows
Stage 6. Boot the Steam Deck from the USB and install Windows.
Refer to Method 2, Stage 3
Stage 7. Download and install the Steam Deck drivers
Please refer to Method 1, Stage 3, and Stage 5.
Bonus Tip: Troubleshooting Can't Install Windows on Steam Deck
When you install or use Windows on Steam Deck, you may have problems or receive an error message. The following is a typical case:
We have briefly summarized some possible solutions. Take a look:
1️⃣. You may not be able to install Windows when your partition is formatted in Steam Deck format. Because this format is not compatible with Windows. Please use EaseUS Partition Master to format USB to NTFS.
2️⃣. Forum users have reported that the wrong partition format of the USB flash drive can also prevent Windows from installing on Steam Deck, which may be solved by formatting it as Master Boot Record (MBR) instead of GUID Partition Table (GPT).
3️⃣. Failure to create the bootable installation media can also cause the installation to fail. If you are unfamiliar with Rufus, you can install a Windows ISO file to USB using the Windows 11 Media Creation Tool or EaseUS Partition Master.
Additionally, as users have reported that they may experience gaming performance issues when using Windows, you can switch to using a portable SSD instead of a microSD card. Don't forget to share this article if you find it's helpful!
Conclusion
Following the scenario provided in this article, you can successfully install Windows on your Steam Deck! Your Steam Deck can act as a portable Windows PC, and you can install Windows on either an SD card or an internal SSD format to NTFS to avoid incompatibility issues. In addition, you can also use this tool to create bootable installation media.
FAQs About Install Windows on Steam Deck
This section also summarizes more questions about installing Windows on Steam Deck. Please read on if you have the same questions:
1. Can I dual-boot Windows on Steam Deck?
Of course, you can dual-boot Windows on Steam Deck. Steam Deck fully supports dual boot.
First, you need to install two systems on Steam Deck. Besides the pre-installed SteamOS, you can also refer to the solution in this article: burn Windows via EaseUS Partition Master and install the second operating system on Steam Deck.
2. Can I install Windows on Steam Deck without USB?
Of course, you can install Windows without USB, but you always need a drive to burn Windows and install it. You can install Windows on an SD card if you don't have a USB. Steam Deck provides a dedicated microSD card slot.
3. How to install Windows on Steam Deck on an SD card?
You can refer to the solution provided in this article to dual-boot Windows 11 and SteamOS on Steam Deck using a microSD card. Here is a brief overview of the solution:
Step 1. Download the corresponding ISO file on Windows and burn it to the SD card using a burning utility.
Step 2. Download the Steam Deck driver on Windows.
Step 3. Install the SD card on the Steam Deck and reboot.
Step 4. Follow the on-screen instructions to install Windows.
How Can We Help You
About the Author
Updated by Tracy King
Tracy became a member of the EaseUS content team in 2013. Being a technical writer for over 10 years, she is enthusiastic about sharing tips to assist readers in resolving complex issues in disk management, file transfer, PC & Mac performance optimization, etc., like an expert.
Cici is the junior editor of the writing team of EaseUS. She accepted the systematic training on computers at EaseUS for over one year. Now, she wrote a lot of professional articles to help people resolve the issues of hard drive corruption, computer boot errors, and disk partition problems.
Product Reviews
-
I love that the changes you make with EaseUS Partition Master Free aren't immediately applied to the disks. It makes it way easier to play out what will happen after you've made all the changes. I also think the overall look and feel of EaseUS Partition Master Free makes whatever you're doing with your computer's partitions easy.
Read More -
Partition Master Free can Resize, Move, Merge, Migrate, and Copy disks or partitions; convert to local, change label, defragment, check and explore partition; and much more. A premium upgrade adds free tech support and the ability to resize dynamic volumes.
Read More -
It won't hot image your drives or align them, but since it's coupled with a partition manager, it allows you do perform many tasks at once, instead of just cloning drives. You can move partitions around, resize them, defragment, and more, along with the other tools you'd expect from a cloning tool.
Read More
Related Articles
-
How to Merge C and E Drive Without Losing Data
![author icon]() Oliver/2024/10/22
Oliver/2024/10/22 -
[Fixed] Boot Device Not Found Error in Windows 10/8/7
![author icon]() Jean/2024/05/21
Jean/2024/05/21 -
FAT File System Format (FAT12, FAT16, FAT32) | 2024 Full Guide
![author icon]() Tracy King/2024/04/22
Tracy King/2024/04/22 -
Western Digital VS Seagate: A Detailed Comparison Guide
![author icon]() Tracy King/2024/04/22
Tracy King/2024/04/22
Hot Topics in 2024


EaseUS Partition Master

Manage partitions and optimize disks efficiently