
Content
Page Table of Contents
About the Author
Hot Topics
If you're a Raspberry Pi 4 user, you may wonder whether installing and running Windows 10 on it is possible. Recently, we've seen Windows 10 getting supported on ARM platforms like Samsung Exynos and Qualcomm Snapdragon. Does this also apply to Raspberry Pi 4? In this article, you'll learn whether installing Windows 10 on Raspberry Pi 4 is possible.
You'll learn the hardware and software requirements you must meet before installing Windows 10 on your Raspberry Pi 4 computer. Also, EaseUS will lead you to learn how to use a third-party tool to burn/flash a Windows 10 ISO file on an SD card before booting it on your Raspberry Pi 4.
| ⏱️Duration | Several hours |
| ✍️Difficulty | Hard but you can find a simple step-by-step guide |
| ⛏️Required Software |
✔️Format tool - EaseUS Partition Master ✔️Raspberry Pi ISO burner - WoR |
| 👣Steps | |
| 🧑💻Suitable for | Install Windows 10 on Raspberry Pi 4 |
Can I Install Windows 10 on Raspberry Pi 4?
Initially, Microsoft only allowed users to run the old version of Windows 10 IoT Core on their Raspberry Pi devices. This would only allow users to execute Visual Studio on their Pi devices but not access a standalone OS backed up by GUI. This, therefore, meant that no Windows OS was officially supported.
With recent developments, however, it's now possible to fully run Windows 10 on Raspberry Pi 4. The next part will discuss how to run a full desktop version of this OS on your Raspberry Pi 4 device.
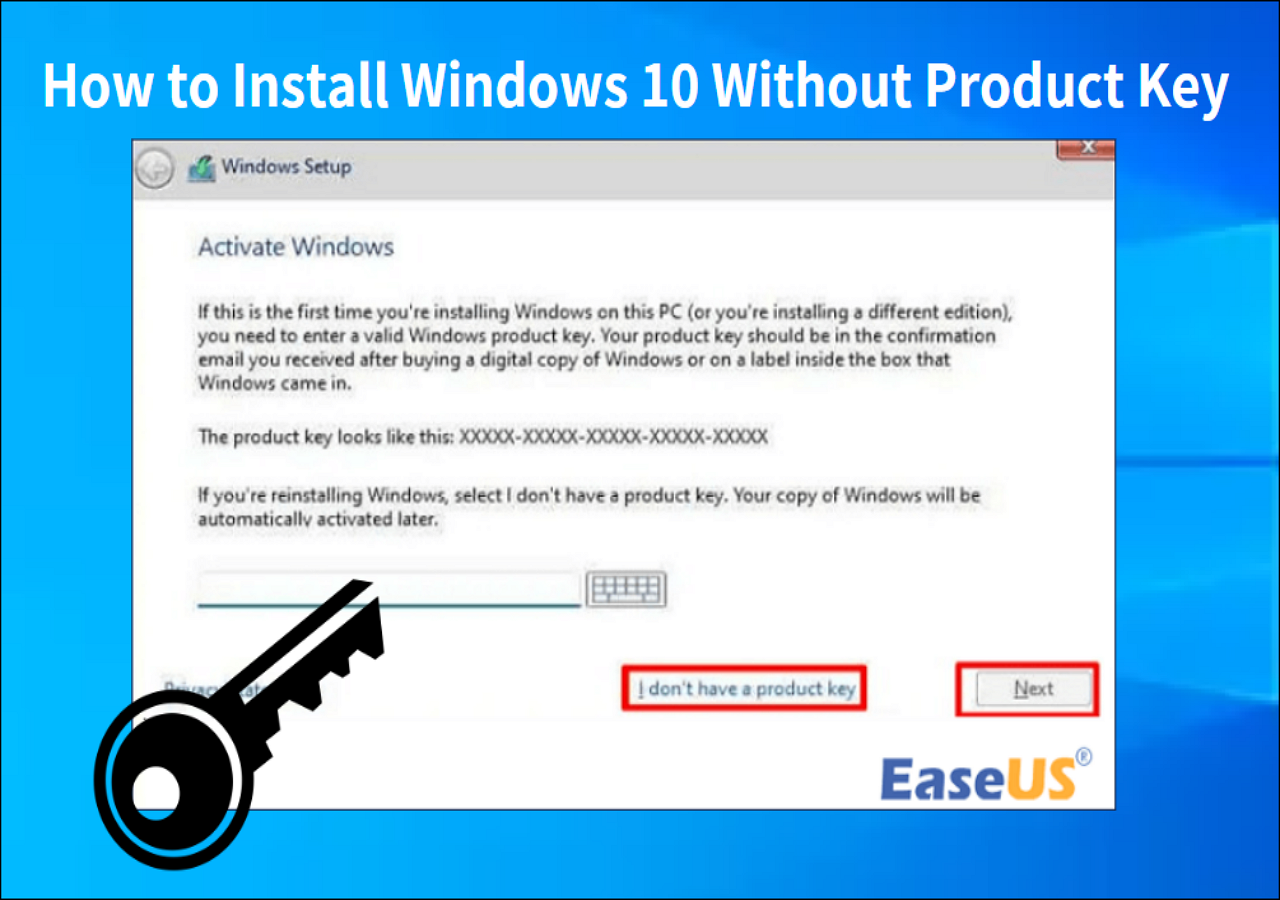
For other solutions to install Windows without product key, please check the following article:
How to Install Windows 10 Without Product Key
You can install Windows 10 without product key by downloading the Windows 10 ISO from Microsoft. This page will offer a comprehensive solution on how to do it.
What Do You Need to Install Windows 10 on Raspberry Pi 4?
Like installing the default OS on your computer, you also need to fulfill some requirements before installing Windows 10 on Raspberry Pi 4. This allows you to run the operating system error-free and without any downtime scenarios. Below is a table showing the hardware and software requirements needed.
| Hardware Requirements |
|
| Software Requirements |
|
How to Prepare the Raspberry Pi 4 SD Card to Install Windows 10
In addition to the above requirements, you need to make another need before installing Windows 10 on Raspberry Pi: you'll need to format your SD card into a Raspberry Pi 4-supported file format (FAT32). This requirement needs you to finish it on Windows.
If you're unsure how to format your Raspberry Pi 4 SD card, we recommend using EaseUS Partition Master. This software lets you quickly format your SD card from any other file format to FAT32. Even if you are new to computer, you can master the format skills.
Step 1. Find your SD card and right-click the partition you want to format and choose "Format".
Step 2. Set a new partition label, file system (NTFS/FAT32/EXT2/EXT3/EXT4/exFAT), and cluster size to the selected partition, then click "OK".
Step 3. Click "Yes" on the pop-up window to continue.
Step 4. Click the "Execute 1 Task(s)" button on the toolbar, then click "Apply" to start formatting your SD card.
Further Reading:
How to Install Windows on Steam Deck in 2024? Complete Guide
In the post, you will learn how to install Windows OS on Steam Deck in detail, along with a step-by-step tutorial and some troubleshooting alternatives.

How to Install Windows 10 on Raspberry Pi 4
Now that you have all the necessary hardware and software, you can install Windows 10 on Raspberry Pi 4. This process entails several stages/steps and may also consume some time. You should be patient as you navigate from one stage to the next. Follow the steps to install the OS on your Raspberry Pi.
- Notice:
- The tutorials in this article have been testified from the official Raspberry Pi tips. And summarized in addition to the most suitable guidance programs. You can fully trust this guide.
Stage 1. Update Your Raspberry Pi Firmware
Using the latest firmware for your Raspberry Pi 4 computer enables it to work correctly. Here are the steps to update your firmware:
Step 1. Launch Raspberry Pi and click on the Terminal icon to open Command-Line. Alternatively, you can press Ctrl + Alt + F1 to access the command line.
Step 2. Next, paste the following commands on Command Line:
sudo apt update
sudo apt full-upgrade
The above commands will update your Raspberry Pi 4 firmware to the latest version. You can switch off your device and proceed to the next stage.
Stage 2. Download the Necessary Tools
The most important tools you need to have before installing Windows 10 on Raspberry Pi include a UUP file and the WoR tool. Here, the WoR tool allows you to flash/burn the ISO file to your SD card, while the UUP file allows you to build the Windows 10 Raspberry ISO file on your computer.
Step 1. Download and install WoR on your computer.
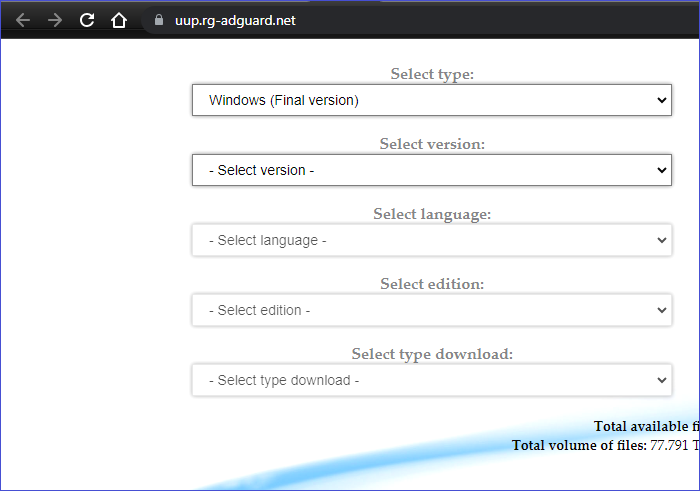
Step 2. Visit this website to download the UUP file. Ensure you choose the correct "Type," "Version," "Language," "Edition, and "Type Download" from the dropdown on the download page. Next, click the "Download ISO compiler in One Click!" option. Click on the first link to download the cmd file.
Having downloaded the necessary tools, you can move to the next stage.
Stage 3. Create Windows 10 Raspberry Pi ISO File
If you want to install Windows 10 on your Raspberry Pi, you'll need to create an ISO file specifically for the Raspberry Pi rather than a general Windows 10 file.
Step 1. Double-click the cmd file on your computer and click Yes in the User Account Control window.
Step 2. The terminal window will download many essential files, so make sure your computer is connected to a stable internet connection.
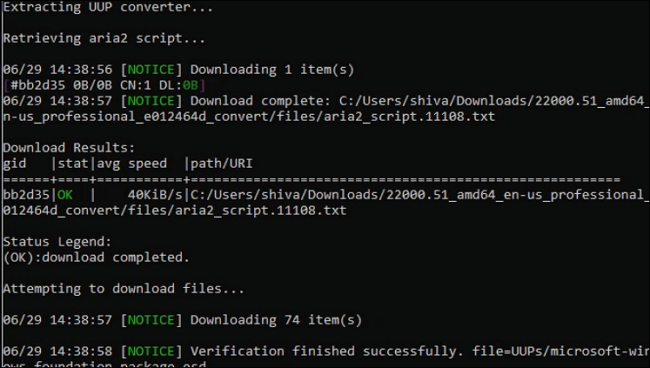
Step 3. The tool will automatically create the Windows 10 Raspberry Pi ISO file.
Stage 4. Flash the ISO File to the SD Card
Once you have downloaded the Windows 10 ISO file, you need to proceed to burn the ISO file to the SD card. For general Windows ISO files, you can choose EaseUS Partition Master. While Windows 10 ISO image for Raspberry Pi needs to use WoR.
- For Windows 10 ISO burning: Burn ISO to USB on Windows 10
- For Windows 10 Raspberry Pi ISO burning, follow the steps:
Step 1. Connect the SD card to your computer.
Step 2. Run the WoR.exe file.
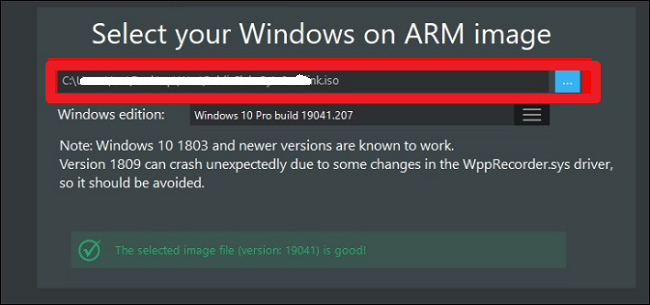
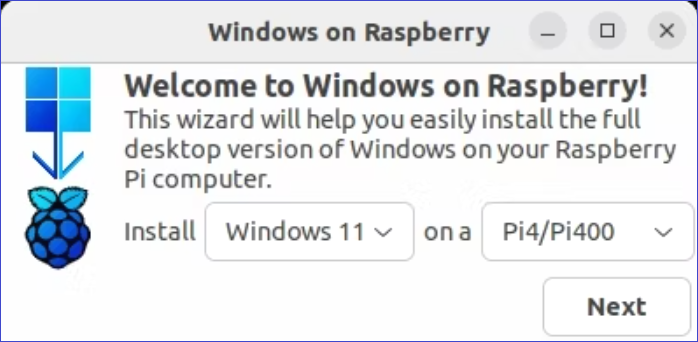
Step 3. Click "Next." Select the SD card and choose Raspberry Pi 4 from Device Type.
Step 4. Select the ISO file you just created and choose the Windows version.
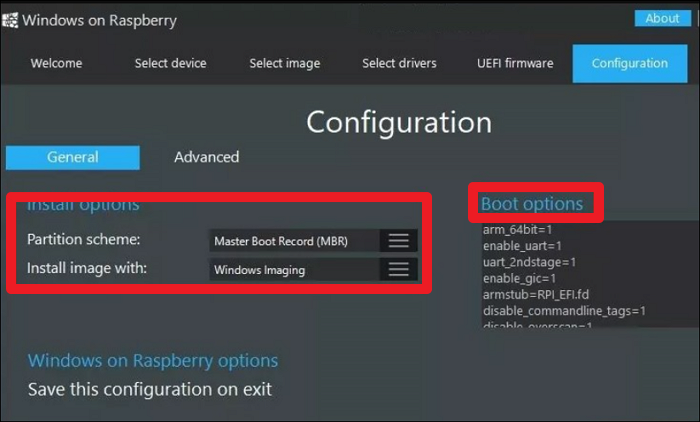
Step 5. On the next page, select Use Latest Package.
Step 6. Set the partitioning scheme, boot options, install options and other configurations, and click Next. And start installing the Windows ISO file to the SD card.
Once you've burned the ISO file to your SD card, you can eject it from your computer and proceed to Stage 5 below.
Note: If you need to burn Windows 10/11 ISO files to USB, EaseUS Partition Master is your wise choice. It is one of the best free ISO burners on Windows. You can use it to create bootable media and then boot different laptops from USB.
Here are some topics related to using the burning feature of EaseUS Partition Master:
Stage 5. Install Windows 10 on Raspberry Pi 4
Now that your SD card is bootable, you can switch to your Raspberry Pi 4 device to install Windows 10 ISO files. This process is not as complex as most people think, and you can follow the steps below to complete it.
Step 1. Connect the flashed SD card to your Raspberry Pi 4 computer. Next, connect other peripherals like the power cable, keyboard, mouse, and HDMI cable.
Step 2. Restart your Raspberry Pi 4 computer and ensure you set your SD card as the boot drive.
Step 3. Once the system detects your bootable SD card, follow the onscreen instructions to finish the Windows installation process.
Step 4. Once the system has finished installing, open Command Prompt and paste the command below to enable 3GB of RAM.
bcdedit /deletevalue {default} truncatememory
Step 5. Restart your device to implement the changes above.
Step 6. Lastly, connect your Raspberry Pi 4 computer to a network and install the programs you want to run on it. You should first install the Microsoft Edge browser.
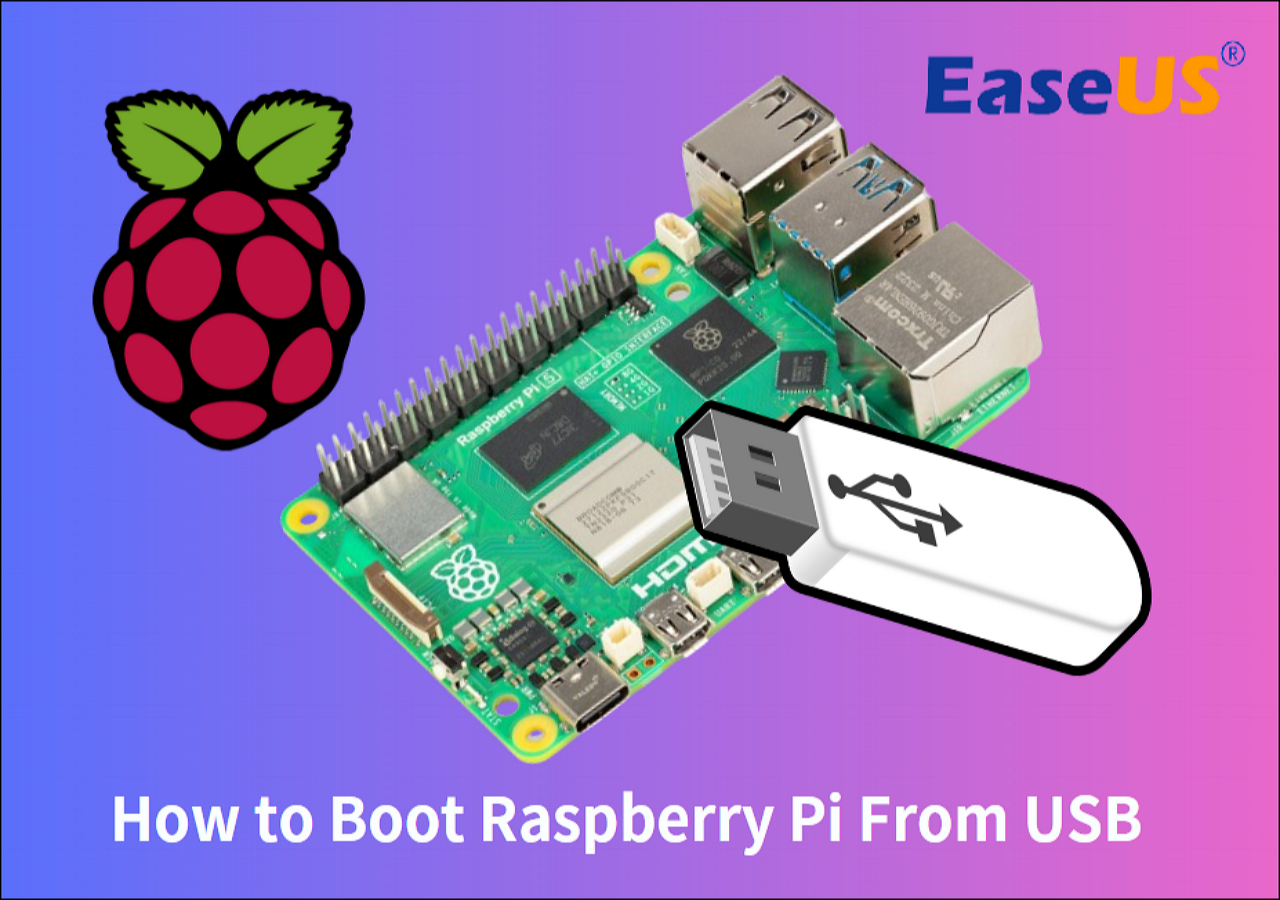
Additionally, if your Raspberry Pi is experiencing any boot-related issues, you can bypass the SD card and boot the Raspberry Pi from USB. Click on the connection below for detailed information.
How to Boot Raspberry Pi From USB [Step-by-Step]
This article shows how to modify the Raspberry Pi bootloader to boot from a USB storage medium. Continue reading for detailed steps on booting Raspberry Pi from USB.
That's it! You've now installed Windows 10 on your Raspberry Pi 4, and you can start enjoying all the features it comes with. If you enjoy the full guide, you can also share it with more people and help them to install Windows 10 on Raspberry Pi 4!
For users who require professional help, our specialized support team is trained to provide assistance in various formats.
EaseUS Windows Configuration Services
Click here to contact EaseUS Partition Master experts for free
EaseUS experts are available to provide you with 1-on-1 manual services (24*7) and help fix different Windows configuration issues. Our experts will offer you FREE evaluation services and efficiently diagnose and resolve Windows update errors, Windows installation, or daily OS issues using their decades of experience.
- 1. Fix Windows update errors, such as update failure, unable to upgrade Windows, etc.
- 2. Serve to download and install the latest Windows operating system on PC with success.
- 3. Provide fixes for daily Windows system errors with drivers, permission, account settings, etc., issues.
Conclusion
This article has helped clarify whether installing Windows 10 on Raspberry Pi 4 is possible. We've determined that it's possible to do that from our discussion. First, you need to prepare all the hardware and software, including using EaseUS Partition Master to format the Raspberry Pi SD Card. Then, you'll need the Windows 10 ISO file and a flashing tool to burn the setup on an SD card.
FAQs About Install Windows 10 on Raspberry Pi 4
Follow through the questions below about how to install Windows 10 on Raspberry Pi 4.
1. Can Raspberry Pi Run Windows Apps?
Once you've successfully installed a Windows operating system on your Raspberry Pi, it's possible to run supported Windows apps. You'll only need to download and install the apps on your Raspberry Pi computer, and you're good to go!
2. Can I Set Up Windows on Raspberry Pi 4?
Yes, it's possible to run Windows 10 on Raspberry Pi 4. You'll first need to download a Windows 10 ISO file, burn it to an SD card, then connect the bootable SD card to Raspberry Pi 4 computer to install your operating system.
3. Is It Good to Install Windows on Raspberry 4?
Installing Windows on your Raspberry Pi 4 gadget allows you to access the Windows features that you need for your project. You can run Windows programs on your Raspberry Pi computer, provided you've installed the operating system. Therefore, it's good to install Windows on Raspberry Pi 4.
How Can We Help You
About the Author
Updated by Tracy King
Tracy became a member of the EaseUS content team in 2013. Being a technical writer for over 10 years, she is enthusiastic about sharing tips to assist readers in resolving complex issues in disk management, file transfer, PC & Mac performance optimization, etc., like an expert.
Cici is the junior editor of the writing team of EaseUS. She accepted the systematic training on computers at EaseUS for over one year. Now, she wrote a lot of professional articles to help people resolve the issues of hard drive corruption, computer boot errors, and disk partition problems.
Product Reviews
-
I love that the changes you make with EaseUS Partition Master Free aren't immediately applied to the disks. It makes it way easier to play out what will happen after you've made all the changes. I also think the overall look and feel of EaseUS Partition Master Free makes whatever you're doing with your computer's partitions easy.
Read More -
Partition Master Free can Resize, Move, Merge, Migrate, and Copy disks or partitions; convert to local, change label, defragment, check and explore partition; and much more. A premium upgrade adds free tech support and the ability to resize dynamic volumes.
Read More -
It won't hot image your drives or align them, but since it's coupled with a partition manager, it allows you do perform many tasks at once, instead of just cloning drives. You can move partitions around, resize them, defragment, and more, along with the other tools you'd expect from a cloning tool.
Read More
Related Articles
-
Top 8 Windows 11 Repair Tools | 2026 Best Picks
![author icon]() Cici/2026/01/29
Cici/2026/01/29 -
[Solved] Diskpart Delete Partition Override Not Working
![author icon]() Jean/2026/04/19
Jean/2026/04/19 -
[2026] How to Convert Primary Partition to Logical Partition
![author icon]() Daisy/2026/01/29
Daisy/2026/01/29 -
SSD Maintenance: Tips to Maintain Performance and Extend the Life of Your SSD
![author icon]() Tracy King/2026/01/29
Tracy King/2026/01/29
Hot Topics


EaseUS Partition Master

Version 20.0 is here - full exFAT support, easier disk partitioning, and PC performance optimization.