Page Table of Contents
About the Author
Hot Topics
Updated on Jan 29, 2026
External SSDs have better performance than HDDs, and the average boot time for SSDs is 10-13 seconds, compared to 30-40 seconds for HDDs. In addition to booting Windows from a USB or SD card, many users wonder if they can boot their computers from an external SSD. The following is a typical case study:
Is it possible to boot Win10 or 11 from an external SSD? I read that SD cards are possible with Windows to go but unreliable enough. (SD card corruption) And I think this might be the least intrusive solution if you are not into dual booting and need Windows for a special use case. - from Reddit
Don't worry. EaseUS will walk you through the feasibility of booting Windows from an external SSD and provide a detailed solution.
View the Necessary Information to Boot from External SSD
| ⚙️Complex Level | Low, Beginners |
| ⏱️Duration | 4-8 minutes |
| 💻Applies to | Set External SSD as a boot drive |
| ✏️Stages |
1️⃣Stage 1. Prepare the External SSD and Put It Into Your PC |
Is It Possible to Boot from External SSD?
Yes, you can boot from external SSD; it helps to have a bootable external drive if the OS on the internal drive is corrupted. There are more benefits to booting Windows from an external SSD. Here are some of the main reasons why:
- External SSD is more durable: it has no moving parts and can take more of a beating. And the SSD generates less heat and noise, which means it's more energy efficient, which can lead to longer battery life for the laptop.
- External SSDs offer faster speeds: SSDs can load and transfer files and applications faster. And it can reduce the time it takes to boot up your computer.
Whatever your reason for wanting to boot from an external SSD, this article has a detailed solution. Next, we will discuss how to boot Windows from external SSD.
You May Also Interested In:
How to Boot from External SSD
There are three stages to booting an SSD from an external drive. I will provide detailed steps for each stage. Please adhere to the instructions in this article to properly navigate and efficiently use an external SSD as a bootable drive.
Stage 1: Prepare the External SSD and Put It Into Your PC
1. Connect the external SSD to your computer using a compatible interface (USB or Thunderbolt).
2. If it is a new SSD, please initialize it. And format the SSD to the NTFS file system
- Press and hold the Windows icon, and select and open Disk Management.
- Right-click on the external SSD to be formatted and select "Format."
- Choose the file system, then adjust the cluster size to your liking.
3. Make sure the SSD has enough space for partitioning
You need to ensure enough space on the external SS to accommodate your Windows 11/10 operating system. The capacity of the external SSD needs to be greater than or equal to the capacity used by the system partition.
Stage 2: Install OS on External SSD
There are several ways to install an operating system on an SSD: you can do it via a Windows ISO file or by cloning the Windows operating system. Whichever way you choose, the best tool to use is the EaseUS Partition Master.
This tool provides powerful features to help you install an operating system. You can migrate your Windows OS to a new external SSD easily and quickly. And it simplifies installing an operating system, providing a safe and fast solution. Read on to see the detailed step-by-step guide.
Step 1. Select the source disk.
- Click the "Clone" from the left menu. Select the "Clone OS Disk" or "Clone Data Disk" and click "Next".
- Choose the source disk and click "Next".
Step 2. Select the target disk.
- Choose the wanted HDD/SSD as your destination and click "Next" to continue.
- Read Warning message and confirm "Yes" button.
Step 3. View the disk layout and edit the target disk partition size.
Then click "Continue" when the program warns it will wipe out all data on the target disk. (If you have valuable data on the target disk, back up it in advance.)
You can select "Autofit the disk", "Clone as the source" or "Edit disk layout" to customize your disk layout. (Select the last one if you want to leave more space for C drive.)
Step 4. Click "Start" to start the disk cloning process.
EaseUS Partition Master is a powerful tool. It supports all external and internal devices. With this way, you can also install Windows 10 from USB. Besides, if you want to know how to boot Windows from SD Card, click the following link to get more information.
How to Boot Windows from SD Card [Full Guide]
Are you looking for a way to boot Windows from SD Card? Learn how to create a bootable SD card and how to boot Windows with it in this article.

After installing the operating system on the external SSD, uninstall the SSD from the computer. Then, follow the steps below to set up the external SSD.
Stage 3: Set up the external SSD as a boot drive in BIOS
When you make the external SSD bootable, you will also need to change the boot order of the external SSD in the BIOS. Whenever you start your computer, it will automatically check if the external SSD is available. If the external SSD is available, you can successfully boot Windows from the external SSD.
Here are the steps to set up an external SSD as a bootable drive on Windows:
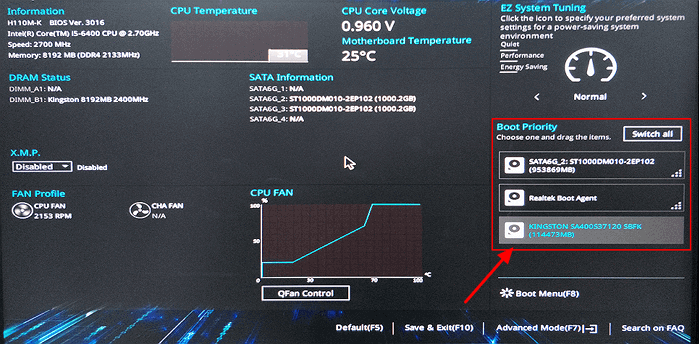
Step 1. Reboot your computer and enter BIOS setup: Use F2/F12/Del to enter BIOS.
Step 2. Change the boot order in the boot options: Find the target external SSD under the Boot Priority tab and move it to the top.

Step 3. Save the changes and exit.
After setting the external SSD as a bootable drive, you can use the new SSD as your system operating disk. Below is a full guide video for booting from the external SSD:

Conclusion
Is it possible to boot from an external SSD? This article provides an easy-to-follow method. In three stages, you can set up an external SSD as the primary boot drive. With EaseUS Partition Master, you can clone your Windows system to an external SSD.
If you enjoyed this article about how to boot Windows from an external SSD, don't forget to share it to help more people in need!
FAQs About Booting from External SSD
If you have further questions about booting from an external SSD or setting it as the primary drive, our FAQ section may provide your answers.
1. How can I boot from SSD instead of HDD in BIOS?
Once you have the required operating system on the external SSD, you can set the drive as the boot drive by following these steps:
Step 1. Press and hold F2/F12/Del to enter the BIOS.
Step 2. Change the boot order to set the operating system to boot from the new SSD.
Step 3. Save the changes and reboot the PC.
2. Why can't I set an external SSD as a boot drive?
A boot mode error may cause setting external SSD as boot drive: If the SSD is a GPT disk, you need to enable EFI/UEFI boot mode. And enter BIOS setting to change boot mode. Or convert SSD to MBR disk. Otherwise, it can't boot from SSD.
3. Why does BIOS not recognize SSD boot?
The cable may be damaged or incorrectly connected if the BIOS does not detect or recognize the SSD. The Serial ATA cable may sometimes be disconnected. Please check if the SATA cable is firmly connected.
4. How to boot Mac from an external SSD?
An external SSD as a boot disk can provide better performance for your Mac regarding system response, applications, startup, and more. Here are the steps to boot from an external SSD on Mac:
Step 1. Connect the external SSD to your Mac and erase the external SSD: Reformat the external SSD using Disk Utilities.
Step 2. Install macOS to the external SSD.
Step 3. Reboot the Mac and hold down the Option key until Boot Options appears.
Step 4. Set "Allow booting from external media or removable media" under Utilities.
How Can We Help You
About the Author
Updated by Tracy King
Tracy became a member of the EaseUS content team in 2013. Being a technical writer for over 10 years, she is enthusiastic about sharing tips to assist readers in resolving complex issues in disk management, file transfer, PC & Mac performance optimization, etc., like an expert.
Cici is the junior editor of the writing team of EaseUS. She accepted the systematic training on computers at EaseUS for over one year. Now, she wrote a lot of professional articles to help people resolve the issues of hard drive corruption, computer boot errors, and disk partition problems.
Product Reviews
-
I love that the changes you make with EaseUS Partition Master Free aren't immediately applied to the disks. It makes it way easier to play out what will happen after you've made all the changes. I also think the overall look and feel of EaseUS Partition Master Free makes whatever you're doing with your computer's partitions easy.
Read More -
Partition Master Free can Resize, Move, Merge, Migrate, and Copy disks or partitions; convert to local, change label, defragment, check and explore partition; and much more. A premium upgrade adds free tech support and the ability to resize dynamic volumes.
Read More -
It won't hot image your drives or align them, but since it's coupled with a partition manager, it allows you do perform many tasks at once, instead of just cloning drives. You can move partitions around, resize them, defragment, and more, along with the other tools you'd expect from a cloning tool.
Read More
Related Articles
-
How to Extend C Drive in Windows 10/11 Without Formatting
![author icon]() Daisy/2026/01/29
Daisy/2026/01/29 -
How to Fix Windows 11 Startup Repair Not Working | 7 Tips
![author icon]() Cici/2026/01/29
Cici/2026/01/29 -
How to Stop Disk Checking and Stock CHKDSK on Startup in Windows 11
![author icon]() Tracy King/2026/01/29
Tracy King/2026/01/29 -
How to Reallocate Disk Space Without Losing Data in Windows 11/10/8/7
![author icon]() Brithny/2026/01/29
Brithny/2026/01/29
Hot Topics
EaseUS Partition Master

Version 20.0 is here - full exFAT support, easier disk partitioning, and PC performance optimization.


