
Content
Page Table of Contents
About the Author
Hot Topics
USB has more storage space than an SD card, booting the Raspberry Pi from USB allows users to perform more operations, such as freshly installing the Raspberry Pi operating system, running a test system, etc. This article from EaseUS will walk you through how to boot the Raspberry Pi from USB with a few commands and a simple firmware update.
- Notice:
- This guide applies to all Raspberry Pi models, including Raspberry Pi 2, 3, 4, and 5. You will learn how to boot Raspberry Pi without SD card. But older Raspberry Pi cannot boot from USB.
Preparations to Boot Raspberry Pi from USB
Before you start setting up your Raspberry Pi to boot from USB, make sure you have all the necessary components on hand and prepare them in detail, including:
1️⃣Prepare the USB and format it to EXT4/FAT32 format. The Raspberry Pi supports ext4/FAT32 format. On Windows, EaseUS Partition Master Free provides a comprehensive formatting solution. It provides a faster, safer, and more reliable USB formatting solution than on the Raspberry Pi.
Download the tool for free and prepare your Raspberry Pi for booting from USB:
Step 1. Launch EaseUS Partition Master, right-click the partition you intend to format and choose "Format".
Step 2. In the new window, enter the Partition label if you prefer to rename it, choose the FAT32/EXT2/EXT3/EXT4 file system, and set the cluster size according to your needs, then click "OK".
Step 3. Then you will see a warning window, click "Yes" in it to continue.
Step 4. Click the "Execute 1 Task(s)" button in the top-left corner to review the changes, then click "Apply" to start formatting the partition to FAT32/EXT2/EXT3/EXT4.
As a powerful and full featured tool, EaseUS Partition Master also has more advanced features, such as install Windows 10 on Raspberry Pi. Downlaod it, and you can manage your Raspberry Pi hard drive better.
2️⃣If you have a newer version of Raspberry Pi, such as Raspberry 4, please update the system and firmware to ensure compatibility with the USB or SSD boot process. Please enter the following command in the terminal:
- sudo apt update - update the package list
- sudo apt full-upgrade- Install the latest update and press Y to confirm
- sudo rpi eeprom-update - update firmware
- sudo rpi-eeprom-update -a - apply available updates
After updating the system and firmware, reboot the Raspberry Pi using sudo restart.
3️⃣To start Raspberry Pi, you need to make an imager first, you can choose to use Etcher to write to the USB device or download and install Raspberry Pi Imager from Raspberry Pi website.
After doing the above preparations, we will continue to guide you on how to boot from the USB device. If you found this guide helpful, don't forget to click the social buttons to share it with more people in need.
How to Boot Raspberry Pi from USB
Once you have done the above, booting the Raspberry Pi using the USB drive is simple. Just follow the steps below:
Stage 1. Set up USB for Raspberry Pi
Step 1. Open the Raspberry Pi Imager and plug the USB into your computer.
Step 2. Click "Operating System" and select the one you want to install on your Raspberry Pi. You can also get more operating system options by clicking Raspberry Pi OS (other):
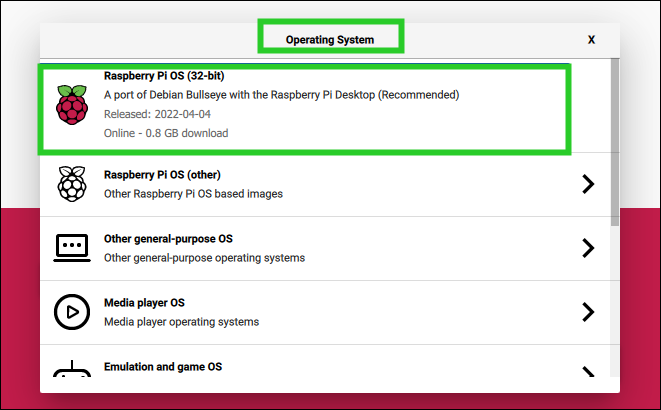
Tip: If you have already downloaded the operating system image file to your computer, you can load it into the Imager by clicking Use Custom.
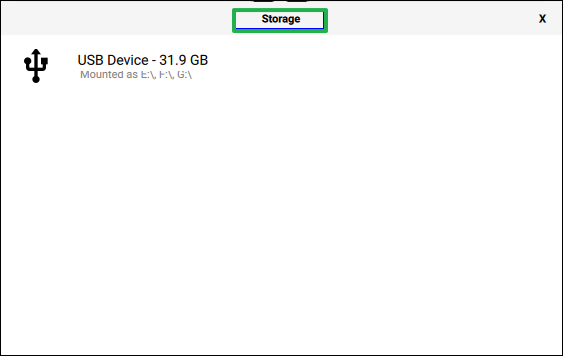
Step 3. Click the Storage tab to select the target USB that is connected to your computer, and then select the USB drive as the bootable USB for your Raspberry Pi:
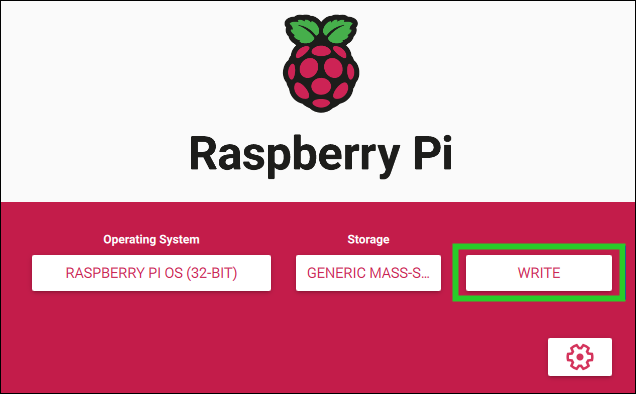
Step 4. When you return to the main screen, to write the selected Raspberry Pi operating system to the USB drive, click the Write button:
Step 5. Click Yes on the pop-up message, and the Imager will start writing the Raspberry Pi system to the USB drive.
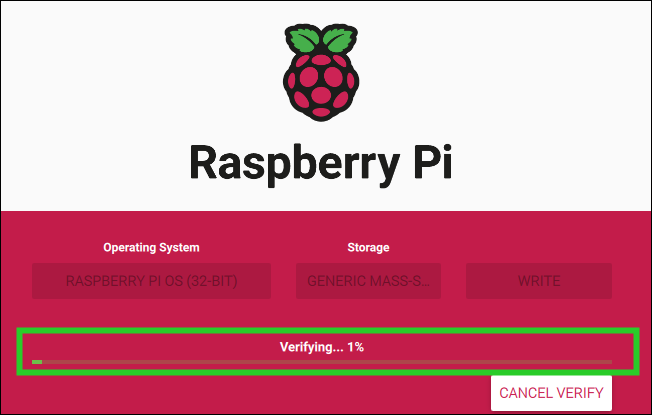
Step 6. Once the Imager has finished writing to the USB, it will begin verifying the USB, which may also take some time:
When the process is complete, click Continue and remove the USB from the computer:
Stage 2. Boot Raspberry Pi from USB
After completing the above steps, you have successfully created a bootable USB for the Raspberry Pi. but please note that the process is not over. We still need to manually complete the boot sequence configuration and make the final adjustments:
Step 1. Switch off the Raspberry Pi and remove the extra SD card.
Step 2. Connect the bootable USB to the Raspberry Pi's 3.0 port. If the Raspberry Pi 4's SATA to 3.0 is incompatible, plug in the 2.0 port.
Step 3. Connect the power supply to switch on the Raspberry Pi 4.
- Tip
-
If you have a Pi 3, modify the /boot/config.txt file to allow the Raspberry Pi 3 to boot from USB/SSD or any other supported external media. Add: program_usb_boot_mode=1.
For the Raspberry Pi 3B+, connect the USB SSD to the operating system, and it will boot.
Once done, you can boot the Raspberry Pi without an SD card. The Raspberry Pi will automatically use your USB as the boot device. However, the Raspberry Pi may take ten to twenty seconds to pick up the USB device and begin booting from it.
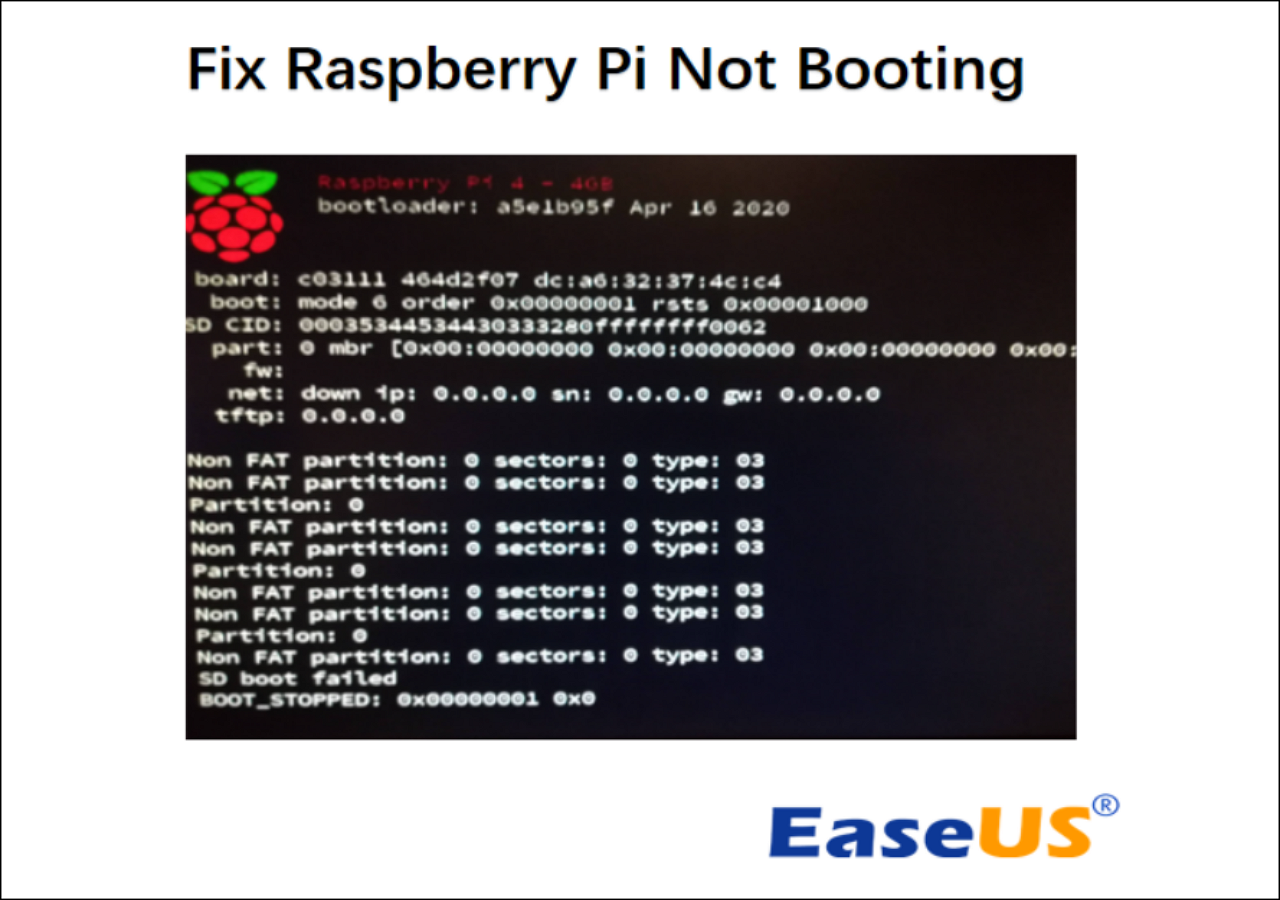
If you encounter a situation where the Raspberry Pi not booting, find out why the Raspberry Pi 4 won't boot and fix it:
How to Fix Raspberry Pi Not Booting [Causes & Solutions]
Is your Raspberry Pi unbootable? Is the green light on the device not flashing? If so, here are quick and easy troubleshooting tips and fixes that can help you fix Raspberry Pi not booting issue.
Conclusion
I hope this tutorial on booting the Raspberry Pi from USB shows you how to set up your Raspberry Pi. If you don't have an SD card, choose a suitable Raspberry Pi external hard drive and boot the Raspberry Pi operating system from USB. Following this tutorial, you can also set up to boot the Raspberry Pi from a SuperSpeed SSD or at least a faster HDD.
Regardless of what you want to perform on the Raspberry Pi using USB or SSD, be sure to satisfy the Raspberry Pi SD card format. EaseUS Partition Master Free can provide the foundation for subsequent operations.
FAQs About Boot Raspberry Pi from USB
If you have any feedback or questions about booting from a USB device, feel free to check out some of the hot topics in this section:
1. How to boot from a USB Raspberry Pi 4 with no SD card?
You can boot the Raspberry Pi from a USB drive if you don't have an SD card. You'll need to perform a firmware update first; the PI 3/4 will boot from the USB.
Then, select the hard drive instead of the SD card in the imager application when writing the boot image.
2. Can Raspberry Pi 5 boot from USB?
Of course, Raspberry Pi 5 can boot from USB. Make sure that your USB device is the only one connected. If the device is a USB 3, ensure it is in one of the two blue USB 3 ports. If not, the Raspberry Pi 5 will automatically boot from a microSD card if one is in the slot.
3. How do you boot a Raspberry Pi?
Power is connected to the USB-C connector adjacent to the HDMI ports labeled POWER IN. The Raspberry Pi has no on button, so it will turn on and begin booting up as soon as you plug it in.
How Can We Help You
About the Author
Updated by Tracy King
Tracy became a member of the EaseUS content team in 2013. Being a technical writer for over 10 years, she is enthusiastic about sharing tips to assist readers in resolving complex issues in disk management, file transfer, PC & Mac performance optimization, etc., like an expert.
Cici is the junior editor of the writing team of EaseUS. She accepted the systematic training on computers at EaseUS for over one year. Now, she wrote a lot of professional articles to help people resolve the issues of hard drive corruption, computer boot errors, and disk partition problems.
Product Reviews
-
I love that the changes you make with EaseUS Partition Master Free aren't immediately applied to the disks. It makes it way easier to play out what will happen after you've made all the changes. I also think the overall look and feel of EaseUS Partition Master Free makes whatever you're doing with your computer's partitions easy.
Read More -
Partition Master Free can Resize, Move, Merge, Migrate, and Copy disks or partitions; convert to local, change label, defragment, check and explore partition; and much more. A premium upgrade adds free tech support and the ability to resize dynamic volumes.
Read More -
It won't hot image your drives or align them, but since it's coupled with a partition manager, it allows you do perform many tasks at once, instead of just cloning drives. You can move partitions around, resize them, defragment, and more, along with the other tools you'd expect from a cloning tool.
Read More
Related Articles
-
How to Install Windows 11 Without Product Key - Details
![author icon]() Sherly/2025/01/23
Sherly/2025/01/23 -
Format/Reformat Seagate External Hard Drive on Windows or Mac
![author icon]() Tracy King/2025/01/23
Tracy King/2025/01/23 -
Windows 11 Gets/Adds a Watermark on Unsupported Hardware, How to Remove It
![author icon]() Tracy King/2025/01/23
Tracy King/2025/01/23 -
Migration Assistant Slow - How to Speed Up
![author icon]() Oliver/2025/02/05
Oliver/2025/02/05
Hot Topics in 2024


EaseUS Partition Master

Manage partitions and optimize disks efficiently