
Content
Page Table of Contents
About the Author
Hot Topics
Updated on Jun 17, 2026
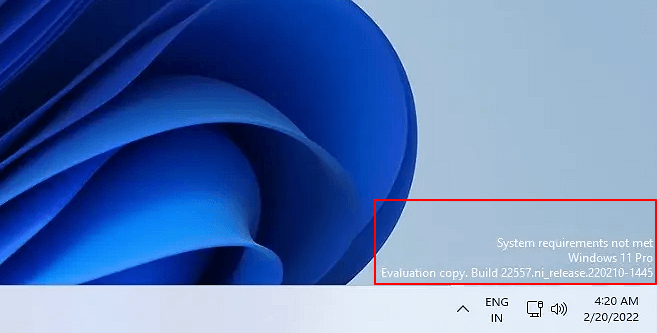
According to Windows Latest, it's reported that Microsoft approves desktop watermark on Windows 11 unsupported PCs. Users who upgraded their computers to Windows 11 but the hardware doesn't fully meet the Windows 11 system requirements would get a water mark at the lower right corner, notifying:
Windows 11 Pro
Evaluation copy. Build 22557.ni_release.202210-1445
What does it mean and how to remove this watermark from your computer? Check the answers here:
In this article, you'll learn:
- #1. What Is "System requirements not met" Watermark
- #2. Why Does Microsoft Add This Watermark to Windows 11 on Unsupported Hardware
- #3. How to Remove and Get Rid Of the 'System requirements not met' Watermark from Windows 11
- #3. How to Remove and Get Rid Of the 'System requirements not met' Watermark from Windows 11
#1. What Is "System requirements not met" Watermark
The "System requirements not met" watermark is a new feature that Microsoft publishes to test and warn users if their hardware isn't compatible with Windows 11. When your computer hardware doesn't meet the minimum requirements, the watermark with 'System requirements not met' information will display on the screen at the lower right corner.
What does this message mean? It means that your current Windows 11 computer doesn't meet the minimum system requirements as listed here:
- Processor: 1 gigahertz (GHz) or faster with two or more cores on a compatible 64-bit processor or System on a Chip (SoC)
- Memory: 4 GB RAM
- Storage: 64 GB or larger storage device
- System firmware: UEFI, Secure Boot capable
- TPM: Trusted Platform Module (TPM) version 2.0
- Graphics card: DirectX 12 compatible graphics / WDDM 2.x
- Display: >9'' with HD Resolution (720p)
- Internet connection: Microsoft account and internet connectivity required for setup for Windows 11 Home.
#2. Why Does Microsoft Add This Watermark to Windows 11 on Unsupported Hardware
So why does Microsoft add this watermark to the computer desktop? As we know, Microsoft has made it clear that computers must meet its minimum system requirements to install the newest operating System on old Windows computers. Otherwise, Windows 10/8/7 users would receive a "This PC Can't Run Windows 11" error message while trying to install or upgrade to Windows 11.
However, even if a computer doesn't meet the requirements, there are still ways to force an installation of Windows 11. For example, bypass the CPU check, bypass secure boot and TPM settings, convert MBR to GPT for Windows 11, etc.
Microsoft doesn't encourage users to try these methods as it may lead to some possible corruption on Windows 11. So if you are looking for an official way to update to Windows 11, we suggest that you check if your computer met the system requirements first.
You May Also Interested In:
So now you've already installed Windows 11 on your computer with unsupported hardware, how will you do with the watermark?
#3. How to Remove and Get Rid Of the 'System requirements not met' Watermark from Windows 11
If you want to remove the watermark, follow the guidelines below. We'll present you with the complete process of running Registry Editor to get rid of the 'System requirements not met' watermark from the computer.
Here are the steps:
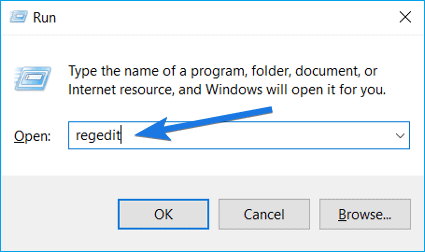
Step 1. Press Windows + R keys, type regedit to open Registry Editor.
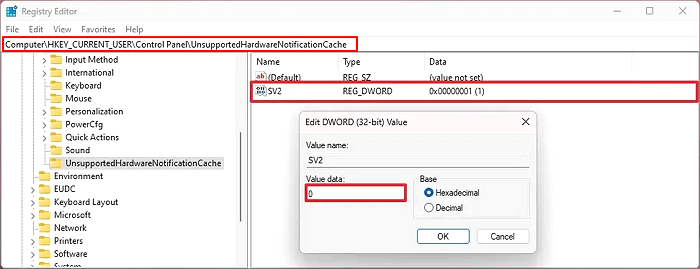
Step 2. Follow this path to open the notification value in Registry: HKEY_CURRENT_USER\Control Panel\UnsupportedHardwareNotificationCache.
Step 3. Find and right-click SV2, change its DWORD value from 1 to 0, save the change, and exit Registry.
After this, restart the PC to keep all the changes. When your computer boots up, you should be able to see the watermark disappears from your desktop screen.
#4. Tips to Protect Windows 11 with Unsupported Hardware
Some Windows 11 users may have this question here: What do I do if I already update Windows 11 from old versions and my computer is the 'unsupported hardware'.
Many of you may have the same question here. You have two options here:
Option 1. Revert Windows 11 to Previous System
For a step-by-step guide, you may follow: How to Rollback from Windows 11 to Windows 10 or Go Back to Previous Version in Windows 11 for help.
Option 2. Stay with Windows 11 with Unsupported Hardware
Most Windows 11 users with unsupported hardware may still decide to stay with Windows 11 to continue enjoying new features on their computers.
Here are some tips that you can follow to set up a stable and secure working environment on your computer. Let's see:
1. Turn on Firewall and Run Antivirus
It's necessary that you turn on Windows 11 Virus Defender on your computer.
Also, installing Antivirus software and regularly scanning your PC is necessary. It will keep your Windows 11 away from malware and virus infection.
2. Disable Windows 11 Automatic Update or Turn Off Windows 11 Update Service
As you've decided to stay with Windows 11 with unsupported hardware on your computer, it's essential that you disable Windows 11 automatic update from your PC.
To do so, you can manually turn of Windows Update Service from Windows 11:
Step 1. Press Windows + R keys, type services.msc and click "OK".
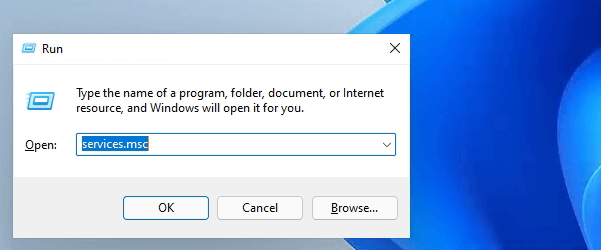
Step 2. Locate and find "Windows Update" from the Services list, and click "Stop".
Step 3. Click the drop menu next to Startup type, select "Disabled" and click "OK" to confirm.

Or you can also try to disable Windows 11 update service via EaseUS Windows CG with one click.
Step 1. Right-click on the D: partition with enough free space and select "Allocate Space".
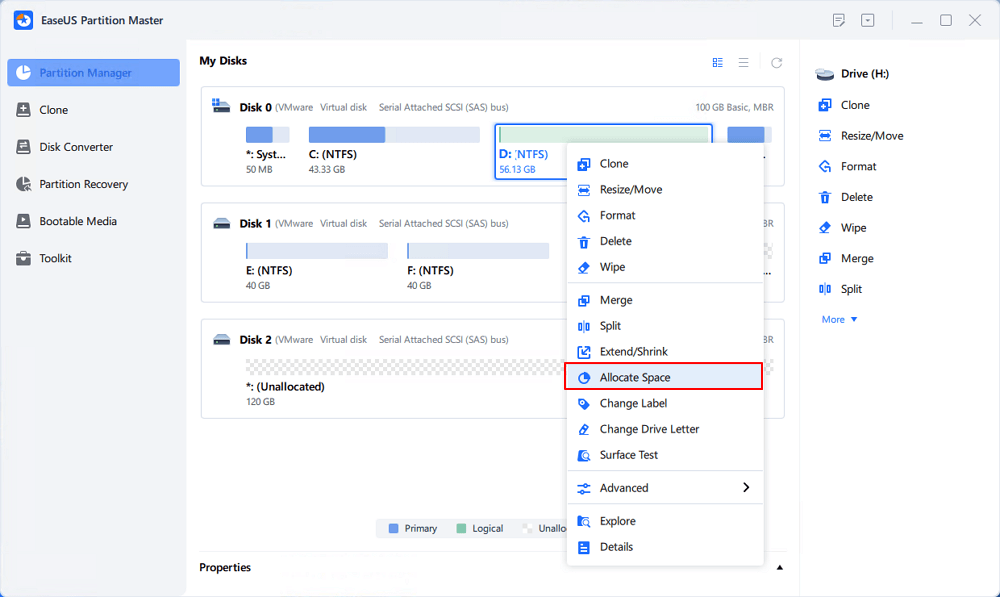
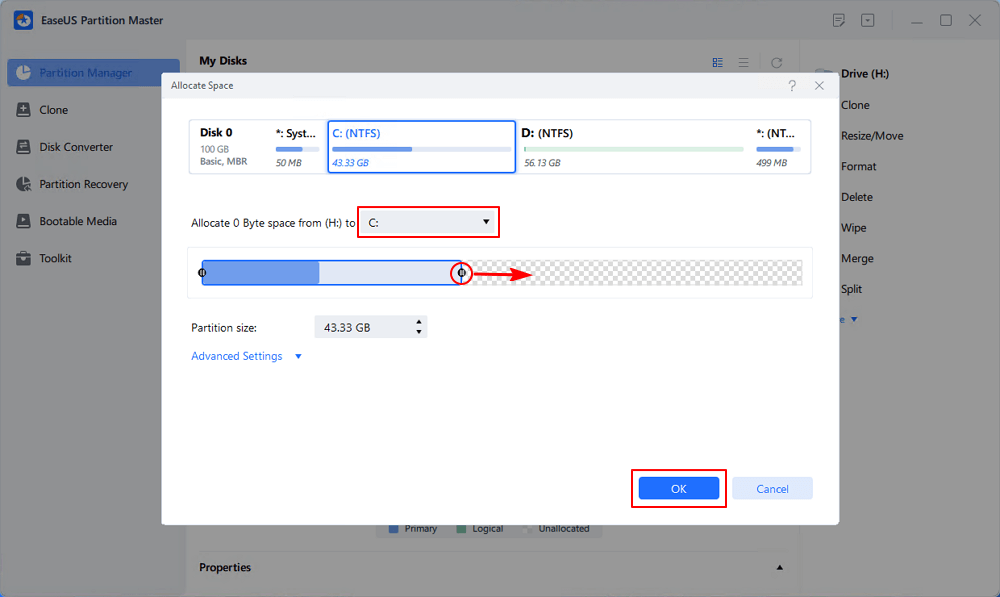
Step 2. Select the target partition - C: drive and drag the partition panel rightward to add the free space from D: drive to C: drive. Then click "OK" to confirm.
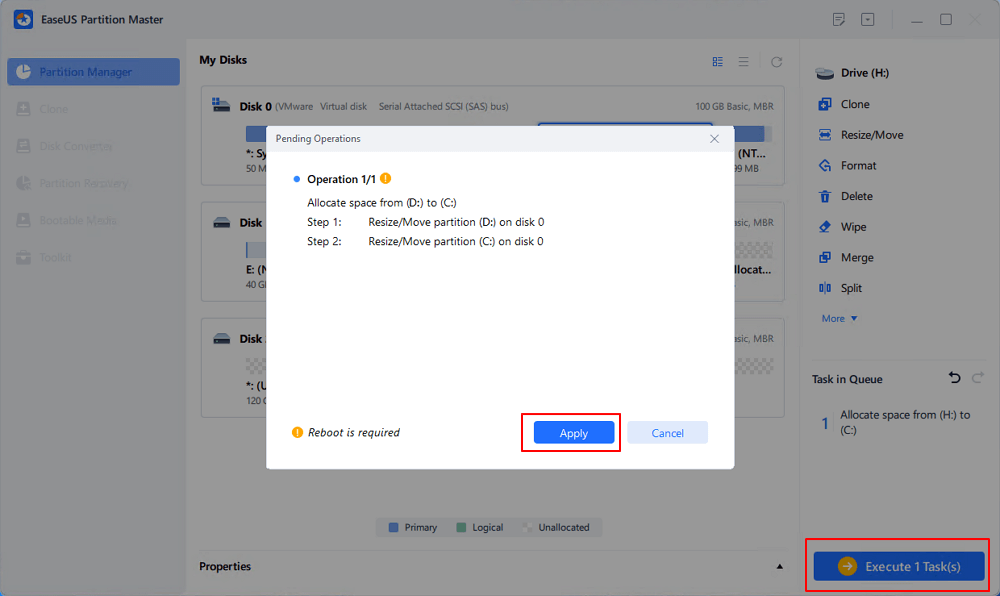
Step 3. Click the "Execute Task" button and click "Apply" to start the process of moving free space from D: drive to C: drive.
3. Extend and Leave Enough Space to C Drive
The last but not the least tip that you can try is to extend and leave enough space in the system C drive on Windows 11. Windows 11 will work as fast as new with sufficient free space in the C drive.
However, when you have very little space left in the drive, you'll notice that your Windows 11 will slow down and even get stuck while running many programs in the background. You can directly add more space to the system C drive with reliable partition manager software to avoid this issue.
EaseUS Partition Master, with its multiple disk partitioning features, can fulfill your needs here. With it, you can:
#1. Extend C Drive with Unallocated Space
Step 1: Free up unallocated space for C drive.
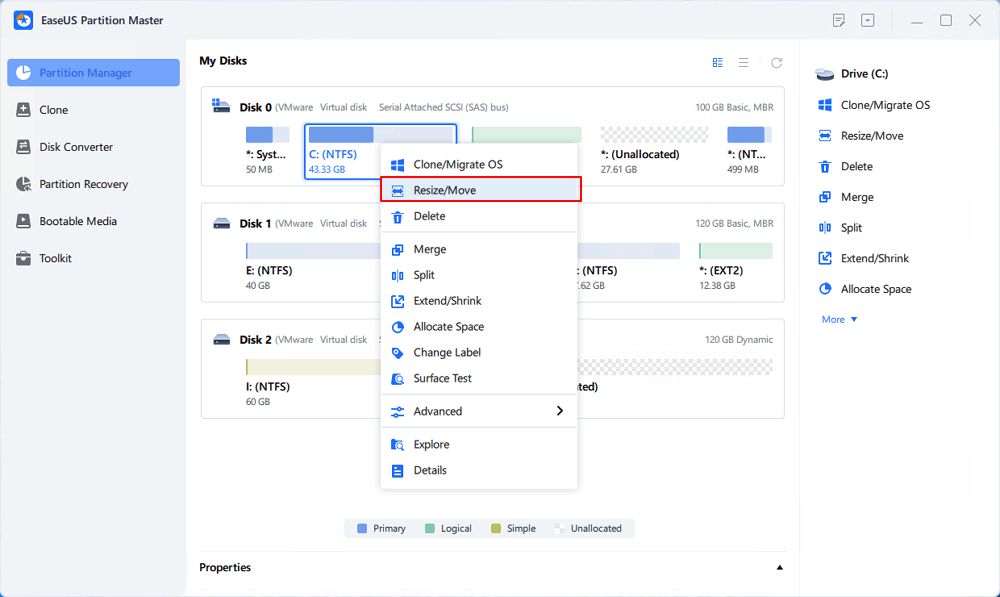
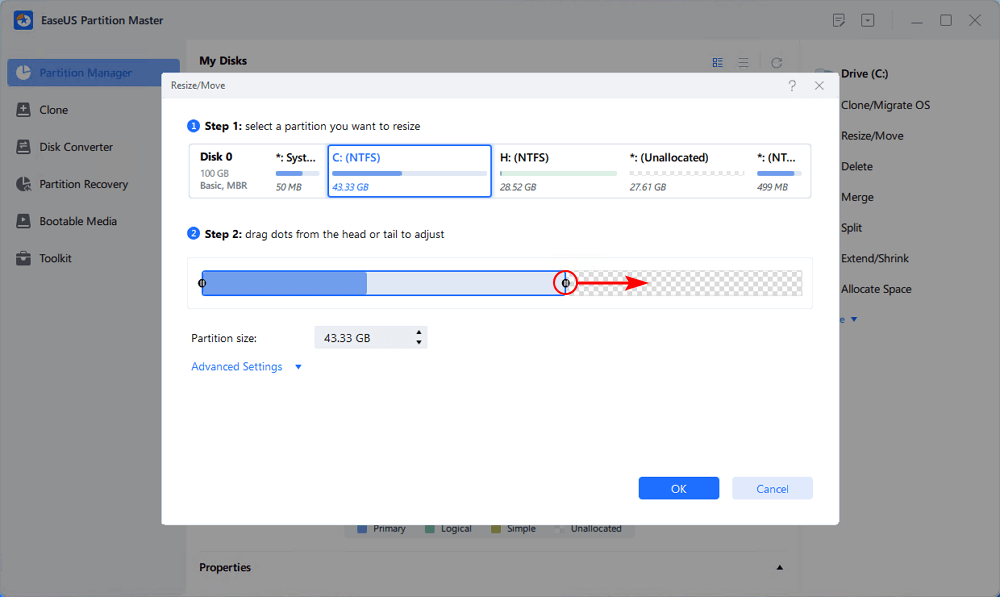
If there is no unallocated space on the system disk, go to Partition Manager and right-click on a partition next to the C: drive and select "Resize/Move".
Drag left panel of the partition to shrink and leave unallocated space behind the system C: drive and click "OK".
Step 2: Increase C drive space.
1. Right-click on C: drive and select "Resize/Move".
2. Drag the system partition end into unallocated space so to add space to C: drive, or click the "fill in all unallocated" and click "OK".
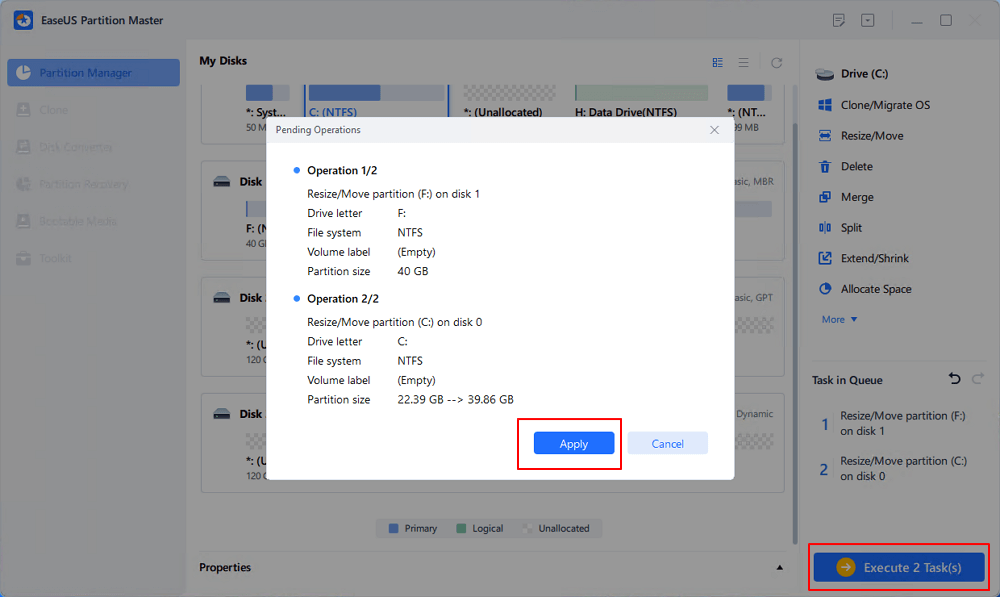
Step 3: Keep all changes to extend C: drive.
Click the "Execute Task" and click "Apply" to keep all changes so to extend the system C: drive.
#2. Extend C Drive with Space from D Drive
Step 1. Right-click on the D: partition with enough free space and select "Allocate Space".
Step 2. Select the target partition - C: drive and drag the partition panel rightward to add the free space from D: drive to C: drive. Then click "OK" to confirm.
Step 3. Click the "Execute Task" button and click "Apply" to start the process of moving free space from D: drive to C: drive.
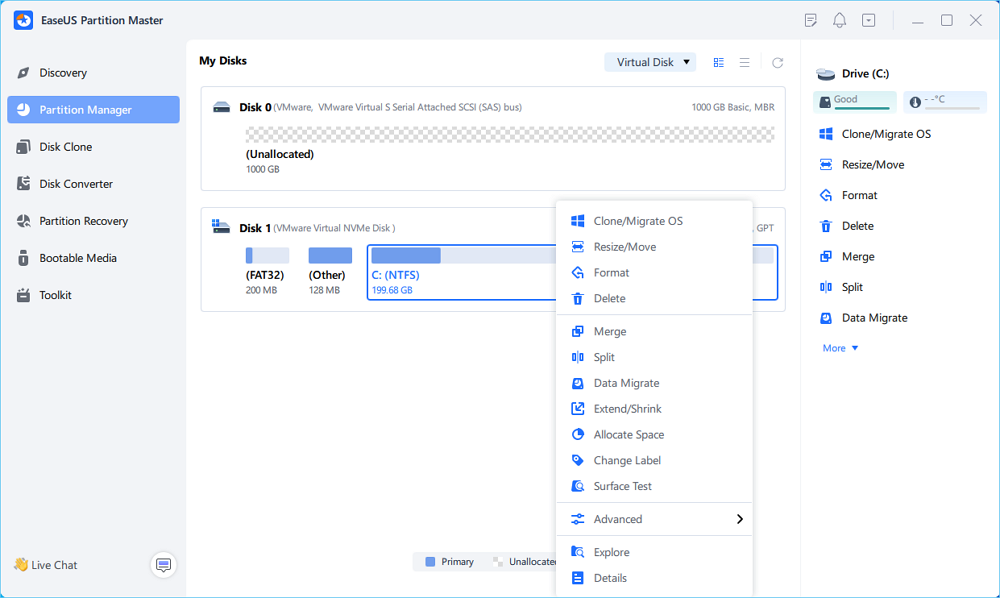
#3. Extend C Drive with a Second Disk
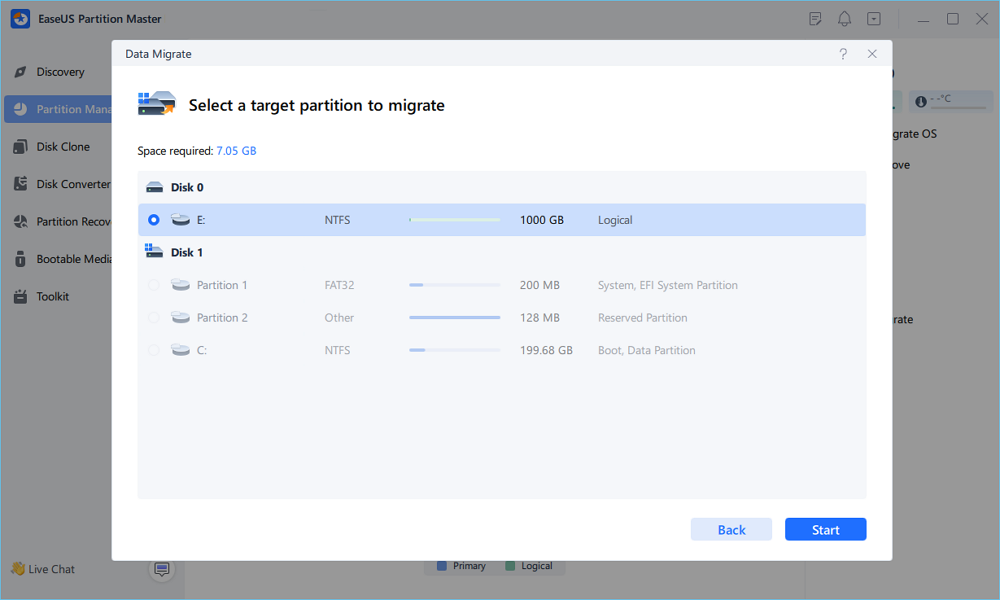
Step 1. Launch EaseUS Partition Master, navigate to "Partition Manager," right click the C drive, and select "Data Migration."
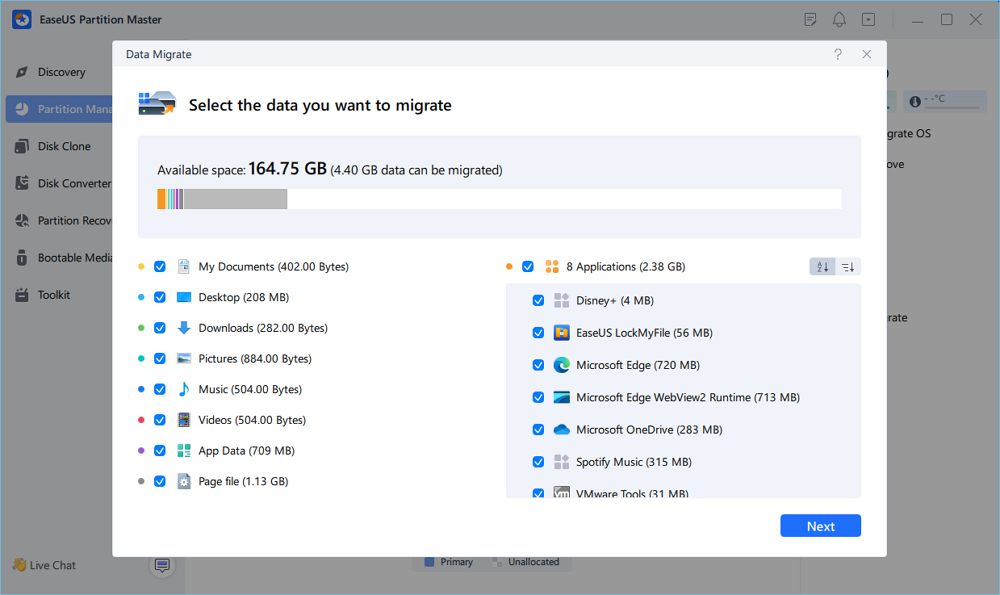
Step 2. Select the data you want to migrate and click "Next" to continue.
Step 3. Select a target partition to migrate and click "Start" to execute the task.
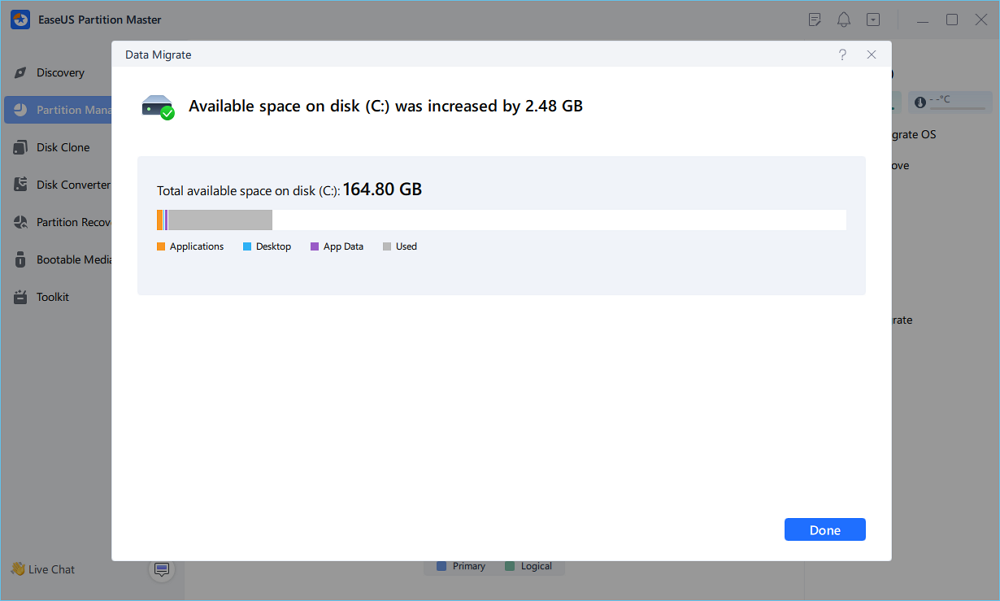
Step 4. After the migration, the available space on the C drive will be increased.
In the End
Though Microsoft has confirmed it will add the 'System requirements not met' watermark to all Windows 11 with unsupported hardware. If your computer is one of the unsupported hardware and you've already installed Windows 11 on it, it doesn't matter. You can simply remove it.
However, if you plan to install Windows 11 on your computer, which is not fully compatible with the system requirements, we suggest that you think twice before taking action. Staying with a suitable operating system and keeping your computer safe is more important than rushing to enjoy new features in Windows 11.
In the end, we hope that this page indeed solved your problem and released your worries.
How Can We Help You
About the Author
Updated by Tracy King
Tracy became a member of the EaseUS content team in 2013. Being a technical writer for over 10 years, she is enthusiastic about sharing tips to assist readers in resolving complex issues in disk management, file transfer, PC & Mac performance optimization, etc., like an expert.
Product Reviews
-
I love that the changes you make with EaseUS Partition Master Free aren't immediately applied to the disks. It makes it way easier to play out what will happen after you've made all the changes. I also think the overall look and feel of EaseUS Partition Master Free makes whatever you're doing with your computer's partitions easy.
Read More -
Partition Master Free can Resize, Move, Merge, Migrate, and Copy disks or partitions; convert to local, change label, defragment, check and explore partition; and much more. A premium upgrade adds free tech support and the ability to resize dynamic volumes.
Read More -
It won't hot image your drives or align them, but since it's coupled with a partition manager, it allows you do perform many tasks at once, instead of just cloning drives. You can move partitions around, resize them, defragment, and more, along with the other tools you'd expect from a cloning tool.
Read More
Related Articles
-
Windows Can't Format USB Drive? Format USB with 6+ Fixes [Beginners' How-To Guide]
![author icon]() Tracy King/2026/07/01
Tracy King/2026/07/01 -
Can't Initialize Disk: 5 Quick Fixes Here
![author icon]() Oliver/2026/06/29
Oliver/2026/06/29 -
M.2 Temperature Monitor | How to Check M.2 Temperature [Step-by-Step]
![author icon]() Cici/2026/06/29
Cici/2026/06/29 -
Fix 'Windows Cannot Be Installed to Disk 0 Partition 1' Error
![author icon]() Daisy/2026/06/29
Daisy/2026/06/29


