Page Table of Contents
Updated on Jan 21, 2026
| Workable Solutions | Step-by-step Troubleshooting |
|---|---|
| Windows 11 Files Backup |
|
| Windows 11 System Backup |
|
| Windows 11 Partition Backup |
For users who want to back up all files on a partition...Full steps |
No matter what computer or what operating system you use, you should make a habit of backing up your data regularly. In Windows 10, some users may use the File History that comes with Windows to back up different file versions to prevent loss of unsaved data; some users may choose to manually back up data to the cloud drive, and other users may prefer third-party backup software because such software is more powerful and comprehensive than the system's built-in backup functions.
So what options do users have when it comes to backups after upgrading to Windows 11? This post will tell you how to backup Windows 11, including backing up files, system, and disk.
Windows 11 Backup - Files, Folders and Desktop Data
When it comes to backup, most users first think of backing up important files, such as Word and Excel documents, essays, etc. In the Windows system, there is a function for backing up files, called File History. With it, you can retrieve documents from days, even months ago at any time. You can also restore files that were accidentally deleted, and you can also compare the difference between a file before and now. In short, File History can back up all the processes of a file from creation to completion. In Windows 11, the operation to set up File History is a little different from that in Windows 10. Let's see how it works in the new Windows system.
Backup Files with File History
Step 1. Click the Start tab in Taskbar, search File History, and open the best match.
Step 2. In Windows 11, you need to back up selected files to an external drive. So connect a backup drive to your computer and turn on File History.
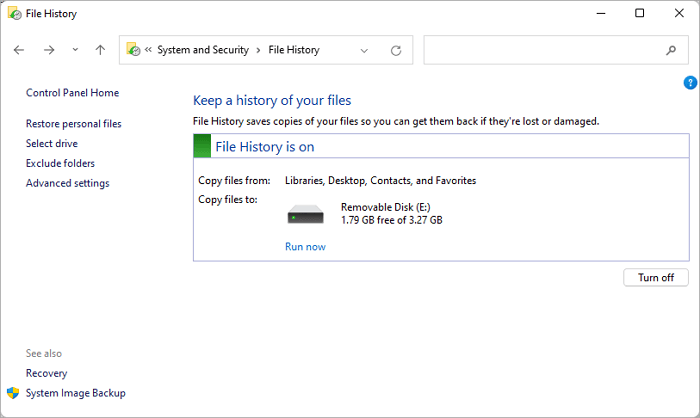
Step 3. File History will automatically copy files from Libraries, Desktop, Contacts, and Favorites to the connected drive.
Step 4. On the left panel, there are a few options for you to customize the backup plan.
- Restore personal files: Restore files from a File History backup record.
- Select drive: You can change the backup destination here. Only external drive and network drive are available.
- Exclude folders: Here you can choose not to backup specific folders or libraries.
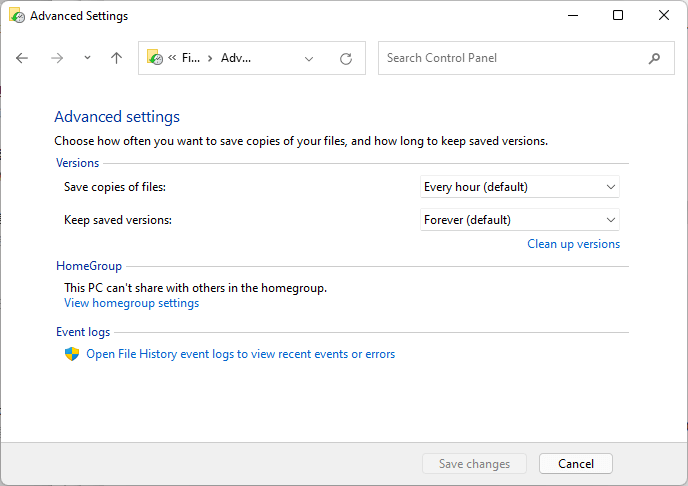
- Advanced settings: Choose how often you want to save copies of your files, and how long to keep saved versions. By default, your computer will save copies of files every hour and save the file versions forever.
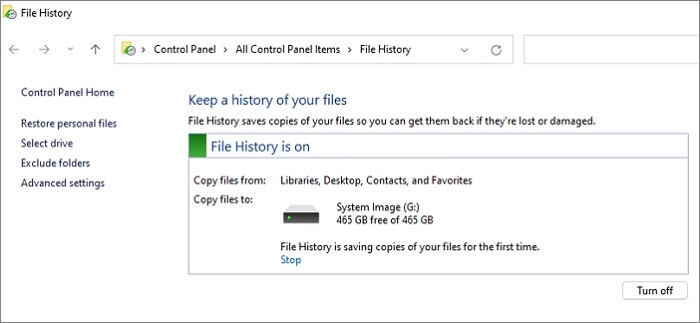
Step 5. Once you have customized the backup plan, File History will start the first backup automatically. You can stop at any time by clicking the stop button.
As you can see, Windows 11 limited the folders you can back up with File History. You can't choose to back up other files except for a few specified folders. We guess Microsoft made this adjustment is to lead more users to use OneDrive to sync data. Fine, let's see what's new about Windows 11 OneDrive syncing.
Sync Files with OneDrive
Step 1. Go to Settings > Accounts > Windows backup, you can see the new built-in backup feature of Windows 11. The first tab is OneDrive folder syncing. Once enabling this feature, the folders you select will be protected and available across your devices. Surely, you need to log into your Microsoft account on all your devices.
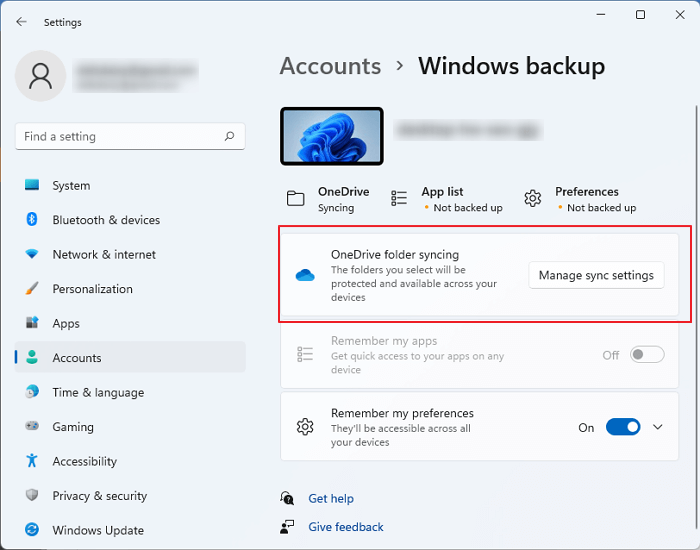
Step 2. Click Manage sync settings, you can see that only Desktop, Documents, and Pictures can be synced to your OneDrive. And once started, new and existing files will be added to OneDrive as a backup.
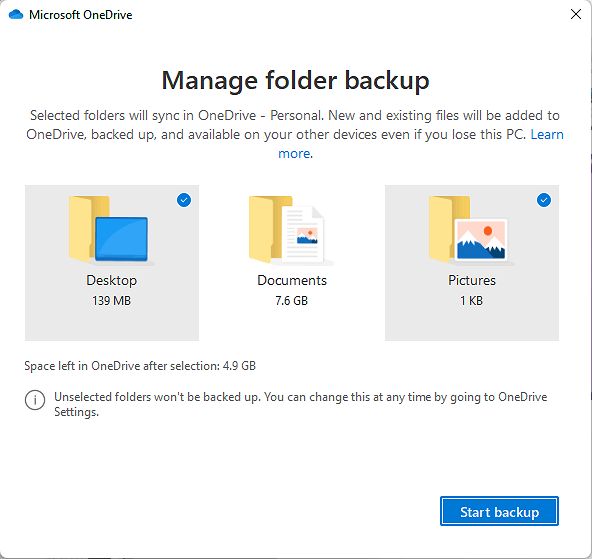
Step 3. Click Start backup, the first syncing process will start.
Step 4. When the syncing process is finished, you can check the backup status by clicking the OneDrive icon in Taskbar. You can also pause syncing or choose to close OneDrive.

Backup More Files with Backup Software
From the above two Windows 11 built-in backup methods, you can see that Windows doesn't give users much authority to customize the backup folders. What if the user wants to backup folders other than those mentioned above? Here comes a recommended backup software - EaseUS Todo Backup.
The highlight of EaseUS Todo Backup is that you can add any folders you want to the backup plan. And you can choose to backup files to a local drive, external drive, cloud drive, and network drive. Simply put, it has the same functionality as the built-in backup tool but is more powerful, and anyone using it can truly customize the file backup schedule.
Secure Download
Step 1. To initiate a backup, click the Select backup contents option.

Step 2. There are four data backup categories, File, Disk, OS, and Mail, click File.

Step 3. On the left, both local and network files will be shown. You may extend the directory to pick the backup files.

Step 4. Follow the on-screen instructions and choose a location to store the backup.

Click Options to encrypt the backup with a password in Backup Options, then click Backup Scheme to specify the backup schedule and start the backup at a certain event. There are also other additional choices you may choose to tailor the backup process to your requirements.

Step 5. The backup may be stored on a local disk, EaseUS' online service, or NAS.

Step 6. EaseUS Todo Backup enables customers to back up data to a third-party cloud drive as well as its own cloud drive.
If you want to back up data to a cloud drive provided by a third party, choose Local Drive, scroll down to add Cloud Device, and then add and log in to your account.

You can also choose the EaseUS cloud drive. Sign up for an EaseUS Account, then click EaseUS Cloud and log in.

Step 7. Click Backup Now to begin the backup process. The backup job will be presented as a card on the left side of the panel after it has been finished. Right-click the backup job to handle it further.

Windows 11 Backup - System Image
In addition to backing up files, it is also necessary to back up the system, because such a backup includes all system files and configurations on your computer, which can help you to reinstall the system or restore a usable system that has already installed all kinds of software you need.
Backup and Restore (Windows 7)
In Windows 11/10/8, users could use the Backup and Restore (Windows 7) feature to create a system backup image. It is highly recommended for you to back up the system to an external hard drive or another disk. When you prepare the backup drive, follow the steps below to start to create a system image.
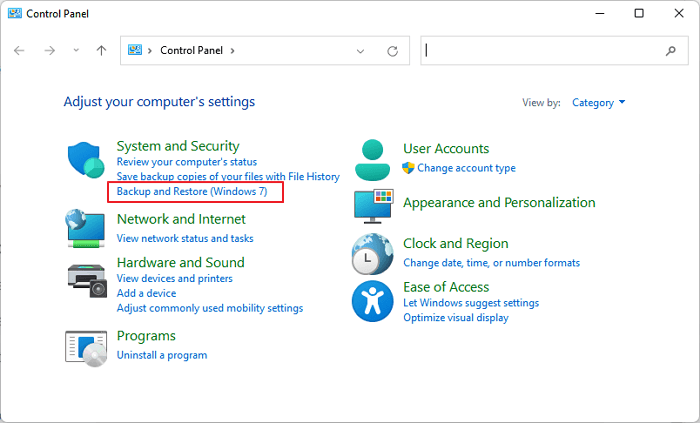
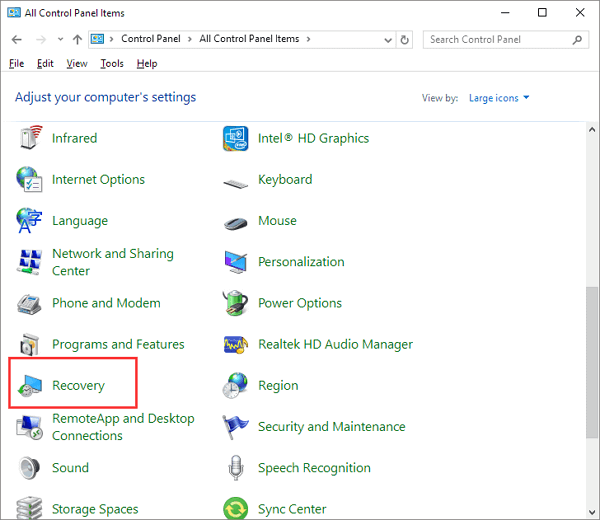
Step 1. Open Control Panel and click Backup and Restore (Windows 7).
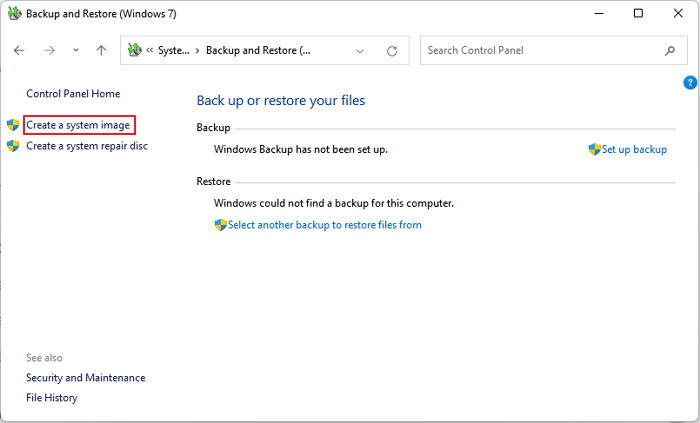
Step 2. On the left side, there is an option called Create a system image, select to enter.
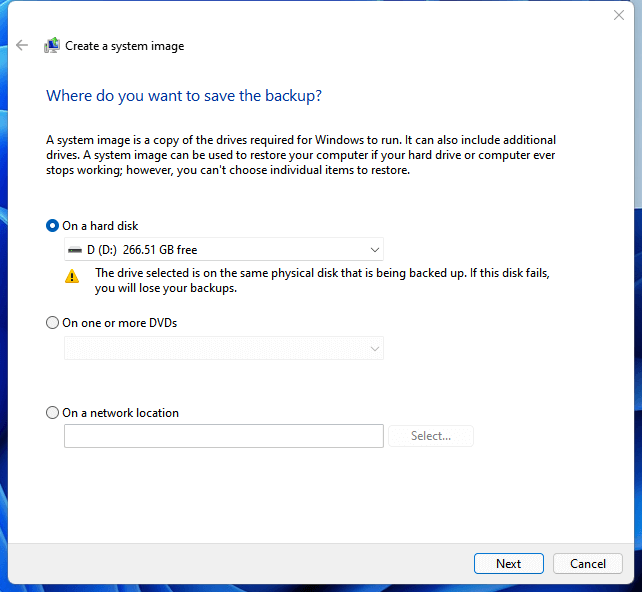
Step 3. Choose the system backup location. You can save the image on a hard disk, DVDs, or a network location.
Step 4. The system partition and system drive will be selected by default, click Next to continue.
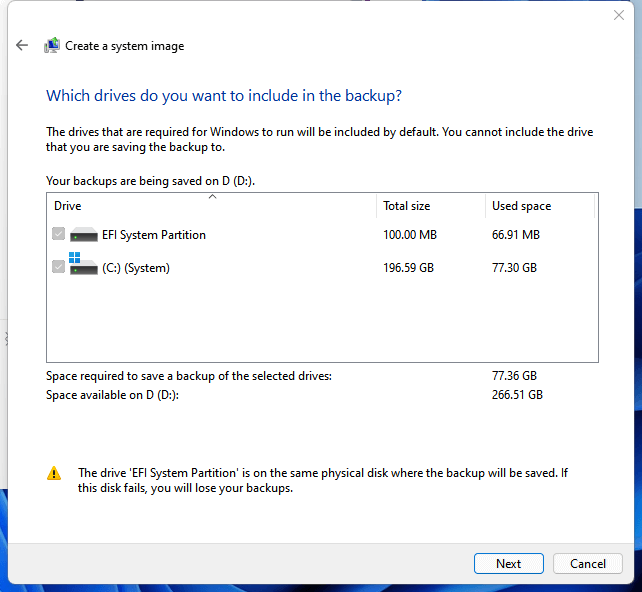
Step 5. Confirm the backup settings again and click Start backup.
It will take about 10 minutes to create a system image, wait with patience.
EaseUS Todo Backup
There is little difference between EaseUS Todo Backup and the tool that comes with Windows 11 in the function of creating system images. However, EaseUS Todo Backup can further customize the system backup plan, such as making scheduled backups, setting the backup file retention time, and supporting saving system backups on a cloud drive.
Step 1. To initiate a backup, click the Select backup contents option.
Step 2. There are four data backup categories, File, Disk, OS, and Mail, click File.
Step 3. On the left, both local and network files will be shown. You may extend the directory to pick the backup files.
Step 4. Follow the on-screen instructions and choose a location to store the backup.
Click Options to encrypt the backup with a password in Backup Options, then click Backup Scheme to specify the backup schedule and start the backup at a certain event. There are also other additional choices you may choose to tailor the backup process to your requirements.
Step 5. The backup may be stored on a local disk, EaseUS' online service, or NAS.
Step 6. EaseUS Todo Backup enables customers to back up data to a third-party cloud drive as well as its own cloud drive.
If you want to back up data to a cloud drive provided by a third party, choose Local Drive, scroll down to add Cloud Device, and then add and log in to your account.
You can also choose the EaseUS cloud drive. Sign up for an EaseUS Account, then click EaseUS Cloud and log in.
Step 7. Click Backup Now to begin the backup process. The backup job will be presented as a card on the left side of the panel after it has been finished. Right-click the backup job to handle it further.
Window 11 Backup - Backup Disk or Partitions
In addition to files and systems, there may also be users who want to back up all files on a partition. In Windows 11, unfortunately, users are not supported to back up disks or partitions. If you have such a need, then we still recommend you to use EaseUS Todo Backup. You can see that EaseUS Todo Backup is a comprehensive tool when it comes to backup, it can satisfy almost all users' backup needs.
Step 1. To initiate a backup, click the Select backup contents option.
Step 2. There are four data backup categories, File, Disk, OS, and Mail, click File.
Step 3. On the left, both local and network files will be shown. You may extend the directory to pick the backup files.
Step 4. Follow the on-screen instructions and choose a location to store the backup.
Click Options to encrypt the backup with a password in Backup Options, then click Backup Scheme to specify the backup schedule and start the backup at a certain event. There are also other additional choices you may choose to tailor the backup process to your requirements.
Step 5. The backup may be stored on a local disk, EaseUS' online service, or NAS.
Step 6. EaseUS Todo Backup enables customers to back up data to a third-party cloud drive as well as its own cloud drive.
If you want to back up data to a cloud drive provided by a third party, choose Local Drive, scroll down to add Cloud Device, and then add and log in to your account.
You can also choose the EaseUS cloud drive. Sign up for an EaseUS Account, then click EaseUS Cloud and log in.
Step 7. Click Backup Now to begin the backup process. The backup job will be presented as a card on the left side of the panel after it has been finished. Right-click the backup job to handle it further.
Final Words
In general, Windows 11 still applies with backup utilities that can satisfy the backup needs of most people. But compare with Windows 10, the built-in backup tools have more limitations. It seems that Windows 11 want to follow the new trend of backing up with cloud drive, and also educate its users to do that, too. But if you still prefer to use a hard drive to store your backup files, third-party backup software like EaseUS Todo Backup might be a good choice.
Was this page helpful? Your support is truly important to us!

EaseUS Todo Backup
EaseUS Todo Backup is a dependable and professional data backup solution capable of backing up files, folders, drives, APP data and creating a system image. It also makes it easy to clone HDD/SSD, transfer the system to different hardware, and create bootable WinPE bootable disks.
Secure Download
-
Updated by
![]()
Daisy
Daisy is the Senior editor of the writing team for EaseUS. She has been working at EaseUS for over ten years, starting as a technical writer and moving on to being a team leader of the content group. As a professional author for over ten years, she writes a lot to help people overcome their tech troubles.…Read full bio -
Written by
![]()
Jean
Jean is recognized as one of the most professional writers in EaseUS. She has kept improving her writing skills over the past 10 years and helped millions of her readers solve their tech problems on PC, Mac, and iOS devices. …Read full bio
Related Articles
![]() How to Solve Outlook Not Syncing with Gmail[2026 Tutorial]
How to Solve Outlook Not Syncing with Gmail[2026 Tutorial]![]() How to Update BIOS Windows 10
How to Update BIOS Windows 10![]() Boot Device Not Found Hard Disk 3F0 Error on HP [FIXED]
Boot Device Not Found Hard Disk 3F0 Error on HP [FIXED]![]() Windows 10 Backup Error Code (0x807800C5) – Why & How to Fix
Windows 10 Backup Error Code (0x807800C5) – Why & How to Fix![]() How Do I Get 100GB Free Cloud Storage
How Do I Get 100GB Free Cloud Storage![]() [Download] Windows 10 Recovery Tool for 32 Bit and 64 Bit
[Download] Windows 10 Recovery Tool for 32 Bit and 64 Bit


EaseUS Todo Backup

Smart backup tool for your files, disks, APPs and entire computer.
Topic Clusters


Interesting Topics