Page Table of Contents
Reviews and Awards
The need for remote file transfer is becoming increasingly common in today's digital age. Whether you're working from home, need to access office files, or share documents with a team spread across different locations, remote file transfer is the key to ensuring your work continues smoothly without geographical barriers.
In this article, EaseUS will show you how to perform remote file transfer in 7 quick and simple ways. Rest assured, these methods are designed to be user-friendly and easy to follow, ensuring that you can implement them without any hassle.
PAGE CONTENT:
How to Perform Remote File Transfer - 7 Safe Tools
When it comes to remote file transfer, safety, speed, and ease of use are paramount. Let's go through the seven tools to see how they can help you transfer files remotely one by one.
Method 1. EaseUS Todo PCTrans
Countless tools are available for remote file transfer, each offering unique advantages and limitations. Choosing the best tool and solution can be difficult. But don't worry—we will simplify this job for you. There's a perfect solution for everyone!
EaseUS Todo PCTrans is your one-stop shop for effortless file transfer across devices. This powerful software boasts a dedicated "Fast File Transfer" feature, breaking geographical limitations and letting you easily share files. EaseUS Todo PCTrans is ideal for beginners, with a user-friendly interface that guides you through the entire process.
Pros of using EaseUS Todo PCTrans:
- Safety: Encryption Transfer ensures your files are securely transferred.
- Fast: Quickly moves files without long wait times.
- Compatibility: Works seamlessly across different devices and operating systems.
Step 1. Set Up the Old PC
- First, install and launch EaseUS Todo PCTrans and select Data Transfer on the left panel of the main interface.
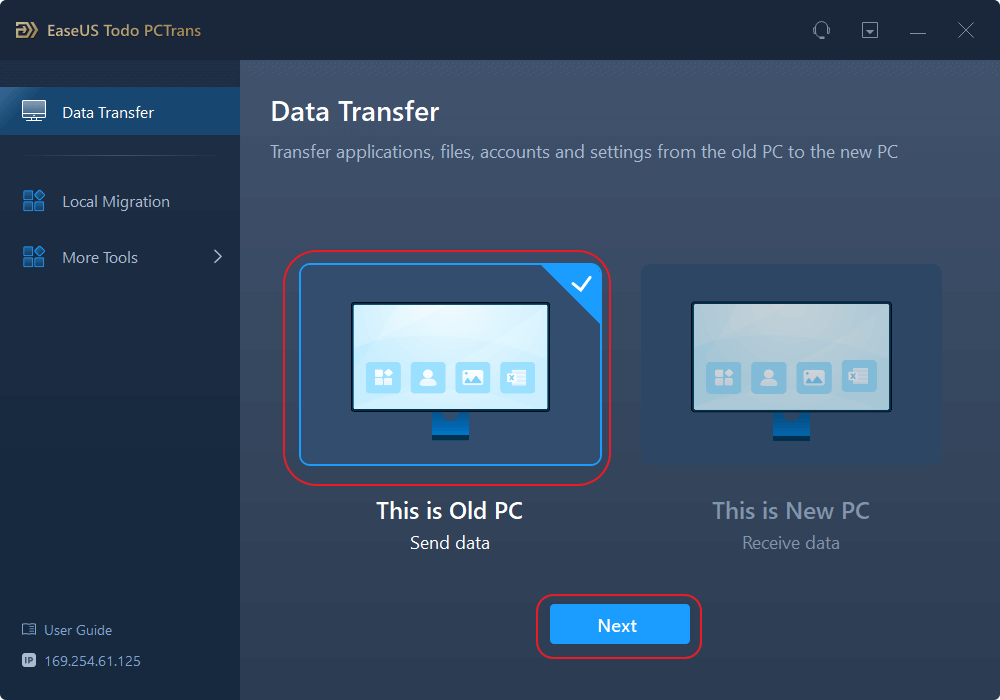
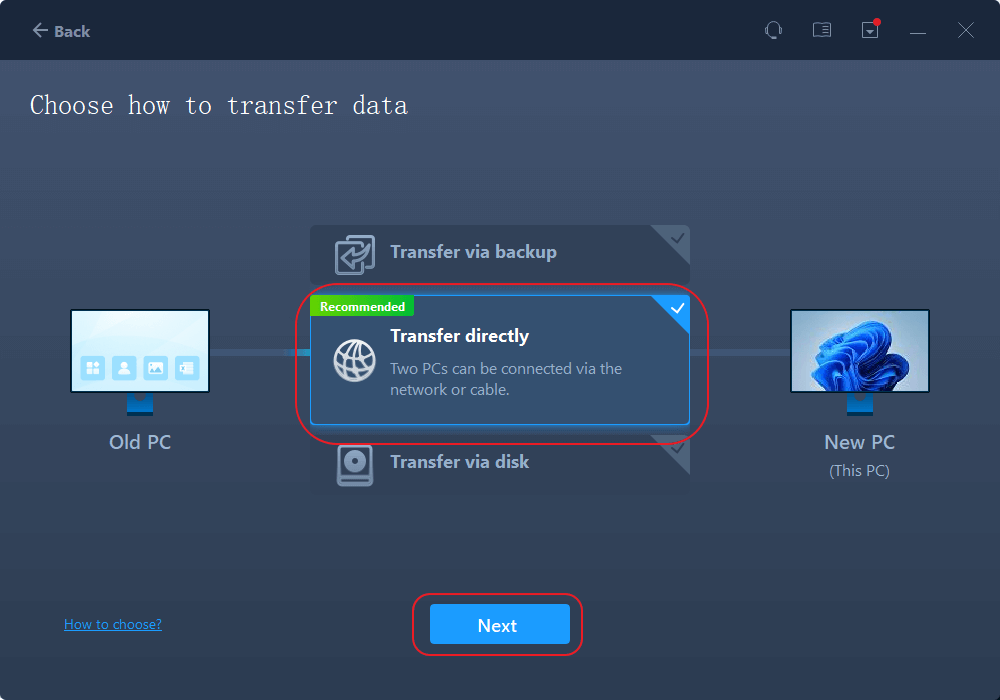
- Select "Transfer Directly" and click "Next" to continue.
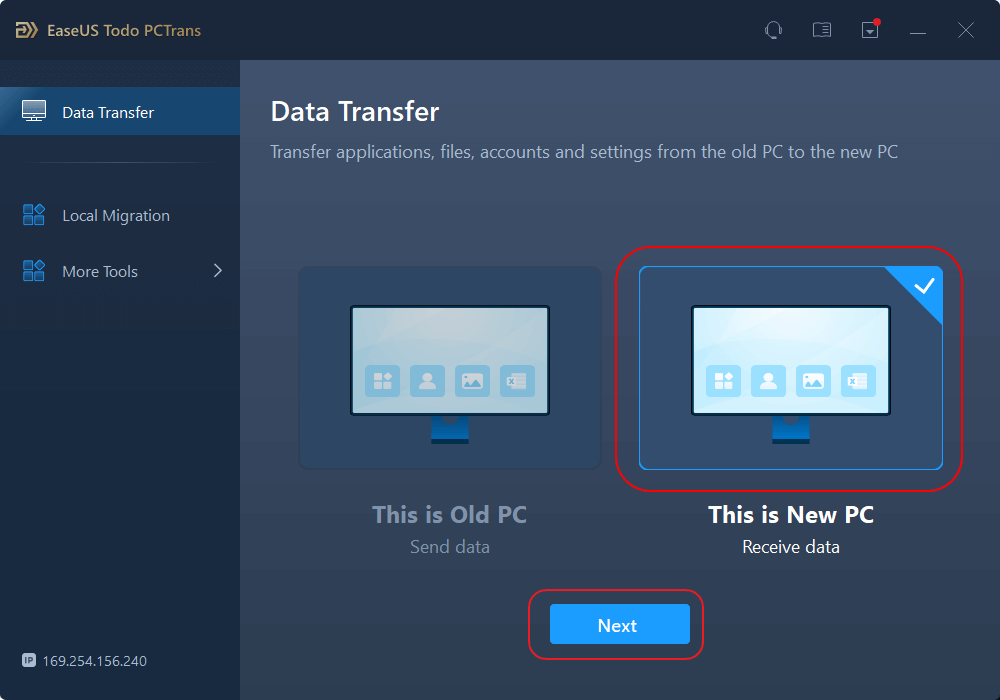
Step 2. Set Up the New PC
- Download and launch EaseUS Todo PCTrans on the new computer; select "This is New PC" and click "Next".
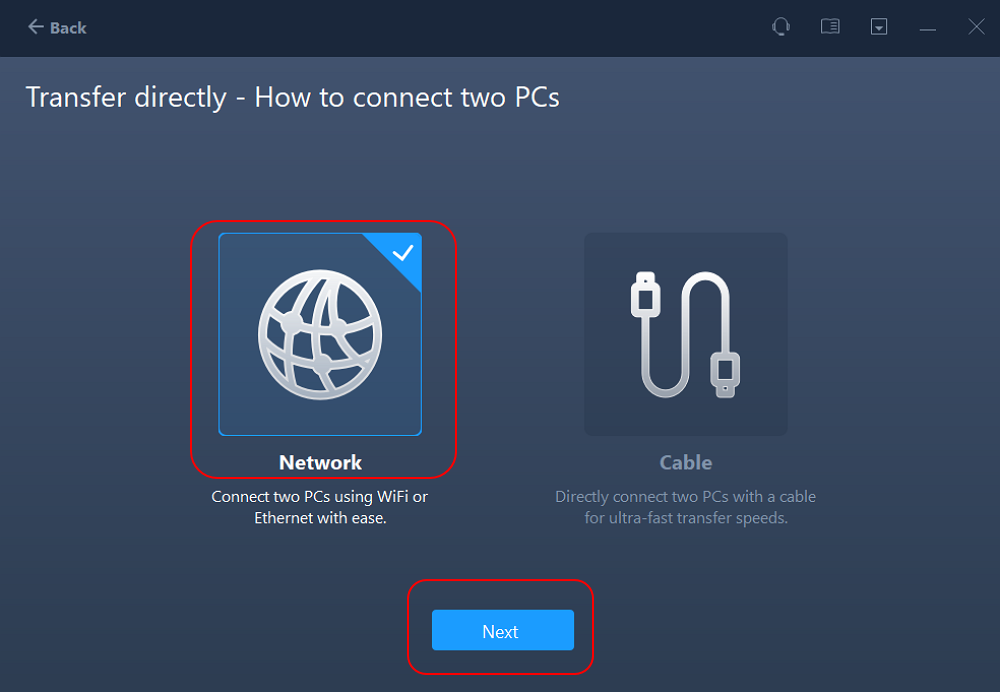
- Select "Transfer directly" and click "Next" to continue.
- Select "Network" and click Next to continue. This will automatically scan the old PC. (Make sure the two PCs are connected to the same LAN.)
- Select the target PC and click Connect. Then, it will take some time to scan and analyze the data in old PC.
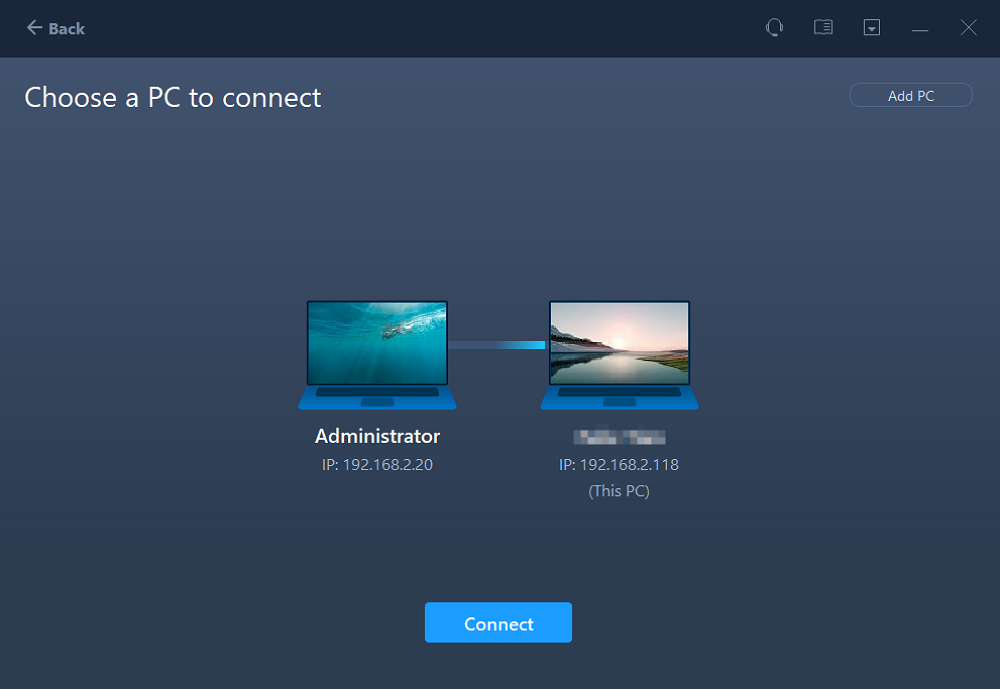
Step 3. Select the Files to Transfer
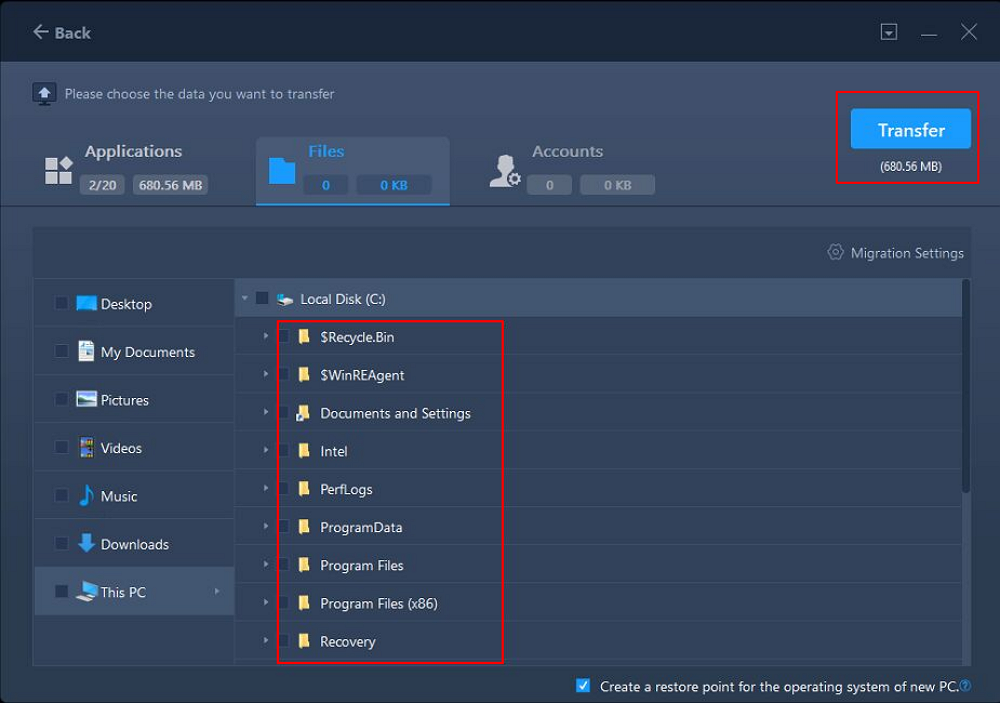
- Finally, on the new PC, select the Files tab, select the files you need to transfer. Then, click "Transfer" to start.
In addition to file transfer across devices, EaseUS Todo PCTrans also has other notable functions:
- Migrate programs to new hard drive.
- Transfer games from PC to SD card.
- Safely clean unnecessary system files.
- Back up your entire computer for protection.
If you want to transfer programs and apps to a new drive, you can download this tool and explore its additional features.
Method 2. Use Windows Remote Desktop
Take advantage of Windows Remote Desktop Connection to access another computer remotely and transfer files with ease. This built-in Windows feature allows you to seamlessly connect to a remote computer and transfer files using the "Copy" and "Paste" functions, eliminating the need for additional software or installations. See the steps below:
Step 1. On the computer you want to access files from (local computer), search for "Remote Desktop Connection" in the search box and click on it to open it.

Step 2. Click the "Local Resources" tab in the Remote Desktop Connection window. Then, check the Clipboard.

Step 3. Return to the "General" tab. In the "Computer" and "User name" fields, type the computer's user name and IP address containing the files you want to transfer (remote computer). Click "Connect" to establish a remote connection.

Step 4. Once connected, you'll see the remote computer's desktop. Select the files you want to transfer and press Ctrl + C to copy them.
Step 5. Switch back to your local computer. Go to the destination folder where you want to paste the copied files. Press Ctrl + V to paste the files.
If you find these methods helpful, please click the social buttons below to share with your friends.
Method 3. Google Chrome Remote Desktop
Google Chrome Remote Desktop is another great option for cross-platform file transfer, but it requires both devices to have Google Chrome installed and active internet access. Here is the guide:
Step 1. Open Chrome and navigate to the Chrome Remote Desktop web store page. Click "Add to Chrome" and "Add extension" to confirm the installation.

Step 2. Click "Accept & Install" to complete the installation.
Step 3. Launch the CRD extension. Assign a name to your computer and create a secure PIN (minimum of 6 numbers).

Step 4. Open Chrome on the client's computer and navigate to the Chrome Remote Desktop site. Log in to the same Google account. Once logged in, you will see the available computers.
Step 5. Locate the host computer in the list and click on it. Enter the PIN you created earlier to establish a remote connection.
Step 6. Once connected, locate the arrow icon on the right side of the remote desktop window and click on it to expand the sidebar.
Step 7. In the File Transfer section, you'll see options for "Upload file" and "Download file."
Step 8. Click "Upload file." A file manager window will open on your local computer. Select the desired file and click "Open" to initiate the upload.
Step 9. Click "Download file." A file manager window will appear on the remote computer. Choose the file you want to download and click "Open." A "Save File" window will pop up on your local computer. Select a location and click "Save" to download the file.
Method 4. Use Sharing Folder
Network file sharing provides easy access to files on another computer within the same local network. However, it has limitations. Both computers must be on the same network, making accessing files from remote locations or long distances unsuitable. Below is how you can use it:
Step 1. On PC A, navigate to the folder you want to share, right-click on it, choose "Share with" or "Give access to," and choose "Specific people."

Step 2. A window will appear. From the drop-down menu, choose who can access the folder. If you select to share with Everyone, it will be accessible on your local network to anyone, even if they don't have a password. Click Add.
Step 3. Click on the user you just added to the list. A permissions window will open. Here, you can choose what level of access each user has: Read or Read/Write.
Step 4. Once you've chosen the users and set permissions, click "Share." You'll see a confirmation message. Click "Done" to finalize the sharing process.
Step 5. On Computer B, navigate to the "Network" section.

Step 6. Computer A's name should be listed under "Network" or "Workgroup." Double-click the computer name.
Step 7. You'll see a list of shared folders on Computer A. You can copy the shared folder anywhere.
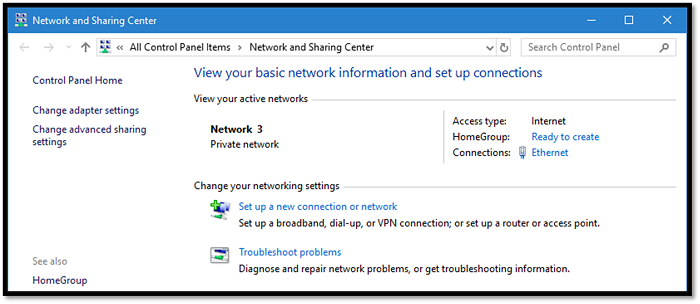
Note: If you're unable to access shared items on a Windows 10 computer, go to "Network and Sharing Center" > "Change advanced sharing settings" and modify the following options on both systems:
- Turn on network discovery.
- Turn on file and printer sharing.
- Turn on sharing so anyone with network access can read and write files in the Public folders.
- Turn off password-protected sharing.
Click here to learn about Network and Sharing Center in detail:
Ultimate Guide on Network and Sharing Center [Updated 2024]
In this article, we will explore how to access and use the Network and Sharing Center to enhance your productivity.
Method 5. Use Nearby Sharing
Nearby Sharing, a feature exclusive to Windows 10 and 11, is designed for short-distance file transfers between physically close devices. However, this method requires both devices to be connected to the same network.
Below is how to do it:
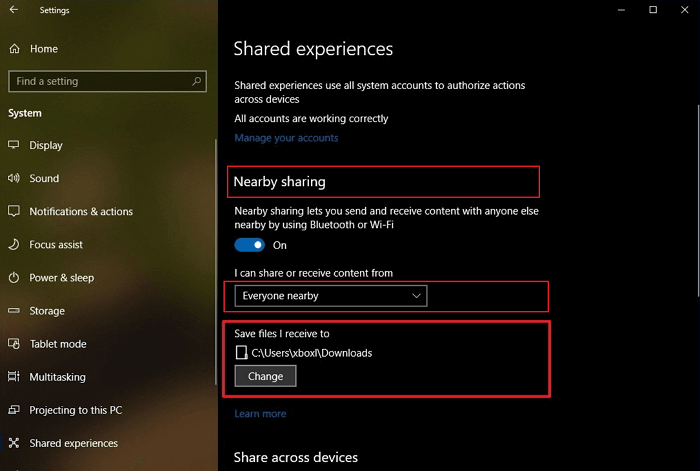
Step 1. Go to Settings> System> Shared Experiences, and turn on the Nearby sharing toggle.

Step 2. Select your preferred sharing option from the drop-down menu:
- Everyone nearby: Your PC will share or receive content from all nearby devices.
- My devices only: Your PC will share or receive content only with devices using the same Microsoft account.

Step 3. Click Change to select the folder location to store the transferred files.

Step 4. Open File Explorer, right-click the file you want to transfer and select Share from the context menu.

Step 5. In the pop-up window, select the target device you want to transfer files to.
Step 6. The target device will receive a notification. Click Save & Open to initiate the file transfer.
If you encounter the error of Nearby Sharing not working, Don't worry. Read the article below for help.
How to Fix Windows 10 Nearby Sharing Not Working | 4 Ways
If your Nearby Sharing does not work and you can't transfer files between PCs, you can read and find multiple solid ways in this passage.
Method 6. Use Email
Email is a common and convenient method for sending files. However, the attachment size is restricted from 25 MB to 50 MB. It makes Email unsuitable when you're looking for large file transfer solutions.
Here is a guide to transfer files using Gmail:
Step 1. Open Gmail and click the "Compose" button.

Step 2. Locate the paperclip icon (often labeled "Attach" or similar) and click on it.

Step 3. A file selection window will appear. Locate the file you want to send and select it. Click "Open" to attach the file to your Email.

Step 4. Enter the recipient's email address in the "To" field, and click "Send".
Method 7. Use Cloud Service
Cloud storage (e.g., Google Drive) lets you transfer files remotely. You can upload files to the cloud and access them from any device with an internet connection, offering incredible flexibility—your files are always available. Here is the guide:
Step 1. Open Google Drive, and click "New" from the top left corner.

Step 2. From the drop-down menu, choose any option according to your preferences. I'd click "File upload".

Step 3. You'll be prompted to log in to your system. Locate the file you want to upload and click "Open."

Step 4. Once the file is loaded, you can send it to anyone by copying a shareable link.
Step 5. Right-click on the uploaded file in the Google Drive. Click "Share."

Step 6. Set the privacy of your file under "General access" and click "Copy link."

Step 7. Now, you can share this copied link with anyone through Email or instant messaging services, such as WhatsApp or WeChat, so they can download it to their PC.
Don't forget to share this article if you find it helpful in moving files across distances.
Conclusion
Mastering remote file transfer is essential with the growing need for remote collaboration and flexible work arrangements. This article covers a range of options to suit various needs, from using built-in tools like Windows Remote Desktop to the flexibility of cloud storage services like Google Drives. For those prioritizing fast transfer speed, EaseUS Todo PCTrans stands out with its user-friendly interface and dedicated "Fast File Transfer" feature, ensuring swift and secure file transfers.
FAQs About Remote File Transfer
Do you have more queries about remote file transfer? Check out the FAQs below.
1. How do I transfer files between remote computers?
There are various methods to transfer files between remote computers, such as:
- EaseUS Todo PCTrans: This software offers a "Fast File Transfer" feature for quick and secure transfers.
- Windows Remote Desktop: The "Copy" and "Paste" functions move files between connected computers.
- Google Chrome Remote Desktop: Upload and download files using this cross-platform solution.
- Cloud Services: Upload files to a cloud platform like Google Drive and access them from any device.
2. What is remote transfer?
Remote transfer refers to moving files from one device to another over a network connection without being physically present at either location. It is commonly done using internet-based services or local network connections.
3. What is the fastest remote file transfer?
For the fastest remote file transfer, EaseUS Todo PCTrans is highly recommended. Its "Fast File Transfer" feature ensures rapid and secure transfers, making it ideal for users who need to move files quickly and efficiently.
About the Author
Sherly joined EaseUS in 2022 and she has always loved writing articles and enjoys the fun they bring. She receives professional training here, focusing on product performance and other relative knowledge. She has written over 200 articles to help people overcome computing issues.
Reviews and Awards
-
EaseUS Todo PCTrans Free is a useful and and reliable software solution created to serve in computer migration operations, be it from one machine to another or from an earlier version of your OS to a newer one.
Read More -
EaseUS Todo PCTrans is by the folks at EaseUS who make incredible tools that let you manage your backups and recover your dead hard disks. While it is not an official tool, EaseUS has a reputation for being very good with their software and code.
Read More
-
It offers the ability to move your entire user account from your old computer, meaning everything is quickly migrated. You still get to keep your Windows installation (and the relevant drivers for your new PC), but you also get all your apps, settings, preferences, images, documents and other important data.
Read More
Related Articles
-
How to Move Programs from C Drive to D Drive Windows 10
![author icon]() Tracy King/2026/01/29
Tracy King/2026/01/29 -
How to Move Downloads Folder to Another Drive on Windows 10/11
![author icon]() Cedric/2026/01/29
Cedric/2026/01/29 -
How to Move Games from C Drive to D Drive [All You Need]
![author icon]() Tracy King/2026/01/29
Tracy King/2026/01/29 -
How to Move Files from OneDrive to Local Drive [Best Solutions]
![author icon]() Tracy King/2026/01/29
Tracy King/2026/01/29