Move Games to Another Drive/PC
Featured Articles
- 01 Guide 1: How to Move Games to Another Drive
- 02 Guide 2: How to Move Games to SSD
- 03 Guide 3: Move Games from C Drive to D Drive
- 04 Guide 4: Transfer Games to a New (Gaming) Computer
- 05 Bonus Tip 1: Copy Games from PC to USB
- 06 Bonus Tip 2: Transfer Playstation Games to External Hard Drive
- 07 Bonus Tip 3: Move Blizzard Games to Another Drive or PC
- 08 Bonus Tip 4: Move Riot Games to Another Drive or PC
- 09 Bonus Tip 5: Move Epic Games to Another Drive or PC
This page focuses on helping you move Blizzard games like Warzone, Diablo 3, World of Warcraft, etc., as well as hot games, to another new drive or PC. If your C drive gets full of Blizzard games, or you are trying to move the Blizzard games to your new Windows 10 or Windows 11 computer, stay here and follow the guide below to learn how to migrate Blizzard games with battle.net on your own.
View the Necessary Information to Move Blizzard Games to Another Drive/PC:
| ⏱️Duration | 3-7 minutes (depending on your method) |
| 🎮Supported Games | All Blizzard games like Warzone, Call of Duty, World of Warcraft, Hearthstone, and Heroes of the Storm |
| 🧑💻Operation Difficulty | Low, suitable for all users |
| ⛏️Tools |
✔️Transfer tool - EaseUS Todo PCTrans ✔️Another drive ✔️Another PC |
| 💼Solutions |
1️⃣Move Blizzard Games to Another Drive Without Re-installation - Simplest 2️⃣Move Battle.net Games to Another Drive by Reinstalling 3️⃣Move Blizzard Games to a new Drive via Changing Installation |
How to Move Blizzard Games to Another Drive in 3 Ways
Moving battle.net games to another drive is easy by using these three solutions we talked about. You can follow the steps below to start moving your games like Call of Duty, World of Warcraft, Hearthstone, and Heroes of the Storm.
Solution 1. EaseUS Todo PCTrans - Without Re-installation
Among the three methods, EaseUS Todo PCTrans is the most useful and convenient one. It is an easy and free PC transfer tool that helps you transfer your data, applications, and user account settings between PCs in one click.
To migrate Blizzard games to a different drive, its APP Migration feature allows you to change the game installation location and copy installed software without any startup issues. Besides, it saves a lot of time as you don't need to reinstall any battle.net game.

EaseUS Todo PCTrans
- Transfer to a new PC: Steam, Origin, LOL, Blizzard.
- Transfer to a new drive: DIABLO, WORLD OF WARCRAFT,
OVERWATCH, HEARTHSTONE, etc. - 3 steps to migrate games apps to a new pc or a new drive.
Now, download this application migration program and migrate Blizzard games to another drive on an HDD or SSD.
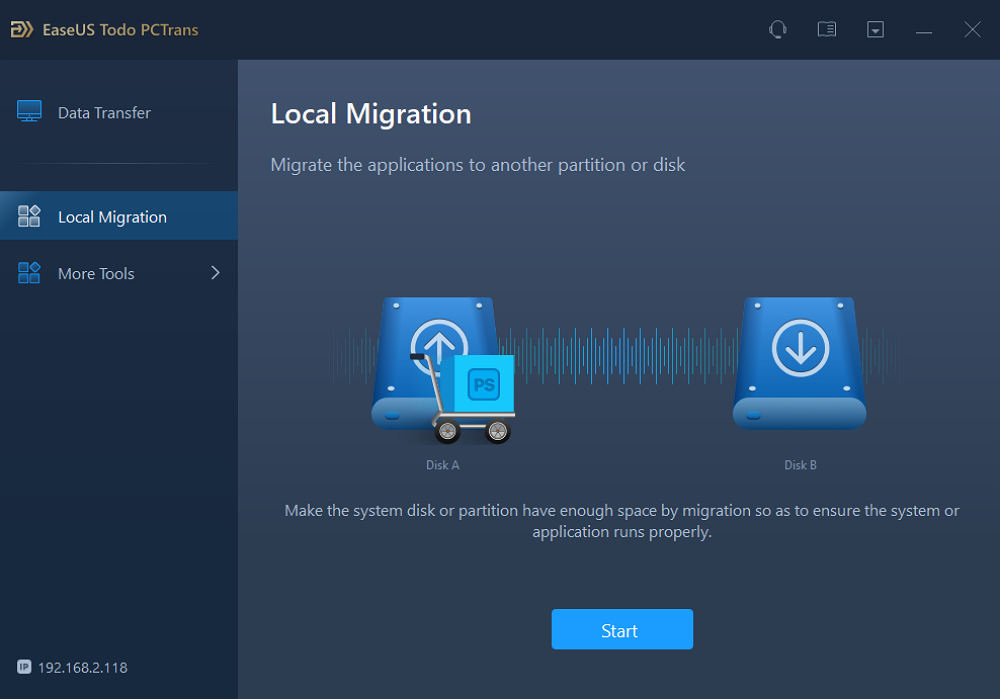
Step 1. Connect the destination drive to your computer
Where do you want to place the games from their original location? Use the correct way to connect the drive to your computer, where EaseUS Todo PCTrans is installed. Run the games transfer software, choose "Local Migration" and then click "Start".
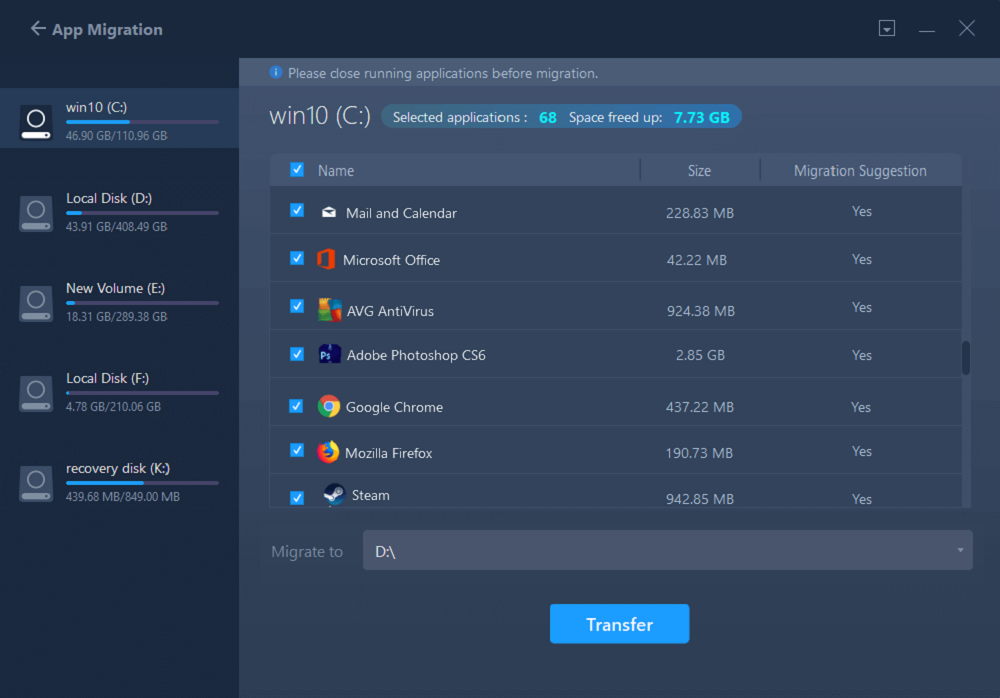
Step 2. Choose the games you want to change the location
On the left bar, choose the original drive where your game programs are installed, locate the games and tick the checkboxes. Click the triangle icon to choose the target drive as the file path. After all the selection, click "Transfer".
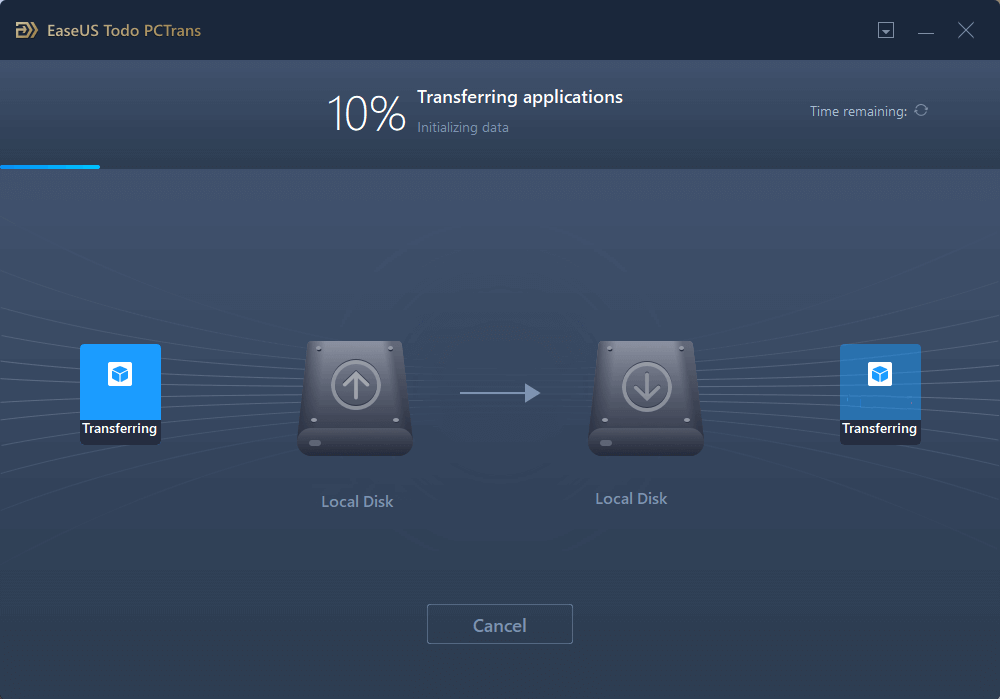
Step 3. Transfer the games to the destination drive
The software will work on moving the selected games from the original location to your customized location. Wait for the process to finish.
What Else Can EaseUS Todo PCTrans Do for You:
- PC to PC transfer: Connect two PCs to move files, applications, and user accounts from one to another directly. For example, transfer files from laptop to laptop using WiFi.
- Transfer via image files: Create images of your files, programs & account, and automatically export them from the source PC to the target PC when there is no internet available.
Solution 2. Move Battle.net Games to Another Drive by Reinstalling
If you dislike using a third-party program, you can still try to manually move Blizzard games to another drive by re-downloading and changing the installation location. Note that manually changing the installation location does not guarantee that the game will start properly.
If you don't mind the time-consuming method, this method is right for you. It is recommended to install Blizzard games like HearthStone, Warzone, Duty of Call, etc., to a drive with enough space for the very first time.
If you have to move them, follow the details below:
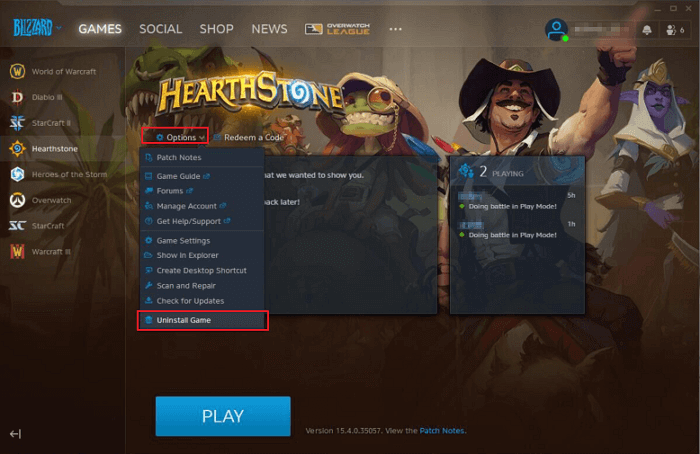
Step 1. Uninstall Games with the Blizzard Battle.net Desktop App.
Open the Blizzard Battle.net desktop app, select the icon for the game you want to uninstall, select "Options," then select "Uninstall Game."
Step 2. Open the Blizzard Battle.net Desktop Application and go to the correct tab for the game you'd like to install. Hit the "Install" button.
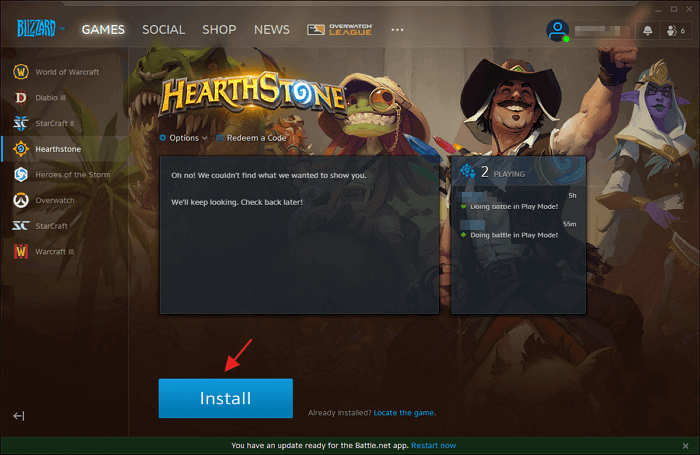
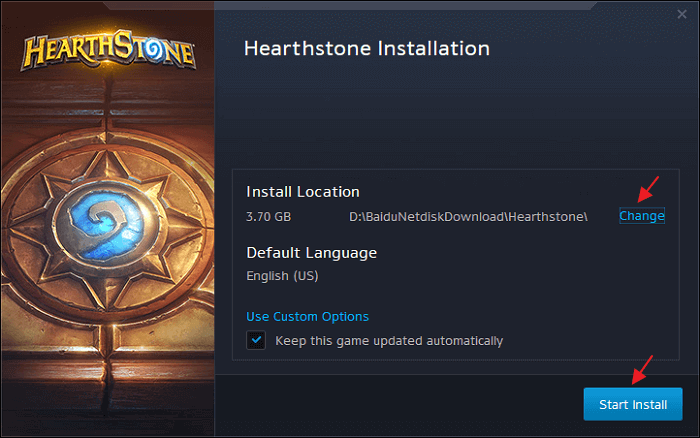
Step 3. Under "Install Location," browse to the correct drive and folder you'd like to use for the installation. Click "Start Install". Then, repeat the steps for each game.
This method only changes the location of the game, not the Blizzard Battle.net Desktop App. Moving the Blizzard Battle.net Desktop Application to a different drive from your Operating System files can cause problems with your games. If you like the solutions, click the social buttons and share this guide with your friends.
Solution 3. Change Installation Setting/Game Folder Location
Besides the two methods of moving Blizzard games to SSD, there is another way to help you move Call of Duty (including Warzone or Modern Warfare) to another drive. You can change the installation game folder:
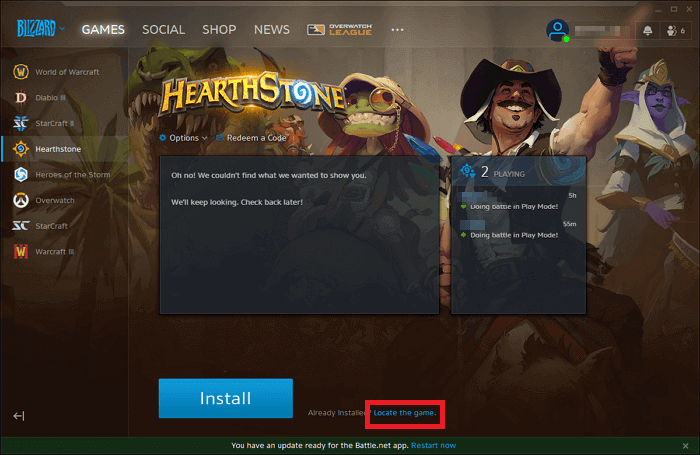
Step 1. Copy and paste the original game folder to another drive and run the Battle.net client.
Step 2. Click Locate the game at the bottom of the interface. Choose the new folder.
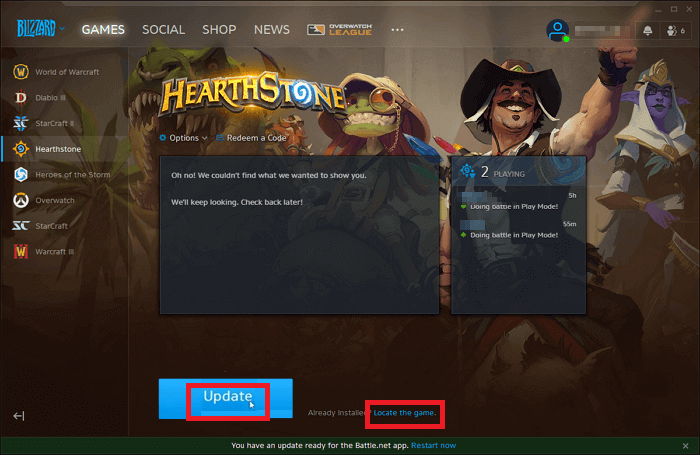
Step 3. Head to the interface again. The Install button will change to the Update button. Click it to finish the folder location change.
Moving Battle.net games to another drive by reinstalling is a little complicated. If you want to save your time and energy, I highly recommend using EaseUS Todo PCTrans.
Bonus Tip: How to Move Blizzard Games to a New PC
Aside from changing the install location of Blizzard games on a local disk, some gamers also want to switch their gaming PCs. EaseUS Todo PCTrans, with its PC-to-PC feature, is exactly what you need. It helps you seamlessly transfer Battle.net to a new computer, and you can re-load the Blizzard games on the new computer successfully.
Read more about how to use EaseUS Todo PCTrans to transfer battle.net games from one computer to another without reinstallation.
Step 1. Set Up the Old PC
- First, install and launch EaseUS Todo PCTrans and select Data Transfer on the left panel of the main interface.
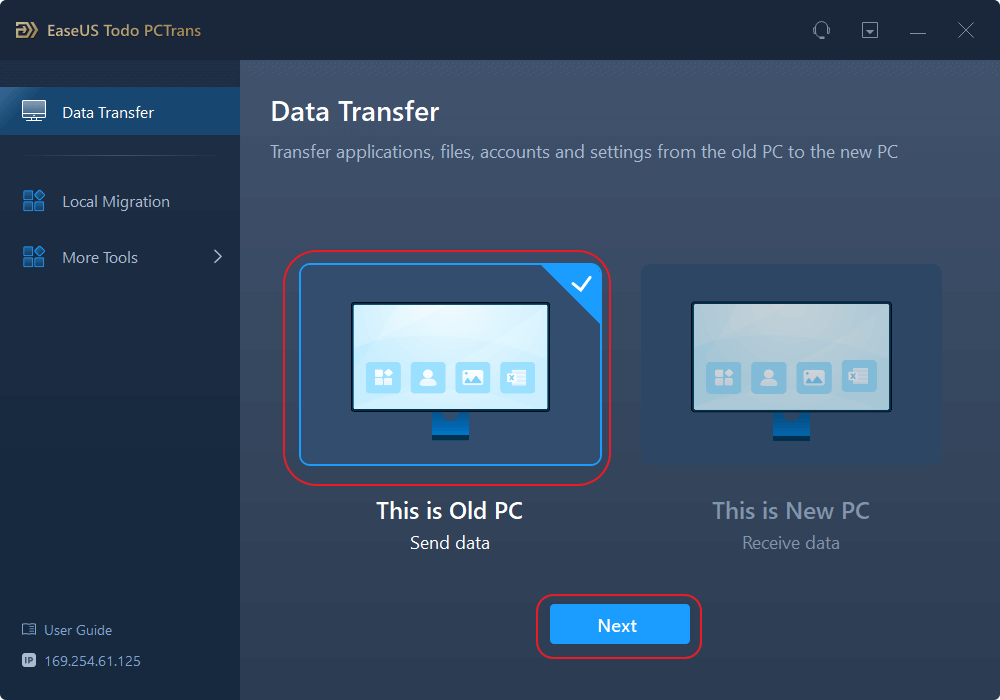
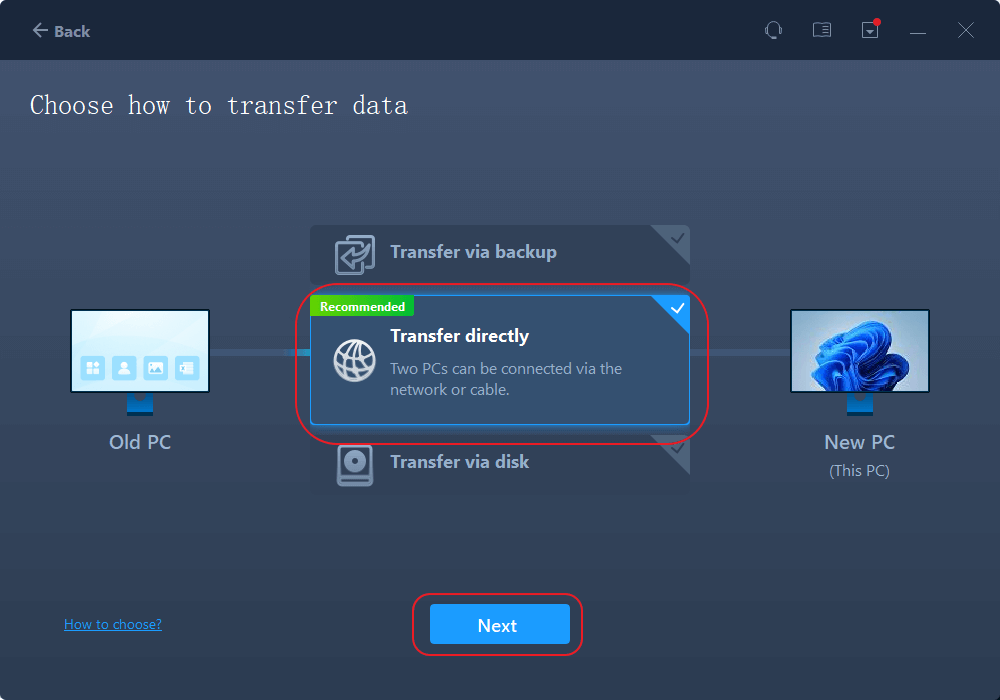
- Select "Transfer Directly" and click "Next" to continue.
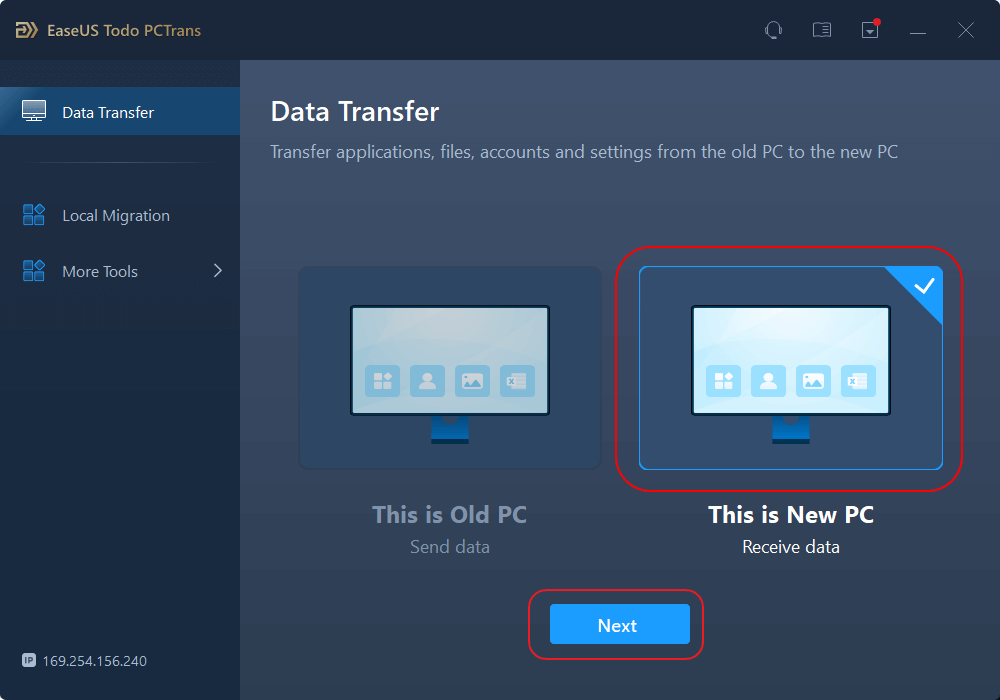
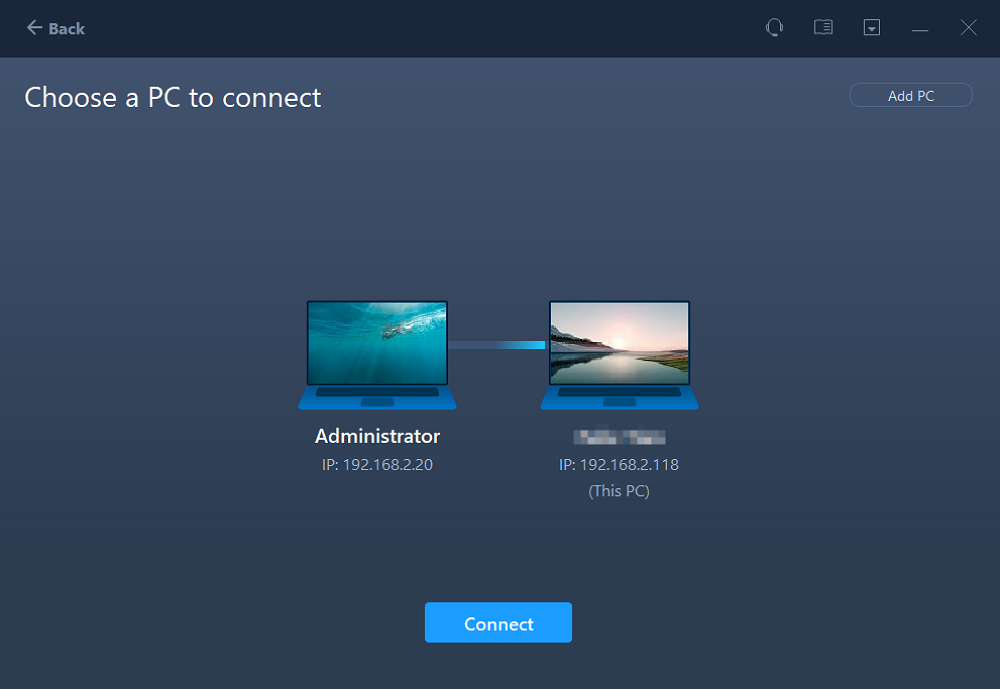
Step 2. Set Up the New PC
- Download and launch EaseUS Todo PCTrans on the new computer; select "This is New PC" and click "Next".
- Select "Transfer directly" and click "Next" to continue.
- Select "Network" and click Next to continue. This will automatically scan the old PC. (Make sure the two PCs are connected to the same LAN.)
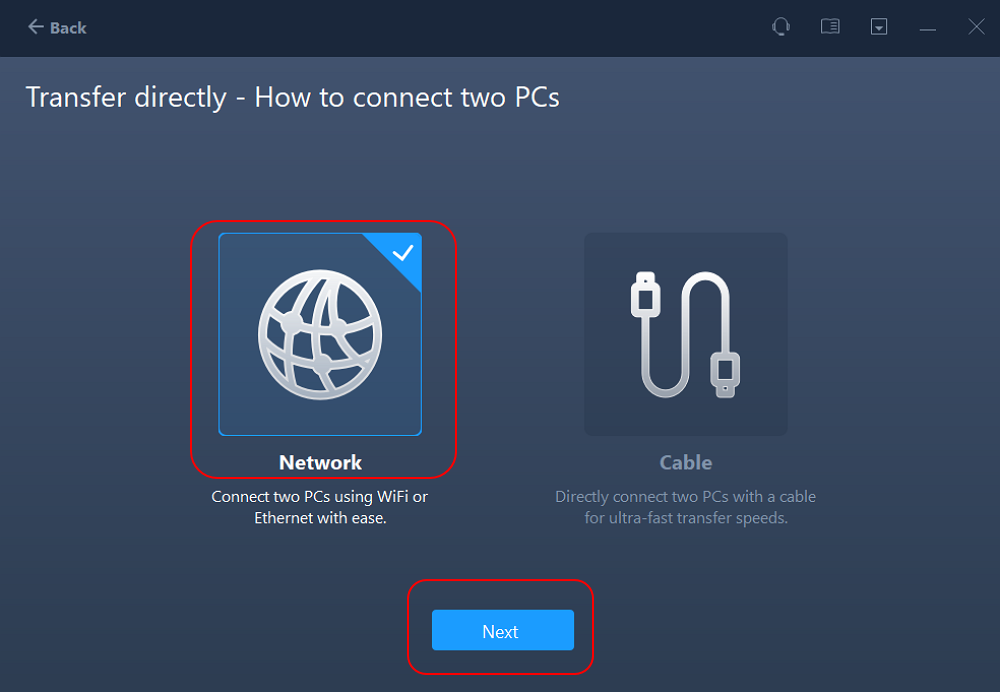
- Select the target PC and click Connect. Then, it will take some time to scan and analyze the data in old PC.
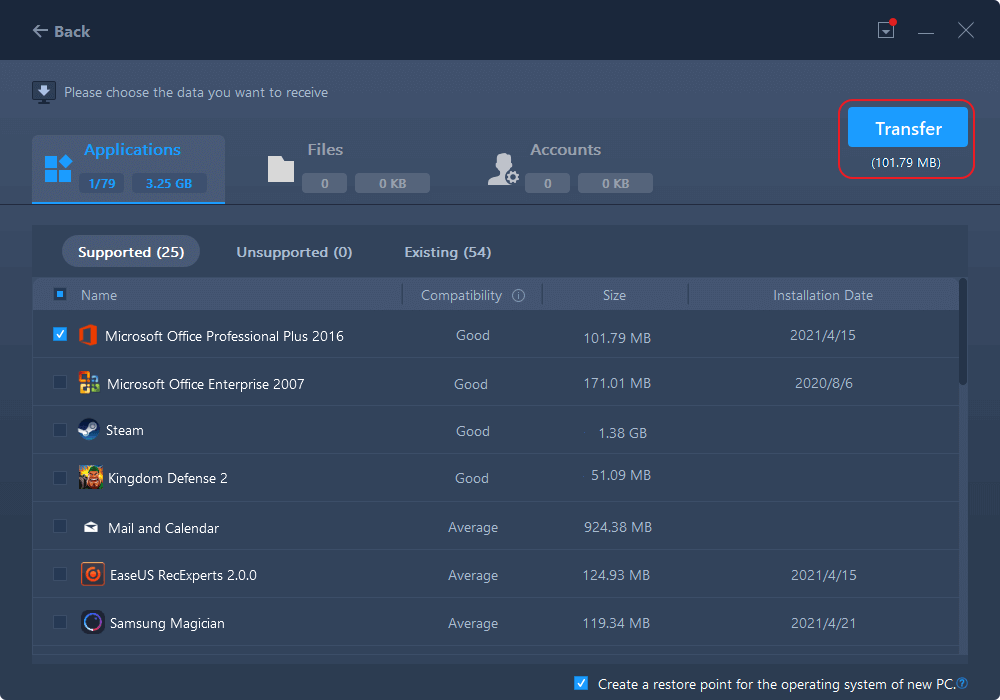
Step 3. Select the Apps to Transfer
- On the new PC, select the applications you want to transfer. Then, click "Transfer" to start.
Then, you can log into your account in battle.net, re-load your favored Blizzard games like Call of Duty, Warcraft, HearthStone, Diablo 3, etc., and enjoy playing them with your team on the new PC later.
After moving Blizzard games to another PC, you may want to uninstall Battle.net from your old PC completely, along with the games and remnants. If so, the following page offers everything you need to perform the task.
How to Uninstall Battle.net from Your PC (Quick Guide)
Whether you are trying to quit Blizzard games, clean your hard drives, or for other reasons, this article will show you how to uninstall Battle.net from your PC completely, along with leftover files. Continue reading and learn more details.

Why Do You Need to Move Blizzard Games to A New Drive or PC
The reasons why gamers want to move their Blizzard games to a new drive or computer could be diverse. Here, we connected three major factors that could explain why there are so many Battle.net users trying to move games to another drive or PC. Check this out:
Reason 1. The HDD or SSD with Blizzard games installed is running out of free space.
By default, Blizzard will drop the game files to your C drive. So, the C drive is full and runs out of space due to various installation files and desktop files.
Reason 2. To optimize the gaming experience by switching games to SSD.
You want to transfer installed programs to SSD to enjoy faster speed and better performance. SSD can reduce the load times because the data transfer speed of an SSD is faster than that of an HDD.

Reason 3. Migrate Blizzard games from an old PC to a new gaming computer.
You purchased a new gaming computer, and you are looking for a solution that helps you move all your Blizzard games, including battle.net, to the new machine.
So, how do I do so? In what way can I move Blizzard games from the C drive to another SSD or even an external disk, or switch all games with battle.net to a new computer? Full guides are provided in this article. Check and follow the guide. You'll make it.
Moving Blizzard Games Is a Simple Click
This tutorial covers the most comprehensive solutions to help you move battle.net games, like Warzone, Call of Duty, Starcraft, and more. EaseUS Todo PCTrans, a seamless PC data transfer tool, enables you to transfer Blizzard games from one drive or PC to another in a few clicks. By transferring programs from C drive to D drive, you no longer have to worry about insufficient disk space.
Move Blizzard Games to Another Drive or PC FAQs
This part will provide more related questions and answers about moving Blizzard games to another drive/PC. Hope it can solve more of your confusion.
1. Can I move Epic games to another drive?
For a better gaming experience, you can transfer Epic games to another drive or computer. You can use free transfer software or a manual way: open Epic games in File Explorer and copy and paste it to another location.
2. How do you move games to another drive on the Blizzard app?
You can migrate the game in the Battle. Net app by changing the default installation directory:
Step 1. Select the target program in the App and click on the Blizzard icon in the top left to open the settings.
Step 2. In the new window, select the Downloads option and change the default installation directory.
Step 3. Select Create a new file and save changes.
Step 4. Scan the game, change the new installation directory, and click Done.
3. How do you move games from the C drive to the D drive on Windows 10?
In the case of computer games, you can move the game from the C drive to the D drive in Windows. Apps and Features:
Step 1. Right-click, select the Windows icon, and open Apps and Features.
Step 2. Select the target game and click Move.
Step 3. Select another drive and confirm the move again.
Was This Page Helpful?
Sherly joined EaseUS in 2022 and she has always loved writing articles and enjoys the fun they bring. She receives professional training here, focusing on product performance and other relative knowledge. She has written over 200 articles to help people overcome computing issues.
Brithny is a technology enthusiast, aiming to make readers' tech lives easy and enjoyable. She loves exploring new technologies and writing technical how-to tips. In her spare time, she loves sharing things about her game experience on Facebook or Twitter.
Related Articles
-
Transfer WhatsApp Backup from PC to iPhone free | Best Way
![author icon]() Tracy King/Jan 23, 2025
Tracy King/Jan 23, 2025 -
How to Move Call of Duty to Another Drive [2025 Guide]
![author icon]() Oliver/Jan 23, 2025
Oliver/Jan 23, 2025 -
Does Upgrading to Windows 10 Delete Programs | Prevent Data Loss Now
![author icon]() Tracy King/Jan 23, 2025
Tracy King/Jan 23, 2025 -
How to Transfer Twitter App to Another Drive/PC
![author icon]() Tracy King/Mar 27, 2025
Tracy King/Mar 27, 2025