Page Table of Contents
Reviews and Awards
- Laptop to Laptop Data Transfer Solution
- To transfer files between laptops wirelessly, use Nearby Sharing, a shared folder, HomeGroup, cloud storage, email, or EaseUS Todo PCTrans.
- To transfer files between laptops without WiFi, you can use a USB or an external hard drive for a direct connection. EaseUS Todo PCTrans supports both the cable and network transfer methods.
Many users are looking for ways to transfer important data between two laptops. Indeed, things become difficult when transferring large files between two laptops or other devices. Whether you want to connect laptops quickly or transfer files wirelessly, you will learn how to transfer files from one laptop to another in this guide.
🔸How to transfer files between PCs directly via wifi (without a router)? - From Reddit.
🔸What is the best way to transfer data from one PC to another wirelessly? What is your method for doing this? - From Quora.
What's the Best Way to Transfer Files from Laptop to Laptop
How to transfer files from laptop to laptop? To make things easier, we provide eight solutions for you to transfer files between two laptops in Windows 11/10/8/7. Read on to share files between two laptops, both with or without WiFi.
View Necessary Information on How to Share Files Between Two Laptops:
| 🚀Method | ✅Pros | ⛔Cons | 🧑🏿💻Best For |
| 1. EaseUS Todo PCTrans | Fast, easy, transfers apps | Requires software installation | Quick and complete transfer |
| 2. Nearby Sharing | Wireless, easy to use | Only Windows 10/11, close range | Small files between nearby PCs |
| 3. Shared Folder (LAN) | No extra tools needed | Complex setup | Network-savvy users |
| 4. HomeGroup | Simple on Windows 7/8 | Removed in Windows 10+ | Older Windows versions |
| 5. Cloud Storage | Wireless, accessible anywhere | Limited storage, slow upload | Small/medium files frequently |
| 6. Email | Universal and simple | Small file size limit | Very small files |
| 7. USB Cable | Direct connection, no network | Slow, manual copying | Users with time and patience |
| 8. External Hard Drive | Large capacity, reliable | Needs external device | Large files offline transfer |
To save you time, we recommend the first option, which is to do a laptop-to-laptop data transfer. It's up to you to select the preferred one.
How to Transfer Files from Laptop to Laptop Wirelessly
If you want to share files from laptop to laptop wirelessly, you can use Nearby Sharing, cloud services, local networks, direct connections, or more. Dive into the 6 ways to easily move files between laptops wirelessly.
Solution 1. Laptop to Laptop Data Transfer Software (Windows 11 Available)
Let this smart file transfer software help you escape the invalid file migration between two devices. This is the easiest and fastest method to share files between laptops. Here, we'd like to recommend you try EaseUS Todo PCTrans. Even if you are a novice, you can learn how to transfer files easily and quickly.
This software helps you transfer whatever you want, such as personal files, important software, programs, and games, from one PC to another with simple clicks. You only need to download the software and follow the steps below to save time and energy.
Step 1. Install and open EaseUS Todo PCTrans on both of your laptops.
Step 2. In the Data Transfer tab, set up the proper transfer direction:
- On old laptop, select "This is Old PC."
- On new laptop, select "This is New PC."
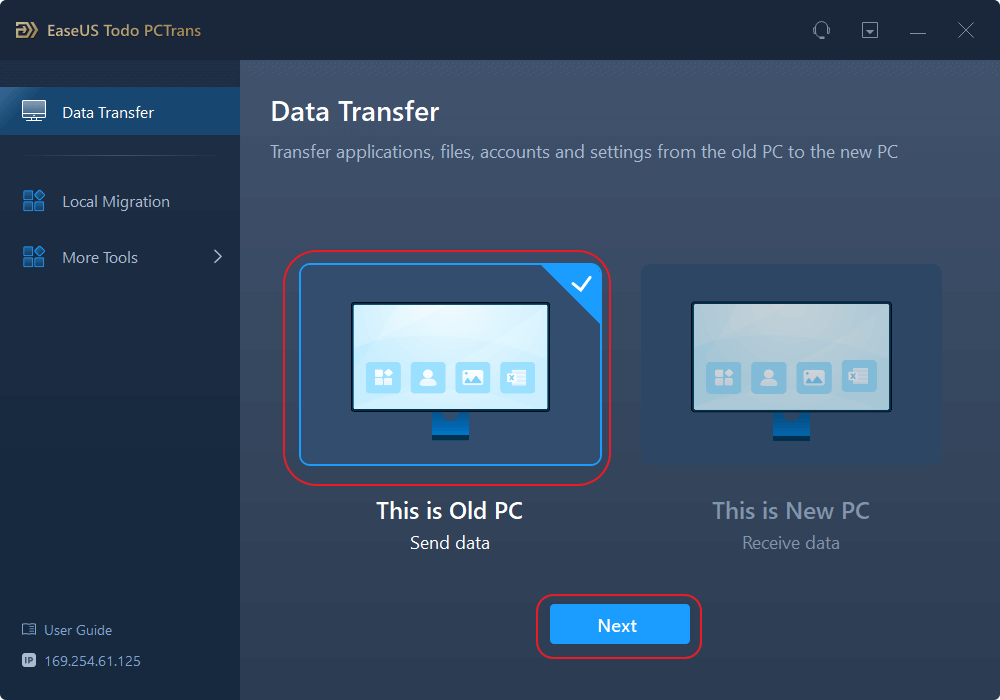
Step 3. Select "Transfer directly" on both laptops and click "Next" to continue.
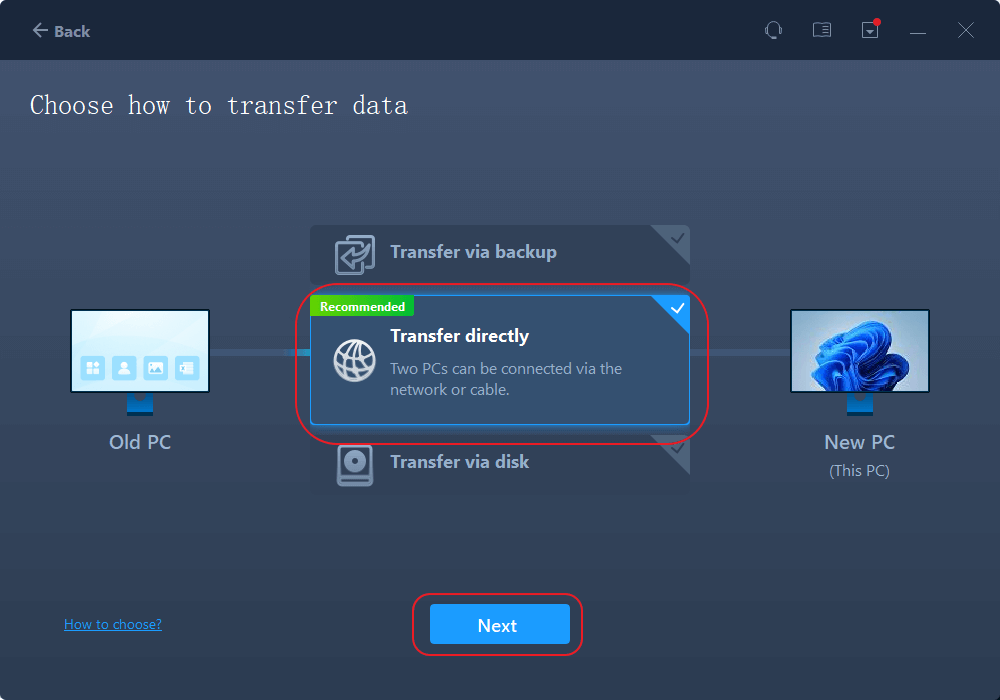
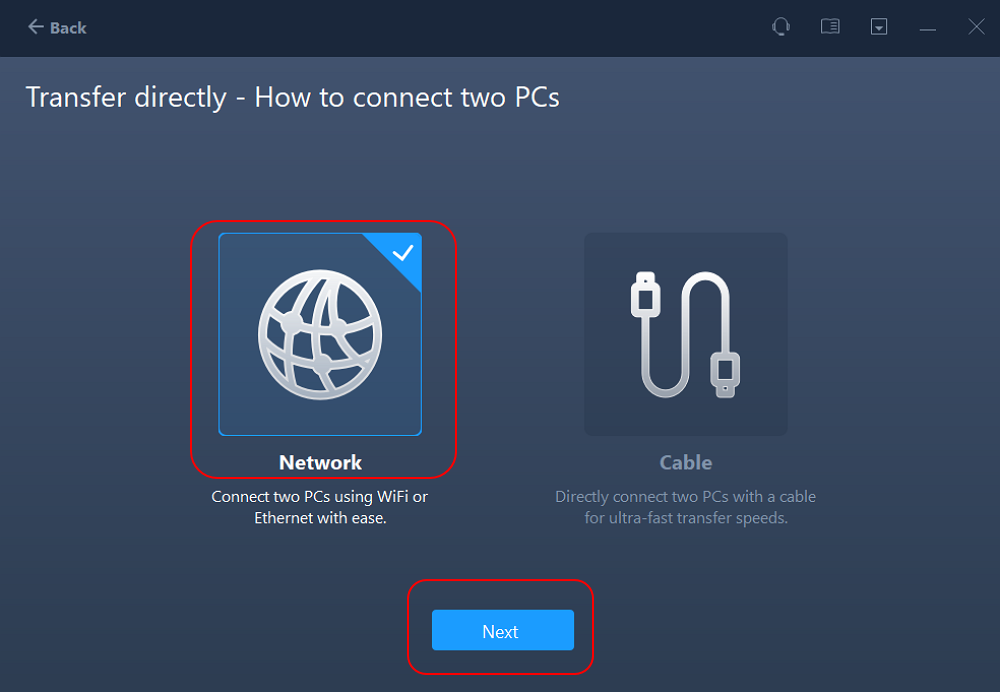
Step 4. On your new laptop, select "Network" and click "Next" to continue. This will automatically scan the old laptop. (Make sure the two PCs are connected to the same LAN.)
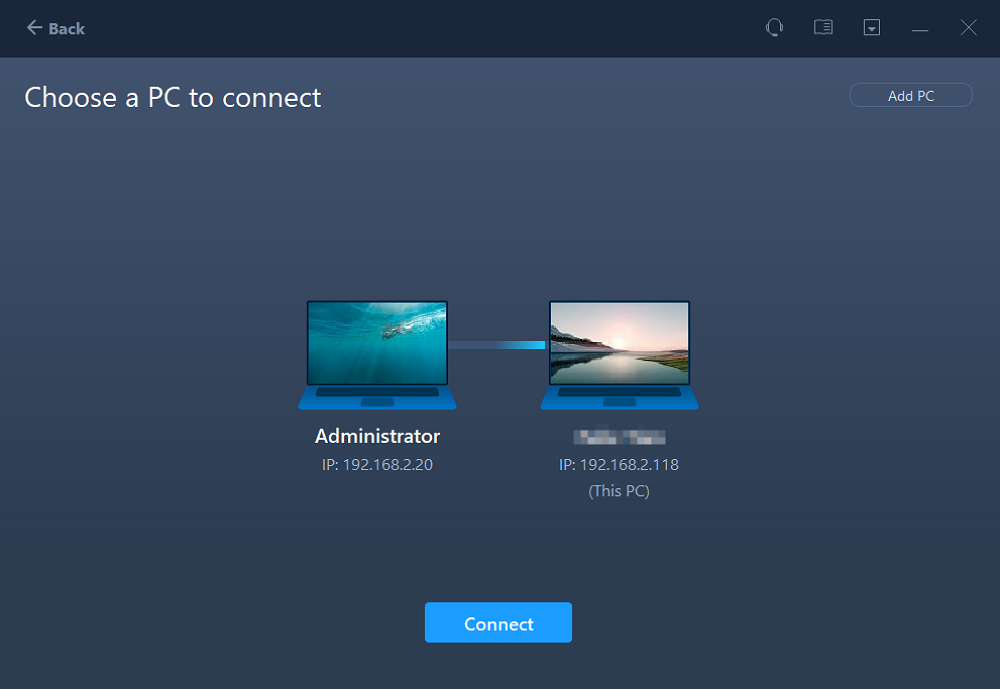
Step 5. Select the target laptop and click "Connect." Then, it will take some time to scan and analyze the data in old laptop.
Step 6. Finally, on the new PC, select the files you want to transfer. Then, click "Transfer" to start.
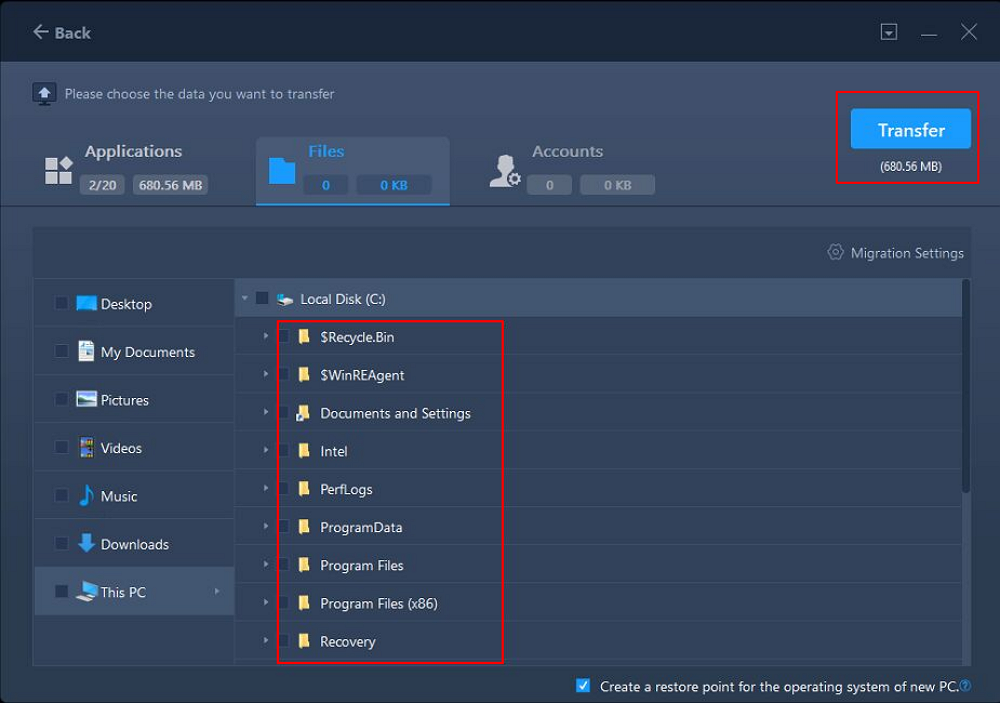
This is the fastest way to transfer files between laptops. Except for transferring data from laptop to laptop, EaseUS Todo PCTrans can also copy installed software from PC to PC or transfer everything to a new laptop.
To help you follow these methods effortlessly, we provide a comprehensive guide video below:
Solution 2. Use Nearby Sharing in Windows
Windows 10 (version 1803) introduces "Nearby sharing". This is a new feature that allows you to quickly transfer files and links wirelessly to nearby devices using Bluetooth and Wi-Fi. If your Windows 10 is Version 1803 or later, you can try this solution.
Step 1. Enable nearby sharing. (Enable both of the laptops)
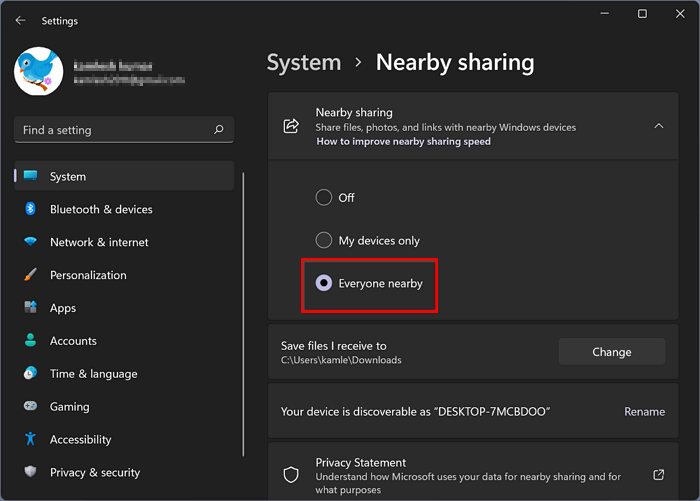
Go to "Settings > System > Shared experiences > Nearby sharing." Turn it on.
Step 2. Under "Nearby sharing," select "Everyone nearby."
Everyone nearby — Your PC will be able to share and receive content from all nearby devices, including those you don't own.
My devices only — Your PC will share and receive content only with devices using the Microsoft account.
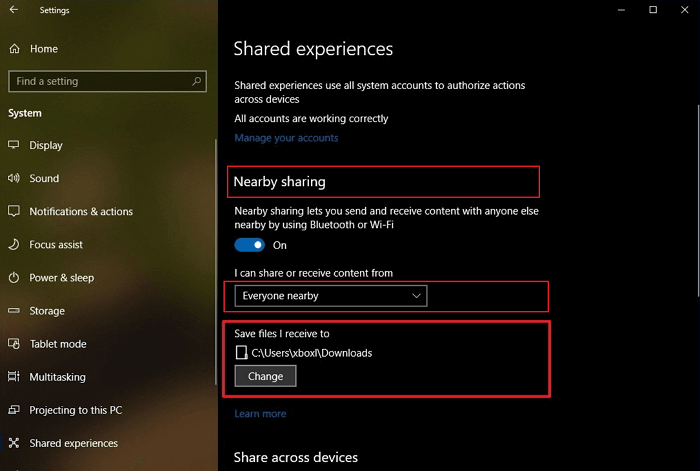
By default, transfers will be stored in the Downloads folder, but you can specify another folder or drive very easily. Under "Nearby sharing," using the "Save files I receive to" option, click the "Change" button. Select a location to save transfers.
Step 3. Start file sharing between the two laptops.
Open "File Explorer". Right-click the file you want to share. Click the "Share" option. Select the device from the list.
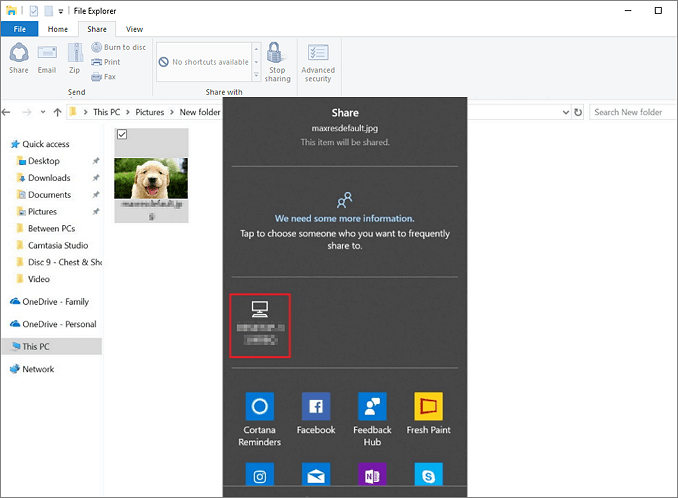
Once you've completed the steps, if the destination device is within Bluetooth range and running Windows 10 version 1803 or later, the user will receive a notification to accept or decline the transfer. The file will be stored in the Downloads folder or in the folder location configured in the "Shared experiences" settings page.
If the Nearby Sharing is not working, click the link to fix it:
Nearby Sharing Not Working Windows 11? Fix It Now!
Is the Nearby Sharing feature on your Windows 11 not working as it should? Find out how to fix Nearby Sharing not working in Windows 11 in this article.
Solution 3. Use A Shared Folder to Perform Laptop to Laptop Data Transfer
The method is more difficult than solution 1. If you are unfamiliar with your PC, you'd better skip this. Windows shared folder is very important for enterprise users who use LAN. In the LAN, users can share data through the shared folders. Let's see how to set up LAN-shared files.
Step 1. Find the file you want to share.
Right-click or press it, and select "Give access to" > "Specific people."
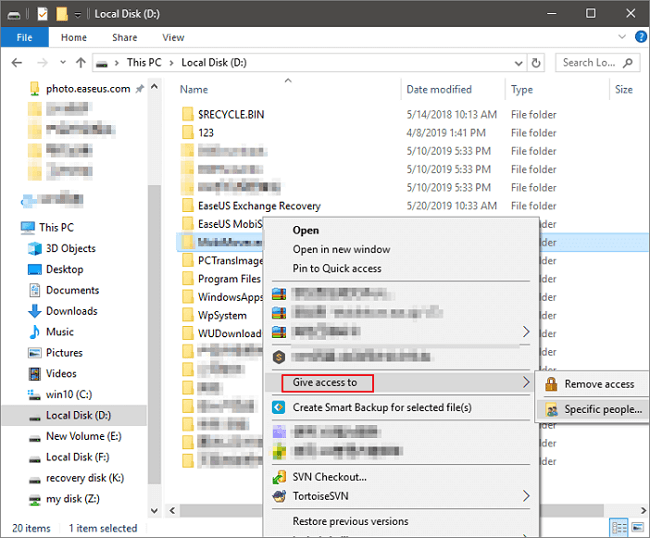
Step 2. Select a user or group to add. Click "Add".
Add the username you want to share. If you are open to all users, you must add "Everyone" to this user. Adjust the privilege level as needed.
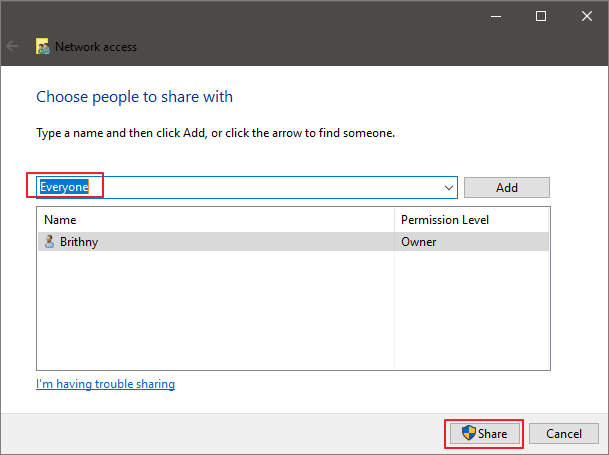
Step 3. Click the "Share" button to enable network discovery and sharing in the dialog.
Step 4. Press "Win+R" and enter "\\IP address". Then, you'll see all the shares of the IP address.
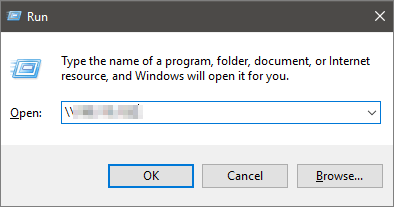
If you don't know your IP address, press "Win+R," type cmd, then input ipconfig. Press "Enter," and you'll see your IP address. If you select multiple files at once, you can share them all in the same way. It works for folders, too.
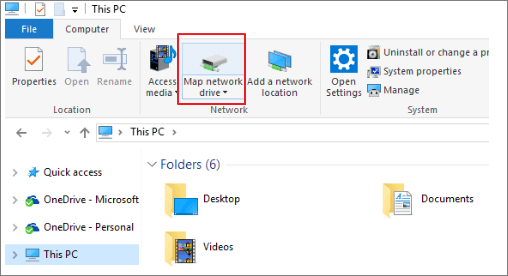
You can also map the shared folder or network drive from File Explorer in Windows without having to look for it or type its network address each time.
Step 1. Open File Explorer from the taskbar or the Start menu.
Step 2. Select This PC from the left pane. Then, on the Computer tab, select "Map network drive".
Step 3. In the Drive list, select a drive letter. Type the path of the folder or computer, or select "Browse" to find the folder or computer. Then select "Finish".
Share this article and let more users know the details of laptop-to-laptop data transfer.
Solution 4. Via HomeGroup - File Transfer PC to PC WiFi
Microsoft removed the HomeGroup feature from Windows 10 in the April 2018 update. You can still use HomeGroups if you're using Windows 7 or 8, but they won't be accessible by computers running Windows 10. So, this method is right for Windows 7 or 8 users. Here, we take Windows 7 as an example:
Step 1. On your Windows 7 computer, type homegroup in the Search box and open it. Then, choose "Create a homegroup" > "Next," and follow the instructions.
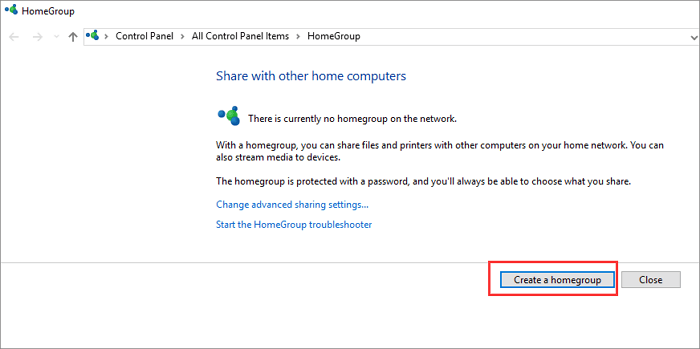
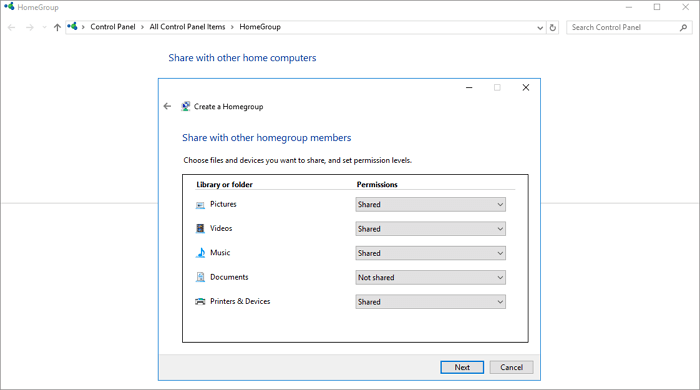
Step 2. Select what you want to share, and click "Next".
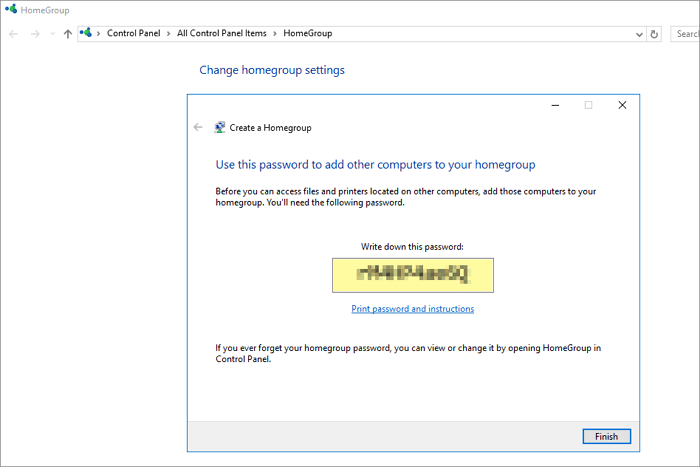
Step 3. Remember the password. Now, go to another Windows 7 or 8 PC that connects to the same WiFi or network. Open "HomeGroup" on it, and join in an existing HomeGroup. Enter the password you got earlier and click "Next" to join.
When you're done, you can open up File Explorer, click the Homegroup icon in the navigation pane, and browse anything shared from other PCs in the HomeGroup.
For Windows 10/11, you can use Nearby Sharing to perform file transfer PC to PC WiFi. This feature allows you to transfer files in the local network.
Solution 5. Cloud Storage Services
Another method of transferring files between your Windows 10 or 11 laptops is via the cloud storage drive. This method is a wireless laptop data transfer way to share files to any Windows app that supports services like OneDrive or Google Drive. This method doesn't have Windows version limitations, and everyone can use it. The limitations of this method are storage space, upload time, and potential cost. If you need to move smaller files on a more frequent basis, this may be a great solution for you. Here, we take OneDrive as an example.
Step 1. Upload files to OneDrive.
Open OneDrive. When the app opens, just click "Add" to add the file to your OneDrive cloud account. The file will be uploaded to your OneDrive account.
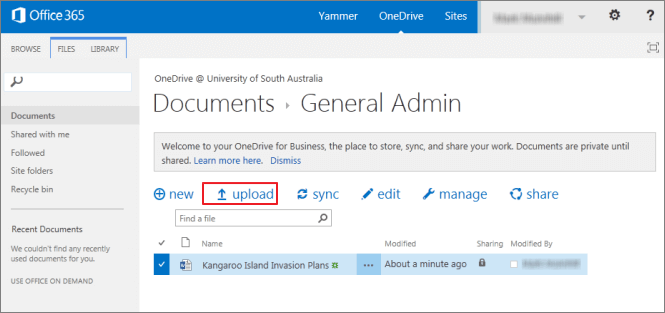
Step 2. Download the wanted files.
On the other laptop, open the "OneDrive" app, right-click on the file, and select "Download."
Cloud storage will complete the data transfer process and finish your file transfer to another laptop or computer on your network.
Solution 6. By Email
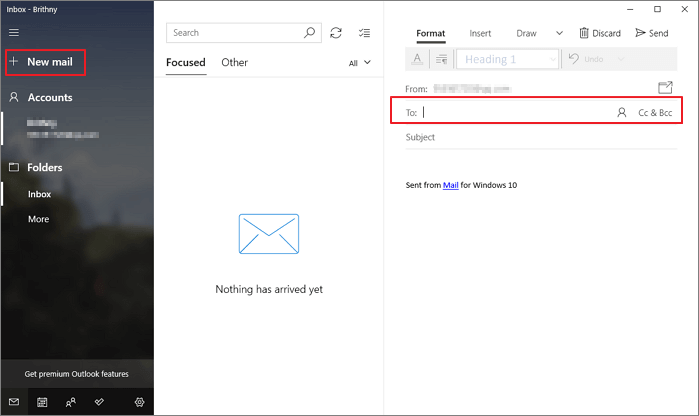
You can email yourself on one laptop and then log in to your email account on the other. This is a quick and simple way to transfer files from PC to PC with a small size.
Step 1. Set the receiver of the email as your email address.
Step 2. Attach files to the email. Different email clients (e.g., Gmail, Hotmail, Yahoo) have different attachment size limitations. So, this method is for small-size file transfer.
Step 3. Log in to your email on the other laptop. Now, download the files.
How to Transfer Files from Laptop to Laptop Without WiFi
What if your computer doesn't have a network connection? There are two ways to transfer files between laptops without WiFi.
Solution 7. Use a USB Cable
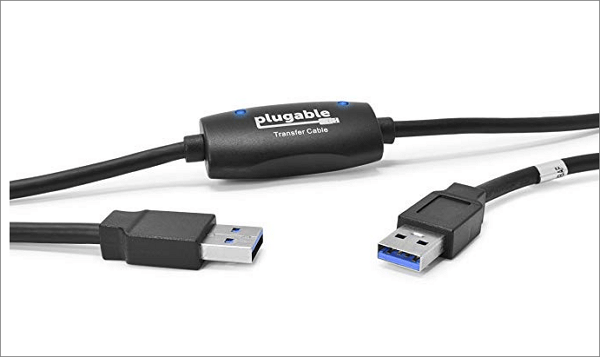
This is the most straightforward method, directly transferring files from the old to the new laptop. All you need is just a cable and the 2 laptops side by side. Plug them in, and from your folder window, drag and drop all the files you want to move to another laptop. This can be time-consuming as you have to locate each file or folder you want to copy and click and drag(or copy and paste) – and repeat! This is the best option if you have heaps of time and patience.
Here is how:

Step 1. Start both computers. Be sure the operating system is running fine on each computer/laptop.
Step 2. Attach the USB cable to a USB port on one laptop. The operating system will recognize the type of cable that has been attached. Attach the USB data transfer cable to the other laptop.
Step 3. Click the Windows "Start" button, type "Windows easy transfer" in the Search field, and press "Enter." Follow the prompts of the Easy Transfer wizard to share files.
How to Transfer Files from PC to PC Using USB Cable
In this article, we will talk about how to transfer files from pc to pc using usb cable. Apart from transferring cable from one PC to another, we also guide you through transferring files from PC to PC in the other three ways, including Nearby Sharing, Cloud Storage, and PC transfer software.
Solutions 8. Try an External Hard Drive
If you don't want to be limited by network speed, Windows version number, or transfer capacity, using an external disk is a good choice.
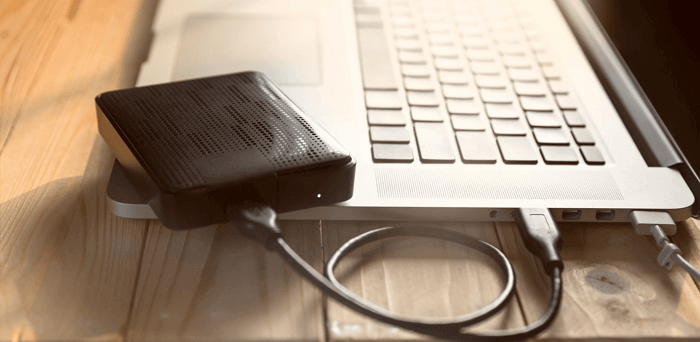
Step 1. Connect your external hard drive to one laptop.
Step 2. Copy the wanted files to the device.
Step 3. Eject the drive and connect it to another laptop. Then, copy the files to the other laptop.
Tips for a Smooth File Transfer Between Laptops
To ensure a smooth file transfer between laptops, it's important to prepare properly before starting. Following these simple tips to save you time, protect your data, and prevent common issues during the transfer process.
- Organize and clean up files before transferring to save time and storage space.
- Scan the old laptop for viruses and malware to avoid transferring harmful software.
- Back up important data separately to prevent accidental loss during transfer.
- Ensure both laptops have sufficient battery or are plugged in to avoid interruptions.
- Use a stable and secure network if transferring files wirelessly.
To Sum Up
After using the above eight methods, you can finish the file transfer quickly and easily move everything from your old computer to your new computer. Choose the most suitable way of transferring files according to your actual situation.
Of course, you can tell us if you have any problem or a better solution. We will reply as soon as possible. If you think this guide is helpful, you can also click the button to share it with other people in need on social media.
How to Share Files Between Two Laptops FAQs
This section has other frequently asked questions about sharing files between two laptops. And we provide some brief answers. If you have further questions on how to transfer data from old PC to new PC, read on.
1. Which is the fastest way to transfer files from laptop to laptop?
There exist a lot of ways to transfer files between computers. You can use a USB cable or save files to a cloud drive. However, these methods are technically demanding and can easily lead to data loss if you are not careful. I recommend using a professional file transfer assistant - EaseUS Todo PCTrans- to transfer files from PC securely.
2. Can I transfer files between laptops without USB?
Of course, there exist many ways for you to transfer files from PC. You can transfer everything from one computer to another without a USB cable. You can transfer files through the nearby sharing feature provided by Windows.
3. How to transfer files between laptops using WIFI?
You can connect the network the same as another computer. Then, use the network sharing feature in Windows: Select the Start button and choose Settings > Network and Internet > Sharing options in order. Then, under Private, open Network Discovery.
About the Author
Updated by Joey Albert
Joey is an enthusiast of science and technology. With a passion for uncovering the latest tech innovations, she creates clear, engaging how-to guides that make technology accessible and enjoyable for all.
Brithny is a technology enthusiast, aiming to make readers' tech lives easy and enjoyable. She loves exploring new technologies and writing technical how-to tips. In her spare time, she loves sharing things about her game experience on Facebook or Twitter.
Reviews and Awards
-
EaseUS Todo PCTrans Free is a useful and and reliable software solution created to serve in computer migration operations, be it from one machine to another or from an earlier version of your OS to a newer one.
Read More -
EaseUS Todo PCTrans is by the folks at EaseUS who make incredible tools that let you manage your backups and recover your dead hard disks. While it is not an official tool, EaseUS has a reputation for being very good with their software and code.
Read More
-
It offers the ability to move your entire user account from your old computer, meaning everything is quickly migrated. You still get to keep your Windows installation (and the relevant drivers for your new PC), but you also get all your apps, settings, preferences, images, documents and other important data.
Read More
Related Articles
-
How to Fix Windows 10 Slow File Transfer Speed - 9 Fixes
![author icon]() Sherly/2026/01/29
Sherly/2026/01/29 -
How to Transfer Data From One External Hard Drive to Another
![author icon]() Sherly/2026/01/29
Sherly/2026/01/29 -
How to Transfer Data from One User Account to Another Windows 10/11
![author icon]() Jean/2026/01/29
Jean/2026/01/29 -
Application Backup Software: Backup Installed Applications in Windows 10
![author icon]() Daisy/2026/01/29
Daisy/2026/01/29