Page Table of Contents
Reviews and Awards
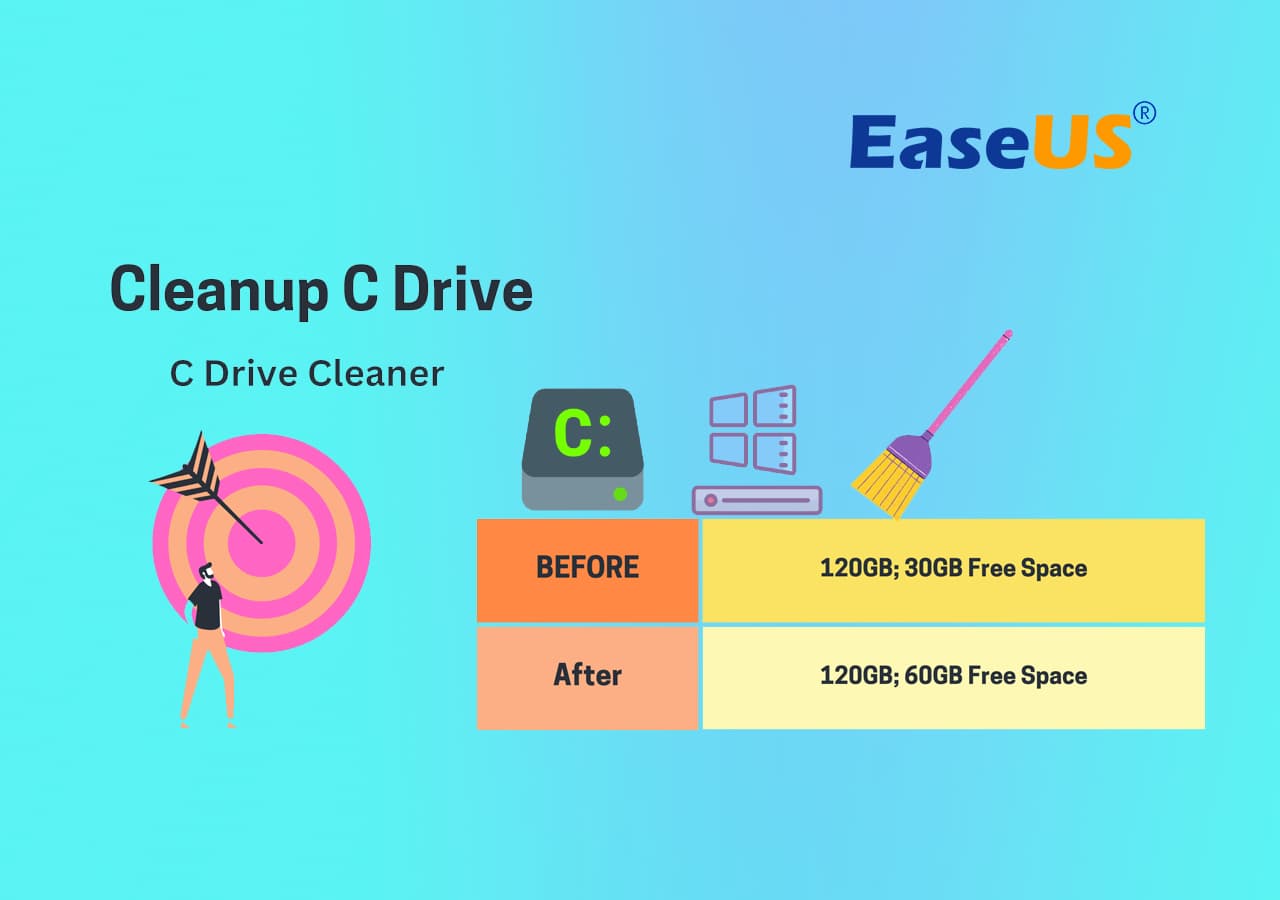
How to clean C drive in Windows 11? What do I do when my C drive is full? Stay chill when your computer becomes slow in booting up, launching applications, or loading games due to insufficient storage space issues in the system C drive. On this page from EaseUS, we'll be showing you 5 practical C drive cleaner utilities that you could apply and follow the respective guide to clean up your system C drive volume on Windows 11 and other systems here.
How to Clean Up C Drive in Windows 11? 5 Best C Drive Cleaners You Can't-Miss
This guide will discuss how to clean up your "C" drive to recover space and ensure your system runs smoothly. There are many tools available to clean up your "C" drive and free up space in the Windows 11 system disk, but the most useful tools to clean up "C" drive are:
| C Drive Cleaner Software/Tools | Why Choose It |
|---|---|
| 1. EaseUS Todo PCTrans🏆 | Reliable, fast & specialized in cleaning up C drive with it System Cleanup & Large File Cleanup features. |
| 2. Disk Cleanup | Free, Windows built-in cleaning feature |
| 3. Storage Sense | Free, Windows built-in cleaning feature |
| 4. Apps & Features | Free, Windows built-in cleaning feature, especially for removing apps |
| 5. OneDrive | Free, more like a Windows content backup solution |
Although different tools are available to free up space in the "C" drive, you must manually delete unwanted files in some methods. In some others, the tool will automatically remove unwanted files. For a complete solution, we recommend you try EaseUS Todo PCTrans for help, as it has multiple features compared to disk cleanup, storage sense, Apps and Features, and OneDrive.
Here is how you can use these tools for cleaning up the "C" drive now.
Tool 1. EaseUS Todo PCTrans
All-in-One "C" Drive Clean Up Software
EaseUS Todo PCTrans Free offers many features, and you can download this software to clean up C drive for free with ease. The features of EaseUs Todo PCTrans for cleaning up the "C" Drive are:
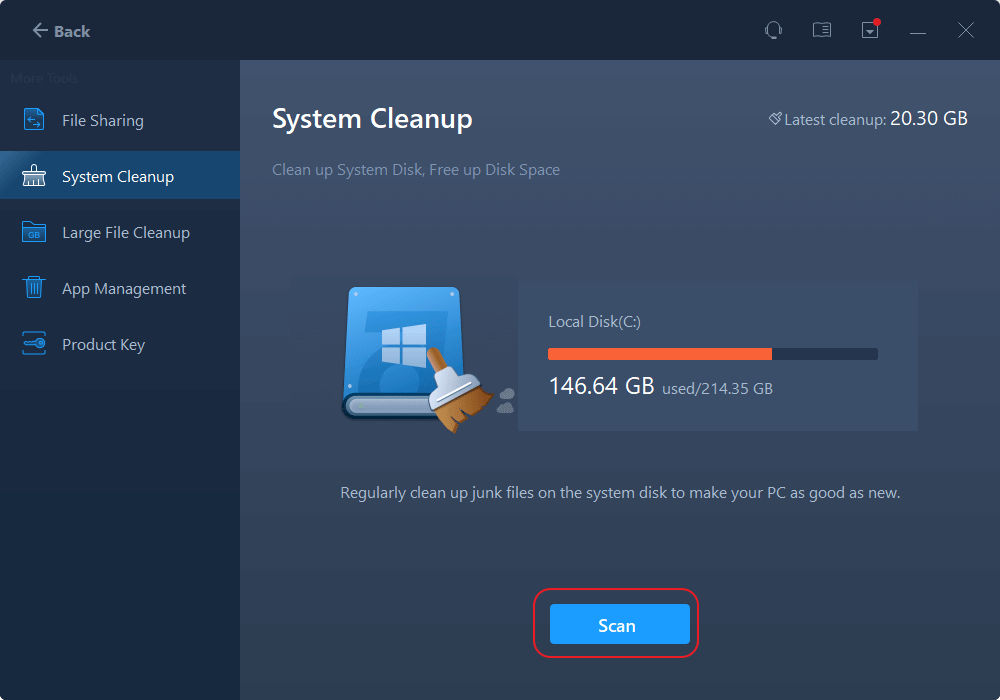
1. System Cleanup
Over time, your system builds up junk that consumes space and wastes your resources. As a result, you run the risk of insufficient disk space and your system slowing down if you often don't clean your computer. To remove the unwanted files, you can use the System Cleanup feature.
- This feature helps in cleaning junk files from the System, Browser, Windows Built-in Applications, and other Apps.
- Apart from saving your disk space, it also improves your system's performance.
- Moreover, regularly cleaning up junk files on the system disk makes your PC as good as new.
Here is the process to use System Cleanup to clean your computer.
Step 1. Open EaseUS Todo PCTrans on your computer. Click "More Tools". Then, click "System Cleanup" and click the "Scan" button to go on.
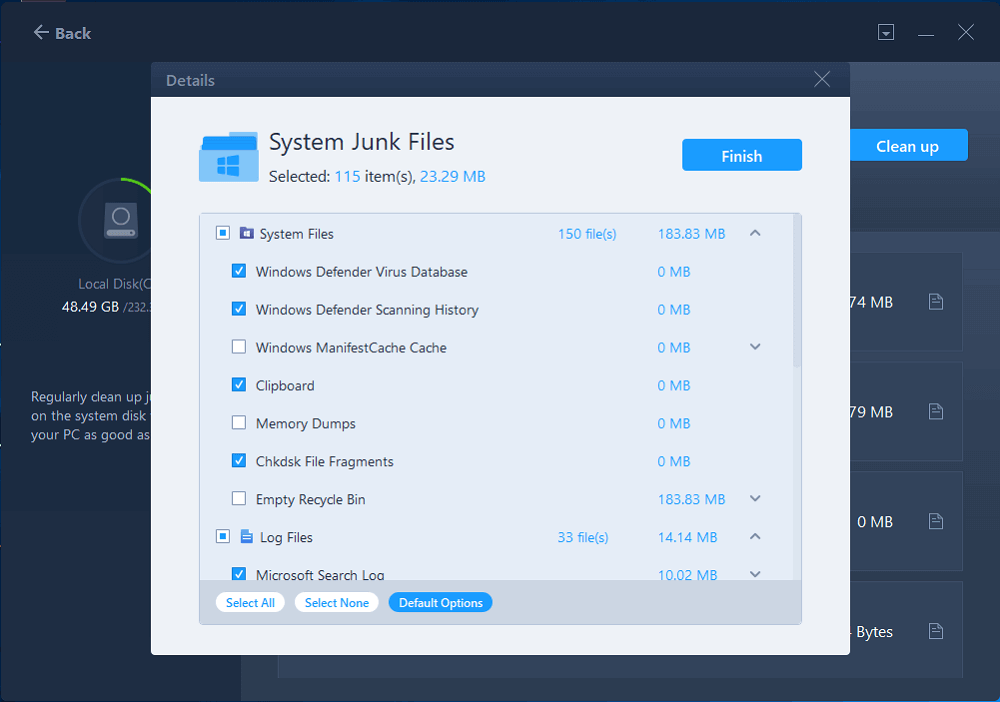
Step 2. When the scan completes, junk files will be listed. Selected the unwanted files. Be careful not to mistakenly delete files that affect the normal operation of your computer or software.
Step 3. Click the "Clean up" button and confirm the cleanup operation. You can regularly use this function to free up disk space.
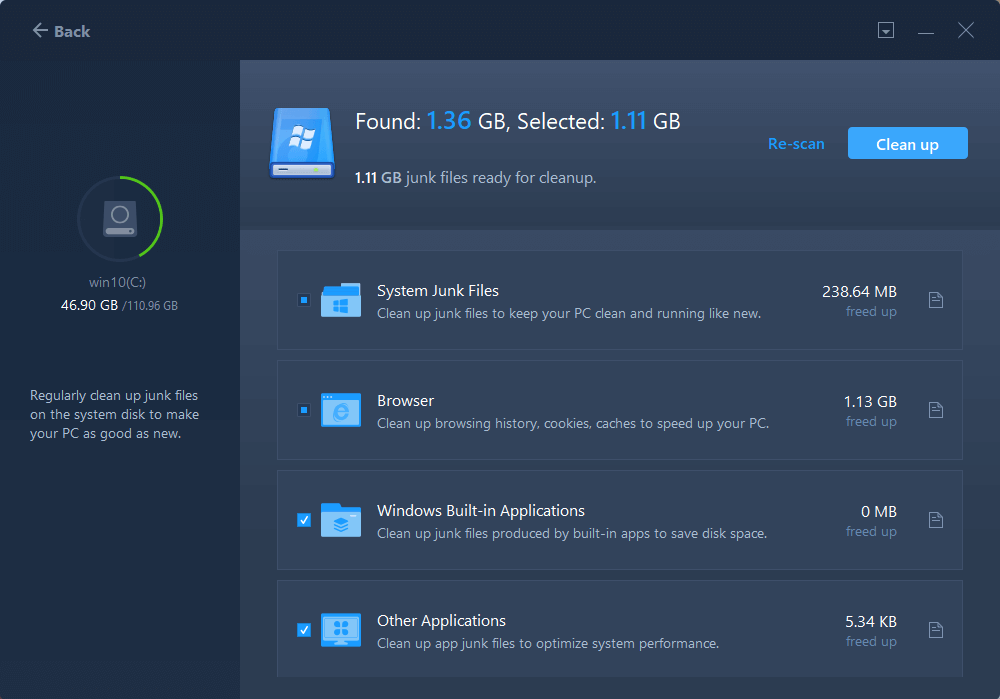
Now, your computer is free from all junk files, and you will have more free space on your system. Moreover, cleaning junk files will help speed up downloads, expedite virus scans, improve streaming performance, and improve your computer's performance.
Feel free to share this feature in EaseUS Todo PCTrans to help your friends online clean up their C drive immediately:
2. Large File Cleanup
It is common that C drive is out of space, and our system becomes slow. This may be because the files stored on your C Drive are files that you probably don't need or are files that you may need but are very heavy. These files could be log files, temporary files, or installation apps for programs installed on your system. So, if your hard drive is running low, it's high time to clean off some useless large files.
The best way to clean up your hard drive is by locating the largest files on your C Drive. Large File Cleanup software from EaseUs Todo PCTrans makes locating and removing these files from your hard drive a breeze.
Large File Cleanup has two folders:
- Folder 1: Move and Delete Large Files option lets you move or delete the large files from the selected drive(s).
- Folder 2: Move Default Folder option lets you migrate personal folders (such as Desktop, Documents, etc.) to another location to save disk space.
Note: Do not delete files from the installation directory of your programs, or else you may not be able to use the programs.
3. App Management
This feature helps you find and uninstall corrupted apps and remove useless large software from the system C drive.
4. App Migration
It helps move programs to another drive, such as from C drive to D drive, with no boot issue.
More articles about cleanup c drive:
Tool 2. Disk Cleanup
It is a Windows Built-in Tool to Clean Up C Drive. The Disk Cleanup tool finds and deletes unnecessary files that the operating system no longer requires. The Disk Cleanup app has a simple interface and lets you clear system files that form a significant part of unwanted files on the system.

With the Disk Cleanup tool, you can easily clean up the following files in the "C" drive:
- 1. Clean up system files
- 2. Windows Update cleanup
- 3. Downloaded Program Files
- 4. Temporary Internet Files
- 5. Recycle Bin
- 6. Temporary Files
- 7. Thumbnail
- 8. User file history, etc.
Below is the tutorial on how to run the Disk Cleanup app to clean up C drive provided by Microsoft:
Step 1. Begin by clicking the search icon on the taskbar, typing disk cleanup, and selecting it from the search results.
Step 2. The next step is to select the check box next to the files you want to delete. The app by default, selects Downloaded Program Files, Temporary Internet Files, and Thumbnails. Clear those checkboxes if you do not wish to delete those files.
Step 3. In order to free up more space, you need to select the Clean Up System Files, and the next step is to select the system files you want to delete. The Disk Cleanup app might take a few minutes to calculate how much space can be freed up.
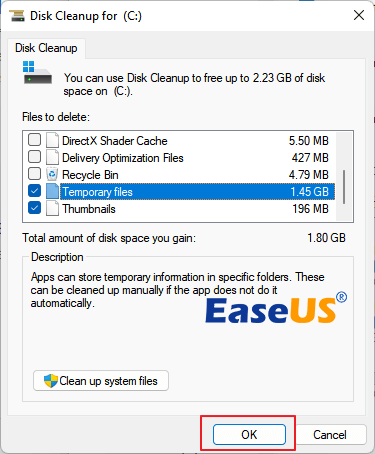
Step 4. After selecting the files you want to delete, click OK and then select the Delete Files option in the confirmation window to start the cleanup process.
- Tip
- 1. You also have an option to Compress Your OS Drive in the Disk Cleanup app. When you select this option, it compresses the drive on which Windows is installed, allowing you to gain extra space for installing important updates. Compressing files does not delete the contents of the "C" drive, and you will not have problems in opening and saving files from the compressed device.
2. Once you install the updates, you can manually decompress the "C" drive at any time. For this, select File Explorer from the taskbar, next in the left pane, select This PC. Now, right-click or tap and hold the "C" drive and then choose Properties. Clear the Compress this Drive to the Save Disk Space checkbox, then select Apply > ok.
Tool 3. Storage Sense
Disk Usage Checker and Disk Cleanup Tool
Storage Sense is a feature on Windows that automates the disk cleanup tasks. It monitors the storage space on your computer and cleans things up if the storage space is running low. Storage Sense does basic things like cleaning your recycle bin, clearing old files in your downloads folder, and deleting temporary files on your computer. In Windows 11, the Storage Sense tool is directly under "Storage Management".
You can use this tool to clean up the "C" drive:
- 1. Delete Temporary Files
- 2. Automatically clean up recycle bin, and temporary files once enabled
- 3. Configure OneDrive online only
- 4. Free up space
How Storage Sense Works
If Storage Sense is turned on by default, it will run when your storage space is running low and clean unnecessary temporary files. It will also clean the recycle bin, but it will not touch the items in your Download folder and OneDrive unless you set up Storage Sense to do so.
Following is the procedure to use Storage Sense:
Note: Storage Sense works on the "C" drive only. If you want to clean up space on any other drive, then go to More Storage Settings > View Storage Usage on Other Drives.
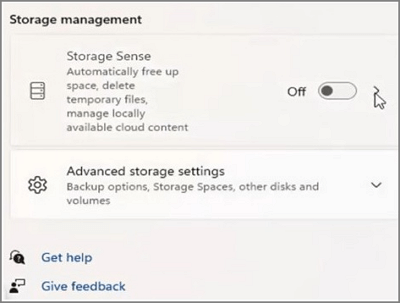
Step 1. Turn on Storage Sense
To turn on Storage Sense, you need to follow the steps below:
- Go to Start > Settings > System > Storage
- Under Storage Sense, turn on Storage Sense.
Step 2. Choosing What to Cleanup from C Drive
- Go to Start > Settings > System > Storage
- Select "Cleanup recommendations".
- Storage Sense will automatically list a list of content you can view and cleanup in C drive.
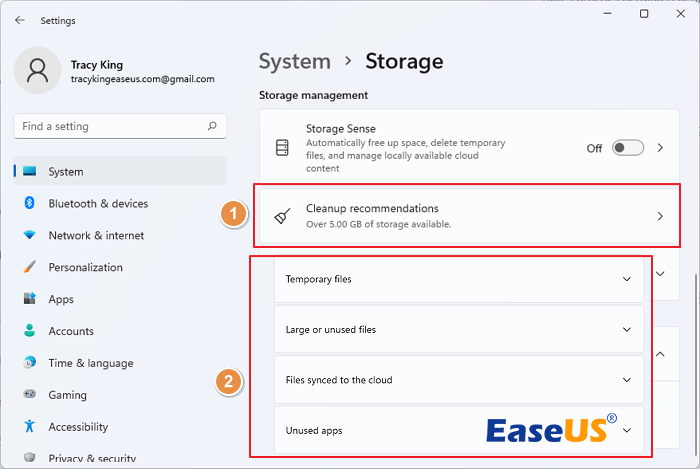
- Temporary files: Downloads are the biggest type of file in your Personal Downloads folder that could take up a huge space in C drive.
- Large or unused files: It contains your Older files that unused or recent content saved on the Desktop.
- Files synced to the cloud: It records the synced files to the OneDrive cloud that you fail to remove or clean up from the computer. This could also take up a certain storage space.
- Unused apps: It marked some installed but unused or some software you didn't use recently.
And you may directly open them one by one to clean up them on your own.
- Notice:
- When you choose these settings, files are not permanently deleted and can be made locally available again in case of free disk space and network connectivity. However, marking any file as "Always keep on this device" gets exempted, and Storage Sense will not manage it.
Tool 4. App & Features
Another effective way to clean the "C" drive is by utilizing the Windows Built-in app manager. The app and features allow you to uninstall apps that are no longer used by you or apps that you hardly use. With this tool, you can:
- 1. View App size
- 2. Uninstall apps that you don't want or too big
- 3. Move some installed apps to another location (only some of them)
You can clean up the C drive by using Apps & Features in Windows 11. The following are the steps:
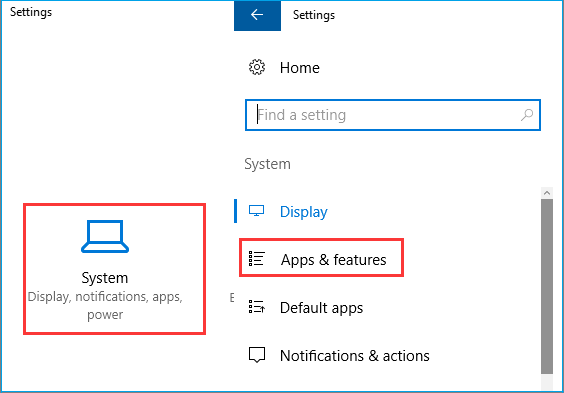
- The first step is to Open Settings.
- Next, click on Apps.
- In it, click on Apps & Features.
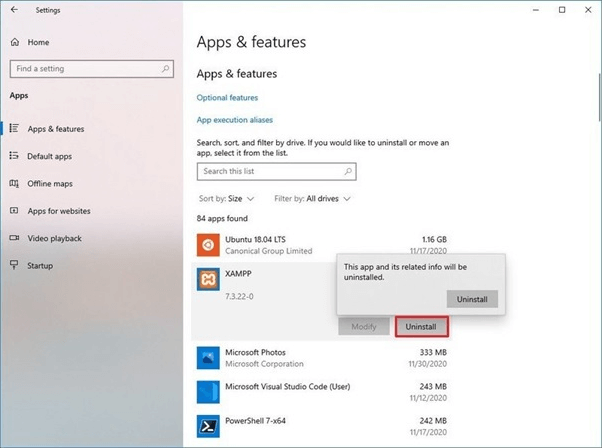
- Choose the "Sort by" filter and select the View By Size to quickly identify the apps and games consuming the most space.
- The next step is to select the item you want to remove.
- Now click the uninstall button.
- Again, click the uninstall button.
- Continue with the on-screen directions.
Repeat the same process once you follow the steps to remove additional unwanted apps and games from your device.
Tool 5. OneDrive
Microsoft OneDrive Files On-Demand feature lets you access all your cloud storage in OneDrive and eliminates the need to download files and use file storage space on Windows 11. The Files On-Demand feature stores only a piece of file information locally and allows you to browse your files without losing local storage.
OneDrive features:
- 1. Make OneDrive Files online only
- 2. Make File Explorer Files online only
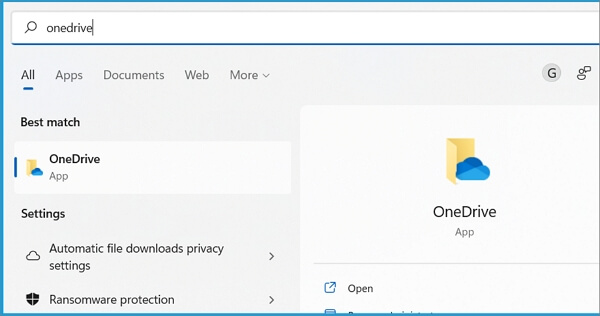
Here are the steps to use the OneDrive Files On-Demand feature:
Begin by turning on the Files On-Demand feature in case it is not turned on by default.
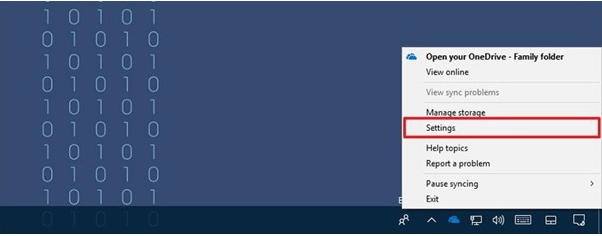
- Now press right-click on the OneDrive cloud icon in the taskbar and select Settings.
- In Settings, under "Files On-Demand", enable the feature "Save Space and Download Files as You Use Them" by checking the box.
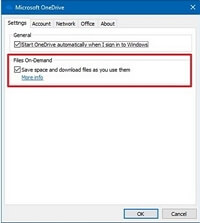
- Next, click OK.
If you want to disable the Files On-Demand feature, then clear the checkbox described in Step 2. Remember, turning off this feature will download files configured to sync with OneDrive.
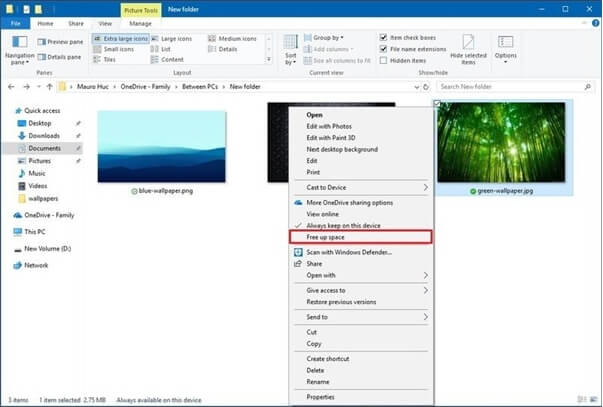
- Free Up Space
In case you don't have space, you can easily make files available online, even without an internet connection. For this, right-click one or more files and then choose the "Free Up Space" option under "Context Menu". You can still view the files available online only in File Explorer, but they'll appear with a cloud icon, and you will require an active internet connection to open them.
What Happens if We Don't Clean Up C Drive?
The all-important "C" drive is the core of most computers. It is the drive where the operating system is installed and all other vital files are stored. But, in fact, it is also the drive that runs out of storage space easily because of unending Windows updates, downloaded files, temporary files of applications, and the fact that everything saves in the "C" drive.
If you don't clean up the C drive timely, the following issue could come up to your PC:
- Thus, your PC may run low on free space and have a slow boot-up speed.
- Apart from this, the file transfer may slow down, the programs may take longer to respond, and the applications might fail to launch.
- Also, you might be unable to install important Windows updates, affecting your PC's speed and performance.
Therefore, cleaning up the "C" drive becomes necessary as it results in your computer's efficient functioning. Moreover, it helps you keep your PC updated and run smoothly.
More Information About Other Windows Uninstall Tools:
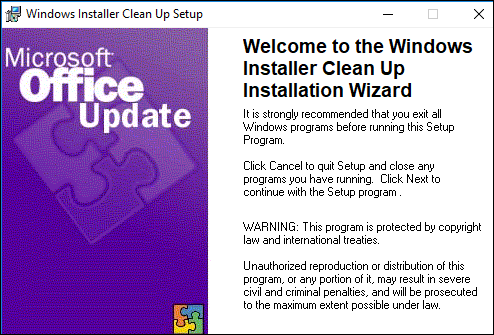
Windows Installer Cleanup Utility Download
Are you looking for an official way to complete Windows Installer Cleanup Utility Download? This article will provide detailed information about Windows Installer Cleanup Utility on Windows 7/10/11.
Conclusion
Although there are multiple cleaner tools to clean the "C" Drive in Windows 11, EaseUs Todo PCTrans, as an "All in One C Drive" clean-up software, offers a most comprehensive way to clean the "C" Drive and create storage space. Follow the guide above to know the detailed steps to clean the "C" Drive in Windows 11.
Alongside third-party C drive cleaning software, you may also turn to Disk Cleanup, Storage Sense, Apps & Features, etc., Windows built-in tools to free up space in your C drive and make Windows computer run faster.
FAQs About C Drive Cleaner
1. Is C drive Disk Cleanup safe?
The brief answer is Yes, but it depends. In most cases, cleaning up the C drive via Disk Cleanup is quick and efficient also secure. However, sometimes, you may have some essential data deleted to the Recycle Bin but forget to retrieve them. When you execute Disk Cleanup in C drive and clean the Recycle Bin, you may lose the Recycle Bin data. So it's vital that you ensure and double-check whether the target item contains valuable data that you need in the C drive. If you have a similar demand, follow to learn How to Recover Deleted Files from Local Disk C.
2. What can I delete from C drive to free up space?
- Desktop items: Downloads, Pictures, Videos, Documents, etc., user data
- Temporary Files: Windows update backup, software caches, system caches, etc.
- Recycle Bin content: The recycled data can be removed to free up a certain size of space in the C drive.
3. How do I run C drive cleaner in Windows 7?
- First, download and install EaseUS Todo PCTrans on Windows 7.
- Second, run the software and go to System Cleanup.
- Scan the C drive and find what is taking up in the system disk on Windows 7.
- Select useless system files to delete and remove.
- Next, go to the Large File Cleanup feature and scan large files and folders in the C drive.
- For useless content, select and delete them from C drive,
- For useful large files and folders, select them to move to another partition with sufficient storage space.
About the Author
Oliver is an EaseUS professional writer who dares explore new areas. With a passion for solving tech issues with straightforward guides for common users, Oliver keeps honing his writing craft by developing in-depth solutions for disk and partition management, computer boot-up issues, file transfer, etc.
Written by Tracy King
Tracy became a member of the EaseUS content team in 2013. Being a technical writer for over 10 years, she is enthusiastic about sharing tips to assist readers in resolving complex issues in disk management, file transfer, PC & Mac performance optimization, etc., like an expert.
Reviews and Awards
-
EaseUS Todo PCTrans Free is a useful and and reliable software solution created to serve in computer migration operations, be it from one machine to another or from an earlier version of your OS to a newer one.
Read More -
EaseUS Todo PCTrans is by the folks at EaseUS who make incredible tools that let you manage your backups and recover your dead hard disks. While it is not an official tool, EaseUS has a reputation for being very good with their software and code.
![]() Read More
Read More
-
It offers the ability to move your entire user account from your old computer, meaning everything is quickly migrated. You still get to keep your Windows installation (and the relevant drivers for your new PC), but you also get all your apps, settings, preferences, images, documents and other important data.
Read More
Related Articles
-
Uninstall Button Greyed Out (Quick Solutions)
![author icon]() Oliver/2026/06/29
Oliver/2026/06/29 -
How to Transfer Games From PC to SD Card - 2 Ways
![author icon]() Sherly/2026/02/01
Sherly/2026/02/01 -
Dropbox Stuck Syncing/Indexing on Windows (Solved)
![author icon]() Oliver/2026/03/29
Oliver/2026/03/29 -
Transfer Data with Windows 11/10 Migration Tool
![author icon]() Tracy King/2026/04/22
Tracy King/2026/04/22