
Content
Page Table of Contents
About the Author
Hot Topics
Experiencing your computer struggling to keep up with a growing workload can be incredibly frustrating. A frequent challenge faced by numerous MSI laptop and desktop users is the troublesome "MSI screen stuck" on Windows 10 and Windows 11 issues. You turn on your MSI device, only to find it frozen on the startup screen. This situation can be both perplexing and concerning, especially if you rely on it for work.
This article from EaseUS is here to provide you with a comprehensive guide on how to address MSI stuck on the MSI screen. It will explore a range of troubleshooting methods and equip you with the knowledge needed to get your MSI system back on track.
Automatically Fix MSI Stuck on MSI Screen Error
If you've found yourself in the frustrating predicament of your MSI device freezing on the startup screen, you'll be pleased to know that there are efficient solutions at your disposal. One such solution is the EaseUS Partition Master, a versatile tool known for its effectiveness in resolving boot-related issues.
EaseUS Partition Master is more than just a partition management tool; it comes equipped with a powerful "boot repair" feature. With this tool, users can effortlessly address various boot-related problems on Windows 10 and Windows 11, offering a comprehensive solution to the MSI screen stuck error and other common boot errors.
Boot repair serves as a procedure aimed at resolving problems associated with your computer's boot sequence. When your MSI device becomes stuck on the MSI logo screen, it generally signifies an issue within the booting process, which obstructs the proper loading of your OS. This can be due to corrupted boot files, misconfigured settings, or other problems.
You can use the following steps to fix MSI stuck on the MSI screen using EaseUS Partition Master:
Step 1. Start EaseUS Partition Master after connecting the external drive/USB to your computer, go to "Bootable Media," and click "Create bootable media."

Step 2. Select an available USB Drive or CD/DVD and click "Create." You can also burn the Windows ISO file to the storage media.

Step 3. Connect the created bootable drive to the new computer and reboot the computer by pressing and holding F2/Del to enter the BIOS. Then, set the WinPE bootable drive as the boot disk and press F10 to exit.
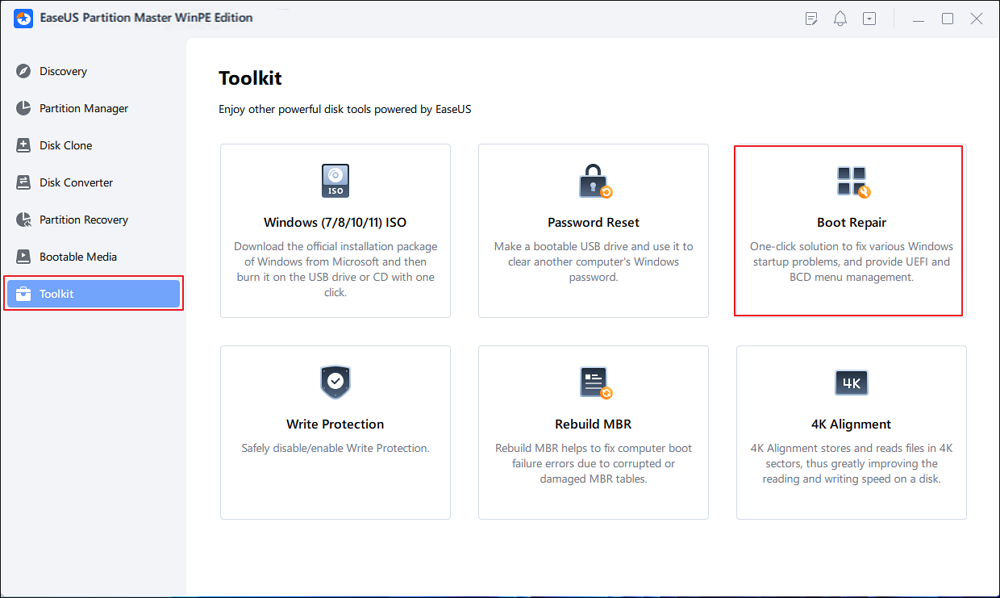
Step 4. Boot the computer again and enter the WinPE interface. Then, open EaseUS Partition Master and click "Boot Repair" under the "Toolkit" option.
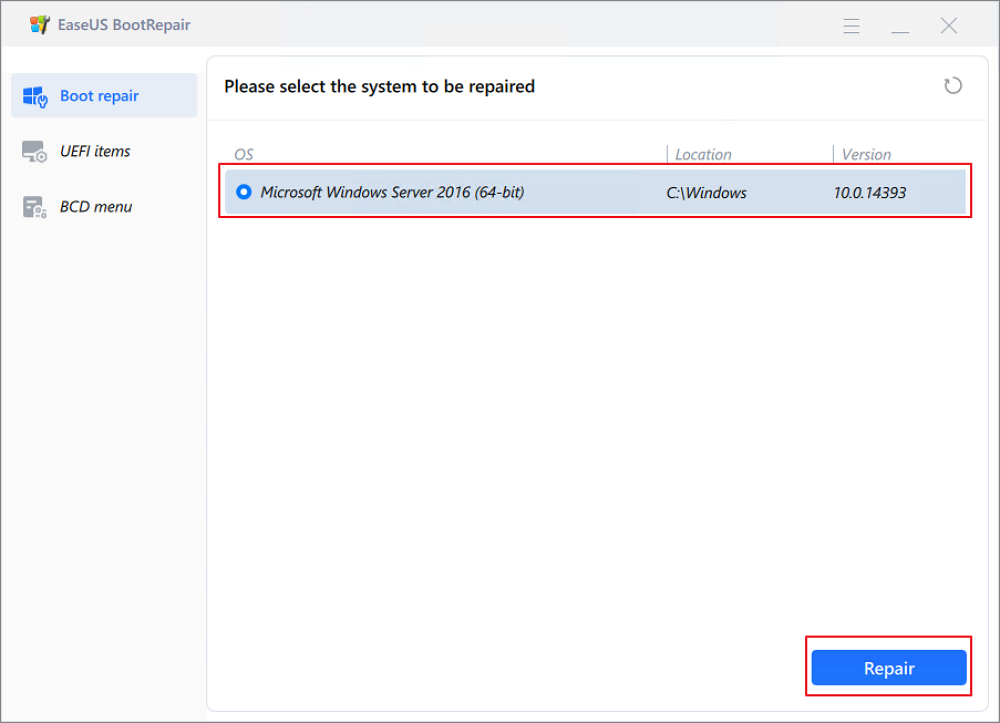
Step 5: Select the system you want to repair and click "Repair."
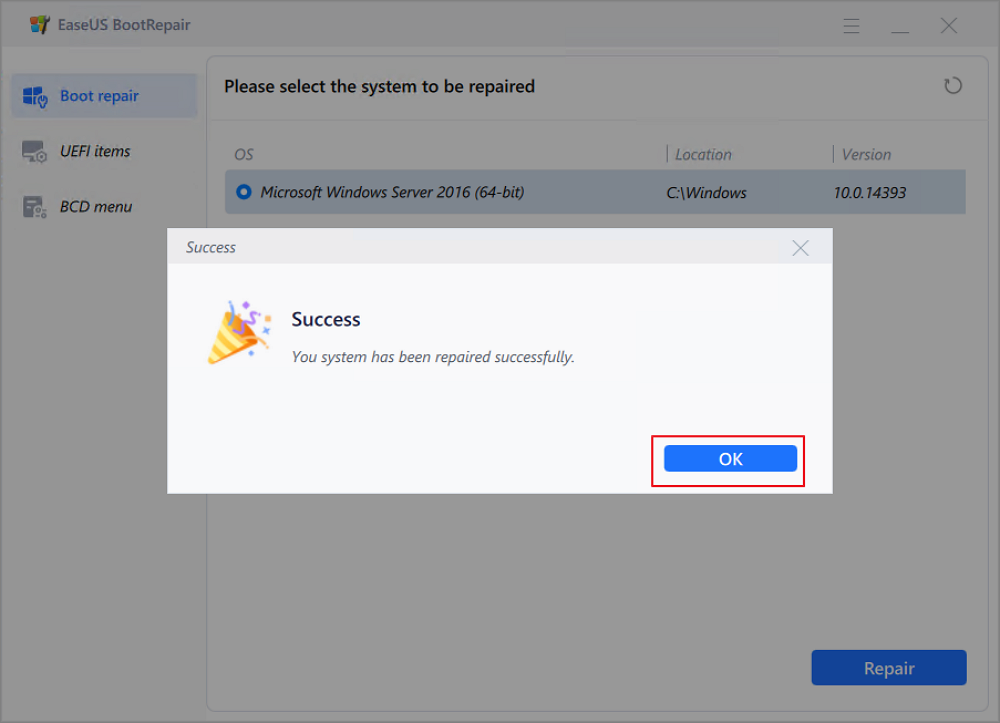
Step 6. Wait a moment, and you will receive an alert that the system has been successfully repaired. Click "OK" to complete the boot repair process.
🎯Support Center
If you're seeking more information, our dedicated experts is here to provide answers:

EaseUS experts are available to provide you with 1-on-1 manual services (24*7) and help fix Windows boot error, BSOD or computer boot loop issues. Our experts will offer you FREE evaluation services and efficiently diagnose and resolve system boot failure, Windows stop codes and OS lagging issues using their decades of experiences.
- 1. Fix BSOD - blue/black screen of death error due to Windows update or other reasons.
- 2. Get rid of Windows boot error such as no bootable device found, or BCD file corruption.
- 3. Serve to fix 0X000_error codes on Windows system or OS boot loop issues.
EaseUS Partition Master's Boot Repair feature goes beyond the ordinary. Its effectiveness stems from the diligent research and development (R&D) efforts dedicated to enhancing the product's algorithm. This means that it can intelligently identify and tackle a wide range of Windows 10 boot problems. Thus ensuring that the MSI screen stuck issue and other commonly encountered boot errors can be easily and effectively resolved.
How to Fix MSI Stuck on MSI Screen Windows 10/11 Manually
Many users ask for help on Reddit and Microsoft. We noticed it and focused on how to remove this error. There are many methods available to fix MSI stuck on the MSI screen. These range from simple battery checks to factory resetting your MSI computer. Given below are the top 7 fixes when you face your MSI computer stuck at the MSI screen:
Fix 1: Remove Peripherals
Before delving into more complex troubleshooting steps, a simple solution can sometimes resolve the "Windows 10/11 MSI laptop Stuck on MSI Screen" issue. Many peripheral devices like USB drives, external hard disks, and even printers can cause conflicts during the boot process.
Carefully unplug or disconnect any external devices connected to your MSI computer. This includes USB drives, printers, scanners, and any other peripherals. Removing peripherals is a straightforward yet effective manual fix.
How to Fix MSI Laptop Black Screen Error - 7 Fixes
Is your MSI laptop stuck on the black screen? In this comprehensive guide, learn how to resolve the MSI laptop black screen issue. Dive into learning now!
Fix 2: Check the Battery
Sometimes, unexpected issues with your MSI device's battery can lead to boot problems, including being stuck on the Windows MSI screen. If your MSI laptop isn't already connected to its charger, plug it in. Sometimes, insufficient battery power can cause boot problems. After giving your device time to charge, attempt to restart it. If your MSI device is older and you've experienced battery problems, it might be time for battery replacement.
Fix 3: Check the RAM
Random Access Memory (RAM) plays a pivotal role in the smooth operation of your Windows 10/11 computer during startup and regular use. Any issues with your RAM can potentially lead to your MSI device becoming stuck on the MSI screen. To address this concern, follow these steps and share this article with fellow users who are also plagued with RAM issues:
Step 1: Power down your MSI device completely and gently open the computer case to access the motherboard. Find the RAM modules situated on the motherboard and gently extract them from their designated slots.
Step 2: Then move on to cleaning the RAM modules. If your computer has multiple RAM modules installed, try removing them one at a time and attempt to boot your device with only one RAM module in place.

Step 3: This step can help pinpoint any faulty modules. If you ascertain that one or more RAM modules are indeed defective, swapping them out with new ones might be essential.
We advise you to share the guide with your fellow Windows MSI device users facing similar issues if you've found the solution helpful. Sharing insights with them can help overcome all technical problems with the device and keep it operational.
You May Also Like:
Fix 4: Perform Automatic Repair
Windows' built-in Automatic Repair feature can often help diagnose and resolve the issue when your MSI device is stuck on the MSI screen. Here's how to manually initiate and use Automatic Repair:
Step 1: Shut down your computer and then reboot it. When you see the MSI logo on your screen, press F3 or F11 repeatedly until you navigate to Windows Recovery Environment.
Step 2: Go to Troubleshoot > Click Advanced options > Automatic/Startup Repair.
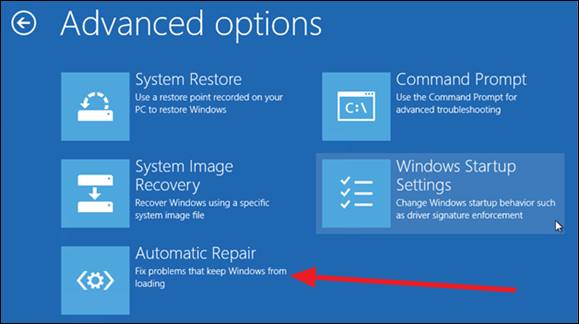
Step 3. Choose your account > enter the password > hit Continue to start the automatic repair.
Fix 5: Boot MSI into Safe Mode
If you're still encountering the "MSI Stuck on MSI Screen" issue after trying the previous fixes, booting your MSI device into Safe Mode can help diagnose and potentially resolve the problem. Safe Mode loads a minimal set of drivers and system files, allowing you to troubleshoot software or driver-related issues. Here's how to manually boot your MSI device into Safe Mode:
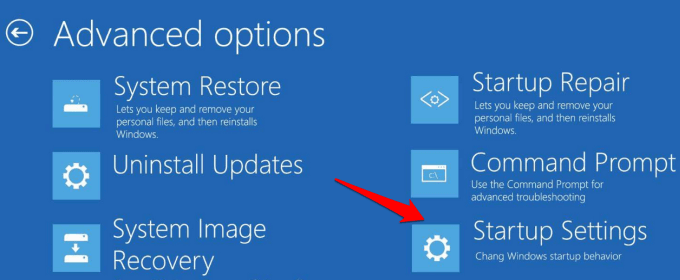
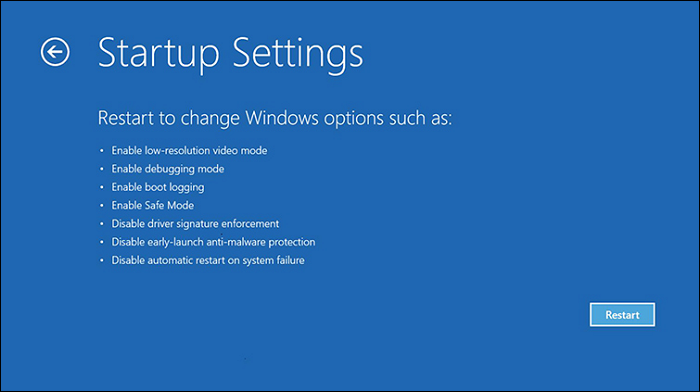
Step 1: Access Windows Recovery Environment and move to "Advanced Options." Now, select "Troubleshoot" and go to "Advanced Options."
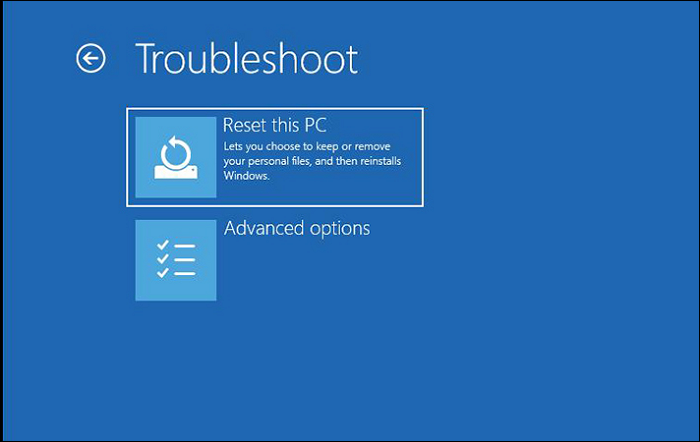
Step 2: Here, select "Startup Settings" and press F4 to initiate Safe Mode on your MSI computer. Now, test and remove the suspicious third-party programs to help resolve the issue.
This method also works on the following issues, such as:
Fix 6: Reset BIOS to Default
It might be necessary to reset your Windows 10 BIOS settings to their default values if your MSI device is still stuck on the MSI screen. Sometimes, incorrect BIOS configurations can lead to boot problems. Altering BIOS configurations can profoundly influence your computer's performance.
Exercise caution when making adjustments, and be sure to adhere to the provided instructions. Here's the process for manually restoring your BIOS settings to their default configuration:
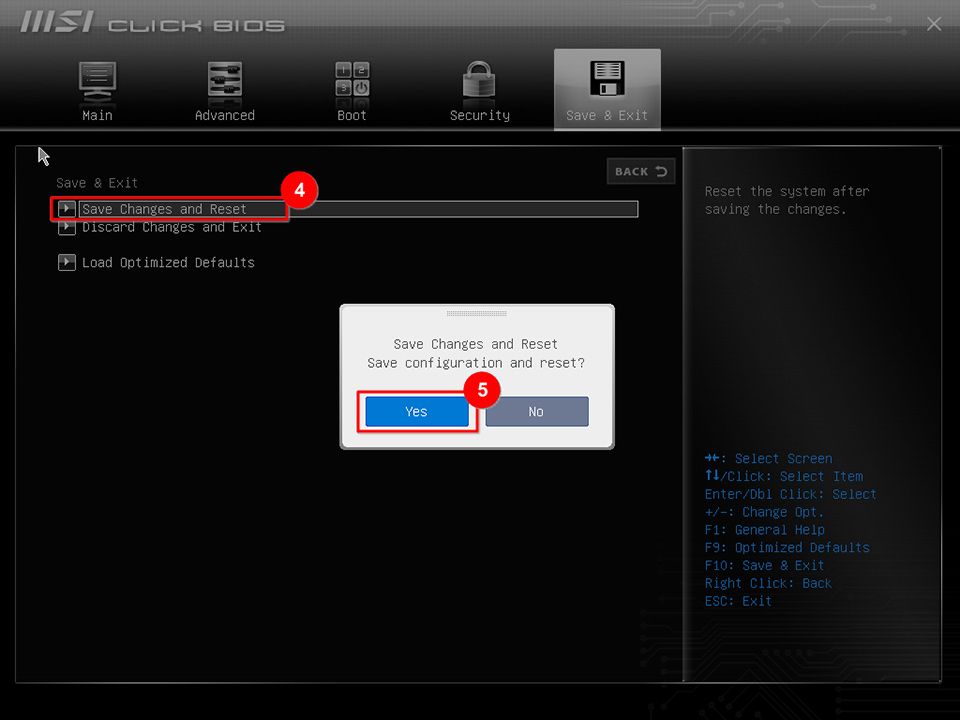
Step 1: Restart your MSI computer and press the "Del" key immediately to access the BIOS settings. Here, move to the "Save & Exit" tab using the arrow keys and select "Load Optimized Defaults."
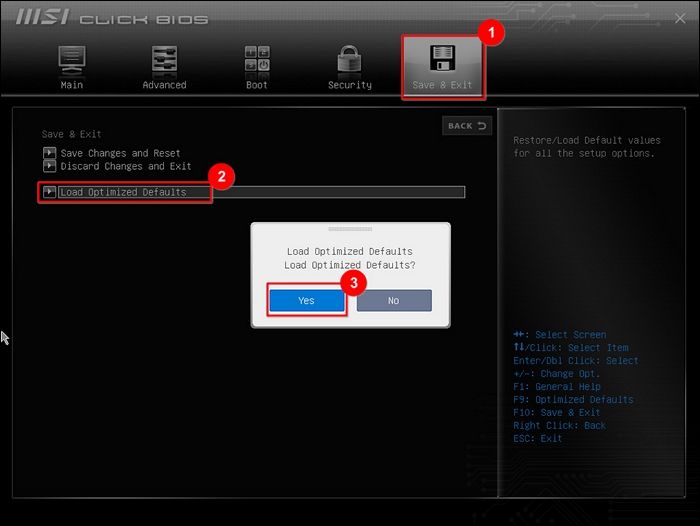
Step 2: Confirm your choice by selecting "Yes" and afterward choose "Save changes and Reset." Again, select "Yes" and reboot your computer for changes to take effect.
Fix 7: Factory Reset Your MSI
If all previous fixes have failed to resolve the "MSI Stuck on Windows screen" issue, a more drastic but effective solution is to perform a factory reset. This procedure involves restoring your MSI device to its initial factory state, effectively reinstalling the operating system, and erasing all your data and installed applications. Here are the steps to manually execute a factory reset on your MSI device:
Step 1: After connecting your MSI device to a power source, reboot it. Once the MSI logo appears, repeatedly press the F3 key to enter the system recovery screen.
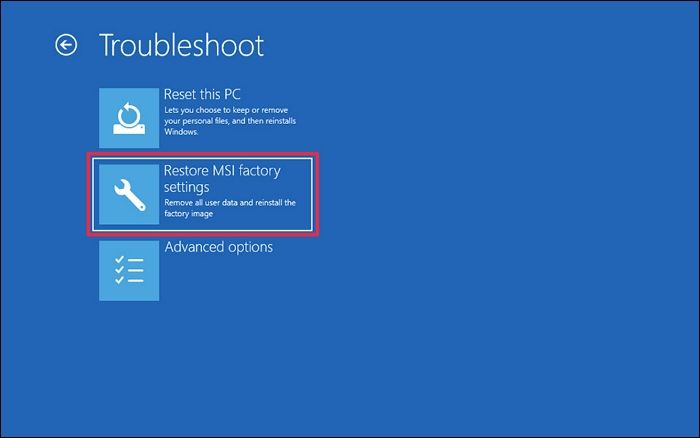
Step 2: From the "Choose an Option" screen, select "Troubleshoot" and follow it by selecting “Restore MSI factory settings." On the following screen, choose "System Partition Recovery."
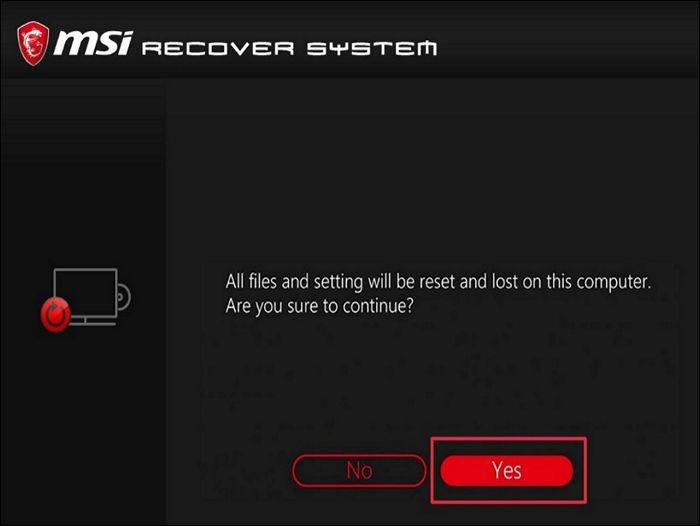
Step 3: Now you will receive the prompt "All files and settings will be reset and lost on the computer. Are you sure to continue?" In this case, proceed with the "Yes" option, and once more, confirm with "Yes" when the prompt reappears.
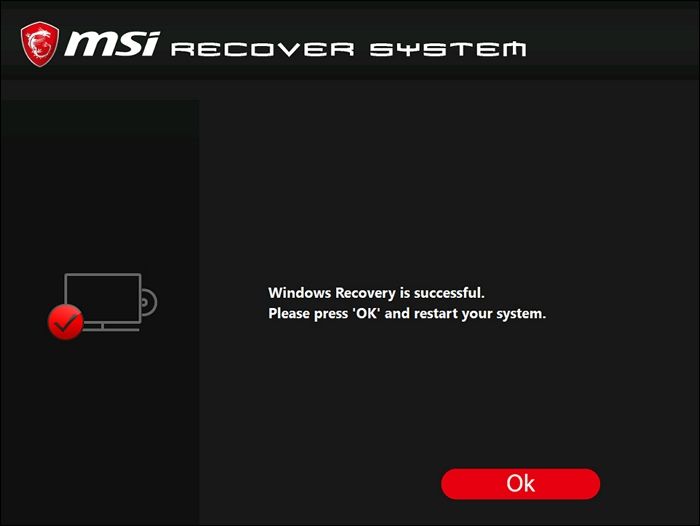
Step 4: Now, wait for the system to undergo recovery, and click "OK" when it is over. Next, choose "Continue" on the "Choose an Option" screen to restart your computer. After the reboot, your system will be restored to its default factory settings.
If you've found this guide useful and think it might be beneficial to others dealing with a similar problem, we encourage you to share it with fellow MSI device users. Sharing knowledge can help individuals overcome frustrating technical issues and keep their devices running smoothly.
Conclusion
To summarize, encountering the "MSI Stuck on MSI Screen on Windows 10/11" error can be a perplexing and frustrating experience. However, armed with the right knowledge and tools, you can resolve this issue and have your MSI device running smoothly again. In this comprehensive guide, we've explored a range of solutions, from automatic fixes using tools like the EaseUS Partition Master's Boot Repair feature to manual troubleshooting steps.
We've covered everything from checking peripherals, battery, and RAM to performing a factory reset and resetting the BIOS to default settings. Each method presented here serves as a valuable tool in your arsenal to tackle the MSI screen stuck problem, catering to both novice and experienced users.
MSI Stuck on MSI Screen FAQs
If you are still facing issues with your MSI device stuck on the Windows MSI screen, you're not alone. Here are answers to some frequently asked questions that can help you resolve MSI stuck on the MSI screen:
1. How do I unfreeze my MSI?
If your MSI device is frozen or unresponsive, try the following steps to unfreeze it:
Step 1: Disconnect the power source (unplug it or remove the battery, if possible) and hold down the power button for 15-20 seconds.
Step 2: Reconnect the power source and turn the device on. Next, verify whether the problem has been resolved.
2. How do I fix my MSI laptop stuck on the MSI logo?
Try the following steps if your MSI laptop is stuck on the MSI logo during boot:
Step 1. Shut down your computer/laptop and then reboot it. When you see an MSI logo on the screen, press F3 or F11 repeatedly until you enter Windows 10 Recovery Environment.
Step 2. Navigate to Troubleshoot > Advanced options > Automatic/Startup Repair.
3. How do I get out of the MSI BIOS loop?
Following are steps you need to follow if your MSI is stuck in the MSI BIOS loop:
Step 1: Restart your MSI computer and press "Del" to enter BIOS settings. Select "Load Optimized Defaults" within the "Save & Exit" section.
Step 2: Confirm with "Yes," select "Save changes and Reset," and restart your computer for the changes to take effect.
4. What date will Windows 10 no longer be supported, and how can you prepare for Windows 10 end of life?
Microsoft will discontinue support for Windows 10 in October 2026. If you're still using the system, we recommend checking out this Windows 10 upgrade and replacement guide as soon as possible and choosing an upgrade or data backup plan based on your actual needs.
How Can We Help You
About the Author
"I hope my articles can help solve your technical problems. If you are interested in other articles, you can check the articles at the bottom of this page. Similarly, you can also check my Twitter to get additional help."
Sherly joined EaseUS in 2022 and she has always loved writing articles and enjoys the fun they bring. She receives professional training here, focusing on product performance and other relative knowledge. She has written over 200 articles to help people overcome computing issues.
Product Reviews
-
I love that the changes you make with EaseUS Partition Master Free aren't immediately applied to the disks. It makes it way easier to play out what will happen after you've made all the changes. I also think the overall look and feel of EaseUS Partition Master Free makes whatever you're doing with your computer's partitions easy.
Read More -
Partition Master Free can Resize, Move, Merge, Migrate, and Copy disks or partitions; convert to local, change label, defragment, check and explore partition; and much more. A premium upgrade adds free tech support and the ability to resize dynamic volumes.
Read More -
It won't hot image your drives or align them, but since it's coupled with a partition manager, it allows you do perform many tasks at once, instead of just cloning drives. You can move partitions around, resize them, defragment, and more, along with the other tools you'd expect from a cloning tool.
Read More
Related Articles
-
[Answered] Is EaseUS Partition Master Safe?
![author icon]() Shelly/2026/06/30
Shelly/2026/06/30 -
Fix SSD SMART Status Bad Error [2026 Easiest Guide]
![author icon]() Tracy King/2026/06/29
Tracy King/2026/06/29 -
How to Install APK on Windows 11 to Sideload Android Apps
![author icon]() Tracy King/2026/06/29
Tracy King/2026/06/29 -
How to Convert FAT32 to exFAT Without Losing Data | 4 Ways
![author icon]() Joey Albert/2026/06/30
Joey Albert/2026/06/30


