
Content
Page Table of Contents
About the Author
Hot Topics
| Workable Solutions | Step-by-step Troubleshooting |
|---|---|
| System Reserved Partition Overview | In this part, we'll explain to you everything about System Reserved partition here...Full steps |
| Check if System Reserved Partition is Deletable | Step 1. Right-click on This PC/My Computer icon on the desktop and select "Manage"...Full steps |
| Delete System Reserved Partition | Step 1. Right-click the partition you want to copy, and choose Clone...Full steps |
This page includes everything you may want to learn about the System Reserved Partition. On this page, we'll show you:
- 1. What is system reserved partition?
- 2. What is system reserved partition used for?
- 3. How do I check my system reserved partition?
- 4. What happens if you delete system reserved partition?
- 5. How to deal with system reserved partition?
- 6. How to delete system reserved partition?
IMPORTANT: As operations that you are about to make here are very dangerous, and in case if you make any mistake, you might result in a non-bootable PC. Therefore, first of all please make sure that you make a backup of system before making any changes.
System Reserved Partition Overview
In this part, we'll explain to you everything about System Reserved partition here:
1. What is system reserved partition?
System Reserved Partition is a partition for data storage which locates before the system C: drive. It is generated during the clean installation process of the Windows operating system so as to reserve a part of the disk space for subsequent use. Windows usually doesn't assign a drive letter to System Reserved partition.
It starts from Windows 7 consuming 100 MB space, and continues to use on Windows 8 and Windows 10 but consuming more space which is 350 MB. Sometimes, Windows OS saves some system components into the System Reserved Partition for booting up PC.
- Important
- Microsoft has officially announced that Windows 10 support will end on October 14, 2025. After this date, the system will no longer receive security updates, bug fixes, or technical support.
2. What is System Reserved Partition used for?
You can use it as a normal data storage partition. And sometimes, Windows use it as a boot partition to load necessary information for the computer to boot up.
3. What happens if you delete System Reserved partition?
Basically, if the System Reserved partition contains OS information or boot files and you directly delete it, you'll meet OS won't boot issue. In other words, the computer cannot boot if you directly delete the System Reserved partition without checking if it's deletable.
In the next part, we'll show you how to deal with a System Reserved partition. You can share this article by clicking the buttons below.
How to Deal with System Reserved Partition - Check If It's Deletable
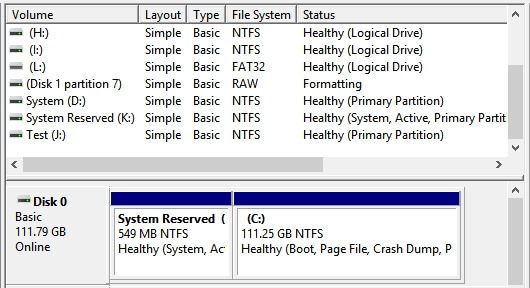
It's unlikely for most of the computer users to notice a non-drive letter assigned partition called "system reserved" until they open Disk Management under Windows 7, 8,10,11.
In this part, we'll show you how to check System Reserved partition and help you to confirm if the partition is deletable. Before you start deleting this partition, it's important that you follow the tutorial here to check the partition and then decide how to deal with the System Reserved partition:
Step 1. Right-click on This PC/My Computer icon on the desktop and select "Manage".
Step 2. Click "Disk Management" on the pop-up window.
Step 3. Check the System Reserved partition and see if it contains "System" information next to the Healthy state.
Step 4. Decide what to do with this partition:
- If your System Reserved partition contains "System" information, we suggest you don't delete it as your system will need to load the computer from this partition.

- If the System Reserved partition doesn't contain the "System" information, you can flexibly delete it.
- If you tend to delete the System Reserved partition and OS partition so as to use the OS disk as a normal data drive, you can also choose to delete it.
So how to delete this partition from your computer? In the next part, you'll learn how to delete System Reserved partition on Windows 11/10/8/7.
How to Recover Deleted Files from Recycle Bin?
Are you looking for a way to perform Recycle Bin recovery? Follow to learn how to recover deleted files from the Recycle Bin immediately.
How to Delete System Reserved Partition Free
Albeit it is of great importance in booting up Windows with the System Reserved partition. But if the System Reserved partition doesn't contain any system boot components or information and you don't want this partition on your drive, you can delete it.
However, you cannot use Windows Disk Management to delete this partition as Windows' protection mechanism command the tool not to delete this partition.
In this case, you need the help of the best Windows disk management alternative - EaseUS Partition Master Free. It's a reliable and powerful free partition manager that helps you safely delete the System Reserved partition with ease.
Note: If you tend to use an OS drive as a data disk and tend to delete the System Reserved partition and other existing drives, make sure that you have installed or migrated OS to a new HDD/SSD. Also, if you have important data saved in this partition, back up them to another drive or location first.
Tutorial on How to Delete System Reserved Partition on Windows 11/10/8/7
Let's start the process of removing your System Reserved partition from your drive now:
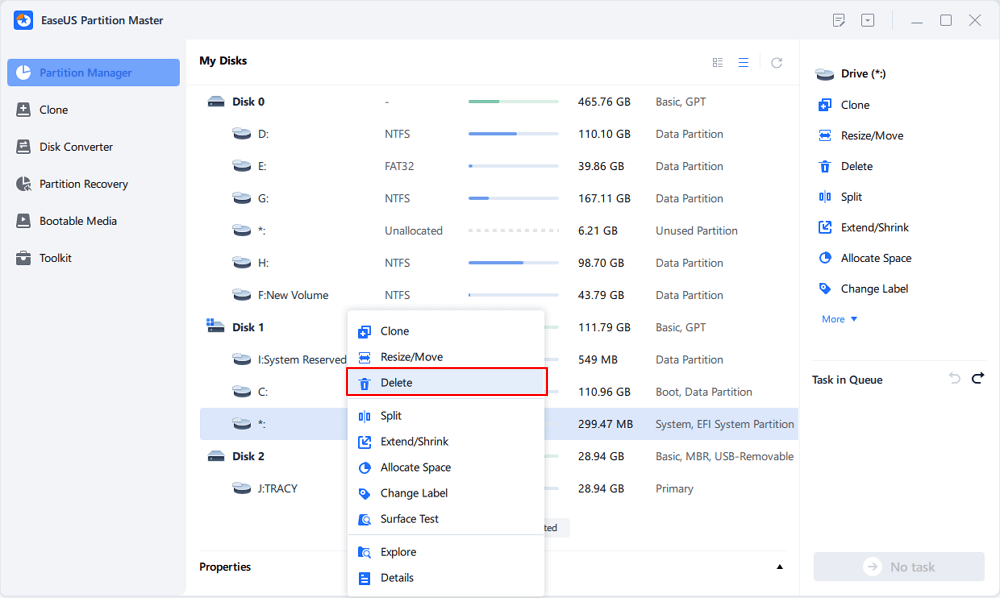
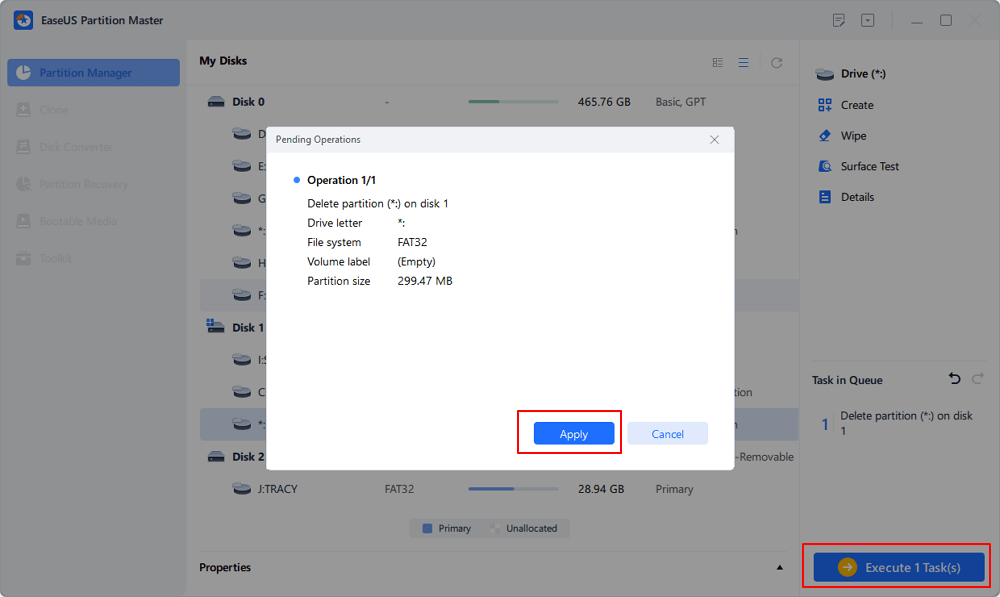
Step 1. Open EaseUS Partition Master, click "Partition Manager". Right-click on the recovery partition and choose "Delete".
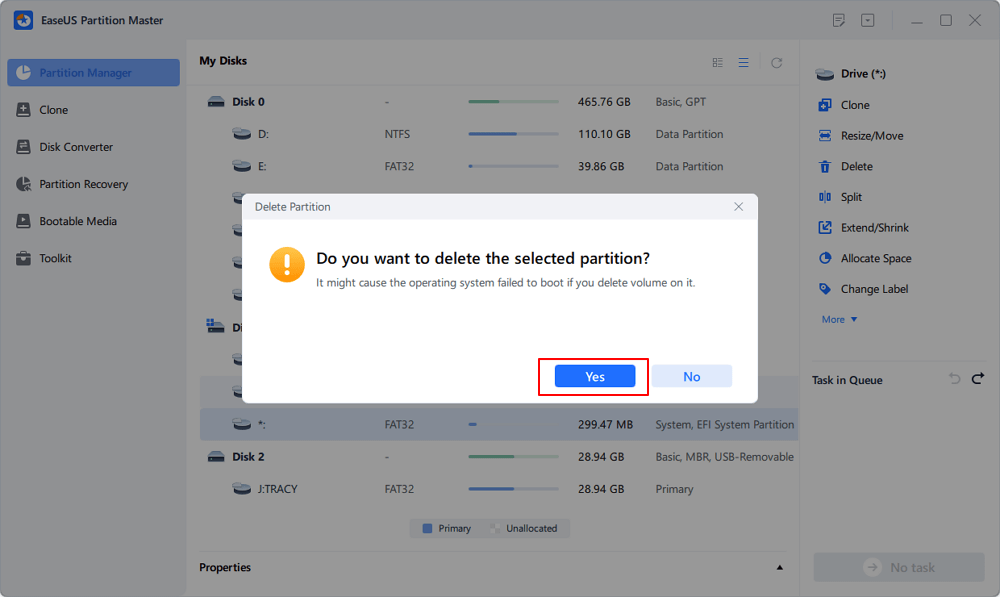
Step 2. Click "Yes" to confirm the message "Do you want to delete the selected partition?".
Step 3. Click "Execute Task" and then click "Apply" in the new window to completely remove the recovery partition.
The following video tutorial shows you how to delete, create, and resize partition on Windows 11/10/8/7. You can learn how to delete system reserved partition.
Besides this, EaseUS Partition Master Free also helps to:
- Recover deleted System Reserved partition
- Clone System Reserved Partition
- Fix low System Reserved partition error
- Fix we couldn't update System Reserved partition issue
Conclusion
On this page, we explained that is System Reserved partition and what it is mainly used for. If you tend to delete the System Reserved partition, we suggest you check if this partition is delectable first.
If it contains system data, don't delete it. Otherwise, you'll meet Windows or PC won't boot issue. If it doesn't contain system data, you can delete it.
As for the partition deleting tool, take powerful partition manager software - EaseUS Partition Master as your first choice. It always works to help.
How Can We Help You
About the Author
Sherly joined EaseUS in 2022 and she has always loved writing articles and enjoys the fun they bring. She receives professional training here, focusing on product performance and other relative knowledge. She has written over 200 articles to help people overcome computing issues.
Brithny is a technology enthusiast, aiming to make readers' tech lives easy and enjoyable. She loves exploring new technologies and writing technical how-to tips. In her spare time, she loves sharing things about her game experience on Facebook or Twitter.
Product Reviews
-
I love that the changes you make with EaseUS Partition Master Free aren't immediately applied to the disks. It makes it way easier to play out what will happen after you've made all the changes. I also think the overall look and feel of EaseUS Partition Master Free makes whatever you're doing with your computer's partitions easy.
Read More -
Partition Master Free can Resize, Move, Merge, Migrate, and Copy disks or partitions; convert to local, change label, defragment, check and explore partition; and much more. A premium upgrade adds free tech support and the ability to resize dynamic volumes.
Read More -
It won't hot image your drives or align them, but since it's coupled with a partition manager, it allows you do perform many tasks at once, instead of just cloning drives. You can move partitions around, resize them, defragment, and more, along with the other tools you'd expect from a cloning tool.
Read More
Related Articles
-
File too Large for USB? Fix Can't Copy Large File to a USB Error
![author icon]() Tracy King/2026/06/17
Tracy King/2026/06/17 -
CHKDSK Cannot Run Because the Volume Is in Use by Another Process
![author icon]() Sherly/2026/07/01
Sherly/2026/07/01 -
Partition Magic Free Download for Windows Disk Management
![author icon]() Tracy King/2026/07/01
Tracy King/2026/07/01 -
ScanDisk Windows 10: How to Scan and Repair Drive Windows 10/8/7
![author icon]() Jean/2026/06/30
Jean/2026/06/30


