
Content
Page Table of Contents
About the Author
Hot Topics
Many newly purchased computers come with more than one partition on the hard drive. However, some users may encounter the case that there is only one partition, usually a C drive, on the disk. It's necessary to divide your hard drive into more sections for installing OS or software and storing various data.
In this article from EaseUS, you will learn how to create D drive from C drive in Windows 11/10, possible issues that might happen during the process, and the reasons why you should do this.
How to Create D Drive from C Drive
We will offer you two methods to help you create a new drive from the C drive. Continue reading and follow the guide.
Method 1. Use EaseUS Partition Master
To partition the C drive and create more partitions easily, you need a dependable and multifunctional third-party tool like EaseUS Partition Master Professional. You can use this software to create a D drive from unallocated space by shrinking the C drive or splitting the C drive directly.
Shrink C Drive and Create D Drive:
Here are the steps on how to shrink the C drive and create a D drive.
Step 1: Locate and select target partition to shrink
Go to the Partition Manager section, right-click on the partition that you want to shrink and select "Resize/Move".
Step 2: Adjust to shrink partition
Use your mouse to drag the end of the target partition to shrink partition space.
You can also adjust the partition size box to shrink the target partition. Once done, click "OK" to continue.
Step 3: Execute operation
Click the "Execute 1 Task(s)" button and "Apply" to keep all changes.
After you shrink the C drive, you can create the D drive from the unallocated space.
Step 4. Now, right-click on the unallocated space and select "Create".
Step 5. Then, you can adjust the partition size, drive letter, and file system of the new partition.
Step 6. Click "OK" and "Execute xx task" to finish the process.
Do you find this solution helpful? If you do, share it on your social media to help more beginners!
Split C Drive to Create D Drive:
The other operation to do so with this software is splitting the C drive.
Step 1. Right-click on your targeted partition and click "Split Partition" from the Feature List.
Step 2. It will automatically split the remaining partition size of your selected partition. Please click "OK" to start splitting.
Step 3. All the introduced changes to the disk layout will be pended until applied in Execute Task.
Step 4. After applying the changes, you successfully split the partition into two partitions.
Notes:
- EaseUS Partition Master supports split partition on basic disk only. It cannot split the dynamic volume.
- Only the non-hidden partition can be split.
- The unused space of the operating partitions should be more than 5% of the total partition space.
Besides creating a new partition, EaseUS Partition Master also has abilities to clone your disk and partitions, merge disk partitions, reset the password, repair boot issues, and so on. Download this terrific software today and explore more possibilities.
Method 2. Use the Built-in Tool Disk Management
If you don't want to download any third-party software, a Microsft built-in tool can help you. Disk Management provides multiple features for you to manage your disks and partitions on your device. Follow the tutorial presented below to create the D drive.
Step 1. Right-click "Start" and select "Disk Management".
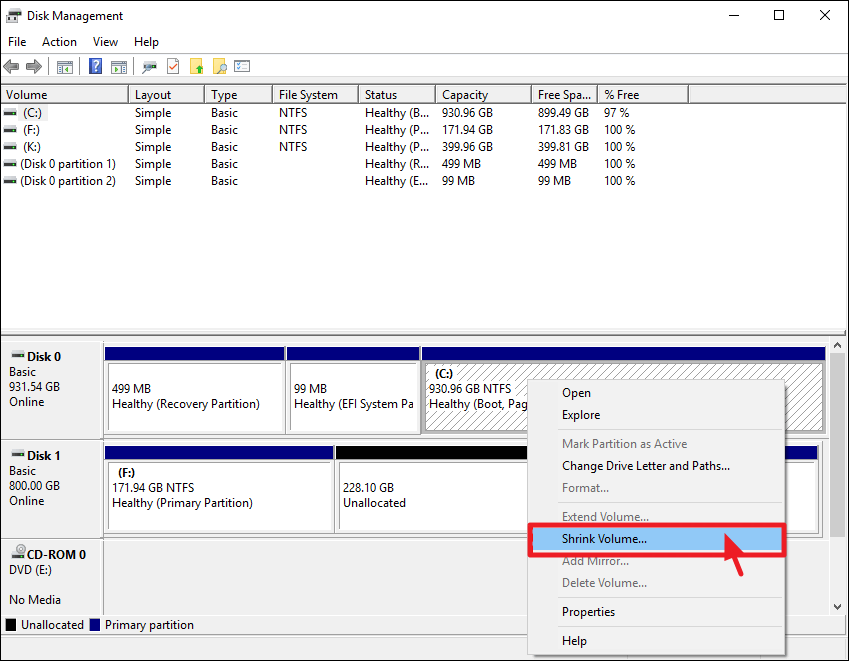
Step 2. Right-click on the C drive and select "Shrink Volume".
Step 3. Type in the amount of space in the box to shrink from C drive, and then click "Shrink" to create the unallocated space.

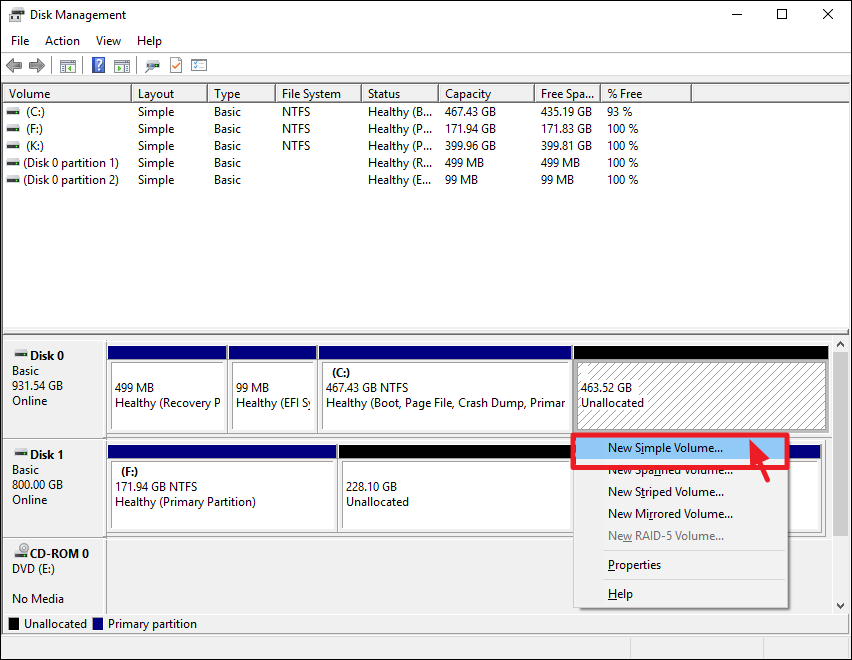
Step 4. Right-click the unallocated space you just created, and select "New Simple Volume".
Step 5. Type in the amount of space that you want to allocate for the new volume, and then format it to create a new partition.
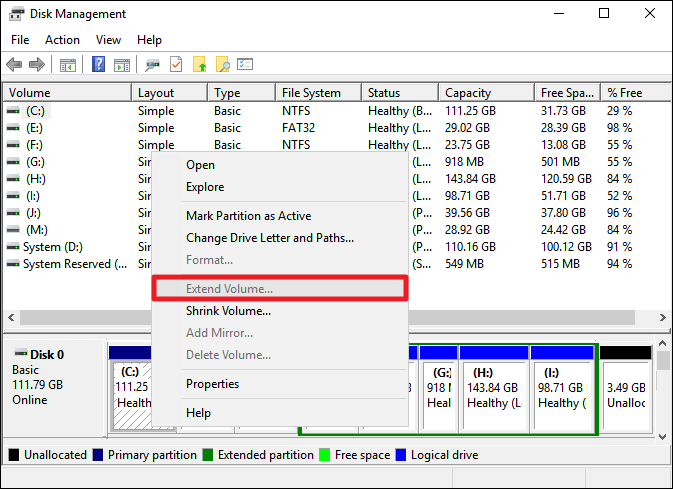
If you try to extend the volume on the right with the unallocated space, but only find out the option Extend Volume is greyed out. This is because the unallocated space can only be used to extend the adjacent partition on the left side.
Using Disk Management has many limits that can be bothersome to beginners, such as it always requires formatting after partitioning a drive. By contrast, professional software like EaseUS Partition Master is a better and easier choice for disk and partition management in Windows systems.
If you find any practical information, share it with your friends who are facing the same issue.
Why Can't Shrink C Drive
Sometimes, you may encounter that volume can't be shrunk. A lot of factors can cause this. Here are the main reasons why you can't shrink a partition on a Windows PC:
- Insufficient space on the C drive
In this case, you might get a message saying, "There is not enough space available on the disk(s) to complete this operation."
- Many fragments on the C drive
Too many fragments on the C drive can prevent you from partitioning a volume normally. You can defrag C Drive with the Windows built-in disk defragmenter.
- Unmovable files are at the end of the C drive
For example, the page file, the hibernation file, and the system volume information folder for the system restore. A volume cannot be shrunk beyond the partition where any unmovable files are located.
- File system error
A file system error can make the volume partition invisible or inaccessible. You can check the disk error and see if it fixes the issue.
Benefits: Create D Drive from C Drive
Having more than one partition on your hard drive has many benefits. Below are a few main advantages of creating a D drive from the C drive.
- Reasonable classification of data. You can separate the operating system from your personal files.
- Reduce disk fragmentation. Creating a new partition can help you minimize the fragment on your drive.
- Avoid data loss. Having your personal data on another drive might save your data from system failure.
- Create a dual boot system. Creating multiple partitions allows you to run different operating systems on your computer.
Conclusion
Many potential problems will be waiting for you if there's only one partition on your drive. Partitioning the C drive into two or more can optimize your experience using a Windows 11/10 computer or laptop. With the assistance of EaseUS Partition Master, you can create a D drive from a C drive safely and fast. Download it now and enjoy those features.
FAQs on Create D Drive from C Drive
After creating a D drive from the C drive successfully, you may also be interested in the frequently asked questions and answers below.
1. Can I transfer program files from the C drive to the D drive?
Yes, you can transfer program files from the C drive to the D drive. However, you can't just manually copy them to your D drive. To transfer them easily, you can download EaseUS Todo PCTrans or use Apps & Features in Windows Settings.
2. Can we add D drive space to C drive?
Yes, you can add D drive space to C drive. First, download EaseUS Partition Master. It provides a feature called "Allocate Space" that can help you increase the C drive from the D drive. You don't have to delete the D drive to make unallocated space during the process. There won't be data loss as well.
3. Why is my C drive full?
Here are the main causes that are taking up space in the C drive and making it merely full:
- Windows operating system, system files, and settings.
- Windows built-in programs, downloaded software, and installed applications on the C drive.
- User data (Documents, Photos, etc.) and personal data are saved on the Desktop or somewhere in the C drive.
How Can We Help You
About the Author
Updated by Joey Albert
Joey is an enthusiast of science and technology. With a passion for uncovering the latest tech innovations, she creates clear, engaging how-to guides that make technology accessible and enjoyable for all.
Oliver is an EaseUS professional writer who dares explore new areas. With a passion for solving tech issues with straightforward guides for common users, Oliver keeps honing his writing craft by developing in-depth solutions for disk and partition management, computer boot-up issues, file transfer, etc.
Product Reviews
-
I love that the changes you make with EaseUS Partition Master Free aren't immediately applied to the disks. It makes it way easier to play out what will happen after you've made all the changes. I also think the overall look and feel of EaseUS Partition Master Free makes whatever you're doing with your computer's partitions easy.
Read More -
Partition Master Free can Resize, Move, Merge, Migrate, and Copy disks or partitions; convert to local, change label, defragment, check and explore partition; and much more. A premium upgrade adds free tech support and the ability to resize dynamic volumes.
Read More -
It won't hot image your drives or align them, but since it's coupled with a partition manager, it allows you do perform many tasks at once, instead of just cloning drives. You can move partitions around, resize them, defragment, and more, along with the other tools you'd expect from a cloning tool.
Read More
Related Articles
-
![author icon]() Daisy/2026/06/17
Daisy/2026/06/17 -
Unable to Extend C Drive Windows 11? Fix It Now!
![author icon]() Sherly/2026/06/17
Sherly/2026/06/17 -
How to Clone Windows 10 to Larger SSD [2026 New Solution]
![author icon]() Sherly/2026/06/30
Sherly/2026/06/30 -
How to Fix Yellow Triangle Warning on C Drive
![author icon]() Cici/2026/06/30
Cici/2026/06/30


