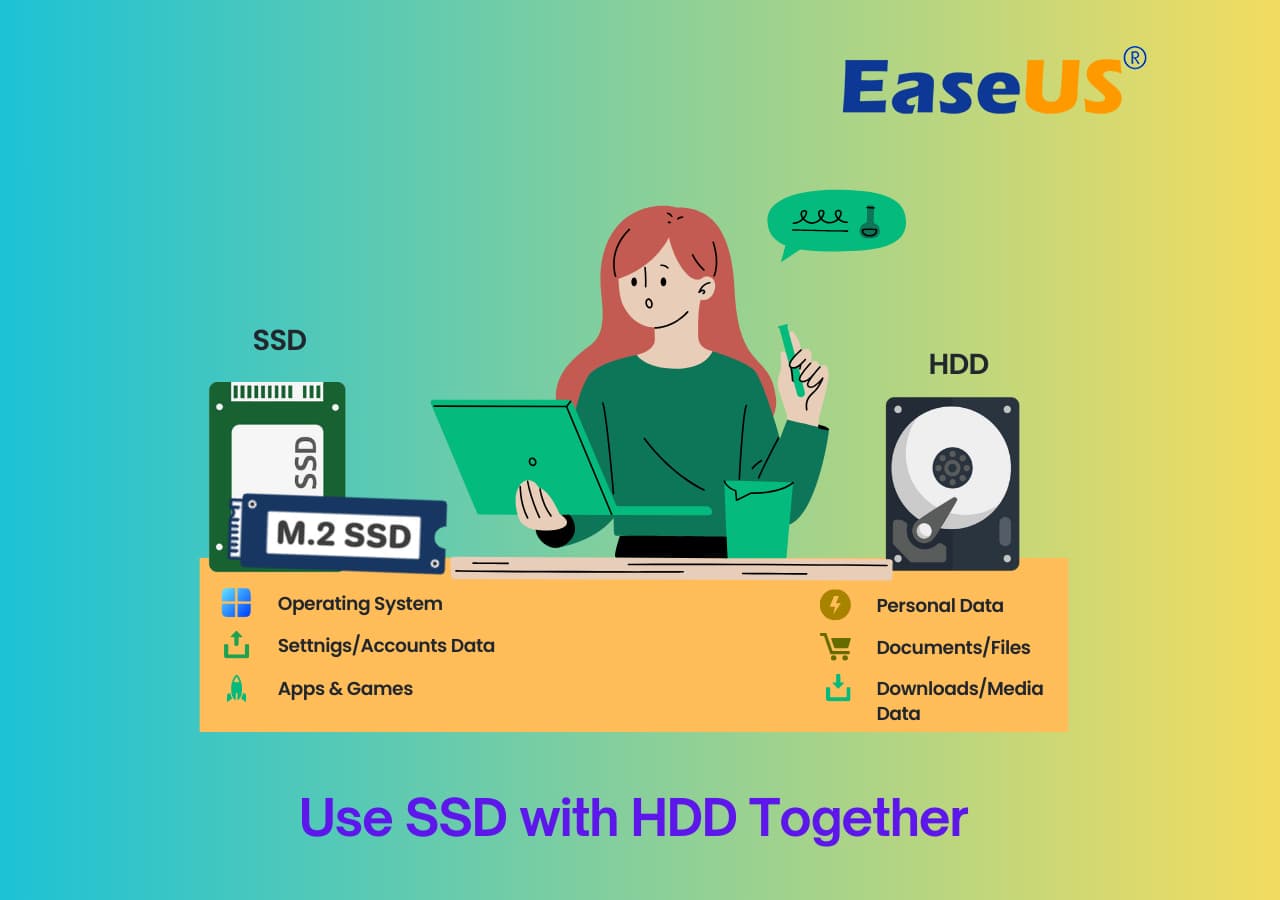
Can I Use SSD and HDD at the Same Time
Yes, without giving any second thought, you can seamlessly use SSD and HDD together in a single system. In the previous days, HDD was always the first choice for storing a large amount of data. Still, with the advancement in technology, multiple types of storage media appeared, and one such storage media is SDD.
SSD comes with a fast speed feature, but an SSD with a large storage capacity is quite expensive than an HDD. Due to this reason, most of the users can only afford SSD with small storage. If the same is the case with you, you can choose to use SSD and HDD simultaneously on the same PC.
Here is a Reddit post that lists the same question and if you need a guide to use HDD and SSD at the same time, follow on the guide below to resolve this issue:
How to use HDD and SSD at the same time?
by intechsupport
Quick Tips to Use SSD and HDD Together Windows 10
If you are successful in using SSD and HDD together in the Windows 10 Operating System, then it's beneficial for you to learn some of the basic tips that will help you use SSD and HDD together correctly:
| 1. Install System and Apps on SSD | SSDs read data much faster than traditional HDDs. Additionally, it is advised to install the system and frequently used apps on the SSD and store data on the HDD so that your PC is capable of working faster. |
| 2. Don't Defrag SSD | Defrag HDD only while using SSD and HDD together. Data is fragmented and stored in more than one location on an HDD. It takes much time to locate the specific file on an HDD compared to an SSD. Defragging the HDD will improve the drive's performance and speed it up. But don't defrag SSD as it will accelerate the degradation of SSD. |
| 3. Store Data Files on HDD | It is advisable to store data files on an HDD. Also, an SSD with no free space will not work faster because it will suffer repetitive writing, which in turn will damage the blocks in use. Therefore, it is wise of you to store data files like music, movies, and other large files on an HDD. |
| 4. Enable TRIM Feature on SSD | Due to the TRIM feature, SSD works more quickly than HDD. Whenever a file is deleted, the TRIM feature commands the drive to clean the file from all the sectors that are no longer required. This process makes it faster for the new data to be written into the drive. To make better use of SSD, always enable TRIM on your computer. |
How to Use SSD and HDD Together in Laptop/PC Windows 10
Your search for "How to use SSD and HDD together" ends here! Well, using SSD and HDD together on a laptop or PC might seem to be a challenging task to do but with the right tools in hand, you can easily do it in just a few simple steps.
So, here's a list of top solutions that will help you in using SSD and HDD together in your Laptop/PC ideally!
1. Use SSD As a Boot Drive
To use SSD and HDD together, you can consider using SSD as a boot drive. One of the essential things that must then be kept in SSD is the Windows Operating System. When you have your OS on the SSD, it will speed up all the elements of Windows involving launching programs, booting up, and shutting down your PC.
Now, if we talk about installing the Windows operating system on SSD, you can do it either by fresh install or OS migration. Here's how each of them works!
Guide 1: Migrate Installed OS to SSD (No Boot Issue)
🧰Preparations: SATA Cable, a new SSD, OS migration tool - EaseUS Partition Master
An efficient and reliable method to use SSD as the boot drive is to move the installed OS to SSD. This method saves you a lot of time and is much faster than the next manual guide.
EaseUs Partition Master is a perfect option that will help you migrate Windows OS to SSD without any need for re-downloading or re-installing. EaseUS Partition Master is free to that performs excellently when it comes to managing the disk. May it be merging partitions or deleting the partitions, you can do it all quickly with this partitioning tool!
Have a look at how OS Migration works with Ease Us Partition Master Tool!
Step-by-Step Guide:
Note: The operation of migrating OS to SSD or HDD will delete and remove existing partitions and data on your target disk when there is not enough unallocated space on the target disk. If you saved important data there, back up them to an external hard drive in advance.
Step 1. Select "Clone" from the left menu. Select the "Migrate OS" and click "Next" to continue..
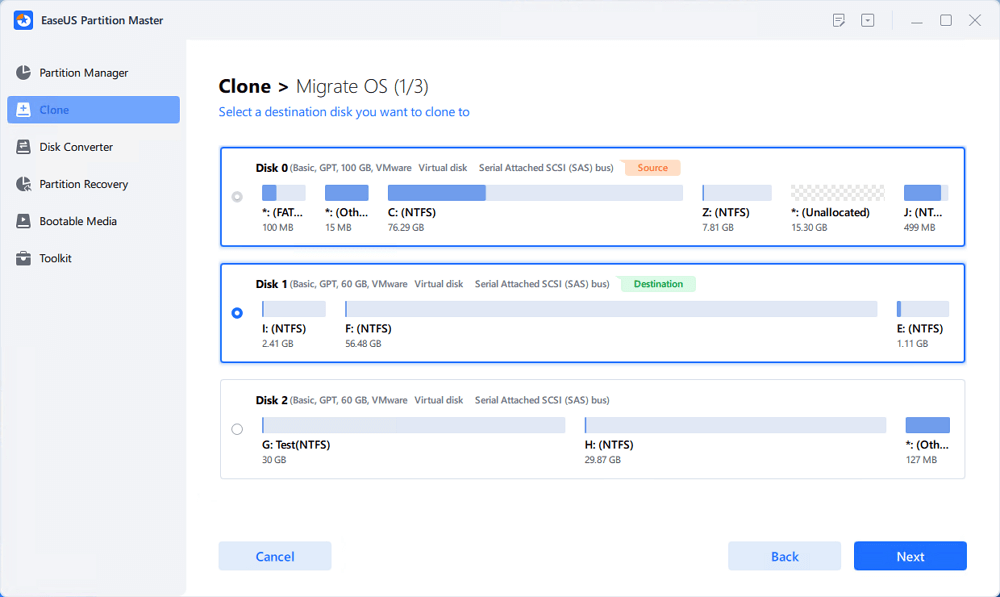
Step 2. Select the target disk you want to clone. Click "Next".
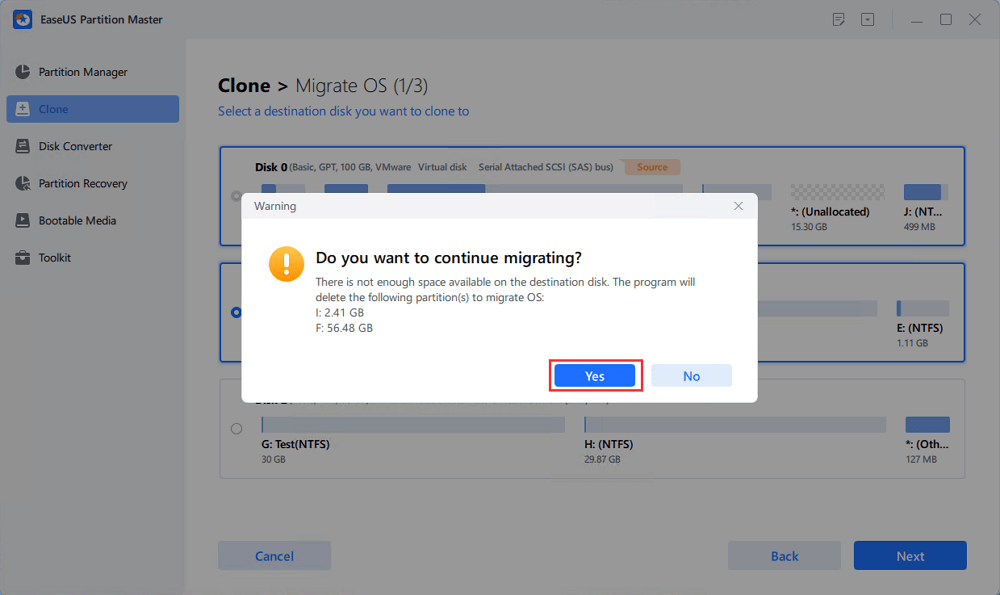
Step 3. Click "Yes" after checking the warning message. The data and partitions on the target disk will be deleted. Make sure that you've backed up important data in advance. If not, do it now.
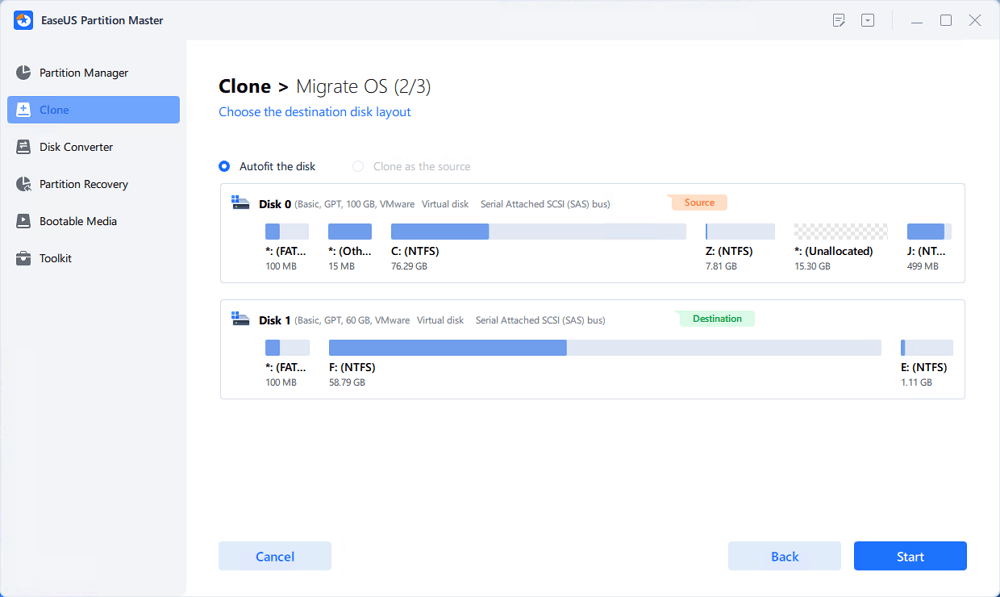
Step 4. Preview the layout of your target disk. You can also click the disk layout options to customize the layout of your target disk as you want. Then click "Start" to start migrating your OS to a new disk
Step 5. When you see a confirming message, asking "If you want to start up computer from the clone target disk", tick "Adjust the order to boot from the clone target disk" and click the respective button through your demands.
- Reboot Now: it means to reboot the PC and boot OS from the new disk immediately.
- Done: it means to make the changes later.

Reminder: If the SSD is large, you can also install some important software on the SSD to get a better user experience.
Guide 2: Install OS on SSD by Fresh Install (Manual)
🧰Preparations: Empty USB (8GB min), download Windows Media Creation Tool, an empty SSD, Windows product key (activate after the installation)
One of the most traditional ways to install OS on an SSD is Fresh Install or Clean Install. Under this process, instead of migrating the OS, you will have to Clean Install the entire OS on SSD by using Windows Media Creation Tool.
Have a look at how Fresh Installing OS on SSD works!
Step-by-Step Guide:
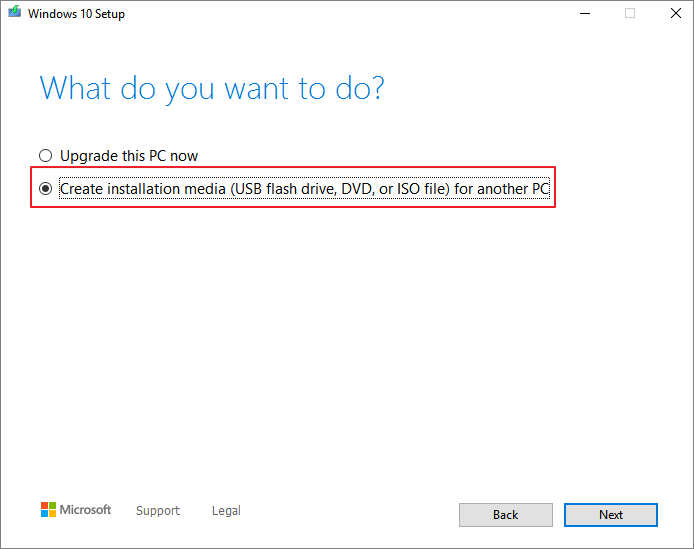
Step 1. Install and run Windows Media Creation Tool on your PC. Now accept all the license terms and conditions and select "Create Installation Media" from the main interface. Later, hit the "Next" button.
Step 2. Plugin the installation disc on your PC and Shut it Down. Now, open its case and remove the old hard drive and replace it with a new SSD into the drive bay.
Step 3. Turn ON your PC and press a specific key to boot into BIOS and change the boot order to make your PC boot from the installation disc.
Step 4. Once the loading gets completed, verify "Language to Install," "Time and Currency format," and "Keyboard and input method." Later, you need to click on "Next"> "Install Now."
Step 5. You will now have to enter "Windows Product Key" and activate it after Windows Installation is completed.
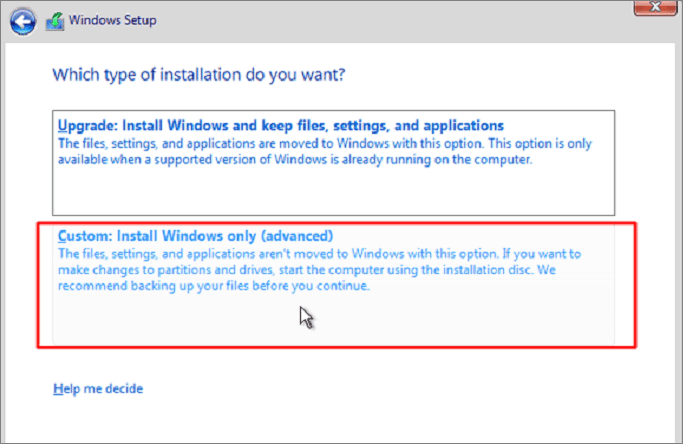
Step 6. Now, a screen will appear that will ask you, "Which type of installation do you want?" Here, select the "Custom: Install Windows only (advanced)" option.
Step 7. Finally, select your SSD on which you want to install Windows 10 and hit the "Next" button. The Windows installation process will start automatically.
2. Store Personal Data on HDD
If you have purchased an SSD of low capacity due to its high price, then you can consider opting for this solution! A fully-filled SSD cannot work effectively, and therefore it is always suggested to store all the personal data on HDD. Consequently, you can consider storing the infrequently used personal data and files like videos, music, movies, photos, etc., on HDD.
Once you start storing the personal data on HDD, make sure to clean and optimize it frequently to avoid technical issues. Learning how to set the SSD as the boot drive and how to store personal data on HDD matters a lot to PC users. Share this article to help more users now.
Bonus Tip: How to Optimize SSD or HDD on Windows 10
If you are not aware of how you can keep your hard drive optimized, then it's time for you to look forward to EaseUS partition management software again! Yes, along with helping you migrate OS to SSD, EaseUs Partition Master is an ideal option for optimizing your HDD. With this free tool in hand, you can perform various functions that involve resizing partitions, merging partitions, deleting partitions, erase/wipe hard disk, format partition, etc.
The steps below show you how to resize and move the partition on HDD or SSD.
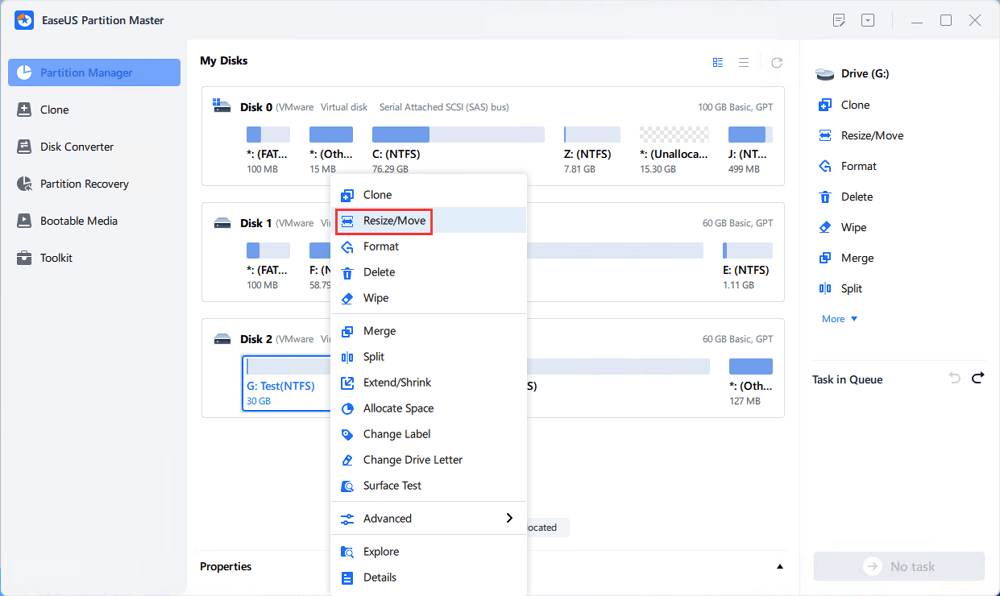
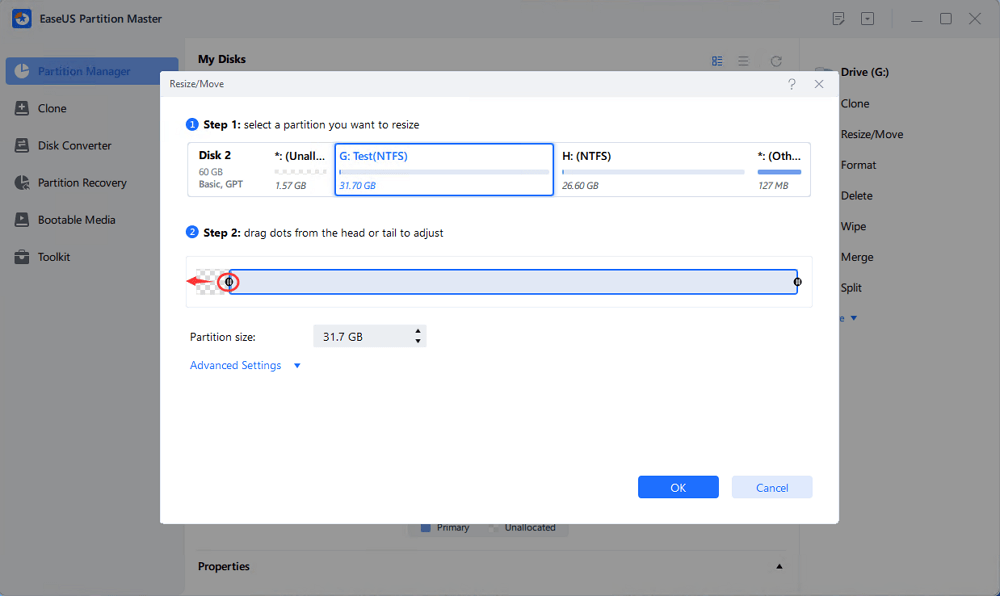
Step 1: Locate and select the target drive/partition
Launch EaseUS Partition Master and go to Partition Manager, select the target drive or partition you need to adjust its size, right-click on it and choose "Resize/Move".
Step 2: Resize or move the partition
1.To shrink the partition, simply drag one of its ends to free up unallocated space. Once done, click "OK".
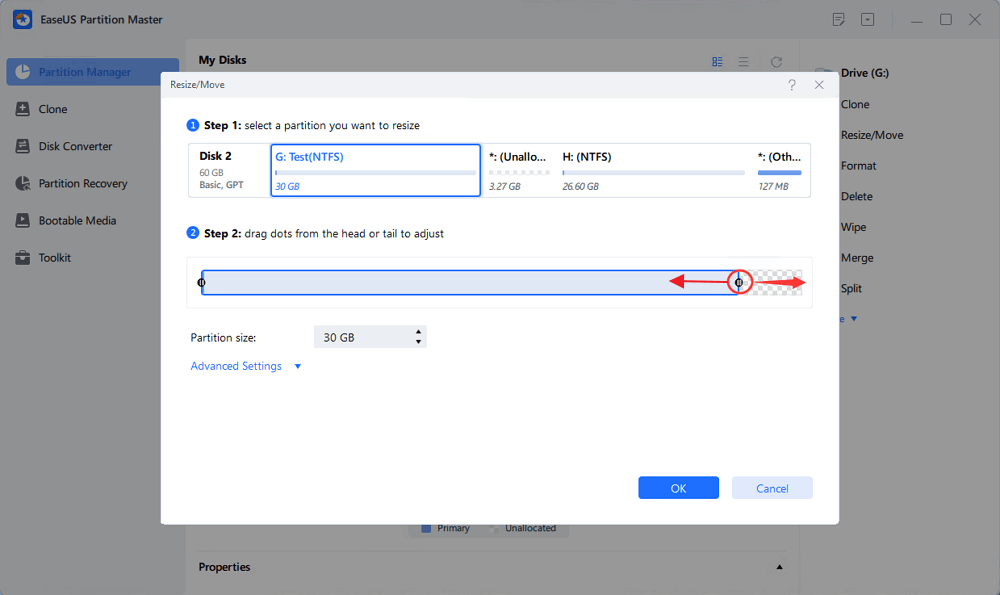
2. To extend the partition, make sure that there is unallocated space aside (if there isn't, follow the above steps to create some). In the same way, drag your mouse into the unallocated space. Click "OK".
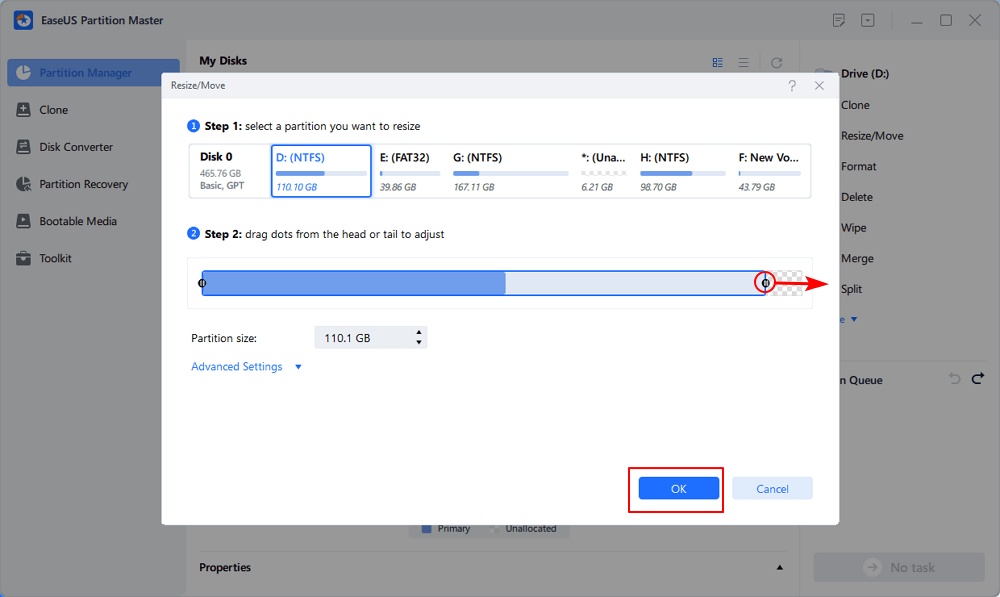
3. To move a partition position, suppose you have created and left the unallocated space next to the target partition. If no, free up some unallocated space first.
Then, right-click the target partition, select "Reize/Move". Then drag the whole partition leftward or rightward to adjust its position. Click "OK" to confirm.
Step 3: Confirm the result and apply changes
At this step, you will see the new disk partition information & diagram.
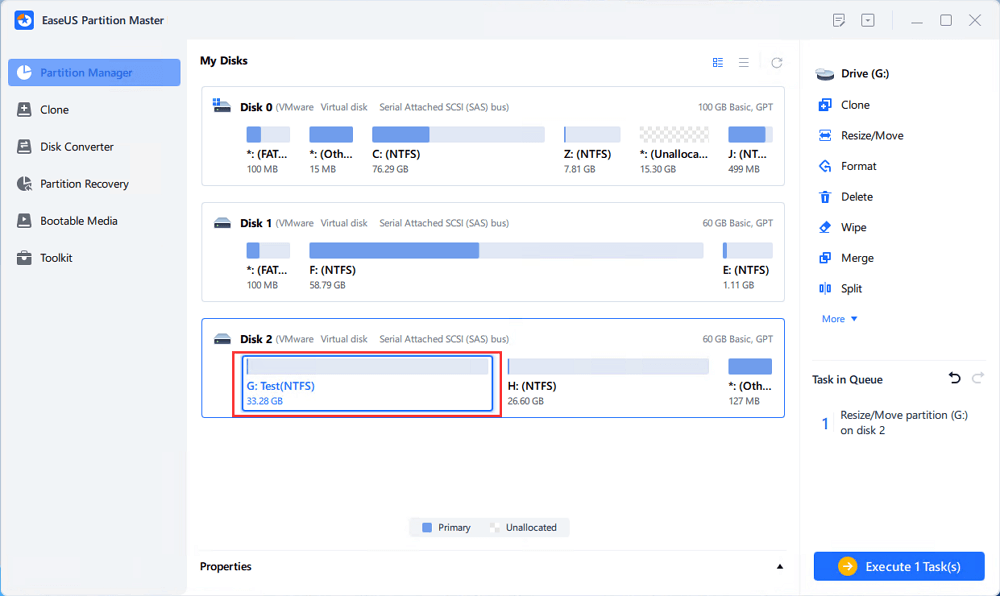
To save changes, click the "Execute Task" button and then "Apply".

As you have now learned how to use SSD and HDD together, it's vital for you to know some of the common tips that will help you make effective use of SSD and HDD together! So, let's learn the tips in the upcoming section of this article!
Conclusion
Hope you've now got a clear understanding of how to use SSD and HDD together! Well, using SSD and HDD together comes with a handful of benefits, but you can make the most out of them only if you keep the above tips in mind.
And if we talk about disk management, then you must undoubtedly look towards EaseUS Partition Manager because this tool comprises excellent features that will surely make disk management a hassle-free and time-saving process!
Extended Reading: Is It Better to Have Both SSD and HDD
Yes, having both SSD and HDD at the same time is absolutely a good-to-go option. An SSD comes up with many benefits that involve low power consumption and fast loading speed. Due to this reason, many users want to install an SDD with an existing HDD.
By using both SSD and HDD together, you can simply take advantage of the lightning speed of an SSD, and on the other hand, you can be benefited from the large storage capacity of an HDD.
Some of the top benefits of using SSD and HDD together involve:
- Increased storage space
- Multiple drives and redundancy
- Reducing costs One Gig at a time
Was This Page Helpful?
Updated by Tracy King
Tracy became a member of the EaseUS content team in 2013. Being a technical writer for over 10 years, she is enthusiastic about sharing tips to assist readers in resolving complex issues in disk management, file transfer, PC & Mac performance optimization, etc., like an expert.
Cedric Grantham is a senior editor and data recovery specialist of EaseUS. He mainly writes articles and how-to tips about data recovery on PC and Mac. He has handled 10,000+ data recovery cases and is good at data recovery of NTFS, FAT (FAT32 and ExFAT) file systems, and RAID structure reorganization.
Related Articles
-
How to Format DVR Hard Disk & How to Connect DVR Hard Disk to PC
![author icon]() Jean/Jun 17, 2026
Jean/Jun 17, 2026 -
How to Merge Partitions in Windows 10 [Safe and Quick Guides]
![author icon]() Tracy King/Jul 01, 2026
Tracy King/Jul 01, 2026 -
4 Tools to Low Level Format Disk in Windows 11
![author icon]() Tracy King/Jun 17, 2026
Tracy King/Jun 17, 2026 -
How to Disable Write Protection on Kingston DT50 [Full Guide]
![author icon]() Cici/Jun 17, 2026
Cici/Jun 17, 2026