-
![]() Bootable Data Recovery Software Full Information | for Beginner
Bootable Data Recovery Software Full Information | for Beginner June 16,2026
 6 min read
 -
![]()
-
![]()
-
![]() [KB5063878] SSD/HDD Not Recognized After Windows 11 UpdateJune 16,20266 min read
[KB5063878] SSD/HDD Not Recognized After Windows 11 UpdateJune 16,20266 min read -
![]() How to Tell if Your Computer Is 32 or 64 Bit Windows 10 [Full Ways]June 16,20266 min read
How to Tell if Your Computer Is 32 or 64 Bit Windows 10 [Full Ways]June 16,20266 min read -
![]() How to Fix the Volume for a File Externally Altered ErrorJune 16,20266 min read
How to Fix the Volume for a File Externally Altered ErrorJune 16,20266 min read -
![]() System_Thread_Exception_Not_Handled on Windows 10/11, Fixed NowJune 16,20266 min read
System_Thread_Exception_Not_Handled on Windows 10/11, Fixed NowJune 16,20266 min read -
![]()
-
![]() How to Convert RAW to NTFS Without Losing Data [2026 Solutions]June 16,20266 min read
How to Convert RAW to NTFS Without Losing Data [2026 Solutions]June 16,20266 min read -
![]() 4 Methods | How to Convert RAW to FAT32 for Micro SD Card/USBJune 16,20266 min read
4 Methods | How to Convert RAW to FAT32 for Micro SD Card/USBJune 16,20266 min read
Page Table of Contents
Are you looking for a simple way to enable or disable TRIM on your SSD? On this page, you'll find two reliable ways to enable SSD TRIM in Windows 10/8/7. We also gathered some practical tips to protect your SSD data after you enable or disable TRIM on SSD.
Follow to learn how to enable TRIM on SSD and apply tips to protect your SSD data quickly:
| Workable Solutions | Step-by-step Troubleshooting |
|---|---|
| Fix 1. Check If TRIM Is Enabled On Your SSD |
Normally, TRIM is enabled on SSDs by default. But it may be disabled by mistake or via a third-party tool. Therefore, you must check if TRIM is enabled regularly...Full steps |
| Fix 2. Enable TRIM on SSD in Two Ways | Method 1. Turn on TRIM on SSD with EaseUS Software and recover SSD data; Method 2. Enable TRIM on SSD via Command Prompt on Windows 11/10...Full steps |
| Fix 3. More Guides on Data Recovery with SSD TRIM Enabled | TRIM ensures the high performance of your SSD, but it eliminates the possibility of data recovery on your device because it erases data instead of deleting...Full steps |
About SSD TRIM, Everything You Need to Know
Before you start enabling or disabling TRIM on SSD, here is some basic information that we think you should know:
- 1. What Is SSD TRIM?
- 2. Should You Enable TRIM on SSD?
- 3. How Often Should SSD be TRIMMED?
TRIM on SSD (Solid-State Drive) is an Advanced Technology Attachment command that tells the SSD to erase data blocks when they are no longer in use. By doing so, the SSD's controller can manage the storage space more efficiently and greatly improve the data reading and writing speed on SSD.
In a word, TRIM can greatly improve the performance of your SSD and extend its lifespan. So should you enable TRIM on SSD? Yes.
How often should the TRIM be enabled on SSD? To always obtain high performance with fast reading and writing speed on your SSD, it's advised that you always turn on TRIM.
To do so, follow the guide below to check if TRIM is enabled on your SSD. If the SSD TRIM is disabled, follow to learn how to enable it on Windows 10/8/7.
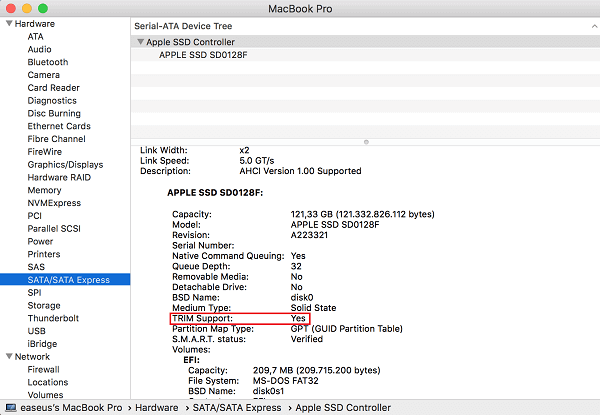
#1. Check If TRIM Is Enabled On Your SSD
Normally, TRIM is enabled on SSDs by default. But it may be disabled by mistake or via a third-party tool. Therefore, you must check if TRIM is enabled regularly on your computer.
You can check and manage the TRIM function on your SSD with the help of Command Prompt. If you are not sure about whether TRIM is in use, you can check if TRIM is enabled first.
To check if TRIM is on:
Step 1. Press Windows + X keys, click "Search" and type cmd in the Search box.
Step 2. Right-click "Command Prompt" and choose "Run as administrator".
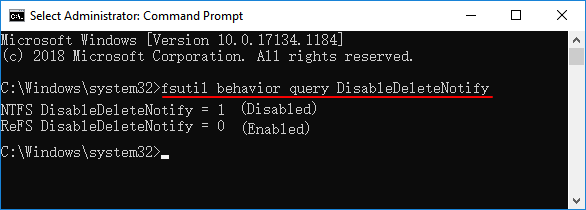
Step 3. Enter the following command: fsutil behavior query DisableDeleteNotify and hit Enter.
- If the output is DisableDeleteNotify = 1, TRIM is currently disabled on your device.
- If the query result is DisableDeleteNotify = 0, the TRIM support is enabled on your SSD.
So how to turn on the TRIM if you see it's disabled on your SSD? Move to the next guide, we'll show you how to efficiently enable TRIM on SSD in Windows 10/8/7.
#2. How to Enable TRIM on SSD in Windows 11/10/8/7 (Two Ways)
To keep your SSD performance at a high level, it's suggested that you always enable TRIM on your SSD. Here are two ways that you can try:
- 1. Check If TRIM Is Enabled On Your SSD - Easier for Beginners
- 2. Enable Trim on SSD via Command Prompt
Method 1. Turn On TRIM on SSD with EaseUS Software and Recover SSD Data
If you want an intuitive way to turn on TRIM in your SSD, free data recovery software - EaseUS Data Recovery Wizard can help. Although it is developed for data recovery, you can also apply it to enabled or to enable or even disable TRIM on your SSD. This program can recover data and disable/enable TRIM at the same time. When the program scans the disk with the TRIM on, it will automatically close the TRIM. And when the program is closed, the TRIM switch will be back to the state before the program was running.
EaseUS Data Recovery Wizard Free offers up to 2 GB of free data recovery, including 500 MB available by default and an extra 1.5 GB unlocked after sharing on Facebook and X.
This video will provide more details on SSD recovery.
- 00:25 Method 1. EaseUS Data Recovery Wizard
- 01:40 Method 2. Recovery Service
- 02:08 Method 3. Recycle Bin
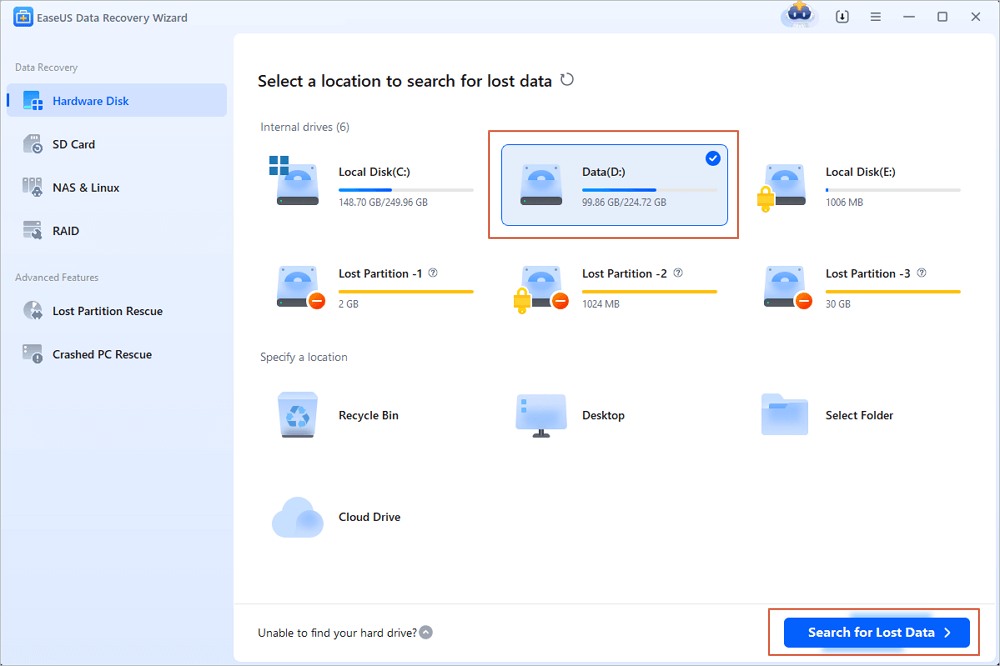
Step 1. Scan the SSD
Open EaseUS Data Recovery Wizard, select the SSD where you lost data, and click the "Search for Lost Data" button.
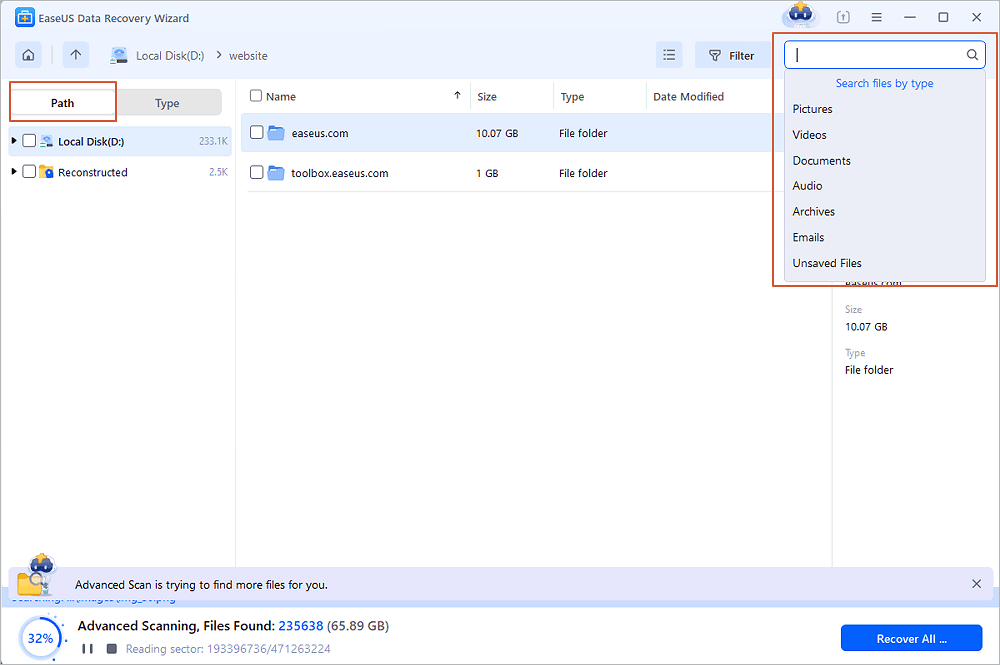
Step 2. View the results
When the scanning finishes, find lost SSD data by using the "Filter" and "Search" options after checking the "Deleted Files" and "Other Lost Files" folders.
Step 3. Recover SSD files
Select desired data and click the "Recover" button to get back lost SSD files.
💡Tip: You can restore data on the local disks, external hard drives, and also the cloud storage.

Method 2. Enable TRIM on SSD via Command Prompt
If you prefer a Windows built-in way to enable TRIM on your SSD, follow the steps below:
Step 1. Right-click the Windows icon, select "Search" and type cmd in the Search box.
Step 2. Right-click "Command Prompt" and choose "Run as administrator".
Step 3. Type: fsutil behavior set DisableDeleteNotify 0 and hit Enter.
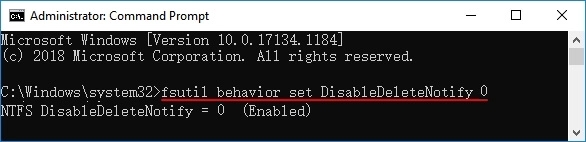
Now, SSD TRIM is enabled on your computer.
#3. Bonus Tip: Data Recovery with SSD TRIM Enabled on Windows 10
As mentioned above, TRIM indeed ensures the high performance of your SSD. But it eliminates the possibility of data recovery on your device because it completely erases the data blocks when you perform "delete" operations.
That's the reason why so many users want to disable TRIM to make their data recoverable. So is it possible to recover lost data even if the TRIM is enabled on your SSD? It depends!
When you accidentally delete or format files on your SSD with TRIM is on, the sooner you take action, the better chance you'll have for SSD data recovery. Here below is the complete process of SSD TRIM data recovery:
1st. Disable TRIM on SSD Immediately
No matter how you lost data on your SSD, once you find files were missing on your SSD disk, disable TRIM on SSD immediately.
Step 1. Right-click the Windows icon, select "Search" and type cmd in the Search box.
Step 2. Right-click "Command Prompt" and choose "Run as administrator".
Step 3. Type: fsutil behavior set DisableDeleteNotify 1 and hit Enter.

2nd. Recover Data from SSD on Windows 10/8/7 As Possible As You Can
With SSD TRIM disabled, you can then apply reliable file recovery software like EaseUS Data Recovery Wizard to scan and find all your lost files as possible as you can.
You May Be Also Interested In:
If you are a Mac user, you can also be interested in how to enable or disable TRIM on SSD and restore SSD data on a Mac computer right? Follow to learn how to resolve the same issue on your Mac.
It's quite easy to perform Trim SSD data recovery now. Only two phrases - 1. Check Trim Status; 2. Perform SSD recovery on Mac.
3rd. Create Backup of Valuable SSD Files
After restoring the lost SSD data, the last but the most important thing that you should do is to create a backup of all valuable files from your SSD to an external hard drive.
To do so, you can either manually copy and save files to an external storage device or apply a reliable file backup software like EaseUS Todo Backup to selectively back up all your files at one time.
It's Your Turn, Enabling TRIM and Protecting Files on SSD
Enabling TRIM ensures the excellent performance of SSDs. But once you get your data lost on your SSD with TRIM on, you will lose it forever. So how to keep your SSD data safe with TRIM enabled?
Here are our suggestions:
- 1st, create a complete backup of your SSD disk data to an external hard drive.
- 2nd, if you don't have a backup, disable TRIM immediately once you lose data on SSD.
- 3rd, turn to reliable data recovery software - EaseUS Data Recovery Wizard to scan and find as much data as you can.
- 4th, after this, enable SSD TRIM in Windows 10/8/7 again.
Was this page helpful?
-
![]()
Approved by
Evan Galasso is a digital forensics and data recovery engineer with over 10 years of experience in the field. He presents opinions on the current state of storage media, reverse engineering of storage systems and firmware, and electro-mechanical systems of SSDs and HDDs.…


20+
Years of experience

160+
Countries and regions

72 Million+
Downloads

4.9 +
Trustpilot Score


