It's quite easy to perform Trim SSD data recovery now. Only two phrases - 1. Check Trim Status; 2. Perform SSD recovery. Follow and get your SSD data back now:
| Workable Solutions | Step-by-step Troubleshooting |
|---|---|
| Phrase 1. Check TRIM Status | On Windows: open Command Prompt and enter fsutil behavior query disable deletenotify On Mac: Open About This Mac > System Report > Hardware > SATA/SATA Express > TRIM...Full steps |
| Phrase 2. SSD Data Recovery | Step 1. If Trim is disabled, run EaseUS file recovery software; Step 2. Scan SSD drive; Step 3. Preview and restore SSD drive data...Full steps |
Can You Recover Data from an SSD with TRIM Enabled
"Hi, just now I inadvertently deleted the wrong folder on my 2014 MacBook Pro running Yosemite, and then emptied the trash bin. I don't have a backup of this folder, so I'm feeling quite helpless. The worst part is that my SSD drive is TRIM-enabled by default. Is there any way for me to recover these files?"
Well, before giving you the answer, it’s important to first understand what the TRIM command is. TRIM command, also known solely as TRIM, allows an operating system to inform a Solid State Drive (SSD) which blocks of data are no longer in use so that they can be wiped to make room for new data.
Normally, when data is deleted from a hard drive, the data is not accessible but it remains on the physical drive. Only once the space needs to be used for other information will the data block be wiped, then rewritten. Via TRIM, the data block is wiped immediately upon deletion. In this way, when the system tries to write new data onto a previously used block, it can do so without waiting. This results in improved performance.
The cost of this improvement in speed is that, on a TRIM-enabled SSD, deleted files can not be recovered. Once you empty the Windows Recycle Bin or Mac Trash Bin, the files are permanently gone.
Check TRIM Status
To see whether TRIM is enabled on your SSD or not, follow these instructions.
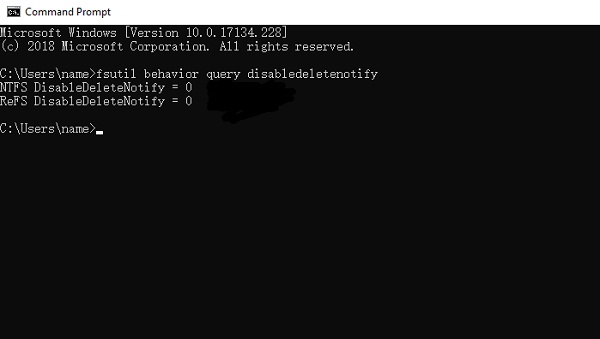
On PC: Go to Command Prompt and enter fsutil behavior query disabledeletenotify

If DisableDeleteNotify = 0, trim is enabled.
If DisableDeleteNotify = 1, trim is disabled.
On Mac:
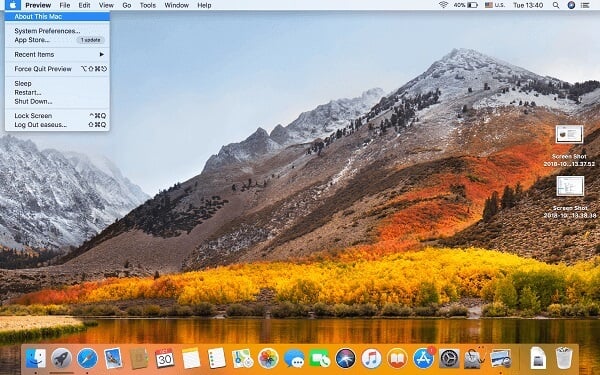
Click the Apple logo in the top-left of the screen and go to About This Mac.

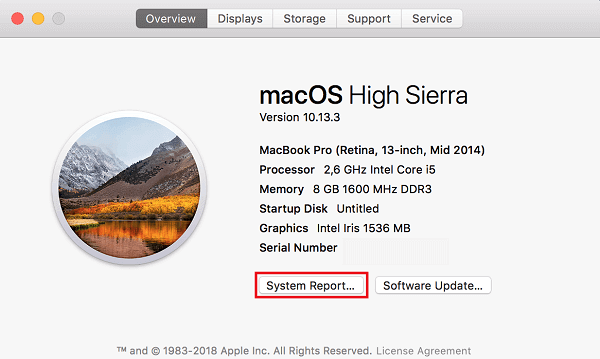
Click System Report…

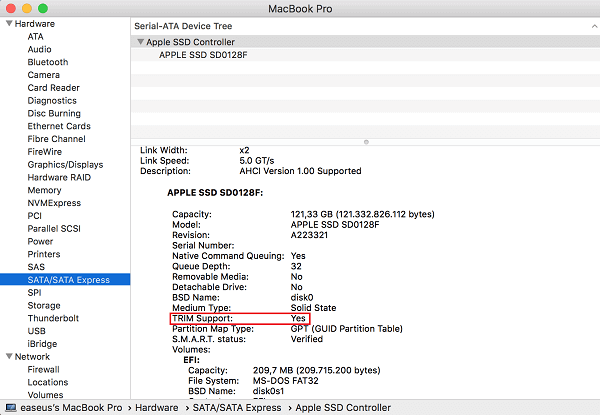
Go to Hardware then SATA/SATA Express, and look for TRIM Support.

TRIM Support: Yes = TRIM is enabled.
SSD TRIM Data Recovery
Although it is definitively impossible to recover data from a TRIM-enabled SSD, you can still attempt to recover using EaseUS Data Recovery Wizard Free (for PC or for Mac). It is often the case that the file names will appear in the software’s scan results, but the file content will not be recoverable. You can try to recover a few files with the free version to see if your data has indeed been wiped or not, at no cost.
Step 1. Select the location to scan
Launch EaseUS Data Recovery Wizard for Mac and choose the hard drive, SSD, SD card, USB flash drive, or TF card where you lost data. Click "Search for lost files" to start scanning.

Step 2. Filter lost Mac data
The software will automatically scan for lost data on MacBook/iMac. When the scan completes, filter wanted data through the "Type" and "Path" buttons.

Step 3. Recover lost data or files
Double-click a file to preview it. Then, click the "Recover" button to restore the lost data to another place.

The ultimate way to safeguard your files is to regularly back up your data. With TRIM enabled, this practice is incredibly important. EaseUS Todo Backup is a data backup utility that will allow you to restore all files that are lost or inadvertently deleted. Through the program, you can automate backup tasks to run on a time or event basis; such as backing up to an external hard drive each time it is plugged in. I’ll stress again that maintaining data backups is crucial, particularly for TRIM-enabled devices. EaseUS Todo Backup Free (for PC or for Mac) is fully functional and can provide you with all necessary back up features.
Was This Page Helpful?
Cedric Grantham is a senior editor and data recovery specialist of EaseUS. He mainly writes articles and how-to tips about data recovery on PC and Mac. He has handled 10,000+ data recovery cases and is good at data recovery of NTFS, FAT (FAT32 and ExFAT) file systems, and RAID structure reorganization.
Jean is recognized as one of the most professional writers in EaseUS. She has kept improving her writing skills over the past 10 years and helped millions of her readers solve their tech problems on PC, Mac, and iOS devices.
Related Articles
-
How to Fix "Volume Hash Mismatch" Error on Mac
![author icon]() Jaden/Jan 19, 2026
Jaden/Jan 19, 2026 -
How to Recover Data from Mac mini Hard Drive: Mac mini Recovery
![author icon]() Dany/Jan 19, 2026
Dany/Jan 19, 2026 -
Recover Lost Data from xD-Picture Card on Mac
![author icon]() Jaden/Jan 19, 2026
Jaden/Jan 19, 2026 -
4 Ways to Fix Grant File Access in Word for Mac
![author icon]() Brithny/Jan 19, 2026
Brithny/Jan 19, 2026