-
![]() Fix Dell Laptop Needs the BitLocker Recovery Key [2026]
Fix Dell Laptop Needs the BitLocker Recovery Key [2026] January 29,2026
 6 min read
 -
![]() How to Fix the Volume for a File Externally Altered Error
How to Fix the Volume for a File Externally Altered Error February 12,2026
 6 min read
 -
![]() How to Fix Raw Drive Without Formatting or Losing Data
How to Fix Raw Drive Without Formatting or Losing Data January 29,2026
 6 min read
 -
![]() Exception on Invalid Stack [Troubleshooting & Recover]
Exception on Invalid Stack [Troubleshooting & Recover] January 29,2026
 6 min read
 -
![]() Fix Windows Taskbar Not Hiding Issue in Windows 10/11
Fix Windows Taskbar Not Hiding Issue in Windows 10/11 February 12,2026
 6 min read
 -
![]()
-
![]() Recover Data from Formatted Transcend External Hard Disk/SD Card
Recover Data from Formatted Transcend External Hard Disk/SD Card January 29,2026
 6 min read
 -
![]() How to Recover Corrupted Macro Enabled Excel File with Top 5 Ways
How to Recover Corrupted Macro Enabled Excel File with Top 5 Ways February 12,2026
 6 min read
 -
![]() How to Recover Formatted Files with Free Format Recovery Software
How to Recover Formatted Files with Free Format Recovery Software January 29,2026
 6 min read
 -
![]() Fix You Need to Format the Disk in Drive | No Data Loss
Fix You Need to Format the Disk in Drive | No Data Loss February 12,2026
 6 min read
Page Table of Contents
| Workable Solutions | Step-by-step Troubleshooting |
|---|---|
| Boot Into Safe Mode | Restart Windows by long-pressing the Shift key on the keyboard and clicking the...Full steps |
| Perform a Startup Repair | Choose Restart from the power icon while holding the SHIFT key...Full steps |
| Scan the PC | It is simple and can take several minutes or longer to scan your PC for viruses...Full steps |
| Other Workable Methods | Change the Boot Order > Update the Volume Boot Code > Re-install Windows 10...Full steps |
Error Code 0xc00000e9: What Does It Mean
Windows error code 0xc00000e9 is a typical Windows Boot Manager error that can occur during the boot process and denotes either a hardware failure or a corrupted system file. It displays shortly after the PC turns on but before the Windows login screen: An unexpected I/O error has occurred. Error code: 0xc00000e9.
The Windows boot procedure is constantly involved with error code 0xc0000e9. When the system cannot access the drive or disk, which prevents it from reading or copying data, I/O (input/output) issues happen. Error 0xc0000e9, therefore, has a wide range of potential causes, such as:
- Damaged system files or a lack of specific files or drivers.
- The motherboard's hard drive connector is defective or broken.
- A sudden break in communication between a computer and a removable storage device. For instance, if you attempt to install Windows and your PC unexpectedly loses contact with the installation disk.
- Faulty registry files.
- Defective installation media; a damaged hard drive or its controller. For instance, the disk itself may be faulty or specific files may be missing, corrupt, or damaged.
- Incorrect Windows 10 installation ISO.
- Malware attack.
How to Fix Windows 10 Error Code 0xc00000e9
Want to know how to fix the Windows 10 error code 0xc00000e9 on your PC? Check out these six methods given below.
- Boot Into Safe Mode and Scan Windows for Errors
- Perform a Windows Startup Repair
- Scan the PC for Malware or Other Issues
- Change the Boot Order to Fix Error 0xc00000e9
- Update the Volume Boot Code to Use BOOTMGR
- Re-install Windows 10 to Fix Error 0xc00000e9
Before explaining these methods, let us check out the video below on how to fix error code 0xc00000e9 in Windows 11 and 10.
- 0:17 Restart your PC
- 0:45 Access BIOS setting
- 2:19 Load optimize default
Now, let us explain the methods and their solutions mentioned above.
Method 1. Boot Into Safe Mode and Scan Windows for Errors
You can access Windows in safe mode when it does not boot normally. If it succeeds, you can try several troubleshooting procedures and scan Windows to check for errors. Safe Mode is also called the diagnostic startup mode.
How to start Windows in safe mode?
Restart Windows by long-pressing the Shift key on the keyboard and clicking the Restart button in the Power button in the lower-right corner.
Once Windows boots up, you will get an Advanced Recovery Screen. Here click on the following option one after the other to boot into Safe Mode.
Troubleshoot> Advanced Options> Startup Settings> Restart on the following screen.
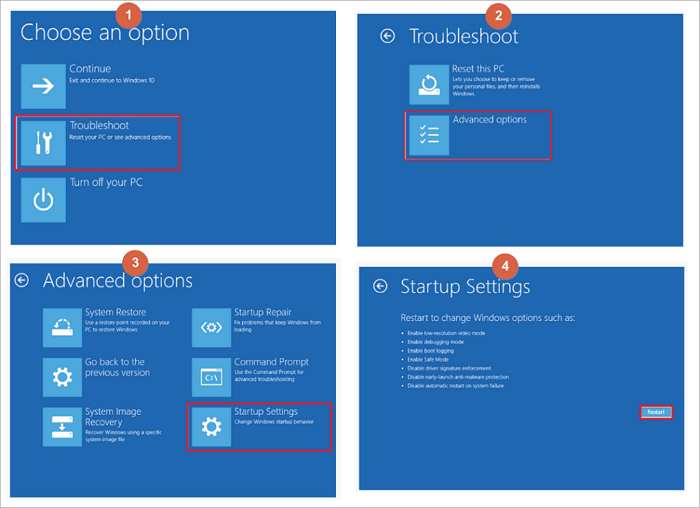
After your PC restarts, you'll see a list of options. Select 4 or press F4 to start your PC in Safe Mode. Or if you'll need to use the internet, select 5 or press F5 for Safe Mode with Networking.
Once Windows boots into Safe Mode, you can use the built-in Windows Error Checking tool and the SFC scannow command. It will check the hard drive and system files for issues that can cause boot issues.
Let us see how to go about it:
Step 1: On your Windows PC, right-click on the Windows logo on the bottom left corner of your screen and choose Windows Terminal (Admin).
Step 2: Press Yes on the User Account Control pop-up window.
Step 3: Type sfc /scannow and press Enter to begin scanning.

Every protected operating system file on your PC will now be checked for integrity by System File Checker. It can take some time to complete. If errors are discovered and fixed, you will get a message. You can restart your PC after that.
Method 2. Perform a Windows Startup Repair
I will explain how to perform a Windows Startup Repair in this method that may eliminate the error code. This is how you go about it:
If Windows won't let you log in, use a Windows disk or a prepared USB device with the Windows automated repair tools. This problem might occasionally appear due to missing or corrupt system files, registry errors, or other issues that can be resolved with a startup repair.
Startup Repair is available from the Advanced Startup Options menu.
Step 1: Choose Restart from the power icon while holding the SHIFT key.
Step 2: On the Choose an option screen, click on Troubleshoot > Advanced Options
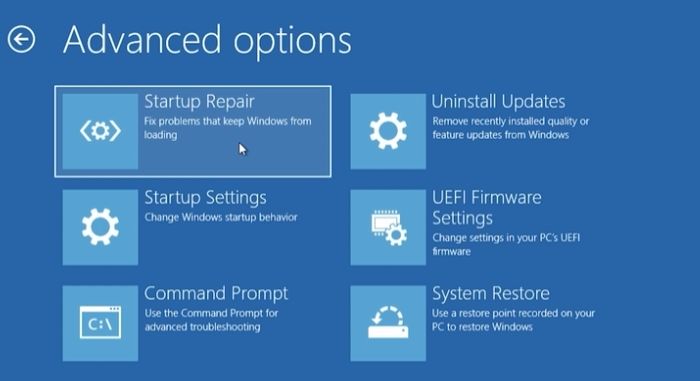
Step 3: Click on Startup Repair to begin the Windows Startup Repair.
During the process, you will need to provide your account details and other related things to help the troubleshooter fix the problem.
Method 3. Scan the PC for Malware or Other Issues
Use a bootable antivirus program if a virus stops Windows from starting. Download an antivirus program for Windows on a different PC, then copy it to a bootable drive. A bootable rescue tool that scans a system from a Windows Terminal is typically included in virus tools.
It is simple and can take several minutes or longer to scan your PC for viruses and other spyware properly. The length of the scan will increase with the number of files you have and the speed of your PC.

Run the Microsoft Windows Malicious Software Removal Program after downloading it. Depending on whether you are using a 32-bit or 64-bit version of Windows, there are two versions to choose from: (Check out which one your PC has) MSRT 32-bit or MSRT-64bit.
Microsoft's free malware removal program may not find everything, but it will search for particular, prevalent malware, which is a decent place to start. Use Windows Update to update the tool if you already have it so that it can scan for the most recent threats.
Method 4. Change the Boot Order to Fix Error 0xc00000e9
If you added a new hard disk, plugged in an external drive, or attached a USB device, the boot order might have been altered. The system BIOS upgrade may also cause it. Verify that the hard disk that Windows is installed on is listed at the top of the boot sequence by accessing the PC's BIOS or UEFI settings.
To change the BIOS boot order, follow the procedures given below. The order in which devices boot will change if the boot sequence is altered.
Step 1: As your PC turns on or restarts, watch for a notification mentioning a key (typically Del or F2) that must be pressed to enter the BIOS setup program. As soon as you see the message, press this key.
Note: The details of changing the boot order options vary from PC to PC because every BIOS setup program is unique. The menu choice or configuration setting may be identified by Boot Options, Boot, Boot Order, etc. A broad menu item like Advanced Options, Advanced BIOS Features, or Additional Options may contain the option.
Step 2: Find the option to change the boot order using the directions for accessing your BIOS tool. The modifications are made in the Boot menu of the BIOS.
The order in which the devices are listed determines the boot order or the order in which your PC will look for operating system information. The integrated hard disk that is in the PC is often what BIOS refers to as a hard drive and will attempt to boot from first from the order on your screen.
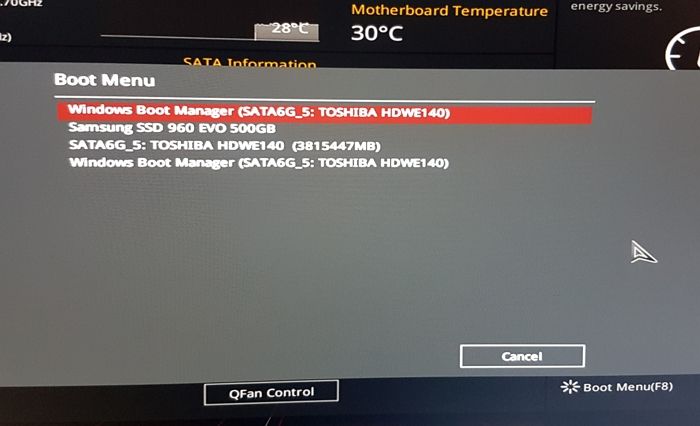
Select the right hard disk or SSD on which your Windows is installed, and press the Enter key.
Step 5: Save your BIOS settings before your option becomes effective. To accomplish that, navigate to the Exit or Save and Exit menu using the guidance provided by your BIOS utility.
Step 6: Verify your changes and then close BIOS. You should choose Yes if you get a confirmation message.
Any modifications to the boot sequence and any other BIOS settings you may have made are now saved, and your PC will restart and follow the new boot order.
Method 5. Update the Volume Boot Code to Use BOOTMGR
If a boot loader other than the Windows default BOOTMGR is used, the volume boot code may get corrupted or linked to it. This issue should be resolved by updating the volume boot code. To boot to Command Prompt and perform the required command, follow these steps:
Step 1: Go to Advanced Startup Options.
Step 2: Choose the Command Prompt.
Step 3: Type the following command and press Enter:
bootsect /nt60 SYS
This will change the volume boot code on the partition used to boot Windows to BOOTMGR, compatible with Windows operating systems.
Step 4: Remove the Windows flash drive from its USB port or the Windows disk from your optical drive before closing the Command Prompt window.
Step 5: Choose either Continue or Restart from the list of options. Windows should now launch usually.
Note: After attempting to start Windows normally once more, if you get any errors or this does not work, try the command bootsect /nt60 ALL.
The ALL option updates the boot code on volumes that can be used as Windows boot volumes, excluding any dynamic volumes not connected with an underlying disk partition.
The only catch is that if you dual boot your machine, you could unintentionally create a problem with any previous operating systems you boot to that is similar but the opposite.
Method 6. Re-install Windows 10 to Fix Error 0xc00000e9
All system modifications are wiped out when Windows is reinstalled. As a result, corrupted or missing system files are recovered and put back in working order. A clean install of Windows is achieved during the Windows setup process by removing the existing Windows installation (assuming there is one) before installing a new operating system or reinstalling the old one. Here is how to go about it:
Step 1: Navigate to the Windows Downloads page and click the Download Now button under Windows Installation Assistant.
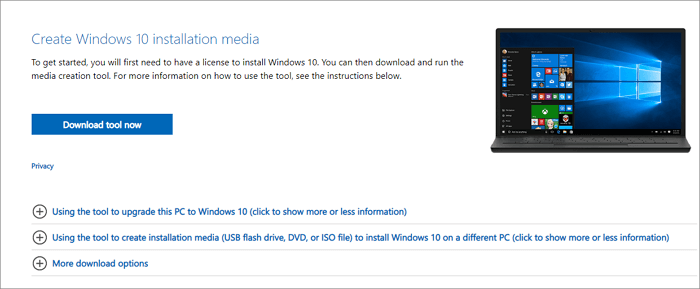
Step 2: Launch the executable file you downloaded for Windows 10 Installation Assistance.
Step 3: Click Accept and Install on the terms of the agreement window.
Note: Before continuing, you might be asked about using the PC Health Check app. Installing that will allow you to determine whether your PC qualifies for the upgrade.
Step 4: The download of Windows will begin instantly. Allow the installation time to finish.
Step 5: After downloading, your PC will restart to install Windows 10 Or, you may choose Restart now to start the installation immediately. Windows 10 will be set up and installed automatically.
How to Recover Windows 10 Data After Fixing Error 0xc00000e9
Windows users may lose data after fixing error code 0xc00000e9. So, I recommend EaseUS Data Recovery Wizard, where you can recover Windows 10 data that you lost after fixing the error code 0xc00000e9.
So, what are the highlights of using the EaseUS Data Recovery Wizard tool?
- It can recover deleted files, photos, videos, music files, documents, and other files with simple clicks.
- This software supports file recovery from a hard drive, SSD, USB flash drive, and pen drive.
- Recovery of files from a corrupted Windows operating system is possible through this tool. To boot your PC and retrieve list data, EaseUS offers a WinPE boot device.
- Attacks from viruses can make your PC malfunction, which is very frustrating. Your data can be quickly and securely recovered using this tool.
- This data recovery software makes restoring a partition's data simple, even if it has been completely lost or the system cannot recognize it.
So these are the features of EaseUS Data Recovery Wizard, and you can easily download them from the official website.
Note: To guarantee a high data recovery chance, install EaseUS data recovery software on another disk instead of the original disk where you lost files.
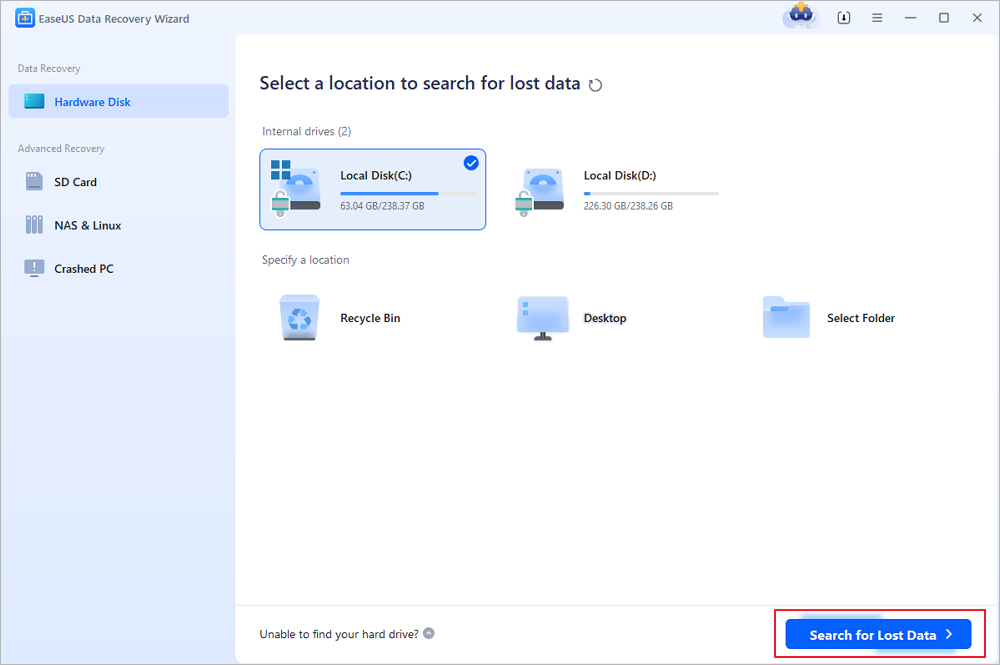
Step 1. Launch EaseUS Data Recovery Wizard on your Windows 11, Windows 10, Windows 8, or Windows 7 computer. Select the disk partition or storage location where you lost data and click "Search for Lost Data".

Step 2. This recovery software will start scanning the disk to find all lost and deleted files. When the scan process completes, click "Filter" > "Type" to specify lost file types. If you remember the file name, you can also search in the search box, which is the fastest way to find the target file.

Step 3. Preview and restore lost Windows files. You can double-click to preview the scanned files. Then, select the target data and click the "Recover" button to save them to another safe spot in the PC or Cloud drive.

Conclusion
So, do not panic if your system does not start when you encounter error 0xc00000e9. By following the above instructions, you can quickly fix the unexpected error without causing any harm to your Windows PC. Reinstall Windows if nothing else works, but be aware that this will erase all the data on your system drive. Replace your drive with another if the issue reappears. A bad or damaged HDD or SSD may bring on error 0xc00000e9.
So, if you lost any data while reinstalling Windows, you can always download and use EaseUS free data recovery software to recover your lost files. So, that's it! I hope this article helped you!
An Unexpected I/O Error Has Occurred (0xc00000e9) FAQs
Do you have more questions about the unexpected error code 0xc00000e9 showing up on your Windows PC? Check out the frequently asked questions and their answers given below:
1. What Is Problem Status 0xc000009e?
A typical Windows Boot Manager issue, Windows error code 0xc00000e9, indicates a hardware failure or a corrupt system file detected during the boot process. Before the Windows login screen, it appears immediately after the PC turns on and looks like this: An unexpected I/O error has occurred.
2. How to do Windows Startup Repair?
This is how you perform Windows Startup Repair: Click the Windows Start icon and the power button icon. Press and hold down the Shift key and then click Restart. On the blue screen, select Troubleshoot. Next, go to Advanced Options > Startup Repair. After the startup repair process is complete, reboot the computer.
3. How to repair Windows 10 without a boot?
To repair Windows 10: Launch the Windows Advanced Startup Options menu. Go to Troubleshoot > Advanced options > Startup Repair. Wait a few minutes, and Windows will fix the startup problem without boot.
4. How to fix MBR in Windows 10 without a disk?
Restart your PC, and after each time the Windows logo appears during boot, force a hard shutdown. You should enter the Windows Recovery Environment (WRE) to perform a system restore after doing this three times. Choose "Automatic Repair" from the Advanced settings menu if that does not work. If all else fails, choose Command Prompt and execute the following commands:
bootrec /fixmbr bootrec /fixboot bootrec /rebuildbcd sfc /scannow
If you find it helpful, share this post to help more people.
Was this page helpful?
-
Brithny is a technology enthusiast, aiming to make readers' tech lives easy and enjoyable. She loves exploring new technologies and writing technical how-to tips. In her spare time, she loves sharing things about her game experience on Facebook or Twitter.…

20+
Years of experience

160+
Countries and regions

72 Million+
Downloads

4.9 +
Trustpilot Score


Free Data
Recovery Software
Recover data up to 2GB for free!


